PayClock Express Time and Attendance System Model PC50 User's ...
PayClock Express Time and Attendance System Model PC50 User's ...
PayClock Express Time and Attendance System Model PC50 User's ...

You also want an ePaper? Increase the reach of your titles
YUMPU automatically turns print PDFs into web optimized ePapers that Google loves.
4Connect the USB Cable to the <strong>PC50</strong>(pg. 17)5Connect the USB Cable to yourcomputer (pg.18)6Using the instructions on page 19,mount your <strong>PC50</strong> to the wall whereyou would like employees to punchin <strong>and</strong> out
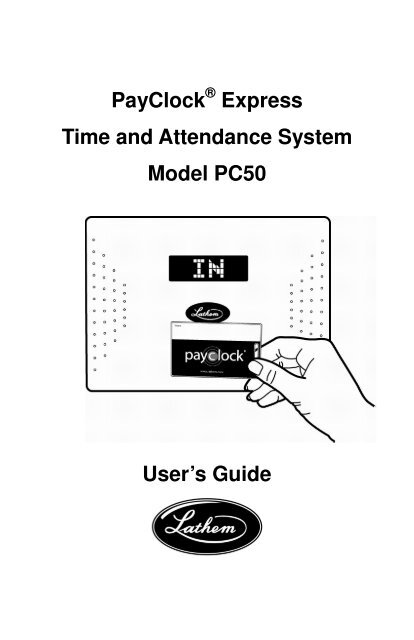
P A Y C L O C K E X P R E S S U S E R ’ S G U I D E - 1WelcomeProduct OverviewCongratulations on the purchase of your new Lathem <strong>PayClock</strong><strong>Express</strong> <strong>Time</strong> <strong>and</strong> <strong>Attendance</strong> <strong>System</strong>. This system will allow you torecord <strong>and</strong> manage employee attendance records with ease <strong>and</strong>simplicity.Included in packaging is the <strong>PayClock</strong> <strong>Express</strong> software, which youwill use to manage data. This software will allow you to view, edit,sort, <strong>and</strong> print attendance records within one window. Should youdesire software upgrades or system accessories in the future,information is available at www.lathem.com.The <strong>PC50</strong> utilizes a proximity badge system, meaning that employeeswill punch in <strong>and</strong> out by waving a badge in front of the clock’ssensor. The <strong>PC50</strong> is “real-time”, so there is no polling this device.When an employee punches In or Out, the punch is immediatelyadded to the database.IMPORTANTThe <strong>PC50</strong> must be connected to the computer <strong>and</strong> the computermust be powered on for the unit to be operational. The <strong>PC50</strong> willstop functioning when it is unplugged from the computer.The <strong>PC50</strong> also offers a backlit LCD screen to display importantattendance information. Upon receiving a punch, the screen willdisplay the employee’s name, In/Out status, <strong>and</strong> total hours workedfor the pay period. You may also elect to add custom text <strong>and</strong> audiomessages to play for individual (or all) punches.<strong>PayClock</strong> <strong>Express</strong> uses an “open schedule” to calculate employeetime <strong>and</strong> attendance. This means that an employee’s schedule beginswith his/her punch <strong>and</strong> ends a set number of hours later. The
4 - P A Y C L O C K E X P R E S S U S E R ’ S G U I D E• Cables <strong>and</strong> ConnectorsGetting HelpYou can access technical support <strong>and</strong> answers to your issues in anumber of different ways. In addition to resources within the<strong>PayClock</strong> <strong>Express</strong> software, assistance may be accessed online, viaemail, via telephone, or through your Lathem dealer. Don’t forgetthat Lathem also offers annual support contracts.<strong>PayClock</strong> Interactive Help <strong>System</strong> ViewerThe Interactive Help <strong>System</strong> Viewer allows you to search through anindex of help topics to locate the answer you need.To launch the Interactive Help <strong>System</strong> Viewer, select Help fromthe Ribbon Bar or select the button next to an unfamiliar term.
P A Y C L O C K E X P R E S S U S E R ’ S G U I D E - 5TroubleshootingFor answers to Frequently Asked Questions, refer to theTroubleshooting section of this User Guide on page 70.Online <strong>and</strong> Email SupportLathem.com provides access to numerous support resources that willallow you maximize your use of <strong>PayClock</strong> <strong>Express</strong>. Help may beaccessed by visiting the following link:http://support.lathem.comOn the Support page, you may also submit a question through ouronline knowledgebase <strong>and</strong> one of our technicians will respond toyour inquiry within 24 hours. Email support is free to all registeredusers of Lathem products.Telephone SupportLathem offers technical support between the hours of 8am <strong>and</strong> 7pmMonday through Friday. Please call (800) 241-4990 to speak withour support team. You will receive free technical support for thefirst 30 days after your initial call. After that period, you maypurchase an Annual Support Agreement, which will cover all calls forone year, or you may pay a per-call fee.Annual Support AgreementsLathem support contracts are designed to keep your <strong>PC50</strong> <strong>and</strong><strong>PayClock</strong> software working seamlessly. For a single annual fee, yourSupport Agreement offers the following advantages:
6 - P A Y C L O C K E X P R E S S U S E R ’ S G U I D E• Unlimited toll-free telephone support (versus a per-call fee)<strong>and</strong> priority status for calls• Unlimited access to Lathem’s extensive library of web-basedtips <strong>and</strong> FAQs• Free software updates <strong>and</strong> version upgrades during theSupport Period, giving you free access to the most currentsoftware features• Quick exchanges for damaged or broken clocks, therebyreducing downtime• Extended parts <strong>and</strong> labor warranty helps you to save moneyon repairs needed after the regular product warranty hasexpiredTo learn more about Lathem support contracts <strong>and</strong> to make apurchase, contact us at (800) 241-4990 or visithttp://www.lathem.com/news/supportplan.shtml
P A Y C L O C K E X P R E S S U S E R ’ S G U I D E - 7Package ContentsPlease verify that your package includes ALL of the following items.If your package is missing an item, please call Lathem technicalsupport at (404) 691-1065.• <strong>PC50</strong> Terminal• Fifteen (15) Radio Frequency ID (RFID) badges• <strong>PayClock</strong> <strong>Express</strong> Software CD• 15’ USB Cable• <strong>PC50</strong> User’s Guide• Three (3) wall mount screws <strong>and</strong> anchors• Securing clip, screw <strong>and</strong> anchor
8 - P A Y C L O C K E X P R E S S U S E R ’ S G U I D E<strong>System</strong> RequirementsYou must verify that your system meets ALL of the minimumrequirements listed below in order to run <strong>PayClock</strong> <strong>Express</strong> on yourcomputer. If your system does not meet these minimumrequirements, do not run the software!Minimum Requirements:• A PC with a 300mhz Pentium processor or better• 128 Megabytes of RAM• Hard disk with at least 200 Megabytes of free space• 256 Color 800 x 600 or higher resolution display• Mouse or other pointing device• An available USB port (USB 1.1 compliant. The port mustbe able to supply a minimum of 500mA)• Internet Explorer 5.0 or higher• Microsoft Windows XP (Pro or Home) or VistaRecommended Requirements:• A PC with a 900mhz Pentium processor or better• 256 Megabytes of RAM• Hard disk with 500 Megabytes of free space• An available USB port (USB 2.0 compliant)• A dedicated server is recommended for multi-user systems• Hi-Speed Internet Connection
P A Y C L O C K E X P R E S S U S E R ’ S G U I D E - 9Install the <strong>PayClock</strong> <strong>Express</strong>Software <strong>and</strong> <strong>PC50</strong> DriversCAUTIONBefore proceeding with your <strong>PayClock</strong> <strong>Express</strong> installation, verifythat your PC meets ALL of the <strong>System</strong> Requirements listed on page8!1. Prepare your computer• Select the computer you will use to manage the <strong>PC50</strong> system• Close all programs, including virus protection software2. Insert the <strong>PayClock</strong> <strong>Express</strong> CD• Insert the <strong>PayClock</strong> <strong>Express</strong> CD into your computer’s CDROM drive• The Setup program should run automatically. If it does not,follow the steps below: Click Start | Run from the Windows taskbar At the comm<strong>and</strong> line, type d:launch.exe where d: is theletter of the drive for your CD-ROM Click OKNOTE<strong>PayClock</strong> <strong>Express</strong> software MUST be installed for hardware tofunction.
1 0 - P A Y C L O C K E X P R E S S U S E R ’ S G U I D E3. Select Install Type• Select Install Full <strong>PayClock</strong> <strong>Express</strong>• Click OK• Note: You will only select Only Install <strong>PC50</strong> Drivers whenyou are moving the hardware to a different computer. Seepage 15 for further instructions on this step4. Begin Setup
P A Y C L O C K E X P R E S S U S E R ’ S G U I D E - 1 1• After you have read the screen, click Next to move forward.5. Read the License Agreement• Select I Accept to accept the terms to move forward.
1 2 - P A Y C L O C K E X P R E S S U S E R ’ S G U I D E6. Select a Destination Folder• The default location for <strong>PayClock</strong> <strong>Express</strong> to be stored is theC:PAYCLOCK folder• To change where <strong>PayClock</strong> <strong>Express</strong> will be stored on yourcomputer click Browse to locate your preferred folder.• Once you have specified a destination folder, click Next tomove forward.
P A Y C L O C K E X P R E S S U S E R ’ S G U I D E - 1 37. Start Install• To start the installation process, click Next.• The installation will begin <strong>and</strong> the following windows willappear:
1 4 - P A Y C L O C K E X P R E S S U S E R ’ S G U I D E• The <strong>PayClock</strong> Server Connection Manager Icon willappear, indicating that <strong>PayClock</strong> has been successfullyinstalled. This icon will display when you log in to Windows,but the <strong>PayClock</strong> Server will run without being logged in toWindows.8. Finish Install• Select Finish to complete the installation <strong>and</strong> to close theinstall window.
P A Y C L O C K E X P R E S S U S E R ’ S G U I D E - 1 59. OPTIONAL: Move <strong>PC50</strong> terminal to a separate computer fromthe one which contains the <strong>PayClock</strong> <strong>Express</strong> software. Thesecond computer MUST be on the same Local AreaNetwork (LAN) as the full <strong>PayClock</strong> <strong>Express</strong> Softwareinstallation.• After installing <strong>PayClock</strong> <strong>Express</strong> on your computer, installthe <strong>PC50</strong> drivers on the computer you will use to connect the<strong>PC50</strong> terminal.• Once you reach the Install Type window, select Only Install<strong>PC50</strong> Drivers. Click OK.• Continue, following the same installation instructionsoutlined above. You will then be ready to connect the <strong>PC50</strong>to the second computer.
1 6 - P A Y C L O C K E X P R E S S U S E R ’ S G U I D EConnect the USB cable to the <strong>PC50</strong>To begin setting up the terminal, first connect the 15ft USB cable tothe rear side of the <strong>PC50</strong> as shown below.NOTEBe aware of the orientation of the USB cable to the port. Be sure toinsert the USB cable with the “THIS SIDE UP” label facing up intothe USB port (see diagram).
P A Y C L O C K E X P R E S S U S E R ’ S G U I D E - 1 7Connect the USB Cable to theComputerAfter connecting the USB cable to the <strong>PC50</strong>, connect the other endof the cable to an available USB port on your computer, as shownbelow. Remember, this may be a different computer than the one onwhich you installed the <strong>PayClock</strong> <strong>Express</strong> software (see page 15)NOTEYou can increase the distance between the <strong>PC50</strong> terminal <strong>and</strong> yourcomputer’s USB port by purchasing USB cable extenders directlyfrom Lathem at http://shop.lathem.com or through an authorizedresellerYou may add up to four 16ft USB Extension Cables (P/N:USBCABLE16)-or-You may add one 150ft Super Extender Cable (P/N:USBEXTENDER)Once you have connected the <strong>PC50</strong> terminal to your computer, theterminal’s display should light up, displaying the current time <strong>and</strong>date.
1 8 - P A Y C L O C K E X P R E S S U S E R ’ S G U I D ENOTEIf this terminal does not light up, the unit is not on. Please refer tothe Troubleshooting Section in this guide.
P A Y C L O C K E X P R E S S U S E R ’ S G U I D E - 1 9Mount the <strong>PC50</strong>Select a site to install your <strong>PC50</strong> terminal that will be convenient toemployees clocking in <strong>and</strong> out. The included USB cable is 15 feetlong. It may be extended using Lathem’s USB Extension Cables.When planning the necessary cable length between the <strong>PC50</strong> <strong>and</strong>host computer, remember to consider the vertical drops between the<strong>PC50</strong> <strong>and</strong> the computer.The <strong>PC50</strong> terminal derives its power from the USB Port of its hostcomputer. No other power source is required for basic operation.Future add-on enhancements to the <strong>PC50</strong> family may require theaddition of an AC Power Adapter. To prepare your installation forthe future inclusion of these new features, it is suggested that the<strong>PC50</strong> be mounted in close proximity to an AC outlet.After selecting the appropriate installation site, use masking tape tohold the included Mounting Template onto the wall, at a suggestedheight from the floor to the bottom drill-hole of 4ft, 6in. Forsheetrock walls, drill a 3/16” diameter hole through each of the fourlocations indicated on the template; each approx 1-1/2” deep.Remove the Template from the wall <strong>and</strong> install the plastic “anchors”included in the installation kit. The smaller anchor goes into the
2 0 - P A Y C L O C K E X P R E S S U S E R ’ S G U I D Ebottom hole. The three larger anchors go into the holes above.Screw-in three larger screws into their corresponding anchors,allowing the screw heads to have a gap of approximately 3/16“ to thewall. Do not tighten all the way.Insert the small “L”-shaped security bracket into the slot at thebottom-rear of the <strong>PC50</strong>, so that the tab with the hole pointsdownward, away from the keyhole slot that can be seen immediatelyabove.Hang the Terminal on the wall, aligning the three keyholes on therear of the enclosure with the three protruding screw heads, <strong>and</strong> thenpressing downward on the Terminal housing until it lowers onto thescrews.Screw the small Screw into the hole of the tab from the small “L”-shaped bracket at the bottom of the enclosure. This will fasten the<strong>PC50</strong> to the wall, <strong>and</strong> keep it from being easily removed.
P A Y C L O C K E X P R E S S U S E R ’ S G U I D E - 2 1Open <strong>PayClock</strong> <strong>Express</strong>Open the <strong>PayClock</strong> <strong>Express</strong> software by clicking on the <strong>PayClock</strong>Icon located on your desktop.Log InTo begin using <strong>PayClock</strong> <strong>Express</strong>, you must first Log In to thesystem at the Log In Window. <strong>PayClock</strong> has one default user: theAdministrator. The Administrator has full access to system,information, <strong>and</strong> functions.NOTEYou may add additional concurrent users by upgrading to <strong>PayClock</strong>EZ or <strong>PayClock</strong> Pro. Refer to page 3 of this User’s Guide forinformation on purchasing software upgrades.1. From the Log In window, choose Administrator from the UserList2. Enter the default password: “lathem”3. Click OK <strong>and</strong> the software will begin. A welcome tone will letyou know that <strong>PayClock</strong> is ready for use.
2 2 - P A Y C L O C K E X P R E S S U S E R ’ S G U I D ECreate <strong>and</strong> Change Your PasswordYou should create your own unique password to protect sensitivepayroll data.1. At the Log In screen, click the Change button.2. Type in your Old Password (remember, the default is “lathem”)3. Type in your New Password (the one you would like to create)4. Confirm your new password by typing it in5. Click OK to finalize the changeNOTEPasswords are NOT case sensitive <strong>and</strong> may be up to 11 charactersRegister Your <strong>PC50</strong>You may register your <strong>PC50</strong> anytime within 30 days of installing thesoftware. If after 30 days you haven’t registered your system, you willbe required to do so before continuing to use the software.There are three ways to register your software:• Complete the Registration Wizard that appears upon log-in.Select Register Now to fill in the requested information <strong>and</strong>submit. If you do not have an internet connection, select
P A Y C L O C K E X P R E S S U S E R ’ S G U I D E - 2 3Print at the end of the wizard to print <strong>and</strong> fax yourinformation to Lathem 1-800-252-2208• Call Lathem at 1-800-241-4990 <strong>and</strong> select option number 1from the telephone menu to speak with a sales rep.• Visit www.lathem.com/register <strong>and</strong> follow the stepsoutlined
2 4 - P A Y C L O C K E X P R E S S U S E R ’ S G U I D EConfigure <strong>PayClock</strong> <strong>Express</strong>Create Company Profile <strong>and</strong> Setup Pay PeriodThe General Tab will allow you to define your company name yourcompany’s pay period. You will enter when your pay period begins,what type of pay period your company uses, <strong>and</strong> select roundingrules.To begin configuring your payroll preferences:1. Click on the Setup Icon within the Ribbon Bar2. Select the General Tab3. Enter your Company Name (this is the name that will bedisplayed on report headers)4. Select your company’s Pay Period Type among the options (forsemi-monthly, you will be asked to enter the two dates, First <strong>and</strong>Second, on which you pay employees each month)
P A Y C L O C K E X P R E S S U S E R ’ S G U I D E - 2 55. Using the pull-down calendar, select the date on which your payperiod begins (or began)6. To set the Maximum Hours Out to Start New Shift, enter thenumber of hours an employee must be punched out before<strong>PayClock</strong> will assume a new shift has started7. To set the Maximum Work Day Length, enter the maximumnumber of hours an employee can work in one day. It isrecommended you leave this setting at the default of 14 hours.8. If you would like lunch breaks to be automatically deducted frompunched time, check the Auto Deduct box. Then, enter
2 6 - P A Y C L O C K E X P R E S S U S E R ’ S G U I D EWorked Hours to Qualify (the number of hours worked beforelunch may be taken). You may then enter the Length of timeautomatically deducted for this break in hours.NOTEAutomatic break deductions are optional. Instead, you may prefer tohave employees punch in <strong>and</strong> out during breaks.9. Click OK to save settingsCreate Overtime RulesIn The Overtime Tab, you can set up how to software calculatesovertime hours. You may define up to two overtime levels.1. If employees receive overtime pay on a daily basis, check the firstbox.• For Overtime Level (1), select the rate at which employeesare paid for overtime work <strong>and</strong> the number of hours worked(Limit) needed to earn this overtime• For Overtime Level (2), select the additional rate at whichemployees are paid for additional overtime work on a daily
P A Y C L O C K E X P R E S S U S E R ’ S G U I D E - 2 7basis <strong>and</strong> the number of hours worked (Limit) needed toearn this overtime• If an option is not applicable, choose “Not Selected”.2. If employees receive overtime pay on a weekly basis, check thesecond box.• For Overtime Level (1), select the rate at which employeesare paid for overtime• work <strong>and</strong> the number of hours worked (Limit) needed toearn this overtime• For Overtime Level (2), select the additional rate at whichemployees are paid for additional overtime work on a dailybasis <strong>and</strong> the number of hours worked (Limit) needed toearn this overtime• If an option is not applicable, choose “Not Selected”.3. Select Daily OT Overrides Level 1 Weekly OT if youremployees will continue to receive Daily overtime after Weeklyovertime has been reached (this is not available if multiple levelsof weekly overtime are set up).4. Choose your Weekly OT Start Day, select the day on which youwould like the overtime counter to reset back to zero (0).Typically, this is the same as the starting day of your pay periodCreate Rounding RulesRounding rules allow you to define how your punch minutes will berounded. Specifically, rounding refers to the increments in which thepunches will be recorded. The point at which the software willdecide to adjust a punch time forward or backward is known as theBreak Point.
2 8 - P A Y C L O C K E X P R E S S U S E R ’ S G U I D E<strong>PayClock</strong> <strong>Express</strong> allows you to select one of three rounding options:No RoundingPunches will be recorded to-the-minute.• If an employee punches in at 7:08am, the software will recordthe time of entry as 7:08am• If an employee punches out at 5:23pm, the software willrecord the time of departure as 5:23pm¼ hour rounding15 minute rounds with a 7 minute break point• <strong>Time</strong> is recorded in increment of 15 minutes: :00, :15, :30, or:45• If an employee punches in at 7:08am, the software will recordthe time of entry as 7:15 because :08 is after the seven minutebreak point at 7:00
P A Y C L O C K E X P R E S S U S E R ’ S G U I D E - 2 9• If an employee punches out at 5:20pm, the software willrecord the time of departure as 5:15 because :20 is before theseven minute break point at 5:151/10 hour rounding6 minute rounds with a three minute break point• <strong>Time</strong> is recorded in increments of 6 minutes: 00, :06, :12, :18,:24, :30, :36, :42, :48, :54• If an employee punches in at 7:08am, the software will recordthe time of entry as 7:06 because :08 is before the threeminute break point after 7:06• If an employee punches out at 5:23pm, the software willrecord the time of departure as 5:24 because :23 is after thethree minute break point after 5:18To finalize your Rounding Rules, select the rule setting you prefer<strong>and</strong> click OK.Format <strong>Time</strong> And DateThe format tab allows you to decide how <strong>PayClock</strong> <strong>Express</strong> willdisplay dates <strong>and</strong> times within the software.
3 0 - P A Y C L O C K E X P R E S S U S E R ’ S G U I D ESoftware <strong>Time</strong> Settings: determines how time will be displayed:• 12-Hour: displays time in increments of twelve hours (12:00,1:00, 2:00, etc)• 24-Hour: displays time in increments of 24 hours (12:00,13:00, 14:00, etc)Software Date Settings: determines how dates will be displayed.For the date of December 1, 2006, the following display optionsexist:• MM/DD/YY: displays date as 12/01/06• DD/MM/YY: displays date as 01/12/06• YY/MM/DD: displays date as 06/12/01Show <strong>Express</strong> <strong>Time</strong> Card in Black <strong>and</strong> White: check this box ifyou would like the <strong>Express</strong> <strong>Time</strong>card displayed in black <strong>and</strong> white,rather than in yellow <strong>and</strong> green
P A Y C L O C K E X P R E S S U S E R ’ S G U I D E - 3 1Add Employees <strong>and</strong> Assign BadgesThe Employee Icon is used to add, delete, <strong>and</strong> filter employees.
3 2 - P A Y C L O C K E X P R E S S U S E R ’ S G U I D EAdd New Employees1. Within the Employee Icon, click Add New.2. Assign each employee a badge to use for punching in <strong>and</strong> out.Each badge contains a unique ten digit badge number on theback (see example below). The number of the badge assignedto an employee must match the number entered in theBadge Number field in that employee’s profile.3. Insert the employee’s personal information in the appropriateblanks.4. You may include Base Pay rate in the employee’s profile in orderto allow <strong>PayClock</strong> to calculate gross pay on the timecard.
P A Y C L O C K E X P R E S S U S E R ’ S G U I D E - 3 35. Use the scroll down menu to select a Date of hire for each newemployee.6. To declare Inactive or to Terminate an employee from thesoftware, check ( ) the box next to the desired selection. Thiswill allow you to enter in the date or Inactivation or Termination.7. You may then use the scroll down menu to select a date ofDeactivation or of Termination.6. To Add Sounds or Add Custom Messages for employees tohear upon punching in or out, you must first check ( ) next tothe box that reads “On any Punch Play:”• For Sounds, scroll through the drop down menu to thedesired greeting.• To preview a greeting, press thedown menu.button next to the drop• To create your custom text message, simply type in themessage you would like displayed for that employee uponpunching in or out. Finally, select a number from the dropdownmenu “How many times should this message play?”
3 4 - P A Y C L O C K E X P R E S S U S E R ’ S G U I D EUsing the Clock And BadgesNote: If you scan a badge that has not been assigned to aspecific employee in <strong>PayClock</strong> <strong>Express</strong>, the terminal willdisplay an error message.
P A Y C L O C K E X P R E S S U S E R ’ S G U I D E - 3 5Navigating <strong>PayClock</strong> <strong>Express</strong>Now that your software is installed <strong>and</strong> your <strong>PC50</strong> is connected toyour PC, you may begin configuring your preferences within<strong>PayClock</strong> <strong>Express</strong>. All of the <strong>PayClock</strong> <strong>Express</strong> functions arecontained within The Home Screen. Within the Home Screen,there are four sections: the Ribbon Bar, the <strong>Express</strong> <strong>Time</strong>card,the Employee List, <strong>and</strong> the Information Area.The Home ScreenUse the scroll buttons (circled) to move through pay periods.Highlighting an employee will display his/her time card in theexpress timecard<strong>PayClock</strong><strong>System</strong> ButtonRibbon BarEmployee List<strong>Express</strong> <strong>Time</strong>cardInformation Area
3 6 - P A Y C L O C K E X P R E S S U S E R ’ S G U I D E• Ribbon Bar: use to navigated software <strong>and</strong> locate functions• <strong>Express</strong> <strong>Time</strong>card: use to edit <strong>and</strong> view individual punchdata• Employee List: use to view pay period summaries for allemployees• Information Area: use to find help <strong>and</strong> purchase softwareupgrades <strong>and</strong> accessoriesChanging the Display<strong>PayClock</strong> <strong>Express</strong> allows you to re-size windows within the HomeScreen so that you may adjust the screen display as needed.Sample Home Screen Displays:You may adjust screen displays by using your mouse to click on <strong>and</strong>move windows
P A Y C L O C K E X P R E S S U S E R ’ S G U I D E - 3 7The <strong>PayClock</strong> <strong>System</strong> ButtonThe <strong>PayClock</strong> <strong>System</strong> Button, located at the top left-h<strong>and</strong> cornerof the Home Screen allows quick access to a number of importanttools. The Administrator should use the <strong>PayClock</strong> <strong>System</strong>s Button toaccess the following critical functions:• Backup Data• Archive Data• Reopen the Last Pay Period• Recalculate• Refresh• Feature Wizard• ExitTo access these functions, click on the <strong>PayClock</strong> <strong>System</strong> Button <strong>and</strong>highlight the desired function from the drop-down menu
3 8 - P A Y C L O C K E X P R E S S U S E R ’ S G U I D EThe Ribbon BarInstead of a menu <strong>and</strong> toolbar, the Ribbon Bar allows you tomanage <strong>and</strong> edit your settings, as well as create reports, within onecomprehensive area.The Setup Icon• create <strong>and</strong> edit your pay period• set overtime rules• set rounding rules• set formatting options• create an export link to your payroll program• set maximum work day hours• set maximum hours to start new shift
P A Y C L O C K E X P R E S S U S E R ’ S G U I D E - 3 9The Employees Icon• Add <strong>and</strong> terminate employees• Edit employees’ personal information• Edit base pay• Create <strong>and</strong> assign custom messages or soundsThe Audio Icon• manage audio settings for the <strong>PC50</strong>• setup global messages to be played to all employees.The Reports Icon• generate, preview, <strong>and</strong> print a Period Totals Report or anindividual Employee <strong>Time</strong>card Report• view All <strong>Time</strong>cards in alphabetical order
4 0 - P A Y C L O C K E X P R E S S U S E R ’ S G U I D EThe Export Icon• export pay period data into the payroll program previouslyestablishedThe Close Icon• Close the selected pay period to future editing. (after youclose a pay period, you may not go back to edit the datawithin that period)The Backup Icon• Back up pay period data to a specified file on their PCThe Help Icon
P A Y C L O C K E X P R E S S U S E R ’ S G U I D E - 4 1• Directs you to the <strong>PayClock</strong> <strong>Express</strong> Interactive HelpViewer, which acts a reference for any questions or issues thatmay arise as you use <strong>PayClock</strong> <strong>Express</strong>The Finger Sensor Icon• Directs you to the Finger Template Management Wizard,which allows you to register employee fingerprints into<strong>PayClock</strong> <strong>Express</strong> using the optional fingerprint attachment(see page 3 for information on purchasing this <strong>and</strong> otheraccessories). This icon is only available for use when aLathem Fingerprint Reader is installed <strong>and</strong> attached to theterminal.The Employee ListThe Employee List displays the list of active employees, the payperiod data for each employee, <strong>and</strong> is used to select employees inorder to edit or update data or to run individual reports.<strong>Express</strong> <strong>Time</strong>cardThe <strong>Express</strong> <strong>Time</strong>card gives you a quick view of individual punchinformation <strong>and</strong> allows you to add, edit, or delete data as is necessary.Use the <strong>Express</strong> <strong>Time</strong>card Toolbar to add punches <strong>and</strong> non-work
4 2 - P A Y C L O C K E X P R E S S U S E R ’ S G U I D Etime, as well as delete punches, <strong>and</strong> find missing punches. The<strong>Time</strong>card displays Base Hourly Pay <strong>and</strong> Gross Pay, as well as totalregular, overtime, <strong>and</strong> non-worked hours worked for the selected payperiod.1. Select the desired employee from the Employee List2. The employee’s <strong>Time</strong>card will appear in the <strong>Express</strong> <strong>Time</strong>cardarea next to the Employee List.
P A Y C L O C K E X P R E S S U S E R ’ S G U I D E - 4 3Add Punch Icon• This button lets you add a new punch, as well as the date <strong>and</strong>time for the new punchAdd <strong>Time</strong> Off Icon• This button lets you add time off for an employee <strong>and</strong> selectthe date, time, <strong>and</strong> pay code category for the absenceDelete Icon
4 4 - P A Y C L O C K E X P R E S S U S E R ’ S G U I D E• This button allows you to delete punches already on the <strong>Time</strong>CardThe Refresh Icon• This icon will refresh the data in the timecards to reflect themost recent activityThe Find Missing Icon• This button will locate any missing punches within anEmployee <strong>Time</strong>card. <strong>PayClock</strong> looks for an even number ofpunches. When an odd number of punches is found,<strong>PayClock</strong> assumes that a punch is missing (an employeepunched In, but not Out, or vice versa).The <strong>Time</strong> Card TableThe timecard table functions much like the cells in a spreadsheet. Byclicking on a desired cell, you may edit it as needed.
P A Y C L O C K E X P R E S S U S E R ’ S G U I D E - 4 5DateDisplaysthe date ofpunchesrecorded inthe tableIn / OutDisplaysthe time ofentrance<strong>and</strong> exit ona given dayIn / OutDisplaysadditionaltimes ofentrance<strong>and</strong> exit ona given dayHoursDisplaystotal hoursworked fora given dayThe Information AreaThe Information Area contains information on <strong>PayClock</strong> software,including links to software help <strong>and</strong> support, user tips, upgrades, <strong>and</strong>accessories. Clicking on a link will open a new window.• Help <strong>and</strong> Support Options: links to FAQs <strong>and</strong> supportinformation online• Add Multiple Users: links to add upgrades <strong>and</strong> increasecapacity• Verify Identity with Fingerprints: links to orderinformation for fingerprint attachment, as well as additionalaccessories
4 6 - P A Y C L O C K E X P R E S S U S E R ’ S G U I D EView <strong>and</strong> Edit Employee Information1. Select the desired employee from the Employee List <strong>and</strong> clickthe Employees Icon from the Ribbon Bar-or-Select an employee from the Employee List by double-clickingon the employee’s name.2. The Employee Window will open <strong>and</strong> you may edit any of theinformation in the window.3. Click OK to save any changesFilter Employees<strong>PayClock</strong> <strong>Express</strong> allows you to filter employees either by hidinginactive or hiding terminated employees.1. To filter employees, click the Filter option from the EmployeeIcon within the Ribbon Bar
P A Y C L O C K E X P R E S S U S E R ’ S G U I D E - 4 72. Use the arrow to select either Hiding Terminated Employeesor Hiding Inactive EmployeesEmployee List Pop-Up MenuThe Employee List Pop-Up Menu allows you to access bothindividual <strong>and</strong> group information quickly, by right-clicking within theEmployee List. A menu will open with a number of options.1. Select an employee within the Employee List2. Right click on the row containing the employee’s information3. Select among the menu options to perform the desired task. Aseparate window will open.• Edit this employee: select this menu item to edit anemployee’s name, badge number, base wage, messages, etc• Add a new employee: select this menu item to add a newemployee to the system
4 8 - P A Y C L O C K E X P R E S S U S E R ’ S G U I D E• Delete the employee: select this menu item to delete theselected employee from the system (important: this cannot beundone!)• Go to this employee’s <strong>Time</strong>card: select this menu item tomove to the first cell of the employee’s timecard in the<strong>Express</strong> <strong>Time</strong>card area• Show the Employee Details Report: this menu item willdisplay a Details report for the selected employee• Show this Employee’s <strong>Time</strong>card Report: this menu itemwill display a <strong>Time</strong>card Report for the selected employee• Show Period Totals Report: this menu item will display aPeriod Totals reportEdit <strong>Time</strong>cardsYou may edit an employee’s <strong>Time</strong>card data in the <strong>Express</strong><strong>Time</strong>card area of the Home Screen.Add PunchesTo add a punch to an employee’s timecard:
P A Y C L O C K E X P R E S S U S E R ’ S G U I D E - 4 91. Select an employee from the Employee List2. Click the Add Punch Icon3. The Registration Edit screen will pop-up. Enter the <strong>Time</strong> <strong>and</strong>Date you wish to enter for this punch You will see your newpunch displayed on the Employee <strong>Time</strong> Card4. Click OK to exit the screenAdd <strong>Time</strong> OffTo add time off to an employee’s timecard:1. Select an employee from the Employee List2. Click the Add <strong>Time</strong> Off Icon3. The Registration Edit screen will pop-up. Enter the <strong>Time</strong> <strong>and</strong>Duration (number of hours) you wish to enter for the <strong>Time</strong> Off4. Select the Date on which you would like the <strong>Time</strong> Off applied<strong>and</strong> the Pay Code (label you would like to give the absence).You will see your new entry displayed on the Employee <strong>Time</strong>Card.
5 0 - P A Y C L O C K E X P R E S S U S E R ’ S G U I D E5. Click OK to exit the screenDelete PunchesTo delete a punch from an employee’s timecard:1. Select an employee from the Employee List to view his/hertimecard2. Select the cell that contains the punch you would like to delete3. Click the Delete Punch Icon
P A Y C L O C K E X P R E S S U S E R ’ S G U I D E - 5 14. A pop-up screen will ask “Are you sure you want to continuewith this deletion?” If you would like to continue, click Yes. Ifnot, click No5. Click OK to exit the screen. You will no longer see the deletedpunch displayed on the Employee <strong>Time</strong> Card.Refresh DataTo refresh your data, simply click the Refresh Data Icon. Anyupdates will automatically uploaded into the data.Find Missing Punches1. Select an individual Employee <strong>Time</strong>card from the EmployeeList
5 2 - P A Y C L O C K E X P R E S S U S E R ’ S G U I D E2. In the <strong>Express</strong> <strong>Time</strong>card screen, select the Find Missing Icon.3. If there are missing punches, correct them one-at-a-time. Ifthere are no missing punches, <strong>PayClock</strong> will display themessage: “No Exceptions Found”.Show Unused PunchesIn the <strong>Express</strong> <strong>Time</strong>card, you may view any punches that have beenrecorded by the <strong>PC50</strong> terminal, but erased by the administrator. Inaddition, this box will show any punches which fell outside of theallotted work day. To change maximum work day settings, select theGeneral Tab from the Setup Icon <strong>and</strong> adjust the hours entered inMaximum Work Day Length.Check the Show Unused Punches box. If there are no unusedpunches, this checkbox will display: “There are NO unusedpunches for this employee”. All unused punches will be displayedin list format, along with a description of the punch.
P A Y C L O C K E X P R E S S U S E R ’ S G U I D E - 5 3Close A Pay PeriodThe Close Icon allows you to close out the current pay period. Youcannot edit data from a closed pay period, although you may still runreports <strong>and</strong> exports. Make sure that you are finished making changesto the data for a pay period before closing it.1. Click the Close Icon in the Ribbon Bar. The Close PayPeriod window will appear.2. Under PayClass, you will see the date that the pay period waslast closed.3. Click Apply. The Confirm Close dialog box will appear. Makesure that the dates listed in this window are the dates that youwould like to close out.4. Confirm the close by typing ‘Yes’ in the box <strong>and</strong> clicking OK
5 4 - P A Y C L O C K E X P R E S S U S E R ’ S G U I D EReopen a Pay PeriodReopening a previously-closed pay period will allow you to view <strong>and</strong>edit employee timecards, just like before the pay period was closed.Reopening the last pay period will display the punch records fromthat period <strong>and</strong> reset the pay period settings for that period, but willnot restore the rules for that pay period.1. Select Reopen Last Pay Period from the drop-down menuwithin the <strong>System</strong> Button. The Reopen Last Pay Periodwindow will appear2. Under Pay Class, choose St<strong>and</strong>ard3. Type Yes in the box to confirm that you want to reopen the lastpay period
P A Y C L O C K E X P R E S S U S E R ’ S G U I D E - 5 54. Click Apply to complete the reopenRecalculate DataSelecting Recalculate from the <strong>System</strong> Button option will instantlyupdate the data calculations for all employees in the software.Refresh DataSelecting Refresh from the <strong>System</strong> Button option will instantlyupdate <strong>and</strong> reload the screen.Backup DataIt is important to backup your data to protect your records in theevent of a disaster. The Backup function makes a complete copy ofall of your files in the Database folder <strong>and</strong> then compresses them intoone file.1. Select Backup Data from the drop-down menu under the<strong>System</strong> Button.
5 6 - P A Y C L O C K E X P R E S S U S E R ’ S G U I D E2. The Database Backup Manager window will open3. <strong>PayClock</strong> automatically locates your data <strong>and</strong> displays the fileunder Database to Backup. Under File Name, select the nameyou want to give your backup file (the default is simply“Database). Backups have the file extension TDK. If you giveyour backup file the same name each time you backup, the filewill be updated with the latest information. Your file will not bewritten over.4. In the Note space, you may add a description of your file (this isoptional).5. Locate the destination for your backup file under Write theBackup to this location section. If you would like to make thisdestination file as your default, select Save as my DefaultBackup Location.6. To simply backup current <strong>and</strong> next pay period data (<strong>and</strong> notclosed pay period data), select Exclude History Data.7. To create the backup file, click Create. Then close the file byclicking Close.Archive DataArchiving your data will allow you to free up space on your harddrive. You may only archive closed pay periods.To Archive Data, select the option from the drop-down menu underthe <strong>System</strong> Button. The following window will appear.
P A Y C L O C K E X P R E S S U S E R ’ S G U I D E - 5 71. <strong>PayClock</strong> automatically locates your data <strong>and</strong> displays the file inthe Database to Archive field.2. Select the pay periods you would like to archive from theHistorical Pay Period field. Check Select All to select all of thelisted pay periods.3. Select a name for your file <strong>and</strong> type it in the File Name field. Allarchived files have a TDA extension.4. You may write a description of the file in the Note field.5. Locate the destination for your archive file under Write theArchive to this location section. If you would like to make thisdestination file as your default, select Save as my DefaultBackup Location.6. To create the archive file, click Create. Then close the file byclicking Close.Adjust Audio Settings1. First, set the volume level you prefer for the <strong>PC50</strong>.2. If you’d like to set the clock up to play a specific greeting for In<strong>and</strong> Out punches, select Play a sound for In/Out punches
5 8 - P A Y C L O C K E X P R E S S U S E R ’ S G U I D E3. To select a message to be played for all In punches, check thebox next to On all In Punches play. Next, use the scroll downmenu to select the sound or message you prefer. You maypreview messages <strong>and</strong> sounds by clicking the preview button tothe right of the selection field. Repeat these steps to select amessage for all Out punches by checking the box next to On allOut Punches play.4. Select Play a sound for a range of punches to choose whataudio sound <strong>and</strong>/or message plays on the <strong>PC50</strong> terminal for allpunches during a specific period of time.NOTE:You have the option of setting up messages for In punches, Outpunches, or both.
P A Y C L O C K E X P R E S S U S E R ’ S G U I D E - 5 9Use the Feature WizardThe Feature Wizard will allow you to unlock software upgradesthat you have purchased online.• To access the Feature Wizard, use the arrow under the<strong>PayClock</strong> <strong>System</strong> Button to scroll down to FeatureWizard• The Feature Wizard will launch <strong>and</strong> guide you through theunlock processExit <strong>PayClock</strong> <strong>Express</strong>There are three ways to exit the software:• In the upper right h<strong>and</strong> corner of the Home Screen, select• To exit <strong>and</strong> log out from <strong>PayClock</strong> <strong>Express</strong>, select Exit fromthe scroll down menu under the <strong>System</strong> Button.• You may also use the <strong>System</strong> Button to quickly close thesoftware, by double-clicking on the icon.
6 0 - P A Y C L O C K E X P R E S S U S E R ’ S G U I D ERun <strong>and</strong> Export ReportsReports are accessible in the Reports Icon within the Ribbon Bar.Scroll Buttons <strong>and</strong> a Pop-Up Calendar allow you to change payperiodsYou may change your formatting preferences by clicking theOptions button within a report <strong>and</strong> editing your data <strong>and</strong> displayformats
P A Y C L O C K E X P R E S S U S E R ’ S G U I D E - 6 1Employee <strong>Time</strong>card ReportThe Employee <strong>Time</strong>card Report provides individual employees’Name, ID number, total regular, overtime, <strong>and</strong> miscellaneous nonworkedhours for the pay period, as well as total meal deductions forthat individual.1. Using the scroll buttons or Pop-up Calendar, select the payperiod for which you would like to generate a report.2. Select the desired employee from the Employee List3. Select Employee <strong>Time</strong>card from the Report Icon in theRibbon Bar4. The Employee <strong>Time</strong>card Report will appear. You may nowprint <strong>and</strong> review the reportPeriod Totals ReportThe Period Totals Report provides a summary view of all Employees’total hours <strong>and</strong> total gross pay for the pay period
6 2 - P A Y C L O C K E X P R E S S U S E R ’ S G U I D E1. Using the scroll buttons or Pop-up Calendar, select the payperiod for which you would like to generate a report2. Select the desired employee from the Employee List3. Select Period Totals Report from the Reports Icon in theRibbon Bar4. The Period Totals Report will appear. You may now print <strong>and</strong>review the reportAll <strong>Time</strong>cards ReportChoosing All <strong>Time</strong>cards from the Reports Icon will pull up allemployee timecards, arranged in alphabetical order. You may scrollto the next employee by using the Forward button or backwardusing the Back button
P A Y C L O C K E X P R E S S U S E R ’ S G U I D E - 6 3Use the Forward button to scroll to the next employee’s timecard1. Using the scroll buttons or Pop-up Calendar, select the payperiod for which you would like to generate a report2. Select All <strong>Time</strong>cards from the Reports Icon. <strong>Time</strong>cards willappear in alphabetical order.NOTE:For all reports, you may use the Print Icon in the report toolbar toprint the report. Click Close to exit the screenExport Payroll ReportsPayroll Export WizardThe Payroll Wizards Tab helps you setup your data for export intoa format your payroll service can read. <strong>PayClock</strong> <strong>Express</strong> can exportdata into QuickBooks, PayChex, <strong>and</strong> ADP payroll software. You canalso export data into ASC II format
6 4 - P A Y C L O C K E X P R E S S U S E R ’ S G U I D ETo run an export wizard:1. Select the Setup Icon from the Ribbon Bar2. Select the Payroll Wizards tab, then highlight the payrollprogram your company uses3. Click Setup to run the Payroll wizard
P A Y C L O C K E X P R E S S U S E R ’ S G U I D E - 6 54. The wizard will take you through the requisite steps for yourparticular payroll program. Fill in the requested information ineach step <strong>and</strong> click Finish5. Your export path will now be available in the list of PayrollInterfaces available by clicking on the Export Icon within theRibbon BarCreate a Payroll Export FileAfter you have set up the software to export your data to your payrollprogram, <strong>PayClock</strong> <strong>Express</strong> can export your time <strong>and</strong> attendancedata directly into your payroll system. The Export Icon creates aseparate file that your payroll program can read.1. Select the Export Icon from Ribbon Bar2. The Export Payroll Data window appears3. Under Payroll Interfaces, select the export option you wouldlike to create4. Click the Export button; You will see a window indicating thatyour file is being processed, followed by a window indicating thatyour file has been created.
6 6 - P A Y C L O C K E X P R E S S U S E R ’ S G U I D EInstall the Wall Mount FingersSensor AttachmentWith the TS-WFS (Wall Mount Finger Sensor) attached to your <strong>PC50</strong>terminal, employees can punch in <strong>and</strong> out by scanning their fingerinstead of using their badge. When an employee places their fingeron the sensor, the <strong>PC50</strong> terminal will scan the fingerprint <strong>and</strong>compare it to the stored fingerprints. When the fingerprint ismatched, a record of the punch will be added to the database <strong>and</strong> willshow In or OUT on the <strong>PC50</strong> display, along with the employee name<strong>and</strong> total hours for the pay period.Note: The Biometric Fingerprint Reader is available for purchase athttp://shop.lathem.com1. Connect the TS-RFS (the Biometric Fingerprint ReaderAttachment) to one of the two additional USB ports on your<strong>PC50</strong>. In the Notification Area of your computer, next to theUSB icon, the following message will appear: “Found NewHardware”. The driver will be loaded automatically2. The sensor window on the TS-WFS attachment will illuminate,indicating that it is ready for use3. You are now ready to begin using the Biometric FingerprintReader attachment with your <strong>PC50</strong> <strong>and</strong> <strong>PayClock</strong> <strong>Express</strong>
P A Y C L O C K E X P R E S S U S E R ’ S G U I D E - 6 7Enroll Fingerprints1. Select the Finger Sensor Icon from the Ribbon Bar2. Select the employee you would like to enroll from the drop downmenu3. At this point, you may change default security levels <strong>and</strong>assigning employees to work stations by selecting thecorresponding button
6 8 - P A Y C L O C K E X P R E S S U S E R ’ S G U I D E4. Select the finger(s) the employee will use for enrollment5. Adjust the security level to meet your company’s needs <strong>and</strong> clickNext6. Click Begin Registration. Follow the step-by-step instructionsdisplayed in the Instruction box to scan fingerprints. Eachfingerprint must be scanned three times to be successfullyregistered.
P A Y C L O C K E X P R E S S U S E R ’ S G U I D E - 6 97. When finished, click Next. You may choose to Enroll anotherfinger for this employee, Enroll another employee, or Closethe wizard. Select the desired option <strong>and</strong> click Close.NOTEThe higher the security level, the more sensitive the fingerprint readeris (refer to glossary under “Security” for more detailed informationon setting security levels)
7 0 - P A Y C L O C K E X P R E S S U S E R ’ S G U I D ETroubleshootingIf you cannot locate an answer to your question or issue within thetroubleshooting duie, please contact Lathem support by telephone at1-800-241-4990 (charges may apply if you do not have a supportagreement) or refer to the support section of our website athttp://support.lathem.comHardwareQ. When I present a badge, it does not record <strong>and</strong> the clockdoes not signal any errors.A. Make sure you swiped the badge correctly. Pass the badge withinrange of the terminal, within 3 to 4 inches of the front of theterminal. See the diagram on the right side of the clock terminal.Q. The badge reader works intermittently:A. Your computer’s USB port is low on power needed to run theterminal. You will need to purchase an external power supply toincrease the power available to run the unit. It is recommendedthat you use only a Lathem PC-50 Wall Wart Power Adapter(a “Regulated” 5vDC, 2.0 Amp Adapter that has been tested forthis purpose) rather than a generic power adapter. Use of otherAdapters may damage the Terminal <strong>and</strong> will void yourWarrantyTo purchase this product, visit http://shop.lathem.com(Reference Part# VIE2764 5vDC / 2.0Amp Regulated PowerAdapter)
P A Y C L O C K E X P R E S S U S E R ’ S G U I D E - 7 1
7 2 - P A Y C L O C K E X P R E S S U S E R ’ S G U I D EIndexAAccessories, 11Add a new employee, 42Add Custom Messages, 39Add New Employees, 38Add Punch Icon, 28Add Sounds, 39Add <strong>Time</strong> Off Icon, 28All <strong>Time</strong>cards Report, 50Archive Data, 56Audio Settings, 57BBackup Data, 55Backup Icon, 26Base Pay, 38CClose A Pay Period, 53Close Icon, 26Company Profile, 31Connections, 19DDate of hire, 39Date Settings, 36Delete an employee, 42Delete Icon, 28Delete Punches, 44Display, 23
P A Y C L O C K E X P R E S S U S E R ’ S G U I D E - 7 3EEdit employee information, 42Employee Details, 42Employee ID number, 39Employee List, 37Employee <strong>Time</strong>card Report, 48Employees Icon, 24Enroll Fingerprints, 58Export Icon, 25Export Payroll, 51<strong>Express</strong> <strong>Time</strong>card, 27FFeature Wizard, 61Filter Employees, 41Find Missing Punches, 45Finger Sensor Icon, 26, 59Fingerprint Reader, 20Forward button, 50HHardware Setup, 19Help, 12Help Icon, 26Home Screen, 22IInactive, 39Information Area, 30LLogging In, 16Logging Out, 18
7 4 - P A Y C L O C K E X P R E S S U S E R ’ S G U I D EMMessages, 39Mounting The <strong>PC50</strong>, 20OOptions button, 48Overtime, 33PPassword, 17Pay Period, 31Payroll Wizards Tab, 51Period Totals Report, 49RRecalculate Data, 54Refresh Data, 45, 54Registering, 17Reopen a Pay Period, 54Reports, 47Reports Icon, 25Ribbon Bar, 23, 24Rounding Rules, 34SSetup Icon, 24Sounds, 39<strong>System</strong> Button, 30<strong>System</strong> Requirements, 10TTerminate, 39The Find Missing Icon, 29
P A Y C L O C K E X P R E S S U S E R ’ S G U I D E - 7 5The Refresh Icon, 29<strong>Time</strong> Card Table, 29<strong>Time</strong> Settings, 36Troubleshooting, 62UUpgrades, 11VView a timecard, 42
USG0058PRINTED IN THE USA