

QS Multi Client for MAC system Instructions - Q-See
QS Multi Client for MAC system Instructions - Q-See
QS Multi Client for MAC system Instructions - Q-See
- No tags were found...

Create successful ePaper yourself
Turn your PDF publications into a flip-book with our unique Google optimized e-Paper software.
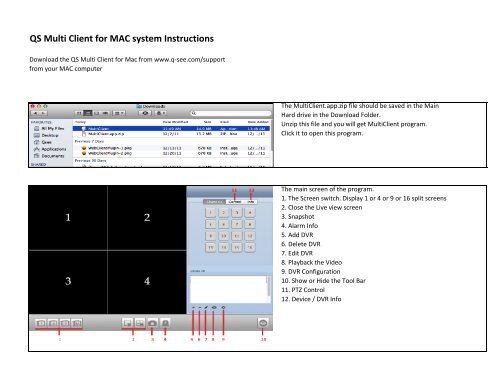
<strong>QS</strong> <strong>Multi</strong> <strong>Client</strong> <strong>for</strong> <strong>MAC</strong> <strong>system</strong> <strong>Instructions</strong>Download the <strong>QS</strong> <strong>Multi</strong> <strong>Client</strong> <strong>for</strong> Mac from www.q-see.com/supportfrom your <strong>MAC</strong> computerThe <strong>Multi</strong><strong>Client</strong>.app.zip file should be saved in the MainHard drive in the Download Folder.Unzip this file and you will get <strong>Multi</strong><strong>Client</strong> program.Click it to open this program.The main screen of the program.1. The Screen switch. Display 1 or 4 or 9 or 16 split screens2. Close the Live view screen3. Snapshot4. Alarm Info5. Add DVR6. Delete DVR7. Edit DVR8. Playback the Video9. DVR Configuration10. Show or Hide the Tool Bar11. PTZ Control12. Device / DVR Info
Click the + sign (5) to add DVR info:Name: can be any nameAddress: the IP or Domain Name of the DVRPort: 9000 (default)User : admin (default)Password: no password (default)To Play the Live camera:High light the Device ListClick on the screen 1Clcik on Number 1
To Playback the Recorded Vdieo:Clcik The Playback Icon (8)Select the DateSelect the Channel; numberSelect the screenDouble Click the File list


