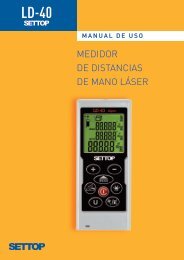
LD-40 LD-40 - Al-Top TopografÃa
LD-40 LD-40 - Al-Top TopografÃa
LD-40 LD-40 - Al-Top TopografÃa
- No tags were found...

You also want an ePaper? Increase the reach of your titles
YUMPU automatically turns print PDFs into web optimized ePapers that Google loves.
<strong>LD</strong>-<strong>40</strong> <strong>LD</strong>-<strong>40</strong> USER’S MANUALEK-118REK-118Roverview for ld-<strong>40</strong>A LCDB AddC Measure / Dina-MeasureDMeasure Function:EK-118GPythagorasAreaDimensionE Unit SwitchF Laser pointerG Battery coverH SubstractI Back-LightJ Power Button / ClearK Reference Switch/ Laser pointerL Receive WindowM Corner measuring supportEK-118GLABCDEFHIJKGM3
<strong>LD</strong>-<strong>40</strong> <strong>LD</strong>-<strong>40</strong> USER’S MANUALEK-118REK-118GEK-118ROVERVIEW FOR SCREEN1 Laser indicator2 Indirect Measuring - Single Pythagoras - Sumary of two Pythagoras - Subtract of two Pythagoras3 Measuring Function (Area Measuring - Volume measuring)4 Measuring Reference5 Add and Subtract6 Maximum display7 Minimum display8 Main Screen and units9 Battery StatusEK-118G1234567894
<strong>LD</strong>-<strong>40</strong> <strong>LD</strong>-<strong>40</strong> USER’S MANUALEK-118RSPECIFICATIONSMeasuring RangeBeam SizeEK-118GEK-118R0.05M - <strong>40</strong>MResolution 0,001MAccuracy+-1.5mmMeasuring Speed0.5 sec.Laser TypeBattery650 nm, Class IIEK-118G25mm@30M2 x AA BatteryBattery lifeUp to 10,000 measuresDimension110mm x 45mm x 30mmOperation temperature -5ºC - <strong>40</strong>ºCTURN ON YOUR <strong>LD</strong>-<strong>40</strong>Before starting, please make sure battery is installed properly.Pressonce to activate <strong>LD</strong>-<strong>40</strong>.Initial screen will flash seconds for checking status, helping you to check that <strong>LD</strong>-<strong>40</strong> is ready towork.After checking, standby screen will be displayed.5
<strong>LD</strong>-<strong>40</strong> <strong>LD</strong>-<strong>40</strong> USER’S MANUALEK-118REK-118RMEASURING DISTANCEPressto enable laser. Then, move the laser dot of <strong>LD</strong>-<strong>40</strong> onto your target.EK-118GEK-118GOnce we keep the dot on the target, pressmain screen.again. The measured result appears on the6
<strong>LD</strong>-<strong>40</strong> <strong>LD</strong>-<strong>40</strong> USER’S MANUALEK-118REK-118Rmeasuring from cornersThe support, integrated into the base, allows us to measure from the corners. To do so, simplyremove the bracket and support it at the corner of the wall.EK-118GEK-118G7
<strong>LD</strong>-<strong>40</strong> <strong>LD</strong>-<strong>40</strong> USER’S MANUALEK-118REK-118RDYNA-MEASURING (CONTINUOUS MEASURING)By default, it is always measured as a simpleEK-118GEK-118GTo activate Dyna-Measuring (continuous measure), holdMeasuring mode.then it will jump to Dyna-8
<strong>LD</strong>-<strong>40</strong> <strong>LD</strong>-<strong>40</strong> USER’S MANUALEK-118REK-118RWhile we measure the minimum value is recorded on the screenEK-118GEK-118GTo end the Continuous mode pressorTo re-start the Continuous mode presssTo quit Continuous mode and back to normal mode, press9
<strong>LD</strong>-<strong>40</strong> <strong>LD</strong>-<strong>40</strong> USER’S MANUALEK-118REK-118RMEASURING FUNCTION. AREA MEASUREMENTPressonce for enabling Area measuring.EK-118GEK-118GPressto activate the laser beam.Follow the instructions on main screen to measure widht and lenght.10
<strong>LD</strong>-<strong>40</strong> <strong>LD</strong>-<strong>40</strong> USER’S MANUALEK-118REK-118ROnce you finish all measurements, area is showed on screen.To change the display units, pressEK-118GEK-118G11
<strong>LD</strong>-<strong>40</strong> <strong>LD</strong>-<strong>40</strong> USER’S MANUALEK-118REK-118RVOLUME MEASUREMENTPresstwice to enter volume measuring.EK-118GEK-118GPressto enable laser beam.Follow the instructions on main screen to measure width, length and height.12
<strong>LD</strong>-<strong>40</strong> <strong>LD</strong>-<strong>40</strong> USER’S MANUALEK-118REK-118REK-118GEK-118GOnce you finish all instructions, volume is showed on screen.To change display units, press13
<strong>LD</strong>-<strong>40</strong> <strong>LD</strong>-<strong>40</strong> USER’S MANUALEK-118REK-118REK-118GEK-118GOnce completed the measures, the height is showed on the displayTo change the measure units press15
<strong>LD</strong>-<strong>40</strong> <strong>LD</strong>-<strong>40</strong> USER’S MANUALEK-118REK-118RMEasuring referenceBy default, reference is set at rear.<strong>LD</strong>-<strong>40</strong> has three reference: rear, front and pintail.To change the references, pressEK-118GEK-118Gand each press will change the measurement area16
<strong>LD</strong>-<strong>40</strong> <strong>LD</strong>-<strong>40</strong> USER’S MANUALEK-118Rmeasuring unitsEK-118RTo change measuring units, pressUnit will be switched by each hold.EK-118GEK-118G17
<strong>LD</strong>-<strong>40</strong> <strong>LD</strong>-<strong>40</strong> USER’S MANUALEK-118REK-118Radd your measurementsTo add a measurement, simply pressThe iconEK-118Gwill display in main screen and you could see what you had added.EK-118Gsubtract your measurementsTo subtract measurements to the memory simply pressThe iconwill display in main screen and you could see what you had subtracted.18
<strong>LD</strong>-<strong>40</strong> <strong>LD</strong>-<strong>40</strong> USER’S MANUALEK-118REK-118Rback-light switchTo enable and disable back-light for <strong>LD</strong>-<strong>40</strong>, pressAfter 10 seconds, it will switch off automaticallyEK-118GEK-118Glaser pointer switchTo enable Laser Pointer, hold the button for 2 secondsThe icon will flash on the display19
Laser distanceBofarull, 14, bajos 08027 BarcelonaTel. 93 3<strong>40</strong> 05 73 Fax 93 351 95 18settop@settop.esmeter handheld,www.settop.eseasy, accurate andsmall.Bofarull, 14, bajos 08027 BarcelonaTel. 93 3<strong>40</strong> 05 73 Fax 93 351 95 18www.settop.es settop@settop.es<strong>LD</strong>-<strong>40</strong>Bofarull, 14, bajos 08027 BarcelonaTel. 93 3<strong>40</strong> 05 73 Fax 93 351 95 18www.settop.es settop@settop.es