Daytime Fan-Aspirated Radiation Shield Kit Installation Manual
Daytime Fan-Aspirated Radiation Shield Kit Installation Manual
Daytime Fan-Aspirated Radiation Shield Kit Installation Manual
- No tags were found...

Create successful ePaper yourself
Turn your PDF publications into a flip-book with our unique Google optimized e-Paper software.
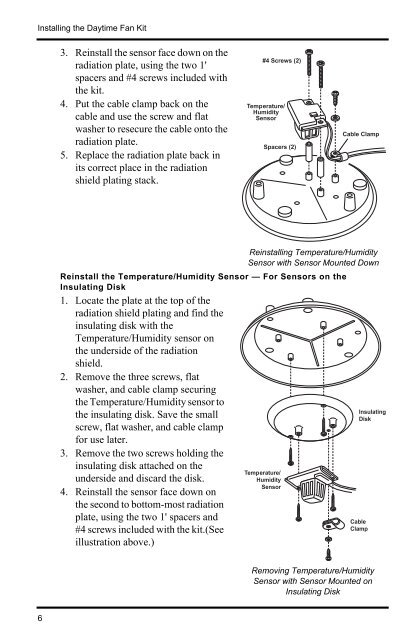
Installing the <strong>Daytime</strong> <strong>Fan</strong> <strong>Kit</strong>3. Reinstall the sensor face down on theradiation plate, using the two 1'spacers and #4 screws included withthe kit.4. Put the cable clamp back on thecable and use the screw and flatwasher to resecure the cable onto theradiation plate.5. Replace the radiation plate back inits correct place in the radiationshield plating stack.#4 Screws (2)Temperature/HumiditySensorSpacers (2)Cable ClampReinstall the Temperature/Humidity Sensor — For Sensors on theInsulating Disk1. Locate the plate at the top of theradiation shield plating and find theinsulating disk with theTemperature/Humidity sensor onthe underside of the radiationshield.2. Remove the three screws, flatwasher, and cable clamp securingthe Temperature/Humidity sensor tothe insulating disk. Save the smallscrew, flat washer, and cable clampfor use later.3. Remove the two screws holding theinsulating disk attached on theunderside and discard the disk.4. Reinstall the sensor face down onthe second to bottom-most radiationplate, using the two 1' spacers and#4 screws included with the kit.(Seeillustration above.)Reinstalling Temperature/HumiditySensor with Sensor Mounted DownTemperature/HumiditySensorInsulatingDiskCableClampRemoving Temperature/HumiditySensor with Sensor Mounted onInsulating Disk6