Daytime Fan-Aspirated Radiation Shield Kit Installation Manual
Daytime Fan-Aspirated Radiation Shield Kit Installation Manual
Daytime Fan-Aspirated Radiation Shield Kit Installation Manual
- No tags were found...

You also want an ePaper? Increase the reach of your titles
YUMPU automatically turns print PDFs into web optimized ePapers that Google loves.
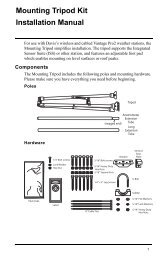
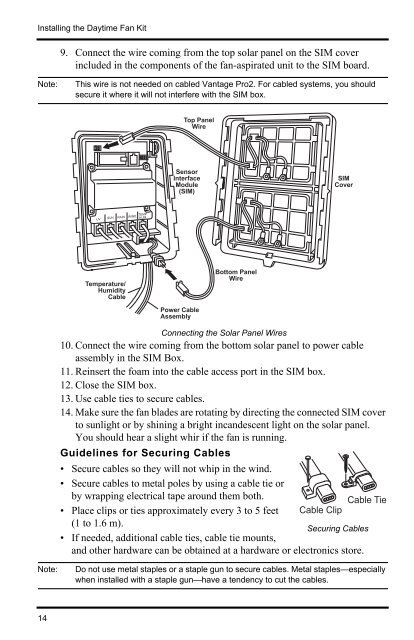
Installing the <strong>Daytime</strong> <strong>Fan</strong> <strong>Kit</strong>9. Connect the wire coming from the top solar panel on the SIM coverincluded in the components of the fan-aspirated unit to the SIM board.Note:This wire is not needed on cabled Vantage Pro2. For cabled systems, you shouldsecure it where it will not interfere with the SIM box.Top PanelWireSensorInterfaceModule(SIM)SIMCoverTemperature/HumidityCablePower CableAssemblyBottom PanelWireConnecting the Solar Panel Wires10. Connect the wire coming from the bottom solar panel to power cableassembly in the SIM Box.11. Reinsert the foam into the cable access port in the SIM box.12. Close the SIM box.13. Use cable ties to secure cables.14. Make sure the fan blades are rotating by directing the connected SIM coverto sunlight or by shining a bright incandescent light on the solar panel.You should hear a slight whir if the fan is running.Guidelines for Securing Cables• Secure cables so they will not whip in the wind.• Secure cables to metal poles by using a cable tie orby wrapping electrical tape around them both.Cable Tie• Place clips or ties approximately every 3 to 5 feet Cable Clip(1 to 1.6 m).Securing Cables• If needed, additional cable ties, cable tie mounts,and other hardware can be obtained at a hardware or electronics store.Note:Do not use metal staples or a staple gun to secure cables. Metal staples—especiallywhen installed with a staple gun—have a tendency to cut the cables.14