Daytime Fan-Aspirated Radiation Shield Kit Installation Manual
Daytime Fan-Aspirated Radiation Shield Kit Installation Manual
Daytime Fan-Aspirated Radiation Shield Kit Installation Manual
- No tags were found...

Create successful ePaper yourself
Turn your PDF publications into a flip-book with our unique Google optimized e-Paper software.
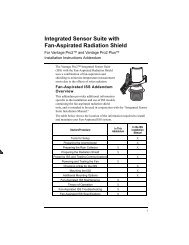
Installing the <strong>Daytime</strong> <strong>Fan</strong> <strong>Kit</strong>12. Place one of the 4''screws removedfrom the originalradiation shield andits corresponding #8lock washer and # 8flat washer into oneof the radiationshield plate holes onthe fan plate locatedjustcounter-clockwisefrom a threadedspacer, making surethe screw goesthrough the boss ineach of the platesand lines up with thethreaded insertlocated in thebottom plate.13. Turn the screw toengage the threadedinsert in the bottomplate.14. Make sure the otherscrew bosses arealigned and theninsert the other two4'' screws and correspondingwashers inthe same way.15. Tighten all threescrews to securelyfasten the bottom section of the radiation shield.#8 Lock Washer#8 Flat WasherInstalling the <strong>Fan</strong> Plate onto the<strong>Radiation</strong> <strong>Shield</strong>#8-32 x 4" Screws (3)<strong>Fan</strong> PlateScrew BossThreaded Insertin Bottom Plate16. Place the fan motor back into place and plug the fan motor cable back intothe power cable assembly.17. Unscrew the cable clamp holding the power cable assembly in place.18. Thread the Temperature/Humidity cable into the cable clamp and tightenthe screw back down in its original placement.19. Place the cap plates on top of the rest of the radiation shield and line uptheir bosses.11