INSTRUCTIONS AND PARTS LIST FOR MODEL 70H & 75H ... - Dake
INSTRUCTIONS AND PARTS LIST FOR MODEL 70H & 75H ... - Dake
INSTRUCTIONS AND PARTS LIST FOR MODEL 70H & 75H ... - Dake
- No tags were found...

Create successful ePaper yourself
Turn your PDF publications into a flip-book with our unique Google optimized e-Paper software.
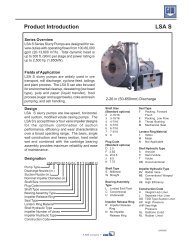
<strong>INSTRUCTIONS</strong> <strong>AND</strong> <strong>PARTS</strong><strong>LIST</strong> <strong>FOR</strong> <strong>MODEL</strong> <strong>70H</strong> & <strong>75H</strong>H<strong>AND</strong>-OPERATED HYDRAULICPRESSSETTING UP THE PRESS <strong>FOR</strong> OPERATIONFor shipping convenience, the gauge, pump handle, hoist crank, screw nose and base angleswere removed from the press. Assemble these parts to the press in the following order:1. Bolt the base angles to the uprights using the four bolts and nuts furnished. Shoulder thebase angles against the stops on the uprights.2. Install the pressure gauge using a hydraulic sealant to ensure a sealed fit.3. Insert pump handle into handle socket and fasten in place by means of the setscrew ontop of the handle socket.4. CAUTION! Place the hoist crank on the lift drum shaft. The table is raised to thedesired height by turning the crank after removing the table pins. Check to makesure the hoist cable is tracking correctly. Run the table channels from top tobottom. The cable should be on each of the two upper pulleys and should trackback and forth on the cable drum. Always place table pins under the tablechannels before releasing the hoist crank when positioning the table channels forcable tracking, servicing, or set-up for desired work opening. If a tracking problemexists, contact the <strong>Dake</strong> factory for instructions. Be sure all table pins are fullyinserted in place before applying pressure. Always remove or release pressure onthe cable before pressure is applied.5. Fasten nosepiece to the end of the screw using the thumbscrew included.OPERATIONS <strong>AND</strong> CONTROLSThe operator should acquaint himself with the use of the following controls:1. The pump handle is the pressure supply source and is manually operated with an up anddown motion.2. Item number 45 (Part no. 10631) is the release valve handwheel. Always keep it firmlyclosed when operating the press and it should only be opened when releasing thepressure to allow the ram to return.3. By turning Item 25 (Part No. 716520), the ram screw can be adjusted into or out of thepiston assembly. Always keep the portion of the screw extending out of the piston asshort as possible. It is advisable to raise the table one or two sets of holes rather thanrunning the screw out to its limit of travel. NEVER EXCEED THE RECOMMENDEDSTROKE OF 4 1/2 INCHES <strong>FOR</strong> THIS PRESS. EXCEEDING THE STROKE WILLCAUSE DAMAGE TO THE INNER PACKINGS.4. The two combination table plates-v blocks provided are used for supporting the workwhile it is being straightened.FILLING THE PRESS WITH OILIt is extremely important that new, clean, light hydraulic oil be used in this press, Mobil DTE 24or an equivalent. It is strongly recommended that the oil be filtered to remove any possibledirt. The piston should be in its maximum upper position when filling the reservoir. Fill thereservoir with 4 quarts of oil. UNDER NO CIRCUMSTANCES USE OLD DIRTY OIL. Nextremove the screw plug from the stand pipe on top of the workhead, close the release valvehandwheel and pump oil into the workhead until oil is visible in the stand pipe. This willremove all air from the chamber above the piston. If oil leaks by the piston, the reservoirshould be drained and refilled (4 quarts of oil) with the piston in the top position.<strong>70H</strong> & <strong>75H</strong> Press 18/02
ORDERING IN<strong>FOR</strong>MATIONPlease order all parts by number and name. Also mention model number and serial numberas shown on the plate attached to the frame of the press. Prices for parts do not includeshipping charges.LUBRICATIONKeep all working parts of the press well oiled for easier operation. Also keep a light film of oilover the entire surface of the ram to prevent rust.WARNING LABELSTo the left is the safety Alert symbol. When you see these safety alert symbolson your press, be alert to the potential for personal injury.Follow recommended precautions and safe operating practices.Carefully read all safety messages in these instructions and on your presssafety signs. Keep safety labels in good condition. Replace missing or damaged safetylabels. This machine is intended to be operated by one person. This person should beconscious of the press ram movement not only for himself but also for persons in theimmediate area of the machine.Label 300168Label 84487Label Placement ViewLabel 84399Label 6767Label 607<strong>70H</strong> & <strong>75H</strong> Press 28/02
TROUBLE SHOOTING – DAKE H<strong>AND</strong> HYDRAULIC PRESSESPUMP PACKING LEAKAGEIf oil leaks past the pump packing, tighten the pump packing nut (551) until pump handle workshard, then slack off just enough to cause the handle to stay in position by itself. After longperiods of operation, it may be necessary to install new pump packings.IF PRESS DOES NOT HOLD PRESSUREThis condition is nearly always caused by dirt under pressure ball valve part number (586).See workhead assembly drawing. To remedy this condition, first remove the reservoir drainplug and drain off all the oil in the reservoir. Next, remove parts, 3/8” pipe plug (588), checkvalve spring (579) and valve ball (586) then clean out port hole and valve seat thoroughly.Replace and using a small piece of brass rod as a drift, tap the brass rod lightly to seat the ballproperly. Replace spring and plug using extreme care to prevent dirt from entering. Replacethe drain plug and refill the reservoir with clean filtered oil.If above procedure does not correct the condition, air may be present in the chamber abovethe piston and should be removed as directed in Filling Press with Oil paragraph III.SYMPTOM CAUSE SOLUTIONOil leaking frompiston oil seal.1) Reservoir is over filled. *2) Piston Packing is worn or damaged.1) Drain excess oil.2) Replace Piston Packing.Press will not holdpressure.1) Check Ball is contaminated.2) Ball and Seat have poor contact.3) Piston Packing is worn or damaged.1) Remove and clean CheckBalls and Seats.2) Reseat Ball on Seat.3) Replace Piston Packing.Press will not buildrated tonnage.1) Pump Plunger Leather is worn ordamaged.1) Replace Pump Plungerleather.2) See 1,2,3 Above.2) See 1,2,3 Above.3) Gauge is defective.3) Replace Gauge.Oil leaking from 1) Packing Nut Loose.1) Tighten Packing Nut.pump plunger 2) Worn Packings.2) Replace packings.Oil leaking from 1) Valve Rod Packing Nut is Loose 1) Tighten Packing Nut.release valve rod 2) Packings are worn.2) Replace Packings.Pump handle drifts Defective Check Ball or Check Ball Clean Check Ball, Reseat.up.Spring.Replace Spring.Ram will not return. Return Spring damaged.Replace Spring.Piston is bent or damaged.Replace Piston.Piston Packing is defective.Replace Piston Packing.* Note: If press leaks around the ram but holds pressure the reservoir has been overfilled.724 Robbins RoadGrand Haven, MI 49417Phone: 616-842-7110 800-937-3253Fax: 616-842-0859 800-846-3253Web: www.dakecorp.comE-mail: customerservice@dakecorp.comtechnicalservice@dakecorp.com<strong>70H</strong> & <strong>75H</strong> Press 38/02
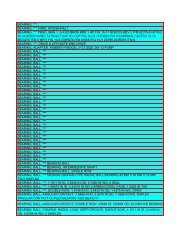
H<strong>AND</strong>PUMP ASSEMBLYItem Qty DescriptionPartNo.1 1 Pump Body 5462 3 Ball valve ½” Dia. 5863 1 ¼“-20 x ½“ Nylock Hex Cap Screw 282974 1 Washer #12 Flat 436295 1 Pump Plunger Leather 5996 1 Check Valve Spring 5797 1 Fitting, Tube, Poly-Tite 714138 7 Pump Packing 5739 1 Pump Packing Nut 55110 1 Handle Socket 55011 1 Handle Socket Link 55512 6 3/8” Retaining Rings 4397213 1 Pump Plunger 55414 3 Handle Socket Pin 59415 1 Valve Rod 112916 1 Valve Rod Packing Nut 57617 8 Valve Rod Packing 98718 1 3/8” Pipe Plug 58819 1 3/8”-16 x 5/8” Set Screw 4358920 1 Pump Gasket 591Hand Pump Assembly Complete 700887Repair Kit – Cylinder & Hand Pump Assembly(Includes – Items 5,8,17,20,26B,27,34,38)701292<strong>70H</strong> & <strong>75H</strong> Press 48/02
WORKHEAD ASSEMBLYItem Qty Description Part No.21 1 Pump Gasket 59122 1 Reservoir 69523 1 Screw Nose – Flat 5721 Screw Nose – V-ram nose 34424 1 Screw 55925 1 Handwheel 71652026A 1 Clamp Ring Assembly 71826B 1 Piston Bumper 73827 1 Oil Seal 147728 1 Pipe Plug, 1/8” NPTF 58929 1 Elbow, Pipe Street1/2” 59030 1 Pipe Plug, 1/2" NPTF 59631 1 Spring, Ram 70532 & 33 1 Piston Assembly (Serial No. < 192522) 701802Piston Assembly (Serial No. > 192523) 71622334 1 Piston Leather (Serial No. < 192522) 706Packing Ring (Serial No. > 192523) 1794235 1 Cylinder – 75 Ton 69336 1 Handwheel 71652137 1 Yoke 73238 1 Gasket, Cylinder 1478Repair Kit – Cylinder & Hand Pump Assembly701292(Includes – Items 5,8,17,20,26B,27,34,38)<strong>70H</strong> & <strong>75H</strong> Press 58/02
FRAME ASSEMBLYItem Qty Description Part No.39 11GaugeBushing712678138440 1 Gauge Extension 73141 4 Roller 59242 24Roller ShaftRetaining Ring7334397543 1 <strong>Dake</strong> Name Plate 8100244 1 Air Vent Tube 63245 1 Handwheel 1063146 2 V-Block 33647 2 Table Plate 70248 6 Table Pins 56949 2 Table Channel 70694550 1 Frame only 70694351 2 Base Angle 56652 2 Fitting, 3/8 NPT, 37° 125153 22Fitting NutFitting Sleeve466145145454 1 Tube Assembly (53 & 54) 70012155 1 Handle 21856 2 Pulley 7272 Pulley Bolt 433612 Pulley Nut 439162 Pulley Lockwasher 4364757 1 Vent Tube 6776158 2 Fitting, Tube, Poly-Tite 7141359 17’ Cable (sold in feet) 4595360 4 Cable Clamps 99161 4444Table SpacerBolt, Hex Head 5/8”Hex Nut 5/8”Lock Washer 5/8”86488799834391743648TABLE HOISTItem Qty DescriptionPartNo.62631 Hand Crank Assembly 70165364 1 Worm Shaft 38465 2 Retaining Ring 2743766 1 Worm Key 4736467 1 Worm 38568 1 Hoist Frame 72569 1 Hex Cap Screw 4333570 1 Hex Nut 4391271 1 Drum Shaft 72472 1 Drum Key 73773 1 Worm Gear 73674 1 Cable Drum 72375 1 Retaining Ring 43992Complete Table Hoist Assembly 700112<strong>70H</strong> & <strong>75H</strong> Press 68/02