tuning neil pryde v8 streetracer sails
tuning neil pryde v8 streetracer sails
tuning neil pryde v8 streetracer sails
- No tags were found...

Create successful ePaper yourself
Turn your PDF publications into a flip-book with our unique Google optimized e-Paper software.
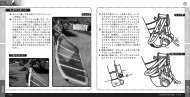
V8 STREETRACER USER MANUAL - ENGLISHThis manual contains all the information necessary to properly rig theNeil Pryde V8 Streetracer <strong>sails</strong>. Careful attention to the instructions andsuggestions presented here will help to ensure that you get the mostfun and best possible service from your <strong>sails</strong>.2TECHNICAL FEATURES11. Microlite Batcam with Power Snap System2. Shear Tip II Rotating Head Fitting53. Three Position Clew4. Low Friction Tack Fitting5. Tube/Rod battens with exclusive CNC taperingPlease see the specific instructions which apply to each of these features beforeyou rig your sail for the first time.31. THE BAT-CAM TENSION SYSTEMBattens and Batcams are pre-installed and factory tuned. Thebattens are pre-tensioned at the factory and should require verylittle, if any adjustment. However, you might want to adjust andfurther fine-tune. Battens may be tensioned before or after youinsert the mast into the luff pocket.4ATo open the lever, place the heel ofyour hand on the lower leech edge ofthe clamp and hook your middlefingers between the sail and the lever.Then pull back with your fingers pryingthe lever away form the leech, whilepushing down the batten itself withyour other hand (A).BTo tension the batten, turn thescrew anti-clockwise. To detensionthe batten turn thescrew clockwise (B).CTo close the lever, position theshoulder of the screw in thesocket portion of the lever andalign the tube with the clip at thefront of the lever (C).DApply pressure andsnap the levershut (D).Warning: Do not over tension the battens. The screw should be extended only as much as necessary to remove wrinklesacross the batten pockets. Over tensioning of the battens can damage the sail.2
V8 STREETRACER USER MANUAL - ENGLISH2THE SHEAR TIP FITTINGAfter inserting the mast into the sail, take care that the fitting is seated correctly inthe socket. Once the rig is tensioned, you may adjust the tension on the Shear Tipsleeve using the Tip adjuster screw, but only until smooth. Do not over tension.Note : The Shear Tip Fitting has been designed in such way that it is possible topush down the tip of the arm (see diagram), e.g. when the tip catches a rock or theground. When pushed down, the tip will automatically spring back to it’s initialposition.3THREE POSITION CLEWSelect the clew ring that’s best suited to your requirements. Use the highest hole in light winds and/or verysmooth water conditions to develop the best power. In this position, you may use less outhaul for a fuller settingwithout easing the mid-leech. Use the middle hole for medium conditions. Use the lower hole when overpoweredor in rough water when you want to tune the sail flatter without closing off the twist.4ADBLOW FRICTION TACK RINGThe Low Friction Tack Fitting must be rigged properly to ensure maximum downhauling efficiency.Always rig the tack fitting according to the diagram.CRIGGINGA. Set your boom and mast base to the dimension printed near the tack. The sailis designed to be perfectly trimmed on the correct mast at the recommendedbase settings.B. Check that all the battens are fully inserted into their pockets. Tension thebattens according to the instructions.C. Insert the mast into the luff pocket taking care that the cams are correctlylocated on the mast. Should the top cam fall off the mast, you should eitherstart over the rigging procedure again by taking the mast out and reinserting itcorrectly, or you can release the tension on that specific cam by opening theBatcam, pulling out the batten slightly and helping the cam back on the mastwith your hands.D. Thread the downhaul line according to the instructions and partially tension theluff using the low friction tack fitting.E. Attach the booms to the mast, allowing space above it in the cut-out so that thesail can be fully downhauled later.F. Downhaul the sail to approximately 1 cm above the cleatbase as shown in the diagram. Fine tune around thisposition. A small sticker has been provided with yoursail which you can wrap around your mast base and useas a reference when you find your best <strong>tuning</strong>. When inthe correct <strong>tuning</strong> range the tack pulley will be as shown.G. Re-tension any battens as necessary until wrinkles atthe batten pockets disappear. Be sure not to overtensionthe battens.H. Adjust the outhaul to the recommended dimensions and make the boomlength so the clew is within two centimeters of the boom end. Use a tapemeasure to ensure accuracy and repeatability of the settings.I. To ensure correct <strong>tuning</strong> for your specific sail, please consult the triminstructions that follow.CAM RIGGING TIPS:Grab the cams (through the luff pocket) and work them down the mast one byone. This is easier and works better than trying to pull the luff pocket over themast from the sail tack. Keep the two cams opposite the boom cut-out closetogether as you work them down the mast. The boom cut-out area of the luffpocket should be compressed and wrinkled looking during this process. Thismethod reduces cam pressure on the mast and makes rigging a lot easier. Usethe tack handle to help pull the tack fitting close to the mast base. Do not pullon the neoprene tack fairing.DE-RIGGING PROCEDURESFold the neoprene tack fairing back over any mast base fittings before releasingthe downhaul. To de-rig, just brace the mast tip against a solid object, andslide the cams up the mast one at a time, reversing the initial process.1. CAREFULLY EASE THE OUTHAUL until it is completely loose.2. NOW REMOVE THE BOOM COMPLETELY.3. THEN CAREFULLY EASE THE DOWNHAUL a little at a time.4. Remove the mast from the sail.3
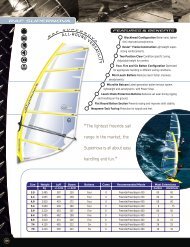
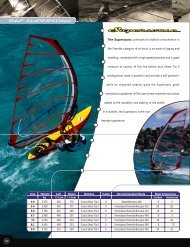
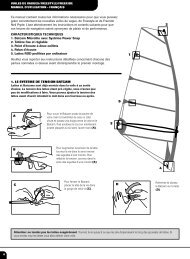
V8 STREETRACER USER MANUAL - ENGLISHSAIL MAINTENANCEAlways store your sail rolled and dry in its sailbag. Try to prevent the sail frombeing crushed or badly creased. Wash the sail in fresh water after use ifpossible, but do not store wet. The battens may be left in their pockets.Do not leave the sail exposed to strong or direct sunlight.Do not use any solvents or chemicals to clean it. If the sail becomes dirty, usefresh water and mild soap.Make sure that you always keep the Shear Tip Rotating Head Fitting as free ofsand as possible and flush the head area and fitting with fresh water regularly.SAIL SAFE, HAVE FUNSail carefully and thoughtfully around other sailors and beach users.Before leaving the beach check all your equipment thoroughly forsigns of wear or breakage. Always check the weather forecasts andtake note of local conditions and potential hazards before sailing.Check for dangerous currents, and consider carefully where youmight land in the event of an emergency.For further information on this or other NEILPRYDE windsurfingequipment contact your AUTHORISED NEILPRYDE DEALER or ourdistributor in your country.TUNING NEIL PRYDE V8 STREETRACER SAILSFirst set the <strong>sails</strong> to base recommendations printed at the sail tack. Then, if necessary, tune the downhaul so that the leech appears justloose at the first and second batten. There may be some small wrinkles in the edge of the leech down to the first batten but these shouldnot look pronounced or extreme. There will be looseness of the sail material inboard from the batten ends down to batten #2 or # 3 butthis will not be wrinkled looking nor will the edge of the sail be heavily wrinkled in this area. Once the upper leech looks correct (seedrawings), then add outhaul until the leech makes a straight line from the first batten above the boom right up to the head. This shouldnormally require between 2 - 4 cm of “positive” outhaul (beyond the point where you start to feel resistance). If in doubt add an additional5 - 10 mm to be sure the sail is sufficiently outhauled.Ideal downhaul –Moderate windExamples of correctly tunedV8 Streetracer.A NOTE ON RIG DIMENSIONSThe rig dimensions printed on the tack of all Neil Pryde collection <strong>sails</strong>show the following information:• Base setting: this is the number which you should set your NeilPryde aluminum or carbon mast base ring. Rigged on the correctmast you will be able to downhaul perfectly with the carbon base.You will have to interpolate the setting for using the aluminum basesince the dimensioning is different.• Boom dimension is stated as the best average tuned dimension plusor minus 1 cm. This is measured from the forward edge of the mast (atthe center of the boom cutout) to the sail clew at the center eyelet.These figures are intended as a GUIDE to proper sail trim and dependingon the rig components you choose may not always correspond perfectly tothe settings which are best for you.CHOOSING THE RIGHT MASTEvery Neil Pryde sail is designed around a specific recommended mast.To get the optimum performance from your Neil Pryde racing <strong>sails</strong>, use therecommended mast. In many cases an alternative mast is specified andthis will also provide good performance.4