WSM User Guide - WatchGuard Technologies
WSM User Guide - WatchGuard Technologies WSM User Guide - WatchGuard Technologies
Configuring a GatewayTo configure this, set the ID type of the remote gateway to Domain Name or User Domain Name. Setthe peer name to the fully qualified domain name. Make sure the Firebox® is configured with DNS serversthat can resolve the domain name.1 From Policy Manager, click VPN > Branch Office Gateways.The Gateways dialog box appears.2 To add a gateway, click Add.The New Gateway dialog box appears.3 In the Gateway Name text box, type the gateway name.This name identifies the gateway only in Policy Manager for this Firebox.4 From the Gateway IP drop-down list, select IP Address or Any.If the remote gateway address is a static IP address, type it in the adjacent address box. If the remote VPN endpointhas a dynamic IP address, select Any.5 From the Remote Gateway Settings ID Type drop-down list, select IP Address, Domain Name,User Domain Name, or X.500 Name.If the remote VPN endpoint uses DHCP or PPPoE to get its external IP address, set the ID type of the remotegateway to Domain Name. Set the peer name field to the fully qualified domain name of the remote VPN endpoint.The Firebox uses IP address and Domain Name to find the VPN endpoint. Make sure the DNS server used by theFirebox can identify the name.244 WatchGuard System Manager
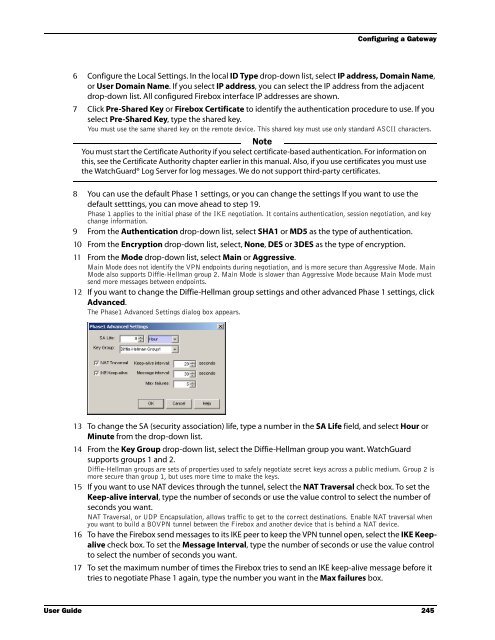
Configuring a Gateway6 Configure the Local Settings. In the local ID Type drop-down list, select IP address, Domain Name,or User Domain Name. If you select IP address, you can select the IP address from the adjacentdrop-down list. All configured Firebox interface IP addresses are shown.7 Click Pre-Shared Key or Firebox Certificate to identify the authentication procedure to use. If youselect Pre-Shared Key, type the shared key.You must use the same shared key on the remote device. This shared key must use only standard ASCII characters.NoteYou must start the Certificate Authority if you select certificate-based authentication. For information onthis, see the Certificate Authority chapter earlier in this manual. Also, if you use certificates you must usethe WatchGuard® Log Server for log messages. We do not support third-party certificates.8 You can use the default Phase 1 settings, or you can change the settings If you want to use thedefault setttings, you can move ahead to step 19.Phase 1 applies to the initial phase of the IKE negotiation. It contains authentication, session negotiation, and keychange information.9 From the Authentication drop-down list, select SHA1 or MD5 as the type of authentication.10 From the Encryption drop-down list, select, None, DES or 3DES as the type of encryption.11 From the Mode drop-down list, select Main or Aggressive.Main Mode does not identify the VPN endpoints during negotiation, and is more secure than Aggressive Mode. MainMode also supports Diffie-Hellman group 2. Main Mode is slower than Aggressive Mode because Main Mode mustsend more messages between endpoints.12 If you want to change the Diffie-Hellman group settings and other advanced Phase 1 settings, clickAdvanced.The Phase1 Advanced Settings dialog box appears.13 To change the SA (security association) life, type a number in the SA Life field, and select Hour orMinute from the drop-down list.14 From the Key Group drop-down list, select the Diffie-Hellman group you want. WatchGuardsupports groups 1 and 2.Diffie-Hellman groups are sets of properties used to safely negotiate secret keys across a public medium. Group 2 ismore secure than group 1, but uses more time to make the keys.15 If you want to use NAT devices through the tunnel, select the NAT Traversal check box. To set theKeep-alive interval, type the number of seconds or use the value control to select the number ofseconds you want.NAT Traversal, or UDP Encapsulation, allows traffic to get to the correct destinations. Enable NAT traversal whenyou want to build a BOVPN tunnel between the Firebox and another device that is behind a NAT device.16 To have the Firebox send messages to its IKE peer to keep the VPN tunnel open, select the IKE Keepalivecheck box. To set the Message Interval, type the number of seconds or use the value controlto select the number of seconds you want.17 To set the maximum number of times the Firebox tries to send an IKE keep-alive message before ittries to negotiate Phase 1 again, type the number you want in the Max failures box.User Guide 245
- Page 212 and 213: Report Sections and Consolidated Se
- Page 214 and 215: Report Sections and Consolidated Se
- Page 216 and 217: WatchGuard Management Server Passph
- Page 218 and 219: Changing the Management Server Conf
- Page 220 and 221: Configuring the Certificate Authori
- Page 222 and 223: Backing up or Restoring the Managem
- Page 224 and 225: Moving the WatchGuard Management Se
- Page 226 and 227: Managing Devices with the Managemen
- Page 228 and 229: Managing Devices with the Managemen
- Page 230 and 231: Managing Devices with the Managemen
- Page 232 and 233: Adding Devices to the Management Se
- Page 234 and 235: Using the Device Management Page17
- Page 236 and 237: Using the Device Management PageCon
- Page 238 and 239: Monitoring VPNsAdding a Firebox VPN
- Page 240 and 241: PKI in a WatchGuard VPNPKI in a Wat
- Page 242 and 243: Managing the Certificate Authority2
- Page 244 and 245: Tunneling ProtocolsVirtual private
- Page 246 and 247: IP Addressingsecurity of the networ
- Page 248 and 249: Network TopologyThis topology is th
- Page 250 and 251: WatchGuard VPN SolutionsSplit tunne
- Page 252 and 253: VPN Scenarios• You make tunnels b
- Page 254 and 255: VPN ScenariosSmall Company Using Ex
- Page 256 and 257: Adding VPN Resourcesapplies a VPN r
- Page 258 and 259: Making Tunnels Between Devices3 To
- Page 260 and 261: Removing Tunnels and Devices2 Expan
- Page 264 and 265: Making a Manual Tunnel18 When you c
- Page 266 and 267: Making a Manual Tunnel7 From the Ty
- Page 268 and 269: Making a Tunnel Policy2 Make the ch
- Page 270 and 271: Setting up Outgoing Dynamic NAT thr
- Page 272 and 273: Working with Devices on a Managemen
- Page 274 and 275: Working with Devices on a Managemen
- Page 276 and 277: Working with Devices on a Managemen
- Page 278 and 279: Scheduling Firebox X Edge Firmware
- Page 280 and 281: Using the Firebox X Edge Management
- Page 282 and 283: Using the Firebox X Edge Management
- Page 284 and 285: Using the Firebox SOHO 6 Management
- Page 286 and 287: Creating and Applying Edge Configur
- Page 288 and 289: Creating and Applying Edge Configur
- Page 290 and 291: Creating and Applying Edge Configur
- Page 292 and 293: Managing Firebox X Edge Network Set
- Page 294 and 295: Using AliasesNaming aliases on the
- Page 296 and 297: Using Aliases3 Click Aliases.The al
- Page 298 and 299: Configuring WINS and DNS Servers•
- Page 300 and 301: Adding New Users to the PPTP_Users
- Page 302 and 303: Preparing the Client Computers- To:
- Page 304 and 305: Creating and Connecting a PPTP RUVP
- Page 306 and 307: Creating and Connecting a PPTP RUVP
- Page 308 and 309: Getting Started with WebBlocker4 In
- Page 310 and 311: Activating WebBlocker4 Click Next.5
Configuring a Gateway6 Configure the Local Settings. In the local ID Type drop-down list, select IP address, Domain Name,or <strong>User</strong> Domain Name. If you select IP address, you can select the IP address from the adjacentdrop-down list. All configured Firebox interface IP addresses are shown.7 Click Pre-Shared Key or Firebox Certificate to identify the authentication procedure to use. If youselect Pre-Shared Key, type the shared key.You must use the same shared key on the remote device. This shared key must use only standard ASCII characters.NoteYou must start the Certificate Authority if you select certificate-based authentication. For information onthis, see the Certificate Authority chapter earlier in this manual. Also, if you use certificates you must usethe <strong>WatchGuard</strong>® Log Server for log messages. We do not support third-party certificates.8 You can use the default Phase 1 settings, or you can change the settings If you want to use thedefault setttings, you can move ahead to step 19.Phase 1 applies to the initial phase of the IKE negotiation. It contains authentication, session negotiation, and keychange information.9 From the Authentication drop-down list, select SHA1 or MD5 as the type of authentication.10 From the Encryption drop-down list, select, None, DES or 3DES as the type of encryption.11 From the Mode drop-down list, select Main or Aggressive.Main Mode does not identify the VPN endpoints during negotiation, and is more secure than Aggressive Mode. MainMode also supports Diffie-Hellman group 2. Main Mode is slower than Aggressive Mode because Main Mode mustsend more messages between endpoints.12 If you want to change the Diffie-Hellman group settings and other advanced Phase 1 settings, clickAdvanced.The Phase1 Advanced Settings dialog box appears.13 To change the SA (security association) life, type a number in the SA Life field, and select Hour orMinute from the drop-down list.14 From the Key Group drop-down list, select the Diffie-Hellman group you want. <strong>WatchGuard</strong>supports groups 1 and 2.Diffie-Hellman groups are sets of properties used to safely negotiate secret keys across a public medium. Group 2 ismore secure than group 1, but uses more time to make the keys.15 If you want to use NAT devices through the tunnel, select the NAT Traversal check box. To set theKeep-alive interval, type the number of seconds or use the value control to select the number ofseconds you want.NAT Traversal, or UDP Encapsulation, allows traffic to get to the correct destinations. Enable NAT traversal whenyou want to build a BOVPN tunnel between the Firebox and another device that is behind a NAT device.16 To have the Firebox send messages to its IKE peer to keep the VPN tunnel open, select the IKE Keepalivecheck box. To set the Message Interval, type the number of seconds or use the value controlto select the number of seconds you want.17 To set the maximum number of times the Firebox tries to send an IKE keep-alive message before ittries to negotiate Phase 1 again, type the number you want in the Max failures box.<strong>User</strong> <strong>Guide</strong> 245


