
Create successful ePaper yourself
Turn your PDF publications into a flip-book with our unique Google optimized e-Paper software.
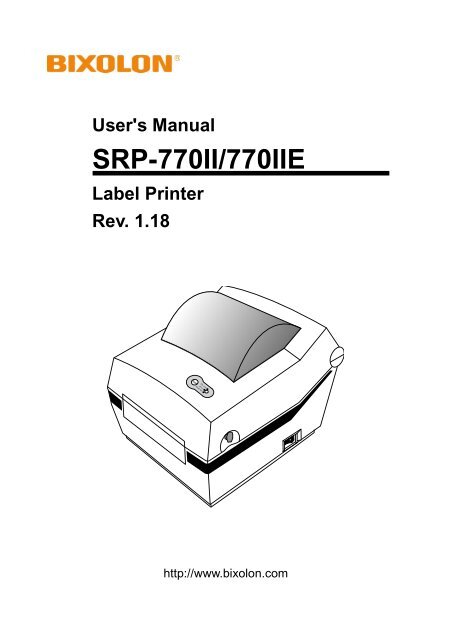
User's Manual<strong>SRP</strong>-<strong>770II</strong>/<strong>770II</strong>ELabel PrinterRev. 1.18http://www.bixolon.com
■ Other Precautions<strong>SRP</strong>-<strong>770II</strong>/<strong>770II</strong>EThe copyright for this user manual and various other manuals is property of the <strong>BIXOLON</strong>Co., Ltd. Any copying or conversion into electronic firm and saving of this material withoutthe express written permission of <strong>BIXOLON</strong> Co., Ltd. is strictly prohibited.Use of the information contained in this manual is not subject to any patent liability. Thismanual has been prepared with utmost care and attention to detail but may contain certainerrors and/or omissions.<strong>BIXOLON</strong> Co., Ltd. is not legally liable for any damages resulting from the use of theinformation in this manual.<strong>BIXOLON</strong> Co., Ltd. and its affiliates are not legally liable (United States excluded) for anydamages, loss, costs, and/or expenses that result from the breakdown, malfunction, and/ormisuse of the product due to violation or neglect of the operation and maintenanceinformation and instructions provided by the <strong>BIXOLON</strong> Co., Ltd., as well as from theunauthorized alteration, repair, and/or modification of the product by the user and/or thirdparty.<strong>BIXOLON</strong> Co., Ltd. is not legally liable for any damages and/or issues resulting from the useof options and/or parts that are not authentic <strong>BIXOLON</strong> products or authorized products.Rev. 1.18 - 6 -
2. Product Part Names<strong>SRP</strong>-<strong>770II</strong>/<strong>770II</strong>EFeed ButtonPower SwitchCover Peel-offCover LeverPrinter HeadPaper CoverPaper HolderPaper Gap SensorPeel-off SensorPaper GuideRev. 1.18 - 8 -
<strong>SRP</strong>-<strong>770II</strong>/<strong>770II</strong>EFan-FoldRS-232C ReceptacleDip SwitchPower ReceptacleIEEE1284 ReceptacleUSB ReceptacleSAMSUNGLABEL PRNTERAuto Cutter (Option)Rev. 1.18 - 9 -
3. Installation & Usage<strong>SRP</strong>-<strong>770II</strong>/<strong>770II</strong>E3-1 Power ConnectionConnect power to the printer as shown below.OFFPower SwitchAC AdapterPower Cord1) Turn off the printer power switch.2) Check to see that the AC adapter voltage matches that of the power source.3) Connect the AC adapter jack to the printer power connector.4) Connect the power cord to the AC adapter.5) Connect the power cord to a power source/outlet.Rev. 1.18 - 10 -
<strong>SRP</strong>-<strong>770II</strong>/<strong>770II</strong>E3-2 Interface Cable ConnectionConnect the interface cable as shown below.This printer supports the following communications interface standards.- RS-232C (Serial)- IEEE1284 (Parallel)- USB- Ethernet (exclusively for <strong>SRP</strong>-<strong>770II</strong>E)USB CableIEEE1284 (Parallel) Cableor LAN (Ethernet ) CableRS-232 (Serial) Cable1) Turn off the power switch.2) Connect the communication cable to the printer communication port to be used.- For a Serial cable, secure by tightening the screws on both sides.- For a Parallel cable, secure by fastening the clips on both sides.- Connect USB cable when using USB interface.- Connect LAN cable when using Ethernet interface.Rev. 1.18 - 11 -
3-3 Paper Installation<strong>SRP</strong>-<strong>770II</strong>/<strong>770II</strong>E1) Open the Paper Cover. 2) Spread the paper holder and insertpaper as shown.SAMSUNG LABEL PRINTER3) Keep note of paper printing direction. 4) Adjust the paper guide to the width ofthe paper.SAMSUNGLABEL PRINTER5) Close the Paper Cover.Rev. 1.18 - 12 -
3-4 LED Display<strong>SRP</strong>-<strong>770II</strong>/<strong>770II</strong>EFeed buttonLEDPaper feed or cancel the print job.The current printer status can be viewed. (Refer to below)The current printer status can be viewed via the printer’s LED display.1) Green LED on- The printer waits for the data from Host (PC) in normal mode.2) Orange LED on- It means paper gap sensing error. It becomes on when the printer fails to detect thepaper or paper jam occurred. When fails to detect the paper correctly useAuto-Calibration function.3) Red LED on- The printer has stopped by pressing FEED button. It restarts printing when pressedagain.4) Green LED blinking- TPH (Thermal Printing Head) overheated or ;- The printers is waiting for the button input to run Auto-Calibration function.5) Orange LED blinking- No paper. Make sure the paper is loaded correctly.6) Red LED blinking- The printer cover is open or ;- Auto cutter has error such as paper jam in case of auto cutter built-in model.Rev. 1.18 - 13 -
3-5 Test printing<strong>SRP</strong>-<strong>770II</strong>/<strong>770II</strong>E3-5-1 Printing using Windows driver1) Install the Windows driver.Refer to the “Windows driver manual” in the CD for the installation procedure.2) Set the “port” of Windows driver to the appropriate interface to be used. Refer to the“Ethernet interface user’s manual” in the CD when using Ethernet interface.3) Print the test page using the “Print test page” function of Windows driver.3-5-2 Printing using label design program- Label design program is sold separately, and contained in the CD.1) Install the label design program.2) Configure the interface by referring to the “Label craft manual” in the CD.3) Print the test page after designing a label.Rev. 1.18 - 14 -
4. Self-Test<strong>SRP</strong>-<strong>770II</strong>/<strong>770II</strong>EThe self-test checks whether the printer has any problems.(Users cannot perform this procedure if using the printer’s label peel-off option.)If the printer does not function properly, contact an authorized dealer.The self-test checks the following;1) Make sure that the paper roll has been installed properly.2) Turn on the power while holding down the FEED button. The self-test begins.3) The self-test prints the current printer status, which provides the control ROM version andthe DIP switch settings.4) After the self-test results are printed out:- No button input within 2 seconds: Normal Print Mode- Button pressed once within 2 seconds: Hex Dump Mode- Button pressed twice within 2 seconds: Line Print Mode* The BXL-POS command set is used in Line Print Mode.Received data is printed in sequence similar to a receipt printer.Rev. 1.18 - 15 -
5. Detailed features<strong>SRP</strong>-<strong>770II</strong>/<strong>770II</strong>E5-1 Printer Settings with Dip switchesThe dip switches are located on the bottom of the printer.The dip switches are used to set the printer to perform various functions.Follow these steps when changing dip switch settings:1) Turn the printer power switch off.2) Remove the screw on the bottom of the printer and open the bracket.3) Flip the dip switches using tweezers or another narrow-ended tool.Switches are off when up and on when down following the figure.4) New settings take effect when the printer is turned back on.Rev. 1.18 - 16 -
<strong>SRP</strong>-<strong>770II</strong>/<strong>770II</strong>E[Table 1] Dip Switch 1No Functions Details1-1 Speed SelectionOff4.0 ipsOn5.0 ips4 3 2 DensityOff Off Off 131-2Off Off On 14Off On Off 151-3 Density Selection Off On On 16On Off Off 171-4On Off On 18On On Off 19On On On 201-5 Exhibition SelectionOff Normal ModeOn Demo Mode1-6 Media SelectionOff Label PaperOn Thermal Continuous Paper1-7 Auto CutterOff Without Auto CuterOn With Auto Cuter1-8 Back Feed OptionOff Back Feeding EnableOn Back Feeding Disable[Table 2] Dip Switch 2No Functions Details2 1 Baud Rate2-1Off Off 9,600 bpsBaud Rate Selection Off On 19,200 bps2-2On Off 230,400 bpsOn On 115,200 bps2-3 Media DetectionOff Detect GapOn Detect Black-mark2-4 Reserved Default --- off2-5 Reserved Default --- off2-6 Reserved Default --- off2-7Paper End Sensor Off EnableStatusOn Disable2-8 Reserved Default --- off5-2 Pause/RestartPress FEED button to pause at the middle of labels printing.1) Press FEED once.2) Printer stops after on-going printing and Red LED becomes on.3) Press FEED once again. It restarts printing in a queue.Rev. 1.18 - 17 -
5-3 Gap Sensor Auto-Calibration<strong>SRP</strong>-<strong>770II</strong>/<strong>770II</strong>EGap sensor auto-calibration is used when the printer does not detect a gap on the labelpaper correctly.Generally a printer is set to detect most of gap types but sometimes it fails to detect andkeep feeding the paper without a stop when special paper used. In such case, use gapsensor auto-calibration function for a proper detection.1) Make sure that paper roll has been installed properly.2) Turn on the power while holding down FEED button with cover open.Then the Green LED blinks.ON3) Close the ribbon roll and paper cover.- An information message is printed out and the red LED turns on.4) Press the paper feed button.1 Once- The LED color changes to orange.- The previous gap sensor correction value is erased and reset to its default value.2 Twice (for automatic sensor calibration)- The LED color changes to green.- The gap sensor auto-calibration is performed as 2~3 pages of paper are fedcontinuously.3 Three times (for automatic sensor calibration and the label length setting)- The LED color changes to green.- The gap sensor auto-calibration and label length measurement are performed whileslowly feeding 4~5 pages of paper.5) Gap sensor auto-calibration is complete.Rev. 1.18 - 18 -
5-4 Gap Sensor Manual-Calibration<strong>SRP</strong>-<strong>770II</strong>/<strong>770II</strong>EManual-calibration of media detection can be used when the printer cannot detect a mediagap (or black mark) even after auto-calibration has been executed.Users can calibrate sensor parameters in detail by using the utility program provided by themanufacturer.The utility can be obtained from the enclosed CD or downloaded from the Internet via the<strong>BIXOLON</strong> website www.bixolon.comPlease make sure the printer is connected and execute the utility program.Please the Calibration Setting Manager Button after setting the interface type.1) Select the sensing type and input the label length by millimeter and click on “CheckSensing Value” tap. Then printer starts to calibrate.2) Printer will print the scanned values after calibration and the values will appear on theScreen.3) Optimal sensing values will appear in black bold letters on the left of the utility screen andselect one of the values and click on “Save Calibration”4) If chosen value does not work properly, please try the other values among the black boldletters.5) To go back to the initial value, please click on “Cancel Calibration”Rev. 1.18 - 19 -
5-5 The Peel-Off<strong>SRP</strong>-<strong>770II</strong>/<strong>770II</strong>EThis function is used to automatically separate labels from the liner.- The peeler is for Label Paper only.- When the peeler switch is on, labels are not printed if previous printed labels havebeen removed from the peeler.- When the peeler function is not required, turn the peeler switch off. Keeping theswitch on may result in the printer not working correctly.- When the peeler switch has been changed, the printer should be turned off andback on.1) Open the peel-off cover and turn on the peeler switch. (Check if the peeler LED is on.)PEELEROFF ONLED2) Remove the paper and insert the paper through the slot.RemoveRev. 1.18 - 20 -
3) Adjust the paper guides and close the cover.<strong>SRP</strong>-<strong>770II</strong>/<strong>770II</strong>E( O ) ( X )4) Turn the printer off and back on.Rev. 1.18 - 21 -
5-6 Using Fan-Fold Paper<strong>SRP</strong>-<strong>770II</strong>/<strong>770II</strong>EInsert paper through both the rear slot and guides.Adjust holders and guides to the width of the paper.1) Open the Dust Cover and insert paper.OPENDust Cover2) Adjust Paper Holders to the paper widthand fixed Paper Holders with fixing tool.3) Adjust Paper Guides and close the PaperCover.Paper HolderRev. 1.18 - 22 -
5-7 Auto Cutter (option)<strong>SRP</strong>-<strong>770II</strong>/<strong>770II</strong>EAuto cutter should be used for continuous paper only. ( i.e. roll paper)1. Open the Dip switch cover, and make the switch 1 number 7 “On”.(Refer to printer mode setting at Chapter 5-1.)2. Put a paper roll into the printer and close the cover.SAMSUNGLABEL PRNTER※ CAUTION (Partial cut)Once the printer cut the paper, remove the receipt in order for next printing.Otherwise the receipt could be back into the printer and the cutter would cut it again.Rev. 1.18 - 23 -
6. Cleaning Head<strong>SRP</strong>-<strong>770II</strong>/<strong>770II</strong>EPaper dust on the heating elements may lower the printer quality.When dirty, clean the print head as follows:※ CAUTION- Make sure to turn the printer power off prior to cleaning.- As the print head gets very hot during printing, if intending to clean the print head, turnthe printer power off and wait approximately 10 minute before commencement.- When cleaning the print head, take care not to touch the heated portion of theprint head.→ The print head is susceptible to damage from static electricity, etc.- Take care not to allow the print head to become scratched and/or damaged in any way.1) Open the paper cover and remove paper and ribbon.2) Wipe the print head with a cleaning pen.3) Use a cloth moistened with an alcohol solution to clean the paper sensor are and removeany paper remnants and/or dust.4) Insert paper into the printer 1~2 minutes after completing the cleaning process and closethe printer cover.※ Perform the cleaning process each time the paper roll is replaced to prevent print qualitydeterioration.Rev. 1.18 - 24 -
7. Appendix<strong>SRP</strong>-<strong>770II</strong>/<strong>770II</strong>E7-1 SpecificationsPrinterPaperACAdapterUsageConditionsItemDescriptionPrinting Method Direct Thermal PrintingDot Density 203 dpi (8 dot/mm)Printing Width 104 mmPrinting Speed 127 mm/secRoll 42~ 106mmFan-Fold Type 45 ~ 112 mmSMPS Input Voltage AC 100~240VFrequency 50/60 HzSMPS Output Voltage DC 24VTemperature0 ~ 40 ℃ (Operating)-20 ~ 60 ℃ (Storage)Humidity 10 ~ 80 % RH (Operating)(except for paper) 10 ~ 90 % RH (Storage)※ Note- Printing speed can vary depending on the data transmission speed and combination ofcontrol commands.- This equipment is indooruse and all the communication hiring are limited to inside ofthe building.- The switch is the disconnecting device. Turn off switch from any hazard.Rev. 1.18 - 25 -
7-2 Certification<strong>SRP</strong>-<strong>770II</strong>/<strong>770II</strong>E1) EMC & Safety Standards• Europe: CE EMC,CB-Scheme:IEC60950-1, GS: EN60950-1: 2001• North America: FCC rules parts 15BWARNINGUse of an unprotected interface cable with this printer conflicts with EMC standards.Users should only use cables approved by <strong>BIXOLON</strong>.2) CE Mark• EMC Directive 89/336/EEC• Low Voltage Directive 73/23/EECEN55002:1994+A1:1995+A2:1997EN55024:1998+A1:2001+A2:2003EN61000-3-2:2000EN61000-3-3:1995+A1:2001EN6100-4-2:1995+A1:1998+A2:2001EN6100-4-3: 2002+A1:2002EN6100-4-4:2004EN6100-4-5:1995+A1:2001EN6100-4-6:1996+A1:2001EN6100-4-8:1993+A1:2001EN6100-4-11:1994+A1:2001Safety: EN60950-1:20013) WEEE (Waste Electrical and Electric Equipment)This mark shown on the product or its literature indicates that thecorresponding item should not be discarded at the end of its working life withother household waste. To prevent possible harm to the environment orhuman health from uncontrolled waste disposal, please separate markeditems from other types of waste and recycle them responsibly to promote thesustained reuse of material resources. Household users should contact either theretailer where they purchased this product, or their local government office for details ofwhere and how they can conduct environmentally safe recycling of such items.Commercial users should contact their suppliers and check the terms and conditions ofpurchase contracts. This product should not be combined with other commercial wastefor disposal.7-3 Label TypesThe label types used with this printer are as follows.• Control Labels: PP• Other Labels: PETRev. 1.18 - 26 -


![MC9190-G Quick Start Guide [Spanish] (P/N 72-139206-01ES Rev. A)](https://img.yumpu.com/50178248/1/178x260/mc9190-g-quick-start-guide-spanish-p-n-72-139206-01es-rev-a.jpg?quality=85)