Pipet-Plus - Mettler Toledo
Pipet-Plus - Mettler Toledo
Pipet-Plus - Mettler Toledo

Create successful ePaper yourself
Turn your PDF publications into a flip-book with our unique Google optimized e-Paper software.
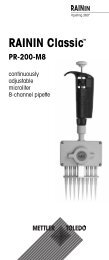
<strong>Pipet</strong>-<strong>Plus</strong>Latch-Mode <strong>Pipet</strong>tecontinuouslyadjustabledigitalmicroliterpipette®10 pipettes forvolume rangesfrom0.1 µL to 10 mL
TABLE OF CONTENTSIntroduction ..................................................................1Setting Aspiration Rate Controller.....................................2Setting Volume..............................................................2Filter ............................................................................3Tip Selection and Mounting ............................................3Operation .....................................................................4Tip Ejector Arm Removal ................................................6<strong>Pipet</strong>ting Guidelines.......................................................6Pre-Rinsing Recommended ............................................6Mixing .........................................................................7<strong>Pipet</strong>ting Liquids of Varying Density.................................7Temperature Considerations ...........................................7Tip Immersion Depth .....................................................7<strong>Pipet</strong>-<strong>Plus</strong> Storage.........................................................8Troubleshooting and Repairs ..........................................8Service, Calibration, and Repair ......................................9Replacement Parts ......................................................12Specifications .............................................................13Autoclaving ................................................................13Contacting RAININ...........................................Back CoverFIGURESFigure 1 <strong>Pipet</strong>-<strong>Plus</strong> <strong>Pipet</strong>te.......................................1FIgure 2 Filter Orientation.........................................3Figure 3 Operating <strong>Pipet</strong>-<strong>Plus</strong> ..................................5Figure 4 Removing the Tip Ejector Arm......................6LINE DRAWINGS<strong>Pipet</strong>-<strong>Plus</strong> 2 µL ...................................................10<strong>Pipet</strong>-<strong>Plus</strong> 10 µL ...................................................10<strong>Pipet</strong>-<strong>Plus</strong> 20 µL ...................................................10<strong>Pipet</strong>-<strong>Plus</strong> 100 µL ...................................................10<strong>Pipet</strong>-<strong>Plus</strong> 200 µL ...................................................10<strong>Pipet</strong>-<strong>Plus</strong> 300 µL ...................................................10<strong>Pipet</strong>-<strong>Plus</strong> 1000 µL ...................................................11<strong>Pipet</strong>-<strong>Plus</strong> 2000 µL ...................................................11<strong>Pipet</strong>-<strong>Plus</strong> 5000 µL ...................................................11<strong>Pipet</strong>-<strong>Plus</strong> 10 mL ...................................................11<strong>Pipet</strong>-<strong>Plus</strong> is a registered trademark, and Latch-Mode & Hang-Ups are trademarksof Rainin Instrument, LLC. <strong>Pipet</strong>-<strong>Plus</strong> pipettes are manufactured underU.S. Patent Nos. 5,364,596, 5,614,153, 5,700,959, 5,792,424, and5,849,248. Other U.S. and national patents pending.
IntroductionRAININ <strong>Pipet</strong>-<strong>Plus</strong> pipettes redefine manual pipetting. <strong>Pipet</strong>-<strong>Plus</strong>differs from conventional manual pipettes by using a latch triggermechanism and aspiration rate controller. These featuresimprove precision from sample to sample and from technician totechnician.Designed as a system with thin-wall RAININ tips, <strong>Pipet</strong>-<strong>Plus</strong>helps reduce the risk of cumulative trauma disorders by reducingthe number of thumb strokes by 50% and by using light springand tip ejector forces.Piston Latch/Trigger Release: The patented piston latchsecures the piston at the zero point. A light touch on the triggerrelease starts the pick-up stroke.Aspiration Rate Controller: Pick-up stroke speed is governedby a patented aspiration rate controller that can easily be setfor fast or slow operation, depending on sample viscosity. Evenat the fastest setting, piston speed is constrained to prevent samplesplash.Volume Lock: The variable-resistance volume lock preventsinadvertent changes to the volume setting. The volume settingcan be locked or unlocked by turning the control wings.Plunger button /volume adjustmentTrigger release forpiston latchDigitalvolumeindicatorAspiration RateControllerVolume lockTip ejectorbuttonBody:high-impact,low thermalconductivityplasticShaftStainless steel tipejector armDisposable tipFigure 1<strong>Pipet</strong>-<strong>Plus</strong> 200 µL1
Setting Aspiration Rate ControllerTo change the setting, slide the control left or right. The fastestspeed setting (for aqueous samples) is with the control to theright.Close-up of Aspiration Rate ControllerSlower Speed:viscous or shearsensitivesamplesFaster Speed:aqueous samplesSetting Volume1. Turn the volume lock counter-clockwise to the positionshown at left below. In this position the volume setting mechanismis unlocked and turns freely.Top view of <strong>Pipet</strong>-<strong>Plus</strong>2. With the mechanism unlocked, turn <strong>Pipet</strong>-<strong>Plus</strong> so you arelooking at the digital volume indicator, then rotate the plungerbutton to change volume.Rotate the plunger button counter-clockwise to increase, andclockwise to decrease the volume.The digital volume indicator is read from the top down.22–20 µL: Black – µL. Red – tenths, hundredths of µL.100–300 µL: All digits black – whole µL.1000–5000 µL: Red – mL. Black – tenths, hundredths of mL.10 mL: Red – mL. Black – tenths of mL.3. To eliminate errors due to mechanical backlash: when settingthe desired volume, first turn the knob 1 ⁄3 turn above thedesired volume. Then turn the knob slowly clockwise until thedesired volume is displayed. Always dial down to thedesired volume.4. Turn the volume lock clockwise to prevent accidental changesto the volume setting.
Example volumes for the 200 µL size are shown below.Volumes can be changed whether the piston is latched orunlatched. Volume ranges/ increments are shown below:<strong>Pipet</strong>-<strong>Plus</strong> Range (µL) SmallestVolume Adjustable Recommended Increment µL2 µL 0 to 2 0.1 to 2 0.00210 µL 0 to 10 0.5 to 10 0.0220 µL 0 to 20 2 to 20 0.02100 µL 0 to 100 10 to 100 0.2200 µL 0 to 200 20 to 200 0.2300 µL 0 to 300 20 to 300 0.51000 µL 0 to 1,000 100 to 1,000 2.02000 µL 0 to 2,000 200 to 2,000 2.05000 µL 0 to 5,000 500 to 5,000 5.010 mL 0 to 10 mL 1 mL to 10 mL 20.0Filter<strong>Pipet</strong>-<strong>Plus</strong> 5000 µL and 10 mL pipettes use a filter in the endof the shaft to help prevent liquid entering the shaft and contaminatingthe piston, should the plunger snap up duringaspiration. Using such a filter is particularly important whenpipetting large volumes. Replace the filter if it gets wet.Figure 2 Filter OrientationFor 5000 µL pipettes insert the small diameter into the shaft,for 10 mL pipettes insert the large diameter into the shaft. Filterpart numbers are 6190-164 (pack of 100) and 6190-165 (pack of 1000).Tip Selection and MountingAlways use RAININ tips. <strong>Pipet</strong>-<strong>Plus</strong> pipettes are calibratedwith RAININ tips, and performance to published specificationscan only be guaranteed when RAININ tips are used.To mount a tip, press the <strong>Pipet</strong>-<strong>Plus</strong> shaft into the end of thetip with light force. RAININ tips will always seal properly onthe shaft with minimal force — do not use more force than isrequired.3
OperationBefore pipetting valuable samples, it is a good idea to practicepressing the plunger then releasing the latch using the trigger.This will allow you to get familiar with aspirating without usingyour thumb.Try this several times without any liquid in the tip. Then practiceaspirating and dispensing water.1. Set the aspiration rate control and the desired volume asdescribed on page 2.2. Attach a new RAININ tip by lightly inserting the shaft into thetip. This ensures a positive airtight seal.3. Press the plunger button fully — to the blowout position —and release your thumb. (A & B in Figure 3). The pistonreturns to the zero point and latches automatically, ready topick up the volume displayed on the volume indicator.4. Holding <strong>Pipet</strong>-<strong>Plus</strong> vertically, place the tip into the sample.Press and release the trigger to aspirate the sample (C). Donot hold the plunger during aspiration; the Aspiration RateController controls pickup speed.5. Pause briefly to ensure that the full volume of sample isdrawn into the tip.6. Withdraw the tip from the sample. If any liquid remains on theoutside of the tip, wipe it carefully with a lint-free tissue, takingcare not to touch the tip orifice.Dispensing:1. Touch the tip end against the side wall of the receiving vesseland press the plunger to the bottom of the stroke length. Thisis the blowout position.Wait: 1 second*: 2, 10, 20, 100, 200 and 300 µL,1-2 seconds*: 1000 µL, 2-3 seconds*: 2000 µL.* Longer for viscous solutions and 5 mL and 10 mL pipettes.2. Still holding the plunger, withdraw the tip, sliding it along thewall of the vessel. Release the plunger.The piston returns and latches at the zero point.3. The piston will remain at the zero point, ready for the nextpipetting cycle.4. Press the tip ejector button lightly to discard the tip. Use anew tip for each sample to prevent carry-over. Repeat theabove process for the next pipetting cycle.4
ABA Press plunger button fully(blowout position).CB Release plunger button.Piston returns to zero pointand is latched.C Place end of tip intosample. Press and release thetrigger topick up sample.Aspiration Rate Controller controlspiston speed during aspiration.D Dispense sample by pressingplunger button fully to blowoutposition (same as A).E Release plunger button.Piston returns to zero pointand is latched.Figure 3Operating <strong>Pipet</strong>-<strong>Plus</strong>5
Tip Ejector Arm RemovalThe tip ejector can be removed if necessary.Two types of tip ejector are used and both types can beremoved with minimum effort - do not use force. See Figure 4.For models up to 2000 µL, press in the quick-release tabs onthe ejector arm and pull the ejector down.For 5000 µL and 10 mL pipettes, grasp the top of the ejectorarm and pull outward then downward.To replace the ejector arm on all models, insert the shaftthrough the large opening, align the top with the tip ejectorpushrod, and push until the ejector arm snaps in place.Up to 2000 µLPush inEjector ArmQuick-Release5000 µL and 10 mLTip EjectorPushrodPull EjectorArm outPull Ejector ArmdownPull EjectorArm downFigure 4Removing the Tip Ejector<strong>Pipet</strong>ting Guidelines<strong>Pipet</strong>-<strong>Plus</strong> pipettes have several features for enhanced pipettingconsistency. You should also maintain:1. Consistent pickup and dispense rhythm.2. Consistent speed and smoothness when pipetting.3. Consistent immersion depth. See table on page 9.4. <strong>Pipet</strong>te vertically, or no more than 20° from vertical.5. Do not invert or lay <strong>Pipet</strong>-<strong>Plus</strong> down with liquid in the tip.Pre-Rinsing RecommendedSome solutions (e.g. serum, protein-containing solutions, andorganic solvents) can leave a film on the inside tip wall, resultingin an error larger than the tolerance specified. Since this filmremains relatively constant in successive pipettings with the sametip, excellent precision may be obtained by refilling the tip andusing the refilled volume as the sample. Successive samples fromthis same tip will exhibit good reproducibility (low variance).6
Mixing (recommended only above 15% of nominal volume)To mix two liquids in the tip, pick up sample normally. Depressand hold the trigger closed. Holding the trigger closed, place thetip end into the liquid in the well and press the plunger to dispensesample. Continue pressing the plunger until you feel thestop. Release thumb pressure and let the plunger return upward.Press and release the plunger to mix the liquids in the tip. Whenfully mixed, dispense the mixture.<strong>Pipet</strong>ting Liquids of Varying Density<strong>Pipet</strong>-<strong>Plus</strong> lets you compensate for solutions of varying densityby setting the volume slightly higher or lower than required.Compensation amount must be determined empirically; e.g., ifpipetting 10 µL of CsCl solution, you determine that the volumedelivered is actually 8.5 µL (≥5 samples); set the volume to11.8 µL and repeat the measurements. If the volumes deliveredare still not close enough to 10 µL, make another slight volumeadjustment until the measurements are as desired.Temperature ConsiderationsWarm or cold liquids can be measured with good precisionusing a consistent pipetting rhythm, which can minimize heatingor cooling effects within the pipette. Use a new tip each time forbest accuracy and precision when measuring samples with temperaturesgreatly different from ambient, and do not pre-rinse.You will get best results if there is no delay between aspiratingand dispensing the sample.Tip Immersion DepthThe recommended depth for tip insertion into the sample foreach <strong>Pipet</strong>-<strong>Plus</strong> volume is shown below.<strong>Pipet</strong>-<strong>Plus</strong> Volume Range Immersion Depth2 µL 0.1 - 2 µL 1-2 mm10 µL 0.5 - 10 µL 1-2 mm20 µL 2 - 20 µL 2 - 3 mm100 µL 10 - 100 µL 2 - 3 mm200 µL 20 - 200 µL 3 - 6 mm300 µL 30 - 300 µL 3 - 6 mm1000 µL 100 - 1000 µL 3 - 6 mm2000 µL 200 - 2000 µL 3 - 6 mm5000 µL 500 - 5000 µL 6 - 10 mm10 mL 1 mL - 10 mL 6 - 10 mmTip immersion depth is critical. If these depths are exceeded, thevolume measured may be inaccurate, possibly out of specification.Tip angle is also important. Hold the pipette within 20degrees of vertical.7
<strong>Pipet</strong>-<strong>Plus</strong> Storage<strong>Pipet</strong>-<strong>Plus</strong> is a precision instrument and should be treated withthe level of care appropriate for laboratory instrumentation.After use, store it in a clean safe place. Three types of hangerare available to hold your <strong>Pipet</strong>-<strong>Plus</strong> conveniently when not inuse.CR-7:Free-standing carousel holds seven pipettes.HU-M3: Set of three individual magnetic Hang-Ups formounting on ferrous surfaces.HU-S3:Three Hang-Ups attached to a clamp which fits ontoa shelf.Troubleshooting and RepairsWarning: When removing the shaft from the body, makesure the spring, seal and o-ring do not fall off the piston,especially on the smaller models.Sample Splash (liquid inside the mechanism)1. Refer to Figure 4 (p. 6) to remove the tip ejector arm.2. On pipettes up to 1000 µL, unscrew the shaft couplingand remove the shaft. For 2000 µL, unscrew the shaft. For5000 µL and 10 mL, unscrew the lower part of the shaft.3. Inspect the seal assembly and piston for contamination. Thepiston should be shiny and free of corrosion. Clean with distilledwater or isopropyl alcohol. Dry with a lint-free tissue,inspect the interior of the shaft for any contamination, andreassemble.4. If any staining and/or corrosion of the piston is evident, donot use the instrument. Call <strong>Pipet</strong>te Service 800-662-7027.Leaks, Inaccurate Sampling, Abnormal Stroke1. Loose shaft. Tighten coupling by hand.2. Split or cracked shaft. Remove the tip ejector and inspectthe shaft. Replace the shaft if necessary. If the shaft wasdropped, remove it to see if the piston is bent. If so, return theinstrument for service.3. Worn seal and / or o-ring. Most models incorporate apolyethylene seal and o-ring. Examine the seal and o-ring,replacing them as necessary. Pull off the old seal and o-ring, position the new seal and o-ring on the piston assemblyas shown in the line drawings on pages 10-11, andreassemble <strong>Pipet</strong>-<strong>Plus</strong>.4. Do not lubricate any components* <strong>Pipet</strong>-<strong>Plus</strong> uses a drysealing system (*except for the 5000 and 10 mL modelswhich use a grease seal.)8
Service, Calibration and RepairRAININ <strong>Pipet</strong>te Repair and Calibration facilities:California:7500 Edgewater Drive, Oakland CA 94621Tel. 800-662-7027, Fax 510-564-16835955 Mira Mesa Blvd, Ste B, San Diego, CA 92121Tel. 800-662-7027, Fax 858-320-0556Massachusetts: Rainin Road, Woburn, MA 01801Tel. 800-662-7027, Fax 781-935-7631Japan: 4-1-11, Bunkyo-Ku, Tokyo 113-0033Tel. (03) 5689-8311, Fax (03) 5689-2670METTLER TOLEDO <strong>Pipet</strong>te Repair and Calibration facilities:Belgium: N.V. <strong>Mettler</strong>-<strong>Toledo</strong> s.a., B-1932 ZaventemTel. (02) 334 02 11, Fax (02) 334 03 34Germany: <strong>Mettler</strong>-<strong>Toledo</strong> GmbH, D-35353 GiessenTel. (0641) 50 70, Fax (0641) 507 128Denmark: <strong>Mettler</strong>-<strong>Toledo</strong> A/S, DK-2600 GlostrupTel. (43) 270 800, Fax (43) 270 828Spain: <strong>Mettler</strong>-<strong>Toledo</strong> S.A.E., E-08038 BarcelonaTel. (93) 223 76 00, Fax (93) 223 02 71France: HTS – F28000 ChartresTel. (02) 37 88 31 00, Fax (02) 37 88 31 09Italy: <strong>Mettler</strong>-<strong>Toledo</strong> S.p.A., I-20026 Novate MilaneseTel. (02) 333 321, Fax (02) 356 29 73Netherlands: <strong>Mettler</strong>-<strong>Toledo</strong> B.V., NL-4004 JK TielTel. (0344) 63 83 63, Fax (0344) 63 83 90Sweden: <strong>Mettler</strong>-<strong>Toledo</strong> AB, S-12008 StockholmTel. (08) 702 50 00, Fax (08) 642 45 62Service is also available in many other countries through authorizedRAININ distributors. See www.rainin-global.com.It is recommended to use only genuine RAININ replacement partssuch as seals and shafts. It is NOT necessary to recalibrate thepipette after changing the seal or shaft. Recalibration of the pipetteis only necessary when the piston is replaced, and should be doneonly by qualified factory-trained personnel in one of the abovementionedfacilities.For pipettes under warranty, please note that the warrantywill be voided if the pipette has been damaged as a resultof physical or chemical abuse, or if the pipette has beenrepaired or recalibrated by any service facility which is notauthorized by Rainin.Contact Technical Support at 800-543-4030 for furtherinformation.9
<strong>Pipet</strong>-<strong>Plus</strong> 2 and 10 µL <strong>Pipet</strong>-<strong>Plus</strong> 20 µLAAHHBBJJCFGFGDECDE<strong>Pipet</strong>-<strong>Plus</strong> 100 µL <strong>Pipet</strong>-<strong>Plus</strong> 200 & 300 µLAAHHBEJFGBEJFGCDCDLegend for <strong>Pipet</strong>-<strong>Plus</strong> 2 µL to 2000 µL ModelsThis page and top of next page.A - Plunger Button B- Shaft Coupling C - ShaftD - Tip Ejector E - Piston Assembly F - SealG - O-ring H - Stroke Spring J - Seal Retainer10
<strong>Pipet</strong>-<strong>Plus</strong> 1000 µL <strong>Pipet</strong>-<strong>Plus</strong> 2000 µLAABFGEEFGCDCDLegend for <strong>Pipet</strong>-<strong>Plus</strong> 5000 µL and 10 mL (below)A - Plunger Button C- Tip Ejector Arm D - Piston AssemblyE - Piston O-ring F- Cylinder G - Cylinder O-ringH - Shaft<strong>Pipet</strong>-<strong>Plus</strong> 5000 µLA<strong>Pipet</strong>-<strong>Plus</strong> 10 mLADDEFGEFGHHCC11
Replacement PartsLegend for <strong>Pipet</strong>-<strong>Plus</strong> 2 µL to 2000 µL ModelsA - Plunger Button B- Shaft Coupling C - Shaft*D - Tip Ejector* E - Piston Assembly F - SealG - O-ring H - Stroke Spring J - Seal RetainerR-series:R-2 R-10 R-20 R-100 R-200 R-300 R-1000 R-2000A 6200-244 6200-245 6200-246 6200-247 6200-248 6200-417 6200-249 6200-250B 6200-236 6200-236 6200-236 6200-236 6200-236 6200-236 6200-236 n/a.C 6200-134 6200-140 6200-145 6200-147 6200-157 6200-413 6200-160 6200-169D 6200-133 6200-133 6200-144 6200-148 6200-156 6200-419 6200-163 6200-168E 6200-130 6200-137 6200-142 6200-149 6200-153 6200-412 6200-159 6200-165F 6200-131 6200-138 6200-143 6200-150 6200-154 6200-415 6200-161 6200-166G 6200-132 6200-139 6200-170 6200-151 6200-155 6200-414 6200-162 6200-167H 6200-195 6200-195 6200-197 6200-197 6200-199 6200-199 n/a n/aJ 6200-196 6200-196 6200-198 6200-201 6200-200 6200-416 n/a n/aRL-series:RL-2 RL-10 RL-20 RL-100 RL-200 RL-300 RL-1000 RL-2000A 6200-275 6200-276 6200-277 6200-278 6200-279 6200-420 6200-280 6200-378B 6200-236 6200-236 6200-236 6200-236 6200-236 6200-236 6200-236 n/aC 6202-063 6202-064 6202-065 6202-066 6202-067 6200-425 6202-068 6202-214D 6202-071 6202-071 6202-071 6202-073 6202-073 6200-419 6202-074 6200-168E 6200-282 6200-283 6200-284 6200-149 6200-153 6200-412 6200-159 6200-165F 6200-131 6200-138 6200-143 6200-150 6200-154 6200-415 6200-161 6200-166G 6200-132 6200-139 6200-170 6200-151 6200-155 6200-414 6200-162 6200-167H 6200-195 6200-195 6200-197 6200-197 6200-199 6200-199 n./a n/aJ 6200-196 6200-196 6200-198 6200-201 6200-200 6200-416 n/a n/a* These parts are autoclavable (C - shaft, D - tip ejector arm)Legend for <strong>Pipet</strong>-<strong>Plus</strong> 5000 µL and 10 mL ModelsA - Plunger Button C- Tip Ejector Arm* D - Piston AssemblyE - Piston O-ring F- Cylinder G - Cylinder O-ring H - Shaft*R-Series:RL-SeriesR-5000 R-10ML RL-5000 RL-10MLA 6200-376 6200-377 6200-332 6200-333C 6200-373 6200-374 6200-373 6200-374D 6200-361 6200-367 6200-361 6200-367E 6200-363 6200-369 6200-363 6200-369F 6200-365 6200-371 6200-365 6200-371G 6200-364 6200-370 6200-364 6200-370H 6200-362 6200-368 6202-222 6202-223* These parts are autoclavable (C - tip ejector arm, H - shaft)Common parts for 5000 µL and 10 mL:Tube of grease: 6100-555Filters: 6190-164 (pack of 100)6190-165 (pack of 1000)12
SpecificationsThese manufacturer’s specifications should be used as guidelineswhen establishing your own performance specification.<strong>Pipet</strong>-<strong>Plus</strong> SpecificationsVolume Increment Accuracy PrecisionModel µL µL % µL (±) % µL (≤)2 µL 0.2 0.002 12.0 0.024 6.0 0.0121.0 2.7 0.027 1.3 0.0132.0 1.5 0.030 0.7 0.01410 µL 1.0 0.02 2.5 0.025 1.2 0.0125.0 1.5 0.075 0.6 0.0310.0 1.0 0.1 0.4 0.0420 µL 2 0.02 7.5 0.15 2.0 0.0410 1.5 0.15 0.5 0.0520 1.0 0.2 0.3 0.06100 µL 10 0.2 3.5 0.35 1.0 0.150 0.8 0.4 0.24 0.12100 0.8 0.8 0.15 0.15200 µL 20 0.2 2.5 0.5 1.0 0.2100 0.8 0.8 0.25 0.25200 0.8 1.6 0.15 0.3300 µL 30 0.5 2.5 0.75 1.0 0.3150 0.8 1.2 0.25 0.375300 0.8 2.4 0.15 0.451000 µL 100 2 3.0 3.0 0.6 0.6500 0.8 4.0 0.2 1.01000 0.8 8.0 0.15 1.52000 µL 200 2 3.0 6.0 0.6 1.21000 0.8 8.0 0.2 2.02000 0.8 16.0 0.12 2.45000 µL 500 5 2.4 12.0 0.6 3.02500 0.6 15.0 0.2 5.05000 0.6 30.0 0.16 8.010 mL 1 mL 20 5.0 50.0 0.6 6.05 mL 1.0 50.0 0.2 10.010 mL 0.6 60.0 0.16 16.0Specifications are subject to change without notice.Acids and CorrosivesAfter pipetting concentrated acids or highly corrosive solutions,inspect and clean the piston assembly, shaft, and seal withdistilled water. Dry all components and reassemble.Exposure of internal components to corrosive fumes can bereduced by using RAININ tips with aerosol barrier filters.AutoclavingAutoclavable parts of <strong>Pipet</strong>-<strong>Plus</strong> are the shaft and the tip ejector:121°C, 1 bar, 15-20 minutes.Do not autoclave the complete pipette or any partsother than the shaft and the tip ejector.13
Limited WarrantySee the Limited Warranty and Limitations of Liability Statement.Please complete and return the Warranty Registration Card on receiptof your pipette.RAININ pipettes are calibrated with RAININ tips. To assure excellentreproducibility and performance, use only RAININ tips as recommendedin this manual. Specified performance is guaranteed onlywhen RAININ tips are used.Contacting RAININTechnical Information:T: 800-543-4030 F: 510-564-1617 tech.support@rainin.com<strong>Pipet</strong>te Service:T: 800-662-7027 F: 781-935-7631 service@rainin.comDirect Order Line:T: 800-472-4646 F: 510-564-1617 pipets@rainin.comRAININ website: www.rainin.comFrom outside North America: T: +1-510-564-1600global@rainin.com (from outside the U.S.)METTLER TOLEDO OfficesMETTLER TOLEDO website: www.mt.com/rainin<strong>Mettler</strong>-<strong>Toledo</strong> (Schweiz) GmbH, Im Langacher , 8606 Greifensee CHVerkauf 044 944 45 45 salesRN.ch@mt.comService 044 944 47 47 serviceRN.ch@mt.com<strong>Mettler</strong> <strong>Toledo</strong> GmbH, Ockerweg 3 , 35396 Giessen DEVerkauf +49 641 507 222 info.mtd@mt.comService +49 641 507 307 info.mtd@mt.com<strong>Mettler</strong>-<strong>Toledo</strong> SAS, 18-20 avenue de la Pépinière , 78220 Viroflay FRVentes 01 30 97 17 17 marcom.fr@mt.comLaboratoire d'Etalonnage Accrédité,264 rue Abraham Lincoln Service <strong>Pipet</strong>te, 62400 Bethune FRService 03 21 64 54 66 marcom.fr@mt.comN.V. <strong>Mettler</strong>-<strong>Toledo</strong> S.A., Leuvensesteenweg 384 , 1932 Zaventem BESales +32 2334 0211 general.mtb@mt.comService +32 2334 0211 general.mtb@mt.com<strong>Mettler</strong>-<strong>Toledo</strong> S.A.E., Miguel Hernández 69-71 ,08908 L'Hospitalet de Llobregat (Barcelona) ESVentas 0034 93 223 7666 mtemkt@mt.comServicio Técnico 0034 93 223 7666 mtemkt@mt.com<strong>Mettler</strong>-<strong>Toledo</strong> A/S, Naverland 8 , 2600 Glostrup DKSalg 43 27 08 25 info.mtdk@mt.comService 43 27 08 25 info.mtdk@mt.comRainin Instrument, LLC7500 Edgewater Drive, Box 2160, Oakland, CA 94621-0060a METTLER TOLEDO CompanyPrices and specifications are subject to change without notice.Copyright 2007, Rainin Instrument, LLC.9920-156 Rev J