TEC22x7-4 Series LonWorks® Network ... - Johnson Controls
TEC22x7-4 Series LonWorks® Network ... - Johnson Controls
TEC22x7-4 Series LonWorks® Network ... - Johnson Controls

Create successful ePaper yourself
Turn your PDF publications into a flip-book with our unique Google optimized e-Paper software.
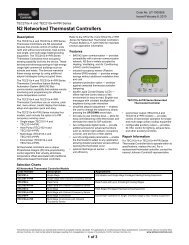
<strong>TEC22x7</strong>-4 <strong>Series</strong> LONWORKS® <strong>Network</strong> ThermostatControllers with Two OutputsInstallation InstructionsTEC2227-4, TEC2247-4Part No. 24-9890-1265, Rev. —Issued February 8, 2010ApplicationsThe <strong>TEC22x7</strong>-4 <strong>Series</strong> Thermostat Controllers areLONWORKS® network devices that provide control oflocal hydronic reheat valves, pressure dependentVariable Air Volume (VAV) equipment with or withoutlocal reheat, or other zoning equipment using an on/off,floating, or proportional 0 to 10 VDC control input.The technologically advanced <strong>TEC22x7</strong>-4 <strong>Series</strong>Thermostat Controllers feature a Building AutomationSystem (BAS) LONWORKS network communicationcapability that enables remote monitoring andprogramming for efficient space temperature control.The <strong>TEC22x7</strong>-4 <strong>Series</strong> Thermostat Controllers featurean intuitive User Interface (UI) with backlit display thatmakes setup and operation quick and easy. Thethermostat controllers also employ a unique,proportional control algorithm that virtually eliminatestemperature offset associated with traditional,differential-based thermostat controllers.IMPORTANT: The <strong>TEC22x7</strong>-4 <strong>Series</strong> ThermostatControllers are intended to provide an input toequipment under normal operating conditions.Where failure or malfunction of the thermostatcontroller could lead to personal injury or propertydamage to the controlled equipment or otherproperty, additional precautions must be designedinto the control system. Incorporate and maintainother devices, such as supervisory or alarm systemsor safety or limit controls, intended to warn of orprotect against failure or malfunction of thethermostat controller.North American Emissions ComplianceUnited StatesThis equipment has been tested and found tocomply with the limits for a Class A digital devicepursuant to Part 15 of the FCC Rules. These limitsare designed to provide reasonable protectionagainst harmful interference when this equipment isoperated in a commercial environment. Thisequipment generates, uses, and can radiate radiofrequency energy, and, if not installed and used inaccordance with the instruction manual, may causeharmful interference to radio communications.Operation of this equipment in a residential area islikely to cause harmful interference, in which casethe user will be required to correct the interferenceat his/her own expense.CanadaThis Class (A) digital apparatus meets all therequirements of the Canadian Interference-CausingEquipment Regulations.Cet appareil numérique de la Classe (A) respectetoutes les exigences du Règlement sur le matérielbrouilleur du Canada.InstallationLocation ConsiderationsLocate the <strong>TEC22x7</strong>-4 <strong>Series</strong> Thermostat Controller:• on a partitioning wall, approximately 5 ft (1.5 m)above the floor in a location of averagetemperature• away from direct sunlight, radiant heat, outsidewalls, behind doors, air discharge grills, stairwells,or outside doors• away from steam or water pipes, warm air stacks,unconditioned areas (not heated or cooled), orsources of electrical interferenceNote: Allow for vertical air circulation to the<strong>TEC22x7</strong>-4 <strong>Series</strong> Thermostat Controller.<strong>TEC22x7</strong>-4 <strong>Series</strong> LONWORKS® <strong>Network</strong> Thermostat Controllers with Two OutputsInstallation Instructions1
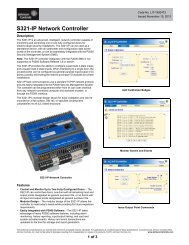
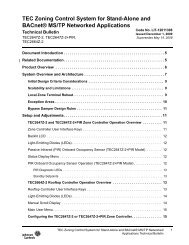
To install the thermostat controller:1. Use a Phillips-head screwdriver to remove thesecurity screw on the bottom of the thermostatcontroller cover.Note: Normally, the security screw is packagedseparately in a plastic bag with the thermostatcontroller. Skip this step if the screw is not installedon the bottom of the cover.2. Pull the bottom edge of the thermostat controllercover and open the thermostat controller asillustrated in Figure 1.FIG:cvr_rmvl4. Pull approximately 6 in. (152 mm) of wire from thewall and insert the wire through the hole in thethermostat controller mounting base.5. Align the thermostat controller mounting base onthe wall and use the base as a template to markthe two mounting hole locations.6. Position the thermostat controller mounting baseso that the arrow on the base points upward toindicate the top of the thermostat controller.Note: If you need to install the thermostat on anelectrical junction box, use 2-1/2 x 4 in.(63 x 101 mm) square boxes with mud ring covers,and avoid smaller 1-1/2 x 4 in. (38 x 101 mm) or3 x 2 in. (76 x 51 mm) square boxes. Thisprocedure ensures that you have enough space forcabling and end-of-line devices, if needed.Note: For surface-mount applications, usedurable mounting hardware such as Molly boltanchors that cannot be easily pulled out of themounting surface.7. Secure the mounting base to the wall surface usingtwo mounting screws as illustrated in Figure 3.Note: Be careful not to overtighten the mountingscrews.Figure 1: Removing the Thermostat ControllerCover3. Carefully pull the locking tabs on the right side ofthe thermostat controller mounting base andunlock the Printed Circuit Board (PCB). Open thePCB to the left as illustrated in Figure 2.FIG:mnt_bsPCBLockingTabsFIG:op_circ_bdFigure 3: Securing the Thermostat ControllerMounting Base to the Wall8. Swing the PCB back to the right and carefully snapit into the locking tabs on the thermostat controllermounting base.Figure 2: Opening the Thermostat Controller PCB2<strong>TEC22x7</strong>-4 <strong>Series</strong> LONWORKS® <strong>Network</strong> Thermostat Controllers with Two Outputs Installation Instructions
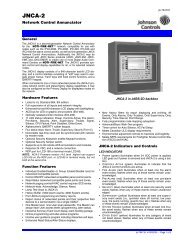
9. Remove the screw terminal blocks that areattached to a disposable adhesive. Figure 4illustrates the locations of the screw terminalblocks on the thermostat controller.!!CAUTION: Risk of Electric Shock.Disconnect the power supply beforemaking electrical connections to avoidelectric shock.CAUTION: Risk of Property Damage.Do not apply power to the system beforechecking all wiring connections. Shortcircuited or improperly connected wiresmay result in permanent damage to theequipment.Figure 4: Removing the Screw Terminal BlocksWiringWhen an existing thermostat controller is replaced,remove and label the wires to identify the terminalfunctions. When a <strong>TEC22x7</strong>-4 <strong>Series</strong> ThermostatController is replaced, simply remove the old screwterminal blocks and reinsert them onto the PCB of thereplacement thermostat controller.The LONWORKS connection does not have a removableterminal block. It has two screw terminals, one for eachof the wires.To replace a thermostat controller:1. Unscrew both LONWORKS terminal screws andremove the wires.2. Replace the thermostat controller.3. Reinsert the LONWORKS wires.4. Tighten the LONWORKS terminal screws, as shownin Figure 5.FIG:trmnl_blcksIMPORTANT: Make all wiring connections inaccordance with local, national, and regionalregulations. Do not exceed the electrical ratings ofthe <strong>TEC22x7</strong>-4 <strong>Series</strong> Thermostat Controller.To wire the thermostat controller:1. Strip the ends of each wire 1/4 in. (6 mm) andconnect them to the appropriate screw terminals asindicated in Table 1 and Figure 6 throughFigure 19.Note: For more details on wiring the LonWorksnetwork, refer to the LONWORKS <strong>Network</strong> LayoutTechnical Bulletin (LIT-1162150).2. Carefully push any excess wire back into the wall.Note: Seal the hole in the wall with fireproofmaterial to prevent drafts from affecting theambient temperature readings.3. Reinsert the screw terminal blocks onto the PCB.4. Reattach the LONWORKS communication wires tothe terminal block. See Figure 5.Note: If inserting multiple wires in the terminals,be sure to properly twist wires together prior toinserting them in the terminal connectors.5. Reattach the thermostat controller cover to themounting base (top side first).6. Use a Phillips-head screwdriver to reinstall thesecurity screw on the bottom of the thermostatcontroller cover.<strong>TEC22x7</strong>-4 <strong>Series</strong> LONWORKS® <strong>Network</strong> Thermostat Controllers with Two Outputs Installation Instructions 3
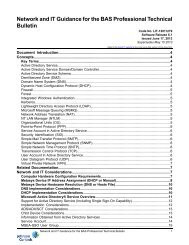
Table 1: Terminal Identification (See Figure 6.)TerminalTerminal LabelFunctionNumber TEC2227-4TEC2247-44 24 V~ Hot 24 V~ Hot 24 VAC from Transformer5 24 V~ Com 24 V~ Com 24 VAC (Common) from Transformer6 BO5 Aux BO5 Aux BO5 Auxiliary Output7 BO5 Aux BO5 Aux BO5 Auxiliary Output8 BO3 Blank Open Heat9 BO4 AO2 Close Heat10 BO1 AO1 Open Cool11 BO2 Blank Close Cool12 BI1 BI1 Configurable Binary Input 113 RS RS Remote Sensor14 Scom Scom Sensor Common15 BI2 BI2 Configurable Binary Input 216 UI3 UI3 Configurable Universal Input 3BlankLONWORKS BusConnecting the LONWORKS <strong>Network</strong>The wiring rules for the LONWORKS network differ fromthe wiring rules for the Metasys® N2 Bus and theBACnet® MS/TP Bus. For more details on wiring theLONWORKS network, refer to the LONWORKS <strong>Network</strong>Layout Technical Bulletin (LIT-1162150).To connect the thermostat controller to the LONWORKSnetwork:1. Connect the LONWORKS network wires to theLONWORKS network terminal block on thethermostat controller (Figure 5).Note: There is no polarity when connecting theLONWORKS network wires to the thermostatcontroller; however, we recommend keeping thepolarity consistent throughout the network.2. After the LONWORKS network wires are connectedto the first thermostat controller, continue in adaisy-chained fashion to the next device.Note: The LONWORKS network wiring mustcomprise twisted-pair lines.Do not run the LONWORKS network wiring in the sameconduit as line voltage wiring (higher than 30 VAC) orother wiring that switches power to highly inductiveloads (such as contactors, coils, motors, orgenerators).Figure 5: LON Terminal Wiring ConnectionThe LONWORKS network requires proper terminationand biasing at the end of a segment (a segment is aphysically continuous length of wire). The thermostatcontroller is not equipped with the ability to provide thistermination; therefore, it cannot be located at thephysical end of a LONWORKS network segment unlessa terminator is attached. Refer to the LONWORKS<strong>Network</strong> Layout Technical Bulletin (LIT-1162150) forend-of-line solutions.4<strong>TEC22x7</strong>-4 <strong>Series</strong> LONWORKS® <strong>Network</strong> Thermostat Controllers with Two Outputs Installation Instructions
Separate 24 VACPower Source for Auxiliary Output(24 VAC Maximum)24 V~Hot24 VACThermostat Power24 V~Hot24 V~ComSame 24 VACPower Source for Auxiliary Output(24 VAC Maximum)24 V~Com24 VACThermostat PowerBO5AuxBO5AuxBO5AuxAuxBO5AuxAuxLONLONVoltage-FreeContact• Remote NSB• Motion• WindowEight-Pole Bottom ConnectorBO4/AO2BO1/AO1BO2LONTwo-PoleLeft TopConnector- OR -24 V~HotBI1SS (Supply Sensor)COS (Change Over Sensor)LON24 V~Com4 5RSThree-PoleRight TopConnectorScomBO5AuxBI2BO5AuxUI3BO36 7 89Aux Contact10 11 12 13 14 15 16(Isolated Common)• Reheat• Lighting• On/Off Actuation• Exhaust FanRemote InputsVoltage-FreeContact• DoorBI1 Scom BI2 UI3• RemoteOverride• Filter Alarm• Service AlarmVoltage-FreeContact• COC/NHNormally HeatClosed Contact= Cold Water• COC/NCNormally CoolClosed Contact= Hot WaterSupervisoryControllerFIG:tec22x7wrngFigure 6: Wiring the <strong>TEC22x7</strong>-4 <strong>Series</strong> Thermostat Controller(See Table 1.)<strong>TEC22x7</strong>-4 <strong>Series</strong> LONWORKS® <strong>Network</strong> Thermostat Controllers with Two Outputs Installation Instructions 5
FloatingActuatorRoom Temperature Control Thermostat(Minimum and Maximum PositionAdjusted on Actuator)UI3 COS24 V~ Com24 V~ HotBO1 OpenBO2 CloseFIG:tec2227clFigure 7: Wiring the TEC2227-4 Thermostat Controller for Floating Control(Pressure-Dependent VAV Cooling Only)ProportionalActuator0 to 10VDCRoom Temperature Control Thermostat(Minimum and Maximum PositionAdjusted on Actuator)UI3 COS24 V~ Com24 V~ HotAO1FIG:tec2247clFigure 8: Wiring the TEC2247-4 Thermostat Controller for Proportional 0 to 10 VDC Control(Pressure-Dependent VAV Cooling Only)ChangeoverSensorSupply AirTemperature SensorFloatingActuatorRoom Temperature Control Thermostat(Minimum and Maximum PositionAdjusted on Actuator)UI3 COS24 V~ Com24 V~ HotBO1 OpenBO2 CloseFIG:tec2227hc_chgovrFigure 9: Wiring the TEC2227-4 Thermostat Controller for Floating Control(Pressure-Dependent VAV Heating/Cooling with Changeover)6<strong>TEC22x7</strong>-4 <strong>Series</strong> LONWORKS® <strong>Network</strong> Thermostat Controllers with Two Outputs Installation Instructions
ChangeoverSensorSupply AirTemperature SensorProportionalActuator0 to 10VDCRoom Temperature Control Thermostat(Minimum and Maximum PositionAdjusted on Actuator)UI3 COS24 V~ Com24 V~ HotAO1FIG:tec2247hc_chgovrFigure 10: Wiring the TEC2247-4 Thermostat Controller for Proportional 0 to 10 VDC Control(Pressure-Dependent VAV Heating/Cooling with Changeover)FloatingActuatorHeating/Coolingand On/OffDuct HeaterSupply AirTemperature SensorC1ChangeoverSensorRoom Temperature Control Thermostat(Minimum and Maximum PositionAdjusted on Actuator)UI3 COS24 V~ Com24 V~ HotBO1 OpenBO2 CloseBO5-AuxBO5-AuxFIG:tec2227hc_chgovr_rhFigure 11: Wiring the TEC2227-4 Thermostat Controller for Floating Control(Pressure-Dependent VAV Heating Cooling with Changeover and Reheat)ProportionalActuatorHeating/Coolingand On/OffDuct HeaterSupply AirTemperature SensorC1ChangeoverSensorUI3 COS0 to 10VDC24 V~ Com24 V~ HotRoom Temperature Control Thermostat(Minimum and Maximum PositionAdjusted on Actuator)AO1AO2BO5-AuxBO5-AuxFIG:tec2247hc_chgovr_rhFigure 12: Wiring the TEC2247-4 Thermostat Controller for Proportional 0 to 10 VDC Control(Pressure-Dependent VAV Heating/Cooling with Changeover and Reheat)<strong>TEC22x7</strong>-4 <strong>Series</strong> LONWORKS® <strong>Network</strong> Thermostat Controllers with Two Outputs Installation Instructions 7
UI3 COS24 V~ ComOptional WaterSupply SensorProportionalHeating/CoolingValve24 V~ HotAO10 to 10VDCRoom TemperatureControl ThermostatSupply WaterTemperature SensorFIG:tec2247hc_hydr_chgovrFigure 16: Wiring the TEC2247-4 Thermostat Controller for Proportional 0 to 10 VDC Control(Heating/Cooling Hydronic Valve Control with Changeover)or24 V~Hot24 V~ComCoolingValveoror24 V~Hot24 V~ComHeatingValveFIG:tec2227_onoffTwo-Pipe ApplicationsFour-Pipe ApplicationsFigure 17: Wiring the TEC2227-4 Thermostat Controller for On/Off ControlBO1BO224 V~Hot24 V~ComCoolingValveBO1BO2 BO3 BO424 V~Hot24 V~ComHeating/CoolingValveTwo-Pipe ApplicationsHeatingValveFour-Pipe ApplicationsFIG:tec2227fltFigure 18: Wiring the TEC2227-4 Thermostat Controller for Floating Control<strong>TEC22x7</strong>-4 <strong>Series</strong> LONWORKS® <strong>Network</strong> Thermostat Controllers with Two Outputs Installation Instructions 9
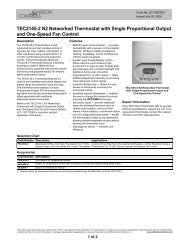
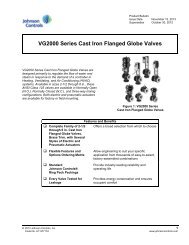
AO124 V~Hot24 V~ComAO1AO224 V~Hot24 V~ComCoolingValveHeating/CoolingValveHeatingValveTwo-Pipe ApplicationsFour-Pipe ApplicationsFIG:tec2247propFigure 19: Wiring the TEC2247-4 Thermostat Controller for Proportional ControlSetup and AdjustmentsStatus LED beneath coverindicates network status.Backlit, plain textLiquid Crystal Display (LCD)is easy to read in any condition.Room Temp70.0ºFLight-Emitting Diodes (LEDs)indicate system activity.Three keys on the thermostat controllermake operation easy and intuitive.Figure 20: Front Cover of Thermostat ControllerFIG:frnt_vw_22x7Thermostat Controller User Interface KeysThe <strong>TEC22x7</strong>-4 <strong>Series</strong> Thermostat Controller userinterface consists of three keys on the front cover(Figure 20). The function of each key is as follows:• OVERRIDE key overrides the unoccupied mode tooccupied at the local user interface for thespecified TOccTime. (TOccTime is defined byselecting the appropriate time period in the InstallerConfiguration Menu.) If one of the binary inputs isconfigured to operate as a remote override contact,this OVERRIDE function is disabled. TheOVERRIDE key also allows access to the InstallerConfiguration Menu. See the Configuring the<strong>TEC22x7</strong>-4 <strong>Series</strong> Thermostat Controller section.• UP/DOWN arrow keys change the configurationparameters and activate a setpoint adjustment.Backlit Liquid Crystal Display (LCD)The <strong>TEC22x7</strong>-4 <strong>Series</strong> Thermostat Controllers includea 2-line, 8-character backlit display. Low-levelbacklighting is present during normal operation, and itbrightens when any user interface key is pressed. Thebacklight returns to low level when the thermostatcontroller is left unattended for 45 seconds.Light-Emitting Diodes (LEDs)Two LEDs are included to call for heat or call forcooling:• The heat LED is on when heating is on.• The cool LED is on when cooling is on.10<strong>TEC22x7</strong>-4 <strong>Series</strong> LONWORKS® <strong>Network</strong> Thermostat Controllers with Two Outputs Installation Instructions
Status Display MenuThe Status Display Menu is displayed during normalthermostat controller operation. This menucontinuously scrolls through the following parameters:• Room Temperature• System Mode• Occupancy Status(Occupied/Unoccupied/Override)• Applicable Alarms (The backlight lights up as analarm condition is displayed.)Note: An option is available within the InstallerConfiguration Menu to lock out the scrolling display andshow only the Room Temperature parameter.Status LEDThe Status LED shows the operational status of thethermostat controller. The Status LED is a small greenlight under the thermostat controller cover (under theLONWORKS daughter board on the left edge whenfacing the thermostat controller).Table 2: Status LED ExplanationStatus LED ExplanationConditionContinuously OnFlashing at a0.5 Hz rateContinuously OffThe thermostat controller does nothave an application loaded in itsmemory.The thermostat controller has anapplication loaded in its memory butis not configured. Use a LONWORKSnetwork management tool to bind thethermostat controller to a LONWORKSnetwork.The thermostat controller has anapplication loaded in its memory andis bound to a LONWORKS network.Configuring the <strong>TEC22x7</strong>-4 <strong>Series</strong> ThermostatControllerThe <strong>TEC22x7</strong>-4 <strong>Series</strong> Thermostat Controller shipsfrom the factory with default settings for all configurableparameters. The default settings are shown in Table 5.To reconfigure the parameters via the thermostatcontroller, follow the steps in this section.1. To access the Installer Configuration Menu, pressand hold the OVERRIDE key for approximately8 seconds.Note: If the Password parameter is configured,Password 0 appears on the thermostat controllerdisplay indicating that the configured password isrequired to proceed. Use the UP/DOWN arrowkeys to indicate the configured password, thenpress the OVERRIDE key to proceed through theInstaller Configuration Menu parameters.2. Once the Installer Configuration Menu begins,release and press the OVERRIDE key to scrollthrough the parameters listed in Table 5.3. When the desired parameter is displayed, use theUP/DOWN arrow keys to choose the desiredselection option.4. Press and release the OVERRIDE key to continuescrolling through the parameters.When the thermostat controller is in the InstallerConfiguration Menu and left unattended forapproximately 8 seconds, the thermostat controllerreverts to the Status Display Menu.For additional information on commissioning andconfiguring thermostat controllers, adding a thermostatcontroller to the <strong>Network</strong> Automation Engine (NAE),thermostat controller mapping, and remote thermostatcontroller commanding, refer to the <strong>TEC22x7</strong>-4 <strong>Series</strong>LONWORKS <strong>Network</strong> Thermostat Controllers with TwoOutputs Configuration Technical Bulletin(LIT-12011612).Configuring the Thermostat Controller’sNeuron® IdentificationPress and hold the UP/DOWN arrow keyssimultaneously for five seconds to broadcast thethermostat controller’s Neuron Identification on theLONWORKS network.If the cover is removed, you can see the green StatusLED under the LONWORKS board flash when thethermostat controller broadcasts the Neuron ID. TheNeuron ID is on a label on the Echelon® chip.You cannot send the Neuron ID while in the InstallerConfiguration menu.<strong>TEC22x7</strong>-4 <strong>Series</strong> LONWORKS® <strong>Network</strong> Thermostat Controllers with Two Outputs Installation Instructions 11
Configuring Inputs BI1, BI2, and UI3When BI1 and BI2 are configured for an alarmcondition, an alarm condition is displayed locally whenthe input is closed. An alarm message is included onthe scrolling Status Display Menu and when themessage is displayed, the backlight momentarilylights up.The UI3 input provides changeover of hot/cold waterswitching, or supply air temperature monitoring at thethermostat controller. Each input can be configured tothe Selection Options included in Table 5.Configuring Output Options: Out1ConfFor applications enabling heat/cool operation from thesame output, choose Out1Conf = 2.0. For applicationsenabling heat/cool operation from different outputs,choose Out1Conf = 4.0.Configuring Sequence of Operation: SeqOperaChoose the appropriate sequence of operation. Themodes presented to the user are dependent on thesequence of operation selected. For heat/cooloperation from the same output utilizing a changeoversensor (COS), choosing 0 = Cooling Only causeschangeover to occur between Cooling Only andHeating Only. Choosing 2 = Cooling with Reheatcauses changeover to occur between Cooling withReheat and Heating with Reheat. For examplesequences of operation, see Figure 21 throughFigure 26.Table 3: Control Sequences for Single-Control Output ApplicationsSequence Control Curves System Parameter: Out1Conf = 2.0 10 = Cooling Only See Figure 21. #10 NO Cool#11 NC Cool1 = Heating Only See Figure 22. #10 NO Heat#11 NC Heat2 = Cooling withReheat3 = Heating withReheatSee Figure 23.See Figure 24.Control = On/Off Control = Floating Control = Proportional#6 & #7 Reheat#10 NO Cool#11 NC Cool#6 & #7 Reheat#10 NO Heat#11 NC Heat#10 Open Cool#11 Close Cool#10 Open Heat#11 Close Heat#6 & #7 Reheat#10 Open Cool#11 Close Cool#6 & #7 Reheat#10 Open Heat#11 Close Heat#10 Proportional Cool#10 Proportional Heat#6 & #7 Reheat#10 Proportional Cool#6 & #7 Reheat#10 Proportional Heat1. Numbers 6, 7, 10, and 11 in the System Parameter columns are terminal block numbers, which are described in Table 1.Table 4: Control Sequences for Two-Control Output ApplicationsSequence Control Curves System Parameter: Out1Conf = 4.0Control = On/Off Control = Floating Control = Proportional0 = Cooling Only See Figure 21. #10 NO Cool#11 NC Cool#10 Open Cool#11 Close Coo#10 Proportional Cool12<strong>TEC22x7</strong>-4 <strong>Series</strong> LONWORKS® <strong>Network</strong> Thermostat Controllers with Two Outputs Installation Instructions
Table 4: Control Sequences for Two-Control Output ApplicationsSequence Control Curves System Parameter: Out1Conf = 4.0Control = On/Off Control = Floating Control = Proportional1 = Heating Only See Figure 22. #10 NO Heat#11 NC Heat2 = Cooling withReheat3 = Heating withReheatSee Figure 23.See Figure 24.#6 & #7 Reheat#10 NO Cool#11 NC Cool#6 & #7 Reheat#8 NO Heat#9 NC Heat4 = Heating/Cooling See Figure 25. #8 NO Heat#9 NC Heat#10 NO Cool#11 NC Cool5 = Heating/Coolingwith ReheatSee Figure 26.#6 & #7 Reheat#8 NO Heat#9 NC Heat#10 NO Cool#11 NC Cool#10 Open Heat#11 Close Heat#6 & #7 Reheat#10 Open Cool#11 Close Cool#6 & #7 Reheat#8 Open Heat#9 Close Heat#8 Open Heat#9 Close Heat#10 Open Cool#11 Close Cool#6 & #7 Reheat#8 Open Heat#9 Close Heat#10 Open Cool#11 Close Cool#10 Proportional Heat#6 & #7 Reheat#10 Proportional Cool#6 & #7 Reheat#9 Proportional Heat#9 Analog Heat#10 Proportional Cool#6 & #7 Reheat#9 Proportional Heat#10 Proportional Cool<strong>TEC22x7</strong>-4 <strong>Series</strong> LONWORKS® <strong>Network</strong> Thermostat Controllers with Two Outputs Installation Instructions 13
OnCooling SetpointFIG:cl_nlyOnReheatOffFIG:ht_rhtDevice Opened100%Device ClosedTemperature Increaseo o( Increments of 1F /0.5C )On/Off, Floating,or ProportionalOutputOffOn/Off, Floating,or ProportionalOutput0%Figure 21: Cooling OnlyTemperature Increaseo o( Increments of 1F /0.5C )Device OpenedHeating SetpointFIG:ht_nlyOn/Off, Floating,or ProportionalOutputsFigure 24: Heating with ReheatHeating OutputCooling OutputOn/Off, Floating,or ProportionalOutputDevice ClosedHeating SetpointCooling SetpointTemperature Increaseo o( Increments of 1F /0.5C )DeviceOpenedDeadbandDeviceOpenedFigure 22: Heating OnlyDeviceClosedDeviceClosedOn/Off, Floating,or ProportionalOutputsHeating SetpointHeating OutputCooling OutputCooling SetpointFIG:cl_rhtTemperature Increase(Increments of 1F°/0.5C°)Figure 25: Heating/CoolingFIG:htng_clngOnOnOffOffDeadbandDeviceClosedDeviceOpenedOn/Off, Floating,or ProportionalOutputTemperature Increaseo o( Increments of 1F /0.5C )Figure 23: Cooling with Reheat14<strong>TEC22x7</strong>-4 <strong>Series</strong> LONWORKS® <strong>Network</strong> Thermostat Controllers with Two Outputs Installation Instructions
On/Off, Floating,or ProportionalOutputsHeating OutputCooling outputFIG:clht_rhtOnHeating SetpointCooling SetpointOnReheatOutputOffOffDeviceOpenedDeadbandDeviceOpenedDeviceClosedDeviceClosedTable 5: Installer Configuration Menu (Part 1 of 6)ParameterAppearingon DisplayDescription and Default Selection OptionsPswrdSets the protective accesspassword to prevent unauthorizedaccess to the Installer ConfigurationMenu.Default: 0Note: The default setting does notlock out access to the InstallerConfiguration Menu.BI1 Configuration of Binary Input 1.Default: NoneTemperature Increaseo o( Increments of 1F /0.5C )Figure 26: Heating/Cooling with ReheatRange: 0 to 1,000(None): No function is associated with an input.(Rem NSB): Remote Night Setback (NSB) via a time clock input, anoccupancy sensor, or from a voltage-free contact.Contact open = Occupied; contact closed = Unoccupied.(MotionNO*): Temporary occupancy request via a motion detectorinput. Contact open = Unoccupied. When the contact closes, thethermostat controller goes into the occupied mode for a specifiedTOccTime. Once the TOccTime begins, the thermostat controllerremains in the occupied mode if the contact is open, until theTOccTime expires.(MotionNC*): Temporary occupancy request via a motion detectorinput. Contact closed = Unoccupied. When the contact opens, thethermostat controller goes into the occupied mode for a specifiedTOccTime. Once the TOccTime begins, the thermostat controllerremains in the occupied mode if the contact is closed, until theTOccTime expires.(Window**): Cancels the thermostat controller heating or coolingaction when a window is open. A Window alarm is displayedindicating that the window needs to be closed to resume heating orcooling.* These settings disable any local override function.<strong>TEC22x7</strong>-4 <strong>Series</strong> LONWORKS® <strong>Network</strong> Thermostat Controllers with Two Outputs Installation Instructions 15
Table 5: Installer Configuration Menu (Part 2 of 6)ParameterAppearingon DisplayDescription and Default Selection OptionsBI2 Configuration of Binary Input 2.Default: NoneUI3 Configuration of Universal Input 3.Default: NoneMenuScroC or FGives the option of having thedisplay continuously scroll theparameters.Default: onProvides temperature scale optionsfor display.Default: °F(None): No function is associated with an input.(Door Dry): Door contact only has an effect if BI1 is set toMotionNO or MotionNC. (See the BI1 parameter in this table.) Theoccupancy is now dictated via BI1 and BI2. Any motion detectedsets the zone to Occupied status. The zone remains permanently inoccupied mode until the door contact switch opens momentarily.The thermostat controller then enters stand-by mode. If moremovements are detected, the occupied mode resumes. While thedoor is opened, any movements detected by the remote PIR sensoror the PIR accessory cover are ignored. Use a Normally Closedcontact switching device. Contact opened = Door opened,Contact closed = Door closed.(RemOVR): Temporary occupancy request via a remote input. Thisoverride function is controlled by a manual remote occupancyoverride. When enabled, this condition disables the overridecapability of the thermostat controller.(Filter): A Filter alarm is displayed. This alarm can be connected toa differential pressure switch that monitors a filter.(Service): A Service alarm is displayed on the thermostat controllerwhen the input is energized. This input can be tied into the airconditioning unit control card, which provides an alarm should therebe a malfunction.(None): No function is associated with an input.(COC/NH): Changeover Contact/Normally Heat: A dry contact inputis used to signal seasonal hot/cold water changeover. The contactcloses when cold water is present. Valid only for two-pipe systems.(COC/NC): Changeover Contact/Normally Cool: A dry contact inputis used to signal seasonal hot/cold water changeover. The contactcloses when hot water is present. Valid only for two-pipe systems.(COS): Changeover Analog Sensor: Used for hot/cold waterchangeover switching. Valid only for two-pipe systems.Note: Choose the selection option (0): Cooling Only for theSeqOpera parameter to allow changeover to occur betweenCooling Only and Heating Only. Choose the selection option (2):Cooling and Reheat to allow changeover to occur betweenCooling and Reheat and Heating and Reheat.(SS): Supply Air Sensor Monitoring(on): The scroll is active.(off): The scroll is inactive.(°F): Fahrenheit scale(°C): Celsius scale16<strong>TEC22x7</strong>-4 <strong>Series</strong> LONWORKS® <strong>Network</strong> Thermostat Controllers with Two Outputs Installation Instructions
Table 5: Installer Configuration Menu (Part 3 of 6)ParameterAppearingon DisplayDescription and Default Selection OptionsLockoutOut1ConfCntrlTypSeqOperaSt-By TMUnocc TMSelectable Lockout Levels forlimiting end user keypad interaction.Default: 0Defines the type of operationneeded for Output 1.Default: 4.0Defines the control output for thetype of valves used in theinstallation (TEC2227-4 model).Default: FloatingDetermines the sequence ofoperation.Default: 1Sets the Stand-By timer value(PIR models).Default: 0.5 hoursSets the Unoccupied timer value(PIR models).Default: 0.0 hoursLockoutFunctionLevelUnoccupied Override Occupied TemperatureSetpoints(0) Access Access(1) No Access Access(2*) This lockout level is not used.(3*) This lockout level is not used.(4) Access No Access(5) No Access No Access*If lockout level (2) or (3) is selected, the lockout functions likelockout level (0) or (1), respectively.(2.0): Limits the number of sequences of operation availablefrom 0 to 3, and enables heat/cool operation from the same output.(4.0): Allows access to all sequences of operation from 0 to 5, andenables heat/cool operation from different outputs.(On/Off): For Normally Open (N.O.) or Normally Closed (N.C.)24 VAC two-position valves.(Floating): For proportional three-wire control of 24 VAC floatingvalves.(0): Cooling Only (Off-Cool). The default is Cool.(1): Heating Only (Off-Heat). The default is Heat.(2): Cooling and Reheat (Off-Auto-Heat-Cool). The default is Auto.(3): Heating and Reheat (Off-Heat). The default is Heat.(4*): Cool/Heat Four-Pipe (Off-Auto-Heat-Cool). The default isAuto.(5*): Cool/Heat Four-Pipe and Reheat (Off-Auto-Heat-Cool). Thedefault is Auto.* Selection option (4.0) for Out1Conf only. (See Out1Conf parameterin this table.)Note: Choose the selection option (0): Cooling Only when using achangeover sensor to allow changeover to occur between CoolingOnly and Heating Only. Choose the selection option (2): Coolingand Reheat when using a changeover sensor to allow changeoverto occur between Cooling and Reheat and Heating and Reheat.Time delay between the moment the PIR cover detected the lastmovement in the area and the time at which the thermostatcontroller Stand-By mode and setpoints become active.Range: 0.5 to 24.0 hrs adjustable in 0.5-hour incrementsTime delay between the moment the thermostat controller toggled toStand-By mode and the time at which the thermostat controllerUnoccupied mode and setpoints become active. Setting thisparameter to the factory value (0.0 hours) disables the Unoccupiedtimer. This prevents the thermostat controller from switching fromStand-By mode to Unoccupied mode when PIR functions are used.Range: 0.0 to 24.0 hrs adjustable in 0.5-hour increments<strong>TEC22x7</strong>-4 <strong>Series</strong> LONWORKS® <strong>Network</strong> Thermostat Controllers with Two Outputs Installation Instructions 17
Table 5: Installer Configuration Menu (Part 4 of 6)ParameterAppearingon DisplayDescription and Default Selection OptionsSt-By HTSt-By CLUnocc HTUnocc CLHeat maxCool minPbandSet typeTOccTimeSets Stand-by heating setpoint;value is between occupied andunoccupied heating setpoints.Default: 69.0°F/20.6°CSets Stand-by cooling setpoint limit;value is between occupied andunoccupied cooling setpoints.Default: 78.0°F/25.6°CSets the Unoccupied Heatingsetpoint value.Default: 62.0°F/16.5°CSets the Unoccupied Coolingsetpoint value.Default: 80.0°F/26.5°CSets the Occupied and Unoccupiedmaximum Heating setpoint values.Default: 90.0°F/32.0°CSets the Occupied and Unoccupiedminimum Cooling setpoint values.Default: 54.0°F/12.0°CProportional Band used by the PItemperature control loop of thethermostat controller.Pband is not converted with C or Fscale and is always shown with arange of 3 to 10.Default: 3 (3F°/1.7C°)Provides the option of temporarilychanging the heating or coolingsetpoint by pressing the UP/DOWNarrow keys.Default: permnentSets the duration of the TemporaryOccupancy Time when the heatingor cooling setpoints in the Occupiedmode are established by:• an Override Function enabled inthe Main User Menu (when thethermostat controller is in theUnoccupied mode)• a temporary heating or coolingsetpointDefault: 2.0 hrsRange: 40.0°F/4.5°C to90.0°F/32.0°CRange: 54.0°F/12.0°C to100.0°F/37.5°CRange: 40.0°F/4.5°C to90.0°F/32.0°CRange: 54.0°F/12.0°C to100.0°F/37.5°CRange: 40.0°F/4.5°C to90.0°F/32.0°CRange: 54.0°F/12.0°C to100.0°F/37.5°CNote: When adjusting thetemperature, press theUP/DOWN arrow keys tochange the temperature in0.5F°/0.5C° increments;press and hold theUP/DOWN arrow keysto change the temperaturein 5.0F°/5.0C° increments.ValueF Scale Pband/C Scale Pband3 3.0F°/1.7C°4 4.0F°/2.2C°5 5.0F°/2.8C°6 6.0F°/3.3C°7 7.0F°/3.9C°8 8.0F°/4.4C°9 9.0F°/5.0C°10 10.0F°/5.6C°Note: The use of a larger proportional band is not to use thethermostat controller as a discharge air controller device. The use ofa larger proportional band can be used to solve issues for flawedHVAC design with basic sizing and thermostat controller locationerrors that cannot be worked around.(temporar): Local changes to the heating or cooling setpoints aretemporary, and remain effective for the specified TOccTime.(permnent): Local changes to the heating or cooling setpoints arepermanently stored in the thermostat controller memory.Range: 0.0 to 24.0 hrs in 1-hour increments18<strong>TEC22x7</strong>-4 <strong>Series</strong> LONWORKS® <strong>Network</strong> Thermostat Controllers with Two Outputs Installation Instructions
Table 5: Installer Configuration Menu (Part 5 of 6)ParameterAppearingon DisplayDescription and Default Selection OptionsDeadbandCal RSAux ContactFL timeCphRA/DAReheatSets the minimum deadbandbetween the heating and coolingsetpoints.Default: 2.0F°/1.0C°Sets the desired room air sensorcalibration (offset). The offset canbe added to or subtracted from theactual displayed room temperature.Default: 0.0F°/0.0C°Determines the auxiliary contactfunction and configuration.Default: 0Sets the maximum actuator stroketiming (floating ContrlTypTEC2227-4 model).Default: 1.5 minSets the maximum number of cyclesper hour (on/off CntrlTypTEC2227-4 model).Default: 4Choice of direct or reverse actinganalog output signal (TEC2247-4model).Default: DASets the duty cycle time for reheatoutput (if Option 2, 3, or 5 is chosenin the SeqOpera parameter).Default: 0Range: 2.0F°/1.0C° to 5.0F°/2.5C° (adjustable in 1.0F°/0.5C°increments)Range: -5.0F°/-2.5C° to 5.0F°/2.5C° (adjustable in 1.0F°/0.5C°increments)(0) Not used,or used forreheat(1) AuxiliaryN.O.(2) AuxiliaryN.C.If the Sequence of Operation is set toreheat (SeqOpera = 2, 3, or 5), ignore thisparameter.Occupied = contactclosedUnoccupied = contactopenOccupied = contact openUnoccupied = contactclosed(3) This selection option is not used.(4) This selection option is not used.(5) Auxiliary On/Off control through theauxiliary network command. The outputcan be commanded through the networkfor any required auxiliary functions via aseparate and dedicated networkvariable.The outputaligns withoccupancy.The outputaligns withthesecondarynetworkoccupancycommand.Note: If this NVI is used to remotely command the Auxiliary OutputBO5), then the Auxiliary Output must be configured to a value of 5for this function to operate.Range: 0.5 to 9.0 min (adjustable in 0.5 minute increments)Range: 3 to 8 cycles per hour(DA): Direct Acting, 0 to 100% = 0 to 10 VDC(RA): Reverse Acting, 0 to 100% = -10 to 0 VDC(0): 15 minutes (four cycles per hour), for various equipment withmechanical relays or contactors controlling mechanical reheatsystems.(1): 10 seconds (six cycles per minute), for various equipment withsolid-state relays that withstand short duty cycles such as electricheat.<strong>TEC22x7</strong>-4 <strong>Series</strong> LONWORKS® <strong>Network</strong> Thermostat Controllers with Two Outputs Installation Instructions 19
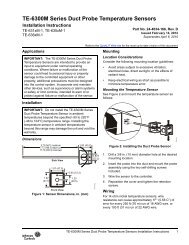
Table 5: Installer Configuration Menu (Part 6 of 6)ParameterAppearingon DisplayDescription and Default Selection OptionsUI3 disTroubleshootingSee Table 7 for display messaging and Table 8 fortroubleshooting details.AccessoriesDisplays the supply or changeovertemperature when UI3 is configuredas an analog input (SS or COS).Used as a diagnostic/service help,to troubleshoot and diagnosesensor operation.Default: -40°F/-40°CAll the accessories in Table 6 include mountinghardware; contact the nearest <strong>Johnson</strong> <strong>Controls</strong>®representative to order any of these parts.Note: Review the technical specifications of theoptional accessories prior to their use in an application.Used as a diagnostic/service help, to troubleshoot and diagnosesensor operation.Repairs and ReplacementIf the <strong>TEC22x7</strong>-4 <strong>Series</strong> Thermostat Controller fails tooperate within its specifications, replace the unit. For areplacement thermostat controller, contact the nearest<strong>Johnson</strong> <strong>Controls</strong> representative.Table 6: Accessories (Order Separately)Code Number DescriptionTEC-7-PIR 1 Zone Controller Cover with Occupancy SensorSEN-600-1Remote Indoor Air Temperature SensorSEN-600-4Remote Indoor Air Temperature Sensor with Occupancy Override and LEDTE-6361M-1 2 Duct Mount Air Temperature SensorTE-636S-1Strap-Mount Temperature Sensor1. The TEC-7-PIR Accessory Cover can be used to replace the existing cover on a non-PIR <strong>TEC22x7</strong>-4 Thermostat Controllerto provide occupancy sensing capability.2. Additional TE-636xx-x <strong>Series</strong> 10k ohm <strong>Johnson</strong> <strong>Controls</strong> Type II Thermistor Sensors are available; refer to theTE-6300 <strong>Series</strong> Temperature Sensors Product Bulletin (LIT-216320) for more details.Table 7: Alarm MessagesDisplayFunctionServiceIndicates that there is a service alarm in accordance with the programmable Binary Input (BI2).FilterIndicates that the filter(s) is dirty in accordance with the programmable Binary Input (BI2).WindowIndicates that an outside window or door is open and has cancelled the thermostat controllerheating or cooling action in accordance with the programmable Binary Input (BI1).20<strong>TEC22x7</strong>-4 <strong>Series</strong> LONWORKS® <strong>Network</strong> Thermostat Controllers with Two Outputs Installation Instructions
Table 8: Troubleshooting DetailsSymptomProbable CausesMultiple Symptoms Excessive bus errors may be occurring.A device may have been added or changed with a duplicate address (may not be the same addressas some devices having problems, and may have happened sometime before the problem wasnoticed).Wiring errors or wire problems may exist.A download may be in progress.There may be a fault at a device.A repeater may be needed or may be configured incorrectly.Poor Performance See the probable causes listed previously in the Multiple Symptoms section of this table.Excessive bus traffic may exist (bus overload).There may be too many devices on the network.There may be unaccounted devices on the network (not mapped to the NAE).There may be unusually slow devices on the network or devices that are slow to respond.ThermostatSee the probable causes listed previously in the Multiple Symptoms section of this table.Controller GoesA power failure or other failure may have occurred at the thermostat controller.OfflineCommunication may have been disabled at the thermostat controller.ThermostatSee the probable causes listed previously in the Multiple Symptoms section of this table.Controller Does NotA thermostat controller may be connected to the wrong bus.Come Online<strong>TEC22x7</strong>-4 <strong>Series</strong> LONWORKS® <strong>Network</strong> Thermostat Controllers with Two Outputs Installation Instructions 21
Technical Specifications<strong>TEC22x7</strong>-4 <strong>Series</strong> LONWORKS <strong>Network</strong> Thermostat Controllers with Two OutputsPower RequirementsTriac OutputRating (BO1,BO2, BO3,BO4)AnalogOutput RatingAuxiliaryOutput RatingAnalog InputsBinary InputsWire SizeOn/Off andFloatingControlProportionalControlTriac Output19 to 30 VAC, 50/60 Hz, 2 VA (Terminals 4 and 5) at 24 VAC Nominal, Class 2 orSafety Extra-Low Voltage (SELV)19 to 30 VAC, 1.0 A Maximum, 15 mA Minimum, 3.0 A In-Rush0 to 10 VDC into 2k ohm Resistance (Minimum)19 to 30 VAC, 1.0 A Maximum, 15 mA Minimum, 3.0 A In-RushResistive Inputs (RS and UI3) for 10k ohm <strong>Johnson</strong> <strong>Controls</strong> Type II NegativeTemperature Coefficient (NTC) Thermistor SensorsVoltage-Free Contacts across Terminal Scom to Terminals BI1, BI2, or UI3Unshielded twisted pair - 22 AWG (0.6 mm Diameter) Minimum, 18 AWG (1.0 mmDiameter) RecommendedLONWORKS <strong>Network</strong> Standard 64 Devices Maximum without a Repeater, 127 Devices Maximum with a Repeater;6,250 ft (1,905 m) Maximum (Bus Topology)Thermostat Controller-40.0°F/-40.0°C to 122.0°F/50.0°CMeasurement RangeSensor TypeLocal 10k ohm NTC ThermistorResolution±0.2F°/±0.1C°Control Accuracy±0.9F°/±0.5C° at 70.0°F/21.0°C Typical CalibratedSetpoint Heating 40.0°F/4.5°C to 90.0°F/32.0°C in 0.5° IncrementsRangeCooling 54.0°F/12.0°C to 100.0°F/38.0°C in 0.5° IncrementsMinimum Deadband2F°/1C° between Heating and CoolingAmbient Operating 32 to 122°F (0 to 50°C); 95% RH Maximum, NoncondensingConditionsStorage -22 to 122°F (-30 to 50°C); 95% RH Maximum, NoncondensingCompliance United States UL Listed, File E27734, CCN XAPX,Under UL 873, Temperature Indicating and Regulating EquipmentLONMARK® Certification 3.4FCC Compliant to CFR 47, Part 15, Subpart B, Class ACanadaEuropeAustralia andNew ZealandShipping WeightUL Listed, File E27734, CCN XAPX7,Under CAN/CSA C22.2 No. 24, Temperature Indicating and Regulating EquipmentIndustry Canada, ICES-003CE Mark, EMC Directive 2004/108/ECC-Tick Mark, Australia/NZ Emissions Compliant0.75 lb (0.34 kg)The performance specifications are nominal and conform to acceptable industry standards. For application at conditions beyond thesespecifications, consult the local <strong>Johnson</strong> <strong>Controls</strong> office. <strong>Johnson</strong> <strong>Controls</strong>, Inc. shall not be liable for damages resulting from misapplication ormisuse of its products.Building Efficiency507 E. Michigan Street, Milwaukee, WI 53202Metasys® and <strong>Johnson</strong> <strong>Controls</strong>® are registered trademarks of <strong>Johnson</strong> <strong>Controls</strong>, Inc.All other marks herein are the marks of their respective owners. © 2010 <strong>Johnson</strong> <strong>Controls</strong>, Inc.22<strong>TEC22x7</strong>-4 <strong>Series</strong> LONWORKS® <strong>Network</strong> Thermostat Controllers with Two Outputs Installation InstructionsPublished in U.S.A.www.johnsoncontrols.com