Create successful ePaper yourself
Turn your PDF publications into a flip-book with our unique Google optimized e-Paper software.
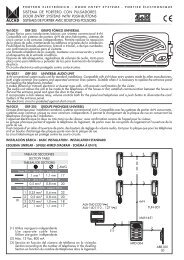
434.LED100-240V~50/60HzR FINR FLOOPTHROUGHDigitalAudioVCR O OTVCoaxial1
INR FR F LOOPTHROUGHAC100-240V~50/60HzDigitalAudioVCR O OTVCoaxial4
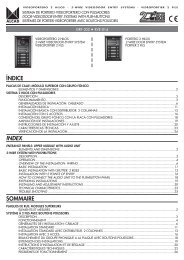
Interfaz del usuario1.Instalación rápida5
My Album - Thumbnail 17/10/07 12:59My Music 04/07/05 19:21MUSIC : 66 songsRoot(USB)STBAFJPEGPROGRE-1QUALITYOGUNDAMHAPPY001.18-vbr_48KB_44.1002.19-vbr_64KB_44.1003.20-vbr_96KB_44.1004.22-vbr_192KB_44.005.23-vbr_256KB_44.006.24-vbr_320KB_44.007.25-vbr_32KB_44.1Move Move OK View ExitFolderDeviceMoveMoveOKSelectExit11
2.4.4 Mi GrabacónEn Mi grabación el usuario puede ver un programa que ha grabadopreviamente, o configurar las opciones de grabación. El sistema dearchivos soportado por el aparato es FAT y FAT32.En el menú de lista de grabaciones, el usuario puede ver todos losprogramas grabados o puede borrar el programa grabado. En el menú dedispositivo de grabación, el usuario puede seleccionar varios tipos dealmacenamiento para los medios audiovisuales o diferentes espacios enun almacenamiento de medios audiovisuales para la grabación. En elmenú de preferencia de grabación, el usuario puede cambiar el modo deGrabación por un botón así como el tiempo de grabación por defecto.Grabación con un botón:ON (ACTIVAR): esta opción inicia la grabación del programa que se estáviendo directamente después de pulsar el botón RECORD (GRABAR).OFF (DESACTIVAR): esta opción permite al usuario programar laduración de la grabación después de haber pulsado el botón RECORD(GRABAR).Pulse los botones (Subir/Bajar/Izquierda/Derecha) para navegar por el menú.Pulse el botón para seleccionar una opción o modificar unaconfirmación.Pulse el botón (SALIR) para salir del presente menú.Pulse los botones (ROJO/VERDE/AMARILLO/AZUL) para funciones especiales indicadasen el menú.Nota:Para las funciones RECORDING/PLAYBACK (DESPLAZAMIENTOTEMPORAL/GRABACIÓN/REPRODUCCIÓN) se necesita un dispositivoUSB2.0. Recomendamos el uso de USB2.0 HDD y utilizar uncompartimiento separado para PVR.Antes de utilizar el compartimiento separado, formateelo con elsintonizador TDT.NOTA: T<strong>eng</strong>a en cuenta que la operación de formateo borrará todos losarchivos existentes en el compartimiento. Debe guardarlos antes deformatear el aparato.My Record 18/07/08 15:13Recorded ListRecording DeviceRecording PreferenceMy Record- Recorded List 18/07/08 15:21No. Progra mN ame0001 Sky Travel_0807170002 Sky Travel_0807170003 Sky Travel_0807170004 Sky Travel_0807170005 UKTV History_080717InfoSky Travel_08071708/07/1716:44~16:4500 0112MoveOKSelectExitDeviceDelCH+/-PageOKSelectExit13
Figura 16. Función Digest3.10 Subtítulo de teletextoEsta opción muestra el subtítulo del telexto. El estilo del subtítulo puede serdiferente dependiendo del servidor del contenido.Pulse los botones (Texto/Subtítulo) para ver el teletexto o lapágina de programación de subtítulos. Pulse los botones (Izquierda/Derecha) para seleccionar TTX Subtitle (Subtítulos de teletexto).Pulse los botones (Subir/Bajar) para el idioma de subtítulos delteletexto. Pulse los botones (OK/Salir) para salir de la página deprogramación.3.11 GuíaPulse el botón (GUÍA) en el modo de reproducción normal. Para másdetalles consulte la sección 2.3.2.3.12 Cambio entre TV y RadioPulse el botón (AMARILLO) para desplazarse entre los modos deTV y Radio.3.13 MensajeAlgunos mensajes informan al usuario del estado en el que se encuentra en esemomento el sintonizador TDT.3.13.1 Sin señalEl sintonizador TDT no recibe señal si por ejemplo tiene un cable desconectado.3.13.2 Sin servicioEl programa no posee ningún contenido.3.13.3 Servicio codificadoEl programa está codificado y hay que pagar para verlo. Deberá entrar encontacto con el proveedor para descodificar el programa.3.13.4 Sobrecarga en la antenaLa potencia de la antena se encuentra sobrecargada.3.13.5 No soporta HDTVSi el contenido del programa es de formato HDTV (Televisión de alta definición),este sintonizador no lo soporta.3.13.6 Bloqueo de canalLos programas se bloquean cuando se activa esta opción (Consultar sección2.3.1.2) y se bloquean mediante una contraseña (Consultar sección 2.2.3.2).Para poder ver el programa el usuario deberá introducir la contraseña correcta.16
NOTA SOBRE DISPOSITIVOS USBEste receptor digital terrestre con grabador necesita, para sucorrecto funcionamiento, el uso de dispositivos externos dememoria de alta velocidad.Si usted va a utilizar un dispositivo de memoria externo USB (disco duro externo o lápiz de memoria) elija un dispositivo USB2.0 con una velocidad mínima de transferencia de datos de 3MB/s siendo recomendable que t<strong>eng</strong>a 6 MB/s.El dispositivo externo se deberá formatear en modo FAT32 parapoder utilizarlo en nuestras grabaciones. Esto se puede hacerdesde una opción del menú.Debido a la gran diversidad de marcas y productos de tipo USBexistentes en el mercado, y dada la imposibilidad de hacerpruebas de compatibilidad con todos los fabricantes, por favorasegúrese de que el dispositivo de grabación es de últimageneración para una mayor compatibilidad.Por otra parte, la reproducción de formatos DivX, MPEG, etc. hasido probada y funciona perfectamente con códecs estándar. Siexperimenta alguna dificultad en la reproducción de alguno deestos formatos, por favor compruebe que está usando códecs decompresión compatibles con el producto.
English
Important Safety Instructions1) Read these instructions.2) Keep these instructions.3) Heed all warnings.4) Follow all instructions.5) Do not use this apparatus near water.6) Clean only with dry cloth.7) Do not block any ventilation openings, install in accordance with the instructions.8) Do not install near any heat sources such as radiations, heat registers, stoves, orother apparatus (including amplifiers) that produce heat.9) Do not defeat the safety purpose of the polarized plug. If the provided plug doesnot fit into your outlet, consult an electrician for replacement of the obsolete outlet.10) Protected the power cord from being walked on or pinched particularly at plugs,convenience receptacles, and the point where they exit from the apparatus.11) Only use attachments/accessories specified by the manufacturer.12) Unplug this apparatus during lighting storms or when unused for long periods oftime.13) Refer all servicing to qualified service personnel. Servicing is required when theapparatus has been damaged in any way, such as power-supply cord or plug isdamaged, liquid has been spilled or objects have fallen into the apparatus, theapparatus has been exposed to rain or moisture, does not operate normally, orhas been dropped.14) Mains plug is used as the disconnect device, the disconnect device shall remainreadily operable.15) The ventilation should not be impeded by covering the ventilation openings withitems, such as newspapers, table-cloth, curtains, etc.16) No naked flame sources, such as lighted candles, should be placed on the apparatus.17) Attention should be drawn to the environmental aspects of battery disposal.18) The use of apparatus in moderate climate.WARNING: To reduce the risk of fire or electric shock, do not expose this apparatus torain or moisture.WARNING: The batteries shall not be exposed to excessive heat such as sunshine,fire or the like.
The symbol indicates that dangerous voltages constituting a risk of electricshock are present within this unit.The symbol indicates that there are important operating and maintenanceinstructions in the literature accompanying this unit.The symbol indicates that this product incorporates double insulation betweenhazardous mains voltage and user accessible parts.When servicing use only identical replacement parts.The USB memory stick should be plug in the unit directly. USB extension cableshould not be used to avoid failing of data transferring and interference caused.When the apparatus was in electrostatic circumstance, it may bemalfunction and need to reset by user.Table of ContentsFront and Rear Panel Illustration........................................................................ 1Remote Controller ............................................................................................. 2Connections...................................................................................................... 4User Interface.................................................................................................... 5Quick Installation............................................................................................ 5Menu Operations.............................................................................................6Normal Play....................................................................................................14Troubleshooting ............................................................................................... 17Specifications................................................................................................... 18
100-240V~Front and Rear Panel Illustration1. Front Panel431. Standby Indicator:Used to visually show power state of the set top box, the greenLED will show if turned on the set top box and the red LED will be light if the set topbox entered standby mode.2. REMOTE CONTROL SENSOR:Used to receive the signal from the remote control.3.USB JACK(Optional):Used to connect to an external USB 2.0 device.Note: Not all receivers have the USB Jack.4.LED DISPLAY WINDOW: Used to display channel number.2. Rear Panel50/60HzR FINR FLOOPTHROUGHDigitalAudioVCR O OTVCoaxial1.RF IN : This socket connects to your external aerial.2.RF LOOP THROUGH: This socket will bypass the RF signal to either your TV oranother video system.3.VCR SCA<strong>RT</strong>: This socket connects to either a DVD or other video system.4.TV SCA<strong>RT</strong>: This socket connects to your TV.5.COAXIAL: This socket connects to a coaxial socket on your surround sound system.6.MAINS CABLE: This is used to connect to your main power supply.1
Remote ControllerRemote Key Function:1. MUTE Used to turn the sound on or off.2. NUMBER KEYS:Used to select channel numbers orinput numbers in menus.3. RECALL: Used to switch between the last two viewedchannels.4. INFO Used to display information about the channelbeing viewed or further information about the programwhen in small EPG screen.5. SUBTITLE: Used to switch between different subtitlesthat are broadcasted6. EXIT: Used to return to the previous screen or menu.7. CH+: Used to move around the menu screens orselecting the channels in non-menu state.8. VOL+:Used to move around the menu screens orchanging the volume in non-menu state.9. OK: Used to confirm a selection within a menu.10. RECLIST: Used to show the recorded programs list.11. COLOR KEYS (RED/ GREEN/ YELLOW/ BLUE):Used to operate different functions in TEXT screen orother menus.12. STOP: Used to stop the current recording if exist orstop the HDD playback back to DTV mode.13.TV/RADIO: Used to switch between TV channels andRadio stations.14. RECORD: Used to record the program <strong>manual</strong>ly,and select the record duration if pressed it again.15. FAST FORWARD: Used to adjust the forwardspeed if in HDD time shifting playback mode.16. DTV/VCR: Used to switch between the VCR SCA<strong>RT</strong>input and the DTV output mode.17.STANDBY Used to switch the set top box to on orstandby.18. FAV: Used to switch access your favourite channels.19. AUDIO:Used to set the sound output, the available settings Are STEREO, LEFT, RIGHT, MONO.20. MENU Used to open the main menu window.21. EPG: Used to display information about the program being viewed and what's on next.22. VOL-: Used to move around the menu screens or changing the volume in non-menu state.23. CH- :Used to move around the menu screens or selecting the channels in non-menu state.24. TEXT: Used to open teletext OSD display if teletext available in the broad caste stream.25. PAUSE: Used to pause or playback the program being viewed .26. FAST BACKWARD: Used to adjust the backward speed if in HDD time shifting playback mode.Note: SUBTITLE/TEXT/LANGUAGE may not be available for all channels.RED/GREEN/YELLOW/BLUE may has specifical function in different menus.2
Installing the BatteriesRemove the battery cover from the remote control and put 2xAAA size batteries insidethe compartment.The diagram inside the battery compartment shows the correct way to install thebatteries.1.Open the cover 2.Install batteries 3.Close the coverOPENOPENUsing the Remote ControlTo use the remote control, point it towards the front of the digital set top box The remotecontrol has a range of up to 7 metres from the set top box at an angle of up to 60 degrees.The remote control will not operate if its path is blocked.Sunlight or very bright light will decrease the sensitivity of the remotecontrol.3
POWERBYPASS1 MIC 21 MIC VOL 2PRO LOGIC100-240V~3 STEREOEXCITEMODETESTCHANNELKARAOKEMUTEINPUT SELECTORDOWNVOLUMEBASS MIC TREBLE ECHOUPConnectionsCaution: Make sure to check the voltage specification of the wall outlet is the samerating with the receiver. To prevent the risk of electric shock, do not open the cover orthe back of the receiver.TV AerialTV50/60HzR FINR F LOOPTHROUGHDigitalAudioVCR O OTVCoaxialVCRCoaxial CableCoaxialAmplificador DigitalNote: When connecting the receiver to other equipment, e.g., TV, VCR and amplifier,make sure to refer to relevant user <strong>manual</strong> for instruction. Also, make sure youdisconnect all the equipments from the mains supply before the connection.4
User Interface1.Quick Installation1.1 Setting Country and LanguageUser can select preferred country and language at Setup - Installation page.(1) Press button to enter Main Menu.(2) Press button to select SETUP option.(3) Press button to select Installation option.(4) Press button to enter Installation page.(5) Press button to select Country option.(6) Press button to set Country Setting.(7) Press button to select OSD Language option.(8) Press button to set a language.If there is no channel database in the STB, it will start at step(5) directly when booting.1.2 How to receive the programs?Scan the possible frequency and bandwidth to receive the programs.Press or button to start Auto Scan or Manual Scan.1.2.1 Auto ScanAuto Scan will erase the database first, and scans default frequency and bandwidthby Country Setting. Follow the steps (1) ~ (8) at section 1.1.(9) Press button to be confirmed to clear the database.(10) Press button to confirm clear action and start Auto Scan.It costs time to do Auto Scan, user can press button to exit at anytime.See Figure 1.Later if you want to scan again, you can follow above Quick Installation procedure.Figure 1. Clear database messageFigure 2. Manual Scan edit5
1.2.2 Manual ScanManual Scan adds the scanning results into database, it doesn't erase the database.But the User has to know the Frequency and Bandwidth for scanning.If the user scans the same Frequency and Bandwidth more than once, the previousprograms will be overwritten. Follow the steps (1) ~ (8) at section 1.1.( 9 ) Press button to enter Manual Scan Page.(10) Press button to select Frequency option.(11) Press button to input the Frequency value.(12) Press button to select Bandwidth option.(13) Press button to set Bandwidth value.(14) Press button to start scan or exit. See Figure 2.2.Menu OperationsOnce the channel scan is finished and all the channels are stored into the database,you can start to watch the digital terrestrial TV channel or listen to the radio broadcast,some typical operations are given in this chapter.2.1 Main MenuMain Menu for operating a lot of functions.(1) Press button to enter Main Menu.(2) Press button to display the version information of STB.2.2 SETUPSet the system settings of STB.2.2.1 InstallationSet the receiving and playing program settings of STB.2.2.1.1 Antenna SettingSet the antenna power on or off to supply +5V power to antenna or not.6
Note: The default is OFF, set this option to ON only if this STB is connected to anactive antenna which amplifies the received RF signal, otherwise please set it to OFF2.2.1.2 Country SettingSet the country for Auto Scan, Manual Scan and Time Zone.Note: Change the Country Setting will automatically change the default Time Zone andset the default Frequency and Bandwidth for Auto Scan.2.2.1.3 OSD LanguageSet the On Screen Display Language.2.2.1.4 Audio LanguageSet the audio language for watching program.2.2.1.5 Subtitle LanguageSet the language for displaying subtitle.2.2.1.6 LCNSet the Logical Channel Number to on or off.Note: LCN is a number that uniquely identifies a logical channel, which is popular insome european countries such as England, France.2.2.1.7 Auto Time Zone / Time ZoneAllow you to enable or disable auto time zone offset update.If you know the GMT(Greenwich Mean Time) time zone offset of your location, set theAuto Time Zone to OFF and select an appropriate Time Zone, otherwise set it to ONand let the system update the time zone automatically according to the transportstream.Note: Some Countries are covered with more than one Time Zone.2.2.1.8 Auto ScanPress button to start Auto Scan. See section 1.2.1 for details.2.2.1.9 Manual ScanPress button to start Manual Scan. See section 1.2.2 for details.2.2.2 TV SetupSetup the display mode for TV. See Figure 3.Figure 3. TV SetupFigure 4. Video Enhancement7
2.2.2.1 TV FormatSet display format for watching program, such as 4:3LB, 4:3PS, 16:9PB,16:9AUTO.4:3LB(LetterBox): Typically for wide screen content displays on conventional 4:3 TVwith black bars above and below the picture.4:3PS(PanScan): Typically for wide screen content displays on conventional 4:3 TVwith left and right edges cropped.16:9PB(PillarBox)/16:9 AUTO: Typically for wide screen 16:9 TV.2.2.2.2 TV ModeSet PAL, NTSC or AUTO for display. AUTO will switch PAL or NTSC by program content.This setting should be matched with user's TV.2.2.2.3 OSD TransparencySet the On Screen Display transparency. 1 is the most transparent.2.2.2.4 Banner Display TimeSet Banner displays time. Banner doesn't disappear when set as Always anddisappears at timeout when set as other values.2.2.2.5 Video OutputSet the video output mode to TV.2.2.2.6 Video EnhancementSet the Video Enhancement. See Figure 4.(1) Press button to select Video Enhancement option.(2) Press button to set Video Enhancement.(3) Press button to select Flesh Tone or Black/WhiteExpansion.(4) Press button to set Flesh Tone and Black/White Expansion.2.2.3 PasswordSet password for menu lock or channel lock or censorship lock. And the user can changepassword here, the default PIN Code is 6666.2.2.3.1 Menu LockLock the menus by password.2.2.3.2 Channel LockLock the channel which has been set to lock status when turning on the Channel Lock.Please see section 2.3.1.2 for details.2.2.3.3 Censorship LockLock the program by password and censorship threshold.The censorship info is in program content. Under the censorship rating, user has toenter the right password for watching program.2.2.3.4 Change PasswordTo change the PIN code, select this option, press button to triggerchanging password and buttons to enter old password, new password andconfirm new password. If succeed, the PIN Code Changed message will be displayed,otherwise the PIN Code Error message will be displayed.8
2.2.4 Advance TimerUser can set timer for watching the program by date and time <strong>manual</strong>ly or from the TV/Radio Guide(see section 2.3.2). When setting date and start time is arrived, STB willautomatically switch to the wanted program. Press any key except button, STB asks user to abort it or not when watching booked program. User candelete the event while it isn't at running.2.2.5 Set DefaultRestore STB to factory default. All settings did by user will be restored to factory defaultvalues and the database will be erased together.2.2.6 SW Update (Optional)Note: Not all receivers have this item.Update software by USB. Enter file browser and press button to changefolder and focus on the update file, press button to start update.2.3 TV/RADIOThere are two types of program: TV and Radio. The operation of the List and Guide ofTV and Radio are almost the same. Herein take TV as example.2.3.1 ListUser can operate some functions in List. See Figure 5.Figure 5. TV ListFigure 6. Guide - Event2.3.1.1 FavoritesUser can quickly channel up/down the favorite programs by favorite filter. There are 8 groupsof favorite for user setting: News, Sport, Movie, Music, Shopping, Travel, Boy and Girl.Press button to set or clear the favorite group when Favorites option selected.2.3.1.2 LockLock will ask password before watching this program when SETUP -> Password ->Channel Lock is turned on. Please see section 2.2.3.2 for details.Press button to set or clear lock status when Lock option selected.2.3.1.3 EditUser can edit the program name, maximum l<strong>eng</strong>th is 20 characters.(1) Press button to select Edit option and button to select theprogram.9
(2) Press button to display program info and press it again to edit program name.(3) Press button to select the character.(4) Press button to finish the editing and return to previous program info page.(5) Press button to save the editing and return to List or press button toreturn to List without saving.2.3.1.4 MoveMove will allow you move the position of the channels in the list.Note: This option will not appears in this list when SETUP->Installation ->LCN is set to ON.2.3.1.5 SortSort will allow you sort the channels by AZ or PayFree.Note: This option will not appears in this list when SETUP->Installation ->LCN is set to ON.2.3.1.6 SkipSkip will skip the program when changing program by CH+/-.Press button to set or clear skip status when Skip option selected.2.3.1.7 DeleteDelete will delete the program permanently from database. User must rescan to recover it.Press button to set delete one or delete all when Delete option selected.2.3.1.8 SearchUser can search the program name by partial keyword.(1) Press button to select Search option.(2) Press button to entry search page.(3) Press button to input keyword.(4) Press button to Search and return List. The matched program will be focused.(5) Press button to the next or previous matched program.2.3.2 GuideGuide is also naming EPG (Electronic Program Guide). See Figure 6.(1) Press button to select program or EPG event.(2) Press button to change event or date.(3) Press button to exit all the menus or show the detail information of selected event.(4) Press button to exit to previous menu.(5) Press button to enter Book page and button to save after edited.If it conflict with itself or other event, a conflict message will be displayed. The successfulbooking will be added to Main Menu-> SETUP->Advance Timer(see section 2.2.4).10
2.4 MULTIMEDIAMultimedia must be used with external storage device, otherwise the "Device is notready!" message will be displayed. Please make sure that the storage device is benot used for PHOTP/MUSIC/MOVIE/RECORD/PLAYBACK/TIMESHIFT, before it willbe plug in/out.2.4.1 My AlbumMy Album can display JPG/BMP/GIF photos and operate it. If there are photos in deviceroot folder, it will start at Thumbnail mode, otherwise it will start at Folder mode.Press button can switch to Folder mode and button to Thumbnail modeagain.2.4.1.1 Thumbnail/FolderThe info (Width X Height and Date) of selected photo will be displayed at the left bottom inThumbnail mode and right up in Folder mode. See Figure7.Figure7. My Album - ThumbnailFigure 8. My Music - BrowserPress button to browse folders or files.Press button to view the selected photo and press again to start slide show.Press button to see the help information when view or slide show.2.4.1.2 ZoomPress button to zoom in or zoom out the photo in view mode.The zoom factor can be 25%, 50%, 100%, 150%,2 00%. If zoom factor greater than 100%,press button can move around the photo.2.4.1.3 RotationPress button to rotate left or right and buttonto flip horizontal or vertical in view mode. After rotating or flipping the photoand return Thumbnail mode, the effect will be keeped.11
2.4.1.4 Slide ShowPress button to view the photo from Thumbnail or Folder mode and press it again tostart the slide show.Press button to play or pause the slide show.Press button to set music playing at background when slide show.Press button to set repeating or once.Press button to set the time interval between current and next photo.Press button to next or previous photo right away.2.4.2 My MusicMy Music can play most of MP3/WMA files. It displays progress bar, audio spectrum, currentplaying time and total time while playing. See Figure 8.Press button to select device if an external USB hub connected.Press button to browse folders and files.Press button to start play.Press button to play or pause.Press button to stop.Press button to set play mode as Repeat All, Repeating, Random, repeat Off.Press button to set fast forward speed as x2,x3,x4,Normal.Press button to adjust volume while playing.2.4.3 My MovieMy Movie can play most of MPEG2/4 files. It displays the played file name at the top leftcorner , and use the info key to get the current playing time and total time information whileplaying.Pressbutton to select device if an external USB hub connected while browsing, and toshow the control info bar while playing.Press to select folders and files duringbrowsing, and to switch next/previous file or adjust the volume while playing.Pressbutton to select a file to play.Pressbutton to play or pause while playing.Pressbutton to play the frame one by one while palying.Pressbutton to set fast backward speed as x2, x4, x8, x16, x32, Normal.Pressbutton to set fast forward speed as x2, x4, x8, x16, x32, Normal.2.4.4. My RecordMy Record make user can view the program that has been recorded, or configure theoptions for recording. Please notice that the File System supported is FAT and FAT32.In Recorded List menu, user can view or delete the recorded program. In RecordingDevice menu, user can select different storage media or different partition in one storagemedia for recording. In Recording Preference menu, user can change the mode of TimeShift, One Button Recording, and the l<strong>eng</strong>th of default recording period. Please noticethat Time Shift Size is calculated automatically according to the current storage mediaor current partition, it can't be modified.12
Time Shift:Auto: this option will start Time Shift recording automatically for programbeing viewed. Pause: this option will start Time Shift recording only afterPAUSE key is pressed by user. OFF: this option will disable Time Shiftrecording.One Button Recording:ON: this option will start recording the program being viewed directlyafter RECORD key is pressed. OFF: this option will enable user topre-set the l<strong>eng</strong>th of recording after RECORD key is pressed.Press for navigation in the menu.Press to select or modification confirm.Press to exit the current menu.Press for special function indicated inthe menu.Note:For usility of TIMESHIFT/RECORDING/PLAYBACK function,USB2.0 storage device is needed basicly. We strongly recommenduser to use USB2.0 HDD, and use independent partition for PVR.Before using the partition, please format the partition throughthe set-top-box.NOTE:Please notice that FORMAT operation will delete all the files in thedisk or the current partition, so backup the files before FORMAToperation.My Record 18/07/08 15:13My Record- Recorded List 18/07/08 15:21Recorded ListRecording DeviceRecording PreferenceNo. Progra mNa me0001 Sky Travel_0807170002 Sky Travel_0807170003 Sky Travel_0807170004 Sky Travel_0807170005 UKTV History_080717InfoSky Travel_08071708/07/1716:44~16:4500 0112MoveOKSelectExitDeviceCH+/-PageOKSelectExitDelFigure 9. My RecordFigure 10. Recorded List2.5 ACCESSORYThere are three options: Gomoku, Calendar, Calculator.GomokuPress button to set play mode and difficulty.Press button to start play Gomoku.Press button to select the position.Press button to place the piece.Calendar displays the year, month, and date.Calculator can used for mathematical calculations.13
3.Normal PlayNormal Play means STB under watching TV or listening to the Radio. See Figure 11.Figure11. Normal Play - RadioFigure 12. Program Info3.1 InformationPress button once to display info banner. Banner displays the program No.,favorite setting, current time, program name, now and next event, lock, scramble,subtitle and teletext info.Press button when banner exist to display detail info of now event.Press button when detail exist to display current program info. See Figure 12.3.2 Switch ProgramUser can switch program by CH+/- or input program number directly.If the input program number doesn't exist, STB will ignore the input. Or press button to switch to last watching program from current watching program.3.3 VolumePress button to adjust the volume.Press button to mute. If adjust the volume while mute, mute will be canceled.3.4 Program ListPress button to display Program List with No., name and lock/scramble/skipstatus.Press to switch the program.Press to return normal play mode.Figure 13. Audio ChannelFigure 14. Teletext Setting Page14
3.5 AudioSwitch the sound channel and switch sound mode to LR(stereo) or LL (left) or RR(right).If setting audio language at SETUP->Installation->Audio Language, the audiochannel default language will be chosen by setting. See Figure 13. Press button to display the audio channel page.Press button to select Channel/Audio PID or Sound Mode option.Press button to set the value.3.6 PausePause video and audio. But it will be canceled by any input.3.7 FavoritesUser can switch the favorite programs in the same favorite group.About favorites setting, see section 2.3.1.1 for details.Press button to switch the favorite group in Program list.Press button to switch the same favorite program in normal play mode.3.8 TeletextDisplay teletext on screen, the style of teletext may be different by content provider.See Figure 14.Press button to display the teletext setting page.Press button to select the teletext language if the program has teletext.Press button to exit the teletext setting page.Press button to change teletext page if teletext exists.3.9 SubtitleDisplay the subtitle on screen, the style of subtitle may be different bycontent provider. See Figure 15.Press button to display subtitle setting page.Press button to select subtitle language, if the program has subtitle.Press button to exit subtitle setting page.Figure 15. Subtitle Setting PageFigure 16. TTX Subtitle in Teletext3.10 Teletext SubtitleDisplay subtitle by teletext, the style of the teletext subtitle may be different by contentprovider.15
Press button to display teletext or subtitle setting page.Press button to select TTX Subtitle .Press button to select teletext subtitle language.Press button to exit the setting page.3.11 GuidePress button at normal play state, see section 2.3.2 for details.3.12 TV/Radio SwitchPress button to toggle between TV and Radio Mode.3.13 MessageThere are some messages to inform user the current status of the STB.3.13.1 No SignalSTB can't get signal, for example, cable is disconnected.3.13.2 No ServiceProgram doesn't have any content to play.3.13.3 Service ScrambledProgram is scrambled for payment, you need contact with the content provider to knowhow to descramble it.3.13.4 Antenna OverloadThe power of antenna is overload.3.13.5 HDTV Not SupportIf the program content is HDTV format, this STB doesn't support it.3.13.6 Channel LockedProgram is locked by setting lock (see section 2.3.1.2) and turning on channel lock inpassword setting (see section 2.2.3.2). User must input correct password to watchprogram.16
TroubleshootingIf you experience problems with this receiver or its installation, in the firstinstance please read carefully the relevant sections of this User Manual andthis Troubleshooting section.17
SpecificationsThis symbol on the product or in the instructions means that your electrical and electronicequipment should be disposed at the end of life separately from your household waste.There are separate collection systems for recycling in the EU.For more information, please contact the local authority or your retailer where you purchased theproduct.18
NOTE ON USB DEVICESTo operate properly, this terrestrial digital receiver with recorderrequires the use of high-speed external memory devices.If you intend to use an external memory device with a USBconnection (for example, an external hard disk or a pendrive),choose a USB 2.0 device with a data-transfer speed of at least 3MB/s, and preferably with a speed of 6 MB/s.Whatever external device you use, it must be formatted in FAT32mode if it is to be used for recordings. Simply choose thisformatting mode from the menu.There exists a great variety of USB products on the market. Sinceit is impossible to test the devices of every manufacturer forcompatibility, please make sure that the recording device youchoose belongs to the latest generation of devices since theseoffer the greatest compatibility.On the other hand, the ability to read such formats as DivX,MPEG, etc. has been tested and the product works perfectly withthe standard codecs. If you experience difficulty reading any ofthese formats, kindly ensure that you are using compressioncodecs which are compatible with the product.
Français
Avertissement: Connectez directement votre périphérique USB au portUSB de l'appareil. L'utilisation d'un câble USB n'est pas recommandée etpourrait provoquer des interférences et l'échec des transferts de données.Une charge électrostatique peut causer un dysfonctionnement de l'appareil.Celui-ci doit alors être réinitialisé par l'utilisateur.124556141718
100-240V~431. Voyant Standby : Utilisé pour montrer visuellement l'état derégime du décodeur, le voyant vert LED indique que le décodeur estallumé, le voyant rouge LED indique que le décodeur est en modeveille.2. RÉCEPTEUR TÉLÉCOMMANDE : Utilisé pour recevoir le signalde la télécommande.3. Prise USB (facultatif) : Utilisé pour connecter une clé USB 2.0.Remarque: tous les récepteurs n'ont pas la prise USB.4.LED.50/60HzR FINR F LOOPTHROUGHDigitalAudioVCR O OTVCoaxial1. RF IN : Ce port est relié à votre antenne externe.2. BOUCLE D'ENTRÉE RF : Pour dévier le signal RF vers votretéléviseur ou à un autre système vidéo.3. MAGNÉTOSCOPE SCA<strong>RT</strong> : Lecteur DVD ou autre lecteur vidéo.4 .TV SCA<strong>RT</strong> : Cette prise se relie à votre téléviseur.5. COAXIAL : Cette prise se relie à un câble coaxial sur votre sonmulti canal.6. CÂBLE DE SECTEUR : Pour brancher l'appareil sur une priseélectrique.1
Fonctions des touches:1. MUET : Utilisé pour activer ou désactiver levolume.2. CHIFFRES: Utilisé pour choisir les numérosdes chaînes ou entrer des chiffres dans les menus.3. RAPPEL : Utilisé pour basculer entre les deuxdernières chaînes visionnées.4. Info: Utilisé pour afficher des informations surla chaîne visionnée ou des informationssupplémentaires au sujet du programme en petitécran EPG.5. SOUS-TITRE : Utilisé pour afficher à l'écran lesdifférents sous-titres.6. SO<strong>RT</strong>IE : Utilisé pour revenir à l'écran ou aumenu précédent.7. CH+ : Utilisé pour se déplacer sur les écransmenu ou pour choisir les chaînes en mode sansmenu.8. VOL+ : Utilisé pour se déplacer autour desécrans menu ou changer le volume en mode sansmenu.9. OK : Utilisé pour confirmer un choix dans unmenu.10. RECLIST: Utilisé pour montrer la listedes enregistrements.11. TOUCHES (ROUGE/VE<strong>RT</strong>E/JAUNE/BLEU): Utilisées dans l'écran TEXT et dans autresmenus. (TV/RADIO: Utilisé pour changer entre chaînes TV et RADIO)12. STOP: Utilisé pour arrêter l'enregistrement en cours ou pour arrêter la reproduction desfichiers du HDD.13. TV/RADIO: Utilisé pour changer entre chaînes TV et RADIO.14. RECORD: Utilisé pour enregistrer et selectionner la durée de l'enregistrement si l'onpresse deux fois.15. FAST FORWARD (AVANCE RAPIDE): Utilisé pour changer la vitesse d'avance rapidequand on reproduit un enregistrement .16. DTV/VCR : Utilisé pour basculer entre l'entrée magnétoscope SCA<strong>RT</strong> et le mode sortie DTV.17. STANDBY Utilisé pour allumer le décodeur ou le mettre en veille.18. FAV : Utilisé pour modifier l'accès à vos chaînes préférées.19. AUDIO : Utilisé pour régler le son, les réglages disponibles sont STÉRÉO,GAUCHE, DROITE, MONO.20. MENU: Utilisé pour ouvrir la fenêtre du menu principal.21. EPG : Utilisé pour afficher des informations sur le programme regardé et sur ce qui suit après.22. VOL - : Utilisé pour déplacer le curseur sur l'écran menu ou changer le volume enmode sans menu.23. CH- : Utilisé pour déplacer le curseur sur des écrans menu ou choisir les chaînesen mode sans menu.24. TEXTE : Utilisé pour ouvrir l'affichage du système télétexte si le système télétexteest disponible dans le programme d'émission diffusé.25. PAUSE : Utilisé pour faire une pause ou repasser le programmeregardé.Remarque: SOUS-TITRE/TEXTE/LANGUE peut ne pas être disponible pourtoutes les chaînes.2
POWERBYPASS1 MIC 21 MIC VOL 2PRO LOGIC100-240V~3 STEREOEXCITEMODETESTCHANNELKARAOKEMUTEINPUT SELECTORDOWNVOLUMEBASS MIC TREBLE ECHOUPTV AerialTV50/60HzR FINR F LOOPTHROUGHDigitalAudioVCR O OTVCoaxialVCRCoaxial CableCoaxialAmplificador Digital4
SETUP. Installation 01/01/2008 00:19MANUAL SCAN 01/01/2008 02:19Antenna_SettingOFFCountry SettingEnglandChannel No.CH .21OSD LanguageEnglishDatabase will be cleared! Continue?Audio Language OK YES Exit OFFFrequencyBandwidth474.000 Mhz8 HzSubtitle LanguageEnglishStr<strong>eng</strong>thQuality65 %94 %LCNONMove Switch ExitMove Move OK Scan ExitAuto ScanManual ScanEdit5
AllTV List 01/01/2008 02:19TV Guide 17/07/2007 02:19No. Program Name Status0001 CT SPO<strong>RT</strong>0002 Aplikace MHP0003 CT 10004 CT 20005 CT 240006 NOVACH23/490166 KHzPID:V 1025 , A 1041No.Program Name0800 TVE 10800 TVE 20802 24H TVE0803 CLAN TVEWed.200710/17DateToday 18 19 20 21 22 2311:30 Por La Manana 200713:15 EI Negociador14:00 Informativo Madrid 200714:30 Corazon De Otono 2007215:00 Telediario 1 Edic ion 2007FavoritesCH+/- Tool Exit1-8: Favorite Group EditSaveBookEPG+/- Date OK Detail Exit9
2.4 MULTIMÉDIA (facultatifs)Remarque: Tous les récepteurs ne possèdent pas de lecture multimédia.Le multimédia doit impérativement être utilisé avec une clé USB insérée,faute de quoi le message 'clé USB indisponible' s'affichera. Enlevez laclé lorsque vous lisez des photos ou des fichiers MP3/WMA. Lemessage 'clé USB enlevée' apparaît à l'écran et le système retourne aumenu principal.2.4.1 Mon albumMon album peut afficher des photos de format JPG/BMP/GIF et les lire.S'il y a des photos dans un dossier source de l'appareil, l'affichagedémarrera en mode Vignettes, ou en mode Dossier.Appuyez sur le bouton pour passer au mode Dossier etappuyez sur le bouton pour revenir au mode Vignettes.2.4.1.1 Vignettes/ DossierL'information (largeur X hauteur et date) de la photo choisie seraaffichée au coin en bas à gauche en mode Vignettes, et en haut à droiteen mode Dossier. Voir Schéma 7Schéma 7. Mon album- VignettesSchéma 8. Ma Musique- NavigateurAppuyez sur le bouton pourpasser en revue des dossiers ou des fichiers.Appuyez sur le bouton pour lire la photo et appuyez de nouveaupour commencer la projection des diapositives.Appuyez sur le bouton pour voir l'information d'aide pendantle visionnage et la projection des diapositives.2.4.1.2 ZoomAppuyez sur le bouton pour faire un zoom avant ou un zoomarrière en mode visionnage.Le coefficient de zoom peut être de 25%, 50%, 100%, 150%, 200%. Sile coefficient de zoom est plus grand que 100%, appuyez sur lebouton pour vous déplacer sur laphoto.11
2.4.1.3 RotationAppuyez sur le bouton pour tourner vers la gauche ouvers la droite et le bouton pour renverser horizontalement ouverticalement la photo. Après la rotation ou le basculement de la photo, lamodification sera sauvegardée quand vous retournerez au mode Vignettes.2.4.1.4 DiapositivesAppuyez sur le bouton pour regarder la photo en mode Vignettes ou enmode Dossier et appuyer de nouveau pour lancer la projection desdiapositives.Appuyez sur le bouton pour lancer la lecture ou mettre sur pause.Appuyez sur le bouton pour mettre une musique de fond pendant lalecture des diapositives.Appuyez sur le bouton pour répéter une photo ou l'ensemble.Appuyez sur le bouton pour mettre un intervalle de temps entre laphoto actuelle et la suivante.Appuyez sur le bouton pour passer immédiatement à la photosuivante ou précédente.2.4.2 Ma musiqueMa musique peut être écoutée dans la plupart des dossiers MP3/WMA.Pendant la lecture, elle affiche la barre de progrès, le volume, la durée dupassage présent et la durée totale. Voir le schéma10.Appuyez sur le bouton pour sélectionner le dispositif si un hub USBexterne est connecté.Appuyez sur le bouton pour passer enrevue des dossiers et des fichiers.Appuyez sur le bouton pour commencer la lecture.Appuyez sur le bouton pour lecture ou pause.Appuyez sur le bouton
Appuyez sur le bouton pour passer image par image pendant la lecture.Appuyez sur le bouton pour reculer en vitesse rapide (x2, x4, x8, x16,x32, Normal).Appuyez sur le bouton pour avancer en vitesse rapide (x2, x4, x8, x16,x32, Normal).9 1013
2.5 ACCESSORYThere are three options: Gomoku, Calendar, Calculator.GomokuPress button to set play mode and difficulty. Press button to start play Gomoku.Press button to select the position. Press button toplace the piece.Calendar displays the year, month, and date. Calculator can used formathematical calculations.Program InfoProgram Name ITV1Program No 0003 Video PID 0512Channel No. 0045 Audio PID 0650Frequency 665934 KHzBandwidth 0008 MHzConstellation QAM64 Hierarchy Mode N/AGuard Interval 1/32 HP Code Rate 7/8FFT 8K LP Code Rate 1/2Str<strong>eng</strong>th 62%Quality 88%14
Audio PID 0650ChannelAudio channel<strong>eng</strong>TELETEXTTeletext Language<strong>eng</strong>OFFSound ModeLR1515
SUBTITLESubtitle Language<strong>eng</strong>OFF151616
Ce symbole sur le produit ou dans les instructions signifie que ceproduit doit être traité lors de son élimination, conformément auxnormes de la CE, de sorte qu'il puisse être recyclé ou démonté limitantainsi son impact sur l environnement. Pour plus d'informations,veuillez contacter les autorités locales, régionales ou votre détaillant18
NOTE SUR LES DISPOSITIFS USBPour fonctionner correctement, ce récepteur numériqueterrestre avec enregistreur nécessite l'utilisation de dispositifsexternes de mémoire à grande vitesse.Si vous comptez utiliser un dispositif de mémoire externe dutype USB (par exemple, un disque dur externe ou une clé USB),choisissez un dispositif USB 2.0 avec une vitesse de transfert dedonnées d'au moins 3 MB/s, et de préférence de 6 MB/s.Quel que soit le dispositif externe que vous utilisez, il doit êtreformaté en mode FAT32 s'il va être utilisé pour desenregistrements. Choisissez ce mode de formatage depuis lemenu.Il existe une grande variété de produits USB sur le marché.Puisqu'il est impossible de réaliser des tests de compatibilité surles dispositifs de tous les fabricants, veuillez vous assurer que ledispositif d'enregistrement que vous choisissez appartient à ladernière génération des dispositifs étant donné que ceux-cioffrent la plus grande compatibilité.D'autre part, la lecture des formats DivX, MPEG, etc. a ététestée et le produit fonctionne parfaitement avec les codecsstandards. Si vous éprouvez de la difficulté à lire un de cesformats, vérifiez que vous utilisez des codecs de compressionqui sont compatibles avec le produit.
Cod. 9050161 - Rev. 01ALCAD, S.L.Tel. 943 63 96 60Fax 943 63 92 66Int. Tel. +34 - 943 63 96 60info@alcad.netApdo. 455 - Pol. Ind. Arreche-Ugalde,120305 IRUN - Spainwww.alcad.netFRANCE - HendayeTel. 00 34 - 943 63 96 60CZECH REPUBLIC - OstrovacicevTel. +420 546 427 059UNITED ARAB EMIRATES - DubaiTel. +971 4 887 19 50TURKEY - IstambulTel. +90 212 295 97 00