POLARÃMETRO POLARIMETER POLARIMÃTRE - Auxilab
POLARÃMETRO POLARIMETER POLARIMÃTRE - Auxilab
POLARÃMETRO POLARIMETER POLARIMÃTRE - Auxilab

You also want an ePaper? Increase the reach of your titles
YUMPU automatically turns print PDFs into web optimized ePapers that Google loves.
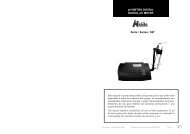
2. DESCRIPCIÓNFigura 1-Frontal1.1. Panel de mandos1.2. Compartimento para muestras1.2Figura 2-Trasera2.1 Fusibles 1 y 3,15 A2.2 Salida RS 2322.3 Toma de corriente2.4Panel de mandos3.1 Pantalla3.2 Clear: zero3.3 Measure: medición3.4 Re-M: repetición de medida3.5 Average: media de medidasde Re-M3.6 Botón Central (1, 2, 3): medidasde Re-MDigital polarimeterModel 4121.12.4 Rejilla de ventilación2.5 Interruptor encendido/apagado2.1 2.52.33.13.63.32.23.4MeasureCASTELLANO3.2Clear1 3 .2Re-MAverage3.5Employez le port compatible RS (COM-1 ou COM-2) pour la communication avecl’appareil.FRANÇAISVoice le cinq fonctions du programme: read, open, print, save et exit.- Read: Effectue la lecture de l’échantillon et capture les trois dernières mesureset la valeur moyenne de celles-ci.- Open: pour ouvrir un fichier pré-gardé.- Print: pour imprimer les données de mesure (l’ordinateur sera connecté àl’imprimant).- Save: pour sauver les valeurs de mesure.- Exit: pour fermer le programme.Mesures de concentration et contenu Préparez plusieurs échantillons standards de différentes concentrations et mesurez lavaleur de la rotation optique. Représentez la courbe de concentration/ rotation optique. Pour connaître la concentration d'un échantillon inconnu, mesurez la rotation optiqueet en regardant la courbe vous pourrez connaître la concentration de l'échantillon.Sécurité. Le polarimètre doit être utilisé par le personnel compétant pour son bon fonctionnement. Placez le polarimètre sur une table horizontale, stable en créant un espace libre d’aumoins 30 cm de chaque côté. Ne placez pas le polarimètre dans des zones proches à des sources de chaleur (Bec bunsen,chalumeau…). N’exposez pas l’appareil directement au soleil, et évitez les vibrationset la poussière. Pendant le fonctionnement, toute matériel dangereux, tels que liquides inflammablesou matériel pathologique, sera hors du lieu de travail. Si vous n’utilisez pas l’appareil durant une longue période de temps, débranchez-le àfin d’éviter d’éventuels accidents. Pour le nettoyage, vérification des components ou remplisse de quelque component (Ex: remplisse un fusible) il est indispensable de l’éteindre et de le débrancher. N’essayez pas de réparer l’appareil vous-même car d’un côté vous perdriez la garantie,et d’autre part, dans le circuit électronique il peut y avoir un haut voltage pouvant causerdes dommages au fonctionnement général de l’appareil ainsi qu’à l’installation électrique.Cela peut également causer des lésions corporelles (brûlures, blessures…) et desdommages électriques. Ne laissez pas rentrer d’eau dans le panneau de contrôle, même si celui-ci est correctement.Si vous pensez que de l’eau ou autre liquide est entré, débranchez immédiatementl’appareil (voir la Maintenance). Fabriqué selon les directives Européennes de sécurité électrique, compatibilité électromagnétiqueet de sécurité en machines.Pág. 4 Manual de instrucciones 50410012 Revisión 5 Enero-2013Revision 5 Janvier-2013 Manuel des Instructions 50410012 Page 29
lité des dégâts causés à l’appareil ni les blessures produites aux personnes, usager ounon. La tension doit être de 220V 50 Hz ±10%.Si vous n’utilisez pas le polarimètre durant une longue période, vérifiez qu’il est biendébranché et protégez-la de la poussière (comme ça vous évitez des accidentes et prolongezla durée de l’appareil).Mise en marcheAllumage de l’appareil Allumez l’appareil au moyen de l’interrupteur d’allumage/éteint (1.3); à l’écran s’affiche“0.000”.L’appareil sera prêt à travail sous la procédure générale.FRANÇAISRéalisation de mesures Pour l’obtention des mesures de rotation optique (α) suivez les points ensuite: Placez le tube à eau distillée ou l’échantillon blanc dans le compartiment des échantillons(1.2), après laissez la lecture se stabiliser et poussez le bouton Clear (3.2).3. ESPECIFICACIONES TÉCNICASReferencia 50410012Modelo 412Rango ±45ºPrecisión ± (0.001º + valor medido x 0.05%)Valor mínimo de lectura 0.005ºVelocidad1.30º/SegundoFuente de luz monocromáticaLED y filtro (λ: 589.44 nm)SalidaRS232Tubos100 y 200 mm (incluidos)Alimentación 220V 50Hz ±10%Dimensiones exteriores60x32x22 cmPeso (aprox.)18 KgNota: RS232 parámetros: Baudios 9600, Parada 1 bit, Datos 8 bits.CASTELLANONote : En plaçant les tubes on doit mettre attention à la position et à la direction.Vérifiez que l'échantillon ne présente pas de bulles d'air, puisque dans ce cas la mesuresera moins exacte.Retirez l’échantillon blanc e introduisez l’échantillon problème ; automatiquementl’appareil réalisera la mesure, qui reste fixé lorsque l’écran montre #1. Si vous désirez répéter la mesure poussez Re-M (3.4). Même deux répétitions restentenregistrées (#2 et #3 à l’écran). Pour visualiser les mesures poussez le Bouton Central(1,2,3) (3.6). Au moyen du bouton Average (3.5) on peut obtenir la moyenne des troismesures (affichage AV). À chaque nouvelle analyse il faut faire le zéro. Pour celui-ci :- Retirez le tube avec l’échantillon déjà analysé et attendez que l’écran affiche “0.000”- Introduisez l’échantillon blanc, laissez que la lecture à l’écran se stabilise et poussezClear (3.2)- Introduisez le nouvel échantillon et l’appareil automatiquement réalisera la mesure.Note: avant d’éteindre l’appareil, retirez l’échantillon du compartiment, laissez que lalecture à l’écran se stabilise et poussez Clear (3.2).Installation du programme Placez le CD-Rom et poussez l’icône Setup pour ouvrir le programme d’installation.Acceptez toutes les pas indiqués pour compléter l’installation. Connectez le polarimètre à l’ordinateur et allumez-le.Cherchez le programme WZZ-2 et exécuter le fichier WZZ-2.4. FUNDAMENTOS TEÓRICOSFigura 4. Esquema interno del polarímetro4.1. Fuente de luz4.2. Apertura4.3. Lente4.4 .Filtro coloreado4.5. Polarizador A4.6. Bobina magnética de rotación4.7. Muestra4.8. Polarizador B4.9. Foto multiplicador4.10. Pre-amplificador4.11. Alto voltaje automático4.12. Amplificador de frecuencia4.13. Encendido del amplificador4.14. Servo motor4.15. Engranaje de gusano4.16. ContadorPage 28 Manuel des Instructions 50410012 Revision 5 Janvier-2013Revisión 5 Enero-2013 Manual de instrucciones 50410012 Pág. 5
Le Polarimètre Zuzi 412 use le principe de position optique nul (optical null principle)pour procurer des lectures précis.Pour celui-ci, utilise une diode LED tel que source de lumière. D’abord, la ouverture(4.2) et la lente (4.3) forment un faisceau de lumière parallèle, le quel, après passer pour lepolarisateur A (4.5) se transforme dans un faisceau de lumière polarisé dont le plane devibration est 00’ (Figure 5a). Lorsque le faisceau de lumière polarisé traverse la cellule deFaraday (4.6), sa plane de vibration oscille dans un angle ±β à une fréquence de 50 Hz.Après passer par le polarisateur B (4.8) le faisceau de lumière se projet dans le photomultiplicateur(4.9) de manière que se produit une signale électrique de courant alterne.Selon le principe de position optique nulle, l’appareil prend comme zéro optique (α =0º) le point où les axes des polarisateurs A y B sont en position perpendiculaires (00’ ⊥ PP’)et pourtant le faisceau de lumière reste totalement bloquée et n’arrive pas au photomultiplicateur.Lorsque s’introduise un échantillon optiquement active, se produis une rotation dans leplane de vibration dans un angle α (Figura 5b) (rotation optique de l’échantillon) à unefréquence certain F qui finalement deviendra dans une signale électrique avec la mêmefréquence F. Cet signale fait tourner le servomoteur (4.14), lequel en même façon fait tournerle polarisateur A dans un angle α jusqu'à rétablir la position optique nulle et le signalde fréquence F disparue. (Figure 5c).L’angle α qui a tournée le polarisateur A se montrera à l’écran avec son signe correspondantcomme lecture de la rotation optique de la substance analysée.Figure 5a Figure 5b Figure 5cP0´0P´P0´a 0´ a0Note: 00’ C’est l’axe de polarisation du polarisateur A et PP’ c’est l’axe de polarisationdu polarisateur BFigure 5a: La lumière polarisée générée par le polarisateur A vibre dans la plane 00’.Figure 5b: Lorsque travers un échantillon optiquement active, le plan de vibration de lalumière polarisée tourne certain angle .Figure 5c: Le polarisateur A tourne dans un angle AAjusqu'à compenser la rotationoptique de l’échantillon et rétablir la position 0; la valeur de se montrera a l’écran avecson signe correspondent.P´PFRANÇAIS0P´5. INSTALACIÓN / PUESTA EN MARCHAInspección preliminar Desembale el polarímetro, retire el plástico que lo envuelve y quite la protección depoliespán en que viene encajado. Retire todas las protecciones y, sin conectar el polarímetroa la red eléctrica, asegúrese de que no presenta ningún daño debido al transporte. Deser así, comuníquelo inmediatamente a su transportista o suministrador para que puedahacer las debidas reclamaciones en el plazo establecido. Guarde el embalaje, ya que siempre se deben realizar las devoluciones en su embalajeoriginal con todos los accesorios suministrados. Compruebe los accesorios que usted debe recibir junto al equipo:- 1 tubo de 100 mm - Fusibles 1 y 3.15 A- 1 tubo de 200 mm - Cable Schuko estándar- Juego de mirillas - Destornillador- Juego de juntas - Manual de instruccionesSolo aceptamos devoluciones de equipos en los 15 días posteriores al envío y siempreque vengan completos en su embalaje original.InstalaciónAntes de comenzar a utilizar el instrumento, es conveniente familiarizarse con sus componentesy fundamentos básicos, así como con las funciones de sus controles.LEA DETALLADAMENTE ESTE MANUAL DE INSTRUCCIONES ANTES DEOPERAR CON ESTE EQUIPO CON EL FIN DE OBTENER LAS MÁXIMAS PRES-TACIONES Y UNA MAYOR DURACIÓN DEL MISMO.CASTELLANOColoque el polarímetro sobre una mesa horizontal, plana y estable, creando un espaciolibre alrededor de al menos de 30 cm por cada lado. No coloque el equipo en zonas próximas a fuentes de calor (mecheros, sopletes...), ni loexponga directamente a la luz del sol, etc. Evite las vibraciones en el lugar de trabajo. Durante el funcionamiento del equipo el material peligroso como líquidos inflamableso infecciosos deben estar fuera del área de trabajo. Inserte el cable Schuko estándar suministrado con el equipo a la base de corriente alterna220 V, 50 Hz ± 10% provista de toma de tierra y por el otro extremo al conector del polarímetro(2.3).Ni el fabricante ni el distribuidor asumirán responsabilidad alguna por los daños ocasionadosal equipo, instalaciones o lesiones sufridas a personas debido a la inobservanciadel correcto procedimiento de conexión eléctrica. La tensión debe ser de 220 V, 50 Hz ± 10%.Page 26 Manuel des Instructions 50410012 Revision 5 Janvier-2013Revisión 5 Enero-2013 Manual de instrucciones 50410012 Pág. 7
Cuando no vaya a hacer uso del polarímetro durante largos períodos de tiempo, asegúresede que esté desconectado de la red y protéjalo del polvo (evitando así posibles accidentesy prolongando la vida útil del equipo).Puesta en marcha Encienda el equipo mediante el interruptor de encendido/apagado (1.3); en pantalla semostrará “0.000”.El equipo está preparado para trabajar según su procedimiento habitual.Realización de medidasPara la obtención de las medidas de rotación óptica (α) proceda de la siguiente manera: Introduzca el tubo con agua destilada o la solución blanco en el compartimiento paramuestras (1.2), deje que la lectura en pantalla se estabilice y pulse el botón Clear (3.2).Nota: Al colocar los tubos se debe poner atención en la posición y en la dirección.Asegúrese de que la muestra no presenta burbujas de aire, ya que en ese caso la medidaserá menos precisa.CASTELLANORetire la muestra blanco e introduzca la muestra problema; automáticamente el equiporealizará la medición, que queda fijada cuando en pantalla aparece #1. Si desea repetir la medición pulse Re-M (3.4). Hasta dos repeticiones quedan registradas(#2 y #3 se mostrarán en pantalla). Para visualizar las mediciones pulse el BotónCentral (1,2,3) (3.6). Mediante el botón Average (3.5) podemos obtener la media de las tresmedidas (se mostrará en pantalla AV). Cada vez que vaya a analizar una nueva muestra, deberá realizar el cero. Para ello:- Retire el tubo con la muestra ya analizada y espere a que la pantalla vuelva amostrar “0.000”- Introduzca la muestra blanco, deje que la lectura en pantalla se estabilice ypulse Clear (3.2)- Introduzca la nueva muestra y el equipo automáticamente realizará la medición.3. SPECIFICATIONS TECHNIQUESRéférence 50410012Modèle 412Rang de mesure de l’échelle ± 45ºExactitude± (0.001º + valeur mesurée x5/10000)Valeur minimale de lecture 0.005ºVitesse1.30º/SecondeSource de lumière monochromatique LED et filtre (: 589.44 nm)SortieRS232Tubes100 / 200 mm (inclus)Alimentation électrique 220V 50Hz ±10%Dimensions extérieures600x320x220 mmPoids18 KgNote : RS232 paramètres : Baudios 9600, arrêt 1 bit, données 8 bits.4. FONDEMENTS THÉORIQUESFigure 4. CircuitFRANÇAISNota: antes de apagar el equipo, retire la muestra del compartimiento, deje que la lecturaen pantalla se estabilice y pulse Clear (3.2).Instalación del programa Inserte el CD-Rom y abra el programa de instalación haciendo doble clic sobre el iconoSetup. Acepte cada paso hasta que la instalación se complete. Conecte el polarímetro al ordenador y enciéndalo. Para comenzar a trabajar deberá buscar el programa WZZ-2 y ejecutar el fichero WZZ-2.Utilice el puerto compatible RS (COM-1 o COM-2) para comunicación con el equipo.4.1. Source de lumière4.2. Ouverture4.3. Lentille4.4. Filtre teinté4.5. Polarisateur A4.6. Bovine magnétique de rotation4.8. Polarisateur B4.9. Photomultiplicateur4.10. Préamplificateur4.11. Haut voltage automatique4.12. Amplificateur de Fréquence4.13. Allumage de l'amplificateur4.14. Servomoteur4.15. Engrenage4.16. CompteurPág. 8 Manual de instrucciones 50410012 Revisión 5 Enero-2013Revision 5 Janvier-2013 Manuel des Instructions 50410012 Page 25
2. DESCRIPTIONFigure 1. Frontal1.1 Panneau de commandes1.2 Compartiment pour échantillons1.2FRANÇAISDigital polarimeterModel 4121.1CASTELLANOEl programa tiene cinco funciones diferentes: read, open, print, save y exit.- Read: Realiza la lectura de la muestra y captura las tres últimas medidasrealizadas y la media de dichas medidas.- Open: Abre un archivo previamente guardado.- Print: Imprime los datos medidos (el ordenador ha de estar conectado auna impresora).- Save: Guarda los valores medidos.- Exit: Cierra el programa.Medidas de concentración y contenido Prepare varias muestras estándar de diferentes concentraciones y mida el valor de larotación óptica. Represente la curva de concentración – rotación óptica. Para saber la concentración de una muestra desconocida mida la rotación óptica.Estudiando la curva puede averiguar la concentración de la muestra.Figure 2. Arrière2.1 Fusibles 1 et 3.15 A2.2 Sortie RS2322.3 Prise de courant2.4Figure 3. Panneau descommandes3.1 Écran3.2 Clear : zéro3.3 Mesure : mesure3.4 Re-M: répétition de lamesure3.5 Average : moyenne desmesures du Re-M3.6 Bouton Central (1, 2, 3) :mesures du Re-M2.4 Grille d’aération2.5 Interrupteur allumage/éteint2.1 2.52.33.13.63.32.23.4Measure3.2Clear1 3 .2Re-MAverage3.5Seguridad El polarímetro debe ser utilizado por personal cualificado previamente, que conozca elequipo y su manejo mediante el manual de uso. Coloque el polarímetro sobre una mesa horizontal, plana y estable, creando un espaciolibre al menos de 30 cm por cada lado. No coloque el polarímetro en zonas próximas a fuentes de calor (mecheros, sopletes...),ni exponga el equipo directamente a la luz del sol. Evite las vibraciones, el polvo yambientes muy secos. Durante su funcionamiento el material peligroso como líquidos inflamables o materialpatológico, deben estar fuera de esta área. Cuando no vaya a hacer uso del equipo por largos períodos de tiempo, asegúrese deque está desconectado de la red para evitar posibles accidentes. Para cualquier manipulación de limpieza, verificación de los componentes o sustituciónde cualquier componente (ej: sustitución de fusible) es imprescindible apagar el equipo ydesconectarlo de la toma de corriente. No intente repararlo usted mismo; además de perder la garantía puede causar daños enel funcionamiento general del equipo, así como lesiones a la persona (quemaduras, heridas...)y daños a la instalación eléctrica. Procure que no entre agua en el cuadro de controles, aunque éste se encuentre debidamenteaislado. Si por cualquier causa sospecha que ha entrado agua o cualquier líquidodesconecte el equipo inmediatamente (ver Mantenimiento). Fabricado según las directivas europeas de seguridad eléctrica, compatibilidad electromagnéticay seguridad en maquinas.Page 24 Manuel des Instructions 50410012 Revision 5 Janvier-2013Revisión 5 Enero-2013 Manual de instrucciones 50410012 Pág. 9
ENGLISHThank you for choosing this equipment. We sincerely wish that you enjoy your Zuzipolarimeter model 412. We highly recommend looking after this equipment according towhat is stated in this manual.Zuzi develops its products according to the CE marking regulations as well as emphasizingthe ergonomics and security for its user.The correct using of the equipment and its good quality will permit you to enjoy thisequipment for years.The improper use of the equipment can cause accidents and electric discharges, circuitbreakers, fires, damages, etc. Please read the point of Maintenance, where we expose thesecurity notes.7. TROUBLESHOOTINGTROUBLEProblem with light sourceAfter pressing the on/offswitch, the equipment doesnot turn onToo high noiseCAUSELight source is dirtyLight source is damagedEnergy does not reach theequipmentThe fuse is blownMechanical frictionENGLISHSOLUTIONOpen the lid and clean the lampReplace the lampCheck the cable and the socketCheck the 3 A fuse and replaceif necessaryGears are not well lubricatedTO GET THE BEST RESULTS AND A HIGHER DURATION OF THE EQUIP-MENT IT IS ADVISABLE TO READ THOROUGHLY THIS MANUAL BEFOREOPERATING WITH THE EQUIPMENT.Please bear in mind the following: This manual is inseparable from the Zuzi polarimeter model 412, so it should be availablefor all the users of this equipment. You should carefully handle the polarimeter avoiding sudden movements, knocks, freefall of heavy / sharp objects on it. Avoid spilling liquids inside the equipment. Never dismantle the different pieces of the polarimeter to repair it yourself, since itcould produce a defective use of the whole equipment and a loss of the product warranty,as well as injuries on people that handle the polarimeter. To prevent fire or electric discharges avoid dry or dusty environments. In case it mayhappen unplug the equipment immediately. If you have any doubt about setting up, installation or functioning do not hesitate incontacting your wholesaler. This equipment is protected under the Warranties and consumer goods regulation(10/2003). Overhaul is not covered by the equipment warranty. Operations made by non-qualified staff will automatically produce a loss of thewarranty. Neither fuses nor accessories (including their loss), are covered by the product’swarranty. The warranty neither covers piece’s deterioration due to the course of time. Please make sure you keep the invoice, either for having the right to claim or asking forwarranty coverage. In case you have to send the equipment to Zuzi Technical AssistanceDepartment you should enclose the original invoice or a copy as guarantee. Please do not forget filling the warranty certificate and send it before 15 days after thedate of purchase.Manufacturer reserves the right to modify or improve the manual or equipment.8. RECOMMENDED ACCESSORIESCodeDescription90404910 Test tube of 100 mm90404920 Test tube of 200 mm90404901 Glass joints for test tubes, 15 mm Ø90404691 Circular rubber washer for test tube90404692 Test tube stopper90400001 Quartz piece for polarimeter calibration, value +5º90400002 Quartz piece for polarimeter calibration, value -5º90400003 Quartz piece for polarimeter calibration, value +17º90400004 Quartz piece for polarimeter calibration, value -17º90400005 Quartz piece for polarimeter calibration, value +35º90400006 Quartz piece for polarimeter calibration, value -35ºINSTRUCTIONS ON ENVIRONMENT PROTECTIONAt the end of its life cycle, please, do not dispose of this polarimeter by throwing it inthe usual garbage; hand it over a collection point for the recycling of electrical and electronicappliances. It does not contain dangerous or toxic products for humans but a nonadequate disposal would damage the environment.The materials are recyclable as mentioned in its marking. By recycling material or by other formsof re-utilization of old appliances, you are making an important contribution to protect our environment.Please inquire at the community administration for the authorized disposal location.Page 12 User`s manual 50410012 Version 5 January-2013Version 5 January-2013 User`s manual 50410030 Page 21
6. MAINTENANCE AND CLEANINGTo get the best results and a higher duration of this equipment it is essential to followthe processes of use.Note: All the processes of use mentioned below will not have any value unless you keepa continued and careful maintenance.Please follow the processes of use of this manual. This manual should be available for all users of this equipment. Always use original components and supplies. Other devices can be similar but theycan damage the equipment. The polarimeter is supplied with a Schuko standard wire. It has to be plugged to anearth connection and the socket should be handy and ready to unplug the equipment incase of emergency. Never try to repair the polarimeter by yourself, since you will lose the warranty andmay provoke damages to the general operating system or the electrical installation, aswell as injuries to the people that usually handle the polarimeter (burns, hurts…) ordamages in nearby equipments. In the event of breakdown please contact your distributor to overhaul through ZuziTechnical Assistance Department.IMPORTANT: BEFORE CHANGING THE LAMP OR THE FUSE, MAKE SURETHAT THE <strong>POLARIMETER</strong> IS DISCONNECTED FROM THE NET. CHECK YOUARE USING THE PROPER LAMPS, AS OTHER TYPES CAN PROVOKE MAL-FUNCTION.Replacement of the fuseFuses (2.1) are located at the back side of the polarimeter.With the help of a screw driver take the fuse compartment out and replace the fuse.Cleaning Never use scourers or substances that can grate for cleaning metallic parts such as stainlesssteel, aluminium, coatings, etc. as they damage the polarimeter and produce an earlyageing of the equipment.Use a fluff-free cloth dampened with soaped water that does not contain abrasives.ENGLISH¡ATTENTION!! IF EQUIPMENTS ARE NOT PROPERLY CLEAN AND DISIN-FECTED THEY WOULD NOT BE ALLOWED TO REPAIR BY OUR TECHNICALSERVICE.¡ATTENTION!! IF EQUIPMENTS ARE NOT PROPERLY CLEAN ANDDISINFECTED THEY WOULD NOT BE ALLOWED TO REPAIR BY OURTECHNICAL SERVICE.INDEX OF LENGUAGESSpanish 2-11English 12-21French22-32INDEX OF CONTENTS1. USES OF THE INSTRUMENT2. DESCRIPTION3. TECHNICAL SPECIFICATIONS4. THEORETICAL FOUNDATIONS5. INSTALLATION / SETTING UP6. MAINTENANCE AND CLEANING7. TROUBLESHOOTING8. RECOMMENDED ACCESSORIES9. ANNEX I: CE CERTIFICATE1. USES OF THE INSTRUMENTThe Zuzi polarimeter model 412 is a complete equipment that allows determination ofthe optical rotation of optically active substances. Thus, it is very useful in several fieldsof industrial and quality control processes as well as in research. Among the main applicationof the polarimeter there are: Research: isolation of crystallized substances, evaluation and characterization of opticallyactive compounds, kinetics and changes in concentration. Pharmaceutical industry: determination of the optical rotation of medicines (antibiotics,codeine, analgesics) and drugs. Food industry: determination of the sugar and condiment content.Chemical industry: study of biopolymers, synthetic and natural polymers, etc.ENGLISH131415151720212132Page 20 User`s manual 50410012 Version 5 January-2013Version 5 January-2013 User`s manual 50410030 Page 13
2. DESCRIPTIONFigure 1-Front side1.1 Control panel1.2 Sample compartment1.2Digital polarimeterModel 4121.1ENGLISHENGLISHThe software has five different functions:- Read: to perform sample measurements and register the last three measurementsand their average value.- Open: to open a previously saved file.- Print: to print measured data (the computer must be connected to a printer).- Save: to save the measured data.- Exit: to close the program.Concentration and content measurements Prepare several standard samples of different concentration and measure their opticalrotation value. Represent the curve with the concentrations and their corresponding opticalrotation values. Measure the optical rotation of the sample to be analysed and use the curve to get theconcentration value of that sample.Figura 2-Back side2.1 Fuses 1 and 3.15 A2.2 RS232 output2.3 Socket2.4Figure 3-Control panel3.1 Display3.2 Clear: zero3.3 Measure3.4 Re-M: repetition of measurement3.5 Average: average of repeatedmeasurements3.6 Central button (1, 2, 3):results of repeated measurementsRe-M2.4 Grille2.5 Power on/off2.1 2.52.33.13.63.32.23.4Measure3.2Clear1 3 .2Re-MAverage3.5Security The polarimeter must be used by previously qualified staff that knows how the equipmentworks thanks to the user manual. Put the polarimeter on top of a horizontal, plane, stable table, having a safety area of atleast 30 cm per side. Do not place the polarimeter near any warm supply (burners, blowlamps, etc), norexpose it directly to the sun. Avoid vibrations, dust and dry environments. During operation dangerous materials such as flammable or pathological substancesmust be out of the working area. When you are not using the polarimeter for a long period of time please make sure it isunplugged in order to avoid possible accidents. It is essential to have the equipment switched off and unplugged from the net beforecleaning, checking components or replacing any piece (e.g. replacement a fuse). Never try to repair the polarimeter by yourself, since you will lose the warranty andmay provoke damages to the general operating system or the electrical installation, aswell as injuries to the people that usually handle the equipment (burns, hurts…). Try not to spill any liquid on the control panel, though it is properly insulated. In caseyou have any doubts do please immediately unplug the poalrimeter (see Maintenance). Made under the European regulations for electrical security, electromagnetic compatibilityand security on machines.Page 14 User`s manual 50410012 Version 5 January-2013Version 5 January-2013 User`s manual 50410030 Page 9
unplugged and protected from dust in order to avoid possible accidents and prolong itsworking life.Setting upTurn the equipment on by pressing power on/off (1.3); “0.000” will be displayed.The equipment is ready to operate under the normal procedure.Measurements To obtain the optical rotation (α) value of samples proceed as follows: Put the tube with distilled water or the blank solution into the sample compartment(1.2), let the displayed reading stabilize and press Clear (3.2).Note: When placing the tubes make sure they are in the correct position and direction.Make sure the sample does not have air bubbles since measurements could be affected.ENGLISHRemove the blank solution or distilled water from the sample compartment and put thesample to be measured; the equipment will automatically measure and display the result.When result stabilizes #1 appears on display. To repeat measurement press Re-M (3.4). Up tp 2 repetitions can be performed andregistered in the equipment (#2 and #3 will be displayed). To display the result of the differentmeasurements press the Central button (1,2,3) (3.6). By pressing the Average button(3.5) the average value of the different measurements will be displayed (AV will be displayed). Before measuring a new sample, it is necessary to make the zero. For this:- Remove the sample with the already analyzed sample from the sample compartment- Put the blank sample or distilled water, let the displayed reading stabilize andpress Clear (3.2)- Put the new sample and the equipment will automatically measure and displaythe result3. TECHNICAL SPECIFICATIONSCode 50410012Model 412Range ±45ºAccuracy ± (0.001º + valor medido x 0.05%)Min. displayed value 0.005ºSpeed1.30º/SegundoMonochromatic light sourceLED light and filter (λ: 589.44 nm)OutputRS232Tubes100 y 200 mm (included)Power 220V 50Hz ±10%External dimensions60x32x22 cmWeight (approx.)18 KgNote: RS232 parameters: Baudios 9600, Stop 1 bit, Data 8 bits.4. THEORETICAL FOUNDATIONSFigure 4. Internal diagram of the polarimeterENGLISHNote: before turning the equipment off, remove the last analyzed sample from the samplecompartment, let the displayed reading stabilize and press Clear (3.2); then turn theequipment off.Software installation Insert the CD-Rom and open the installation program by making double click on theSetup file. Accept all steps until the installation process finishes. Connect the polarimeter to the computer and turn it on. To start working, look for the software WZZ-2 and execute the file WZZ-2.Use the compatible RS port (COM-1 or COM-2) for communication with the equipment.4.1 Light source4.2 Aperture4.3 Lens4.4 Coloured filter4.5 Polarizer A4.6 Magnetic rotation coil4.7 Sample4.8 Polarizer B4.9 Photo-multiplier4.10 Pre-amplifier4.11 Automatic high voltage4.12 Frequency amplifier4.13 Amplifier power4.14 Servo motor4.15 Worm-gear4.16 CounterPage 18 User`s manual 50410012 Version 5 January-2013Version 5 January-2013 User`s manual 50410030 Page 15
Zuzi polarimeter 412 is based on the optical null principle to obtain accurate readings.For this purpose, it uses a LED diode as the light source. Firstly, the aperture (4.2) andthe lens (4.3) form a parallel light beam, that, after passing through the polarizer A (4.4)becomes a polarized light beam whose vibrating plane is 00’ (Figure 5a). When the polarizedlight beam passes through the Faraday coil (4.5), its vibrating plane will swing in a±β angle at a frequency of 50 Hz. After passing through the polarizer B (4.8) the light beamis projected into the photo-multiplier (4.9) so as an alternating current electric signal isgenerated.According to the optical null principle, the equipment takes as the optical null position(α = 0º) the point in which the axes of the polarizers A and B are orthogonally arranged(00’ ⊥ PP’) and therefore the light beam is completely blocked and does not reach thephoto-multiplier.When an optically active sample is placed, the vibrating plane will rotate into an α angle(Figure 5b) (optical rotation of the sample) at a certain frequency F that finally will becomean electric signal of the same frequency F. This signal makes the servo motor spin(4.14), which at the same time makes the polarizer A turn in an α angle until the opticalnull position is restored and the frequency F signal disappears (Figure 5c).The α angle that the polarizer A has rotated will be displayed as the reading of the opticalrotation of the analyzed sample.Figure 5a Figure 5b Figure 5cP0´0P´P0´a 0´ a0Note: 00’ is the polarization axe of polarizer A and PP’ is the polarization axe of polarizerBFigure 5a: The polarized light generated by the polarizer A vibrates in the plane 00’.Figure 5b: When light passes through an optically active sample its vibrating planeswings in a α angle.Figure 5c: The polarizer A rotates in a α angle to compensate the optical rotation of thesample and to restore the optical null position; the α value will be displayed with thecorrect sign.P´P0ENGLISHP´5. INSTALLATION / SETTING UPPreliminary inspection Unwrap the polarimeter, take off the involving plastic and take off the protection inwhich it comes fitted. Take off all the protective items and, without connecting the polarimeterto the net, make sure that it does not present any damage because of the shipment.In case the polarimeter presents any damage tell it immediately to your transport agentor dealer so that they can make the claims in the correct time limit. Please keep the original wrapping; you will always need it for returns enclosed with allthe accessories supplied. Please check that all the accessories are enclosed with the equipment:- 1 tube 100 mm-long - Fuses- 1 tube 200 mm-long - Screw driver- Set of rubber washers - Schuko wire- Set of glass joints - User’s manualWe will only accept any equipment return within 15 days after delivery and providedit comes in its original wrapping.InstallationBefore using this instrument, it is convenient for you to familiarize with its componentsand basic essentials.PLEASE READ THOROUGHLY THE INSTRUCTIONS BEFORE CONNECTINGAND OPERATING WITH THIS EQUIPMENT.ENGLISHPlease put the polarimeter on top of a horizontal, plane and stable table making a freespace of at least 30 cm per side. Do not put the polarimeter near any warm supply (burners, blowlamps…), nor exposeit directly to the sun, etc. Avoid vibrations in the working area. Avoid the presence of inflammable or toxic substances in the working area. The polarimeter is supplied with a Schuko standard wire. Please insert the wire thatfeeds the AC electric current in the base of current 220 V, 50 Hz ± 10% provided with earthwire and to the other end to the polarimeter connector (2.3).Neither the manufacturer nor the distributor will assume any responsibility for thedamages produced to the equipment during its installation or damages to persons sufferedby the improper use of the electric connection. The tension should be 220 V, 50Hz ± 10%.When you are not using the polarimeter for a long period of time please make sure it isPage 16 User`s manual 50410012 Version 5 January-2013Version 5 January-2013 User`s manual 50410030 Page 17