TurboCAD Pro V17 Workplanes SAMPLE - Textual Creations
TurboCAD Pro V17 Workplanes SAMPLE - Textual Creations
TurboCAD Pro V17 Workplanes SAMPLE - Textual Creations
- No tags were found...

You also want an ePaper? Increase the reach of your titles
YUMPU automatically turns print PDFs into web optimized ePapers that Google loves.
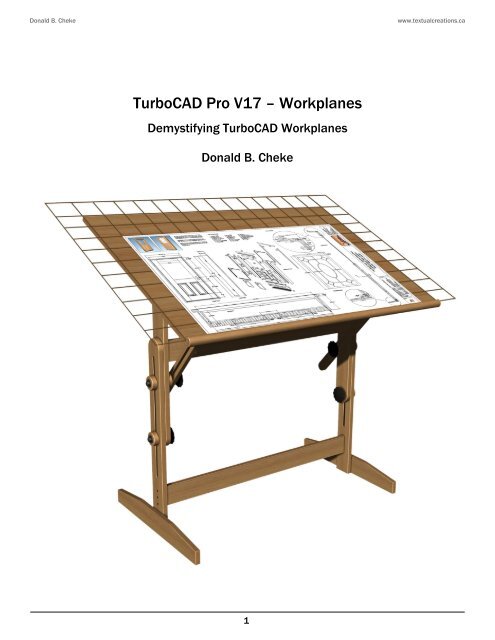
Donald B. ChekeIntroductionwww.textualcreations.caOne of the fundamental concepts in <strong>TurboCAD</strong>, when it comes to drawing in 3D, is the use andunderstanding of workplanes. Most new users are initially overwhelmed by this concept, but once theuser puzzles out what workplanes are all about they quickly realize that they weren't that complex afterall.Each workplane tool, complete with a user-friendly explanation and example will be illustrated within thistutorial and this will be done by having the reader work through various examples keystroke bykeystroke. By the time the reader reaches the end of this tutorial any confusion about workplanes shouldhave lessened significantly.Perhaps an analogy might help start the process of demystification. Think of a workplane as the tableunderneath a piece of paper. When you draw on the paper the table supports the paper, it keeps thepaper flat and stable. This stability, this structure, ensures that the pencil doesn't poke through the paperand ensures that the graphite is laid down smoothly and clearly. Work proceeds just as planned. Let's saythen, that the paper is moved off the table and held in the air. Now, when one attempts to draw on thepaper one is plagued with problems. The paper is flimsy, one cannot lay down a straight line of graphiteand if one pushes too hard the pencil can poke right through the paper. In this analogy, this is so becausethe table, and its stable structure, was left behind. In order, then, to be able to draw in different views oron different surfaces the table must be moved and placed under the paper wherever that paper mayhave been moved to, much like one may adjust their drafting table to a different angle.One very important thing for the beginner to remember, right from the start, is that the table (workplane)is required to employ all the 2D tools, be it lines, circles or the myriad other tools. It is also required withall the 2D modification tools. As well, after some procedures, such as mirror copy, the objects will needto be selected and placed on the current workplane to utilize other 2D tool functions or processes suchas line length, offset, parallel or tangent.Objects are placed on the workplane by selecting them and invoking 'Place on WorkPlane' from Formatmenu at the top of the <strong>TurboCAD</strong> desktop.4
Donald B. Chekewww.textualcreations.caSince this is a frequent need, many users create a shortcut tool on their <strong>TurboCAD</strong> desktop or use theshort-cut keys (Shift + Alt + W). Below is an image of the tool the author has on his desktop. A texttoolbar is created first and then the text icon is changed to the down arrow icon via the 'change buttonimage' customize dialogue.Many users find the above part especially confusing and often ask why? In essence every item is createdon its own workplane even though it looks like they are on the same workplane. Issues don't arise untilthe 2D objects are copied and then functions such as line length, offset, parallel, tangent and so forth areemployed. It is just something a user has to get used to as it has been this way for all versions of<strong>TurboCAD</strong>. Eventually a user will come to know instinctually when to place their 2D objects on theworkplane.Because the "table" (workplane) is required continually while drawing the developers of <strong>TurboCAD</strong> haveincluded several workplane tools to facilitate 'the move' quickly and efficiently.f Show / Hide Workplanef Workplane by Active Viewf Workplane by Worldf Workplane by Entityf Workplane by 3 Pointsf Workplane by Z Axisf Previous Workplanef Set Named Workplanef Workplane Originf Edit Current Workplanef Workplane by Facetf Auto Workplane by Facef Fit Workplane to Windowf Show/Hide Intersections between WorkPlane and 3D ObjectsThis tutorial assumes that the beginner has studied the desktop to some degree and can locate most ofthe tools. Since there are endless desktop configurations that can be set up in <strong>TurboCAD</strong> the author has5
Donald B. Chekewww.textualcreations.caopted to illustrate the required tools with the Office 2000 user interface, and the default toolbars in theirundocked format (Office 2000 theme).6
Donald B. ChekeBe sure to click the Save button at the top of the <strong>TurboCAD</strong> desktop on a regular basis.www.textualcreations.caIf need be, scroll in with the mouse wheel so that the grid is visible on screen.It is now time to begin looking at the workplane tools.Show/Hide Workplane & Fit Workplane to WindowSelect the Show/Hide Workplane icon from the Workplane toolbar to turn it on.This tool creates an on-screen dashed red line that corresponds with the two-dimensional X-Y plane ofthe workplane.It may not be immediately visible so select the Fit Workplane to Window tool from the Workplanetoolbar.The workplane indicator appears.22
Donald B. Chekewww.textualcreations.caPlease note that the Fit Workplane to Window tool cannot be selected unless the red workplane indicatoris set to Show.To see further how this functions, select the Box tool from the 3D Object toolbar.Near the upper left hand corner of the drawing window place the cursor over a grid intersection and pressthe G key (G SEKE snap) to snap the first point of the box in place. Tab into the Inspector Bar and enter 4in the Width field, 4 in the Length field and 2 in the Height field. Press Enter.Press the Space Bar to exit the tool.Left mouse click on the box to select it.Select Zoom Selection from the menu bar at the top of the <strong>TurboCAD</strong> desktop. The selection is zoomedin on.23
Donald B. ChekeSwitch to Isometric SE view.www.textualcreations.caPreparations for the next workplane tool explanation will now take place.Select the Rectangle tool from the Line toolbar.In a clear area of the drawing snap an 8 inch square to the grid using two G SEKE snaps.Press Space Bar to exit the tool.Select the new rectangle and note the relationship of the X, Y, Z handles to the world coordinate systemicon. They are the same. The square is on the X-Y plane.Select the Make Copy tool from the right mouse click local menu or from the Inspector Bar (providing theuser has a large enough monitor) to turn it on.33
Donald B. Chekewww.textualcreations.caLeft mouse click on the green Z rotation handle to pick it up (click and release). Note which rotation fieldon the Inspector bar changes as the cursor is moved.Tab into the Inspector Bar and enter 270 in the Y Rotation field (rotating on the Y axis). Press Enter.Note the relationship to the world CS icon. This rotated square now represents the Z-Y plane.Left mouse click on the green Y rotation handle to pick it up (click and release). Begin to rotate therectangle counterclockwise and when the X and the Y Rotation fields change to 90 Tab into the InspectorBar and enter 0 in the Y Rotation field. Press Enter.34
Donald B. Chekewww.textualcreations.caSelect the Make Copy tool again to turn it off.Note the relationship to the world CS icon. This rotated square now represents the Z-X plane.Select the three rectangles. This can be done by dragging the selection cursor around part of all three, ora user can press and hold the Shift key down and left click them one at a time to add them to the currentselection. (With this method, a user can also deselect objects with a left mouse click if the object isalready selected. Release the Shift key when all three are selected)Left mouse click on the yellow reference point of the selection to pick it up. Move the cursor over to theedge of the box that was created earlier and E SEKE snap the squares to the box. In progress below.35
Donald B. Chekewww.textualcreations.caTab into the Inspector Bar and enter 1 in the Base Radius field and .25 in the Tube Radius field. PressEnter.Press the Space Bar to exit the tool.Switch to Front view. Note the position of the workplane indicator.Switch to Isometric SE view.Select the torus. Left mouse click on the reference point of the selection to pick it up (click and release).Move the cursor to the top edge of the cylinder and C SEKE snap it in place. In progress below.47
Donald B. Chekewww.textualcreations.caWith the torus still selected, Tab into the Inspector Bar and enter 0 in the Y Rotation field. Press Enter.Select the Workplane by Entity tool from the Workplane toolbar.Left mouse click the torus. Note the workplane indicator moves to line up horizontally with the center ofthe torus, along its base point.Switch to Front view. Note the workplane indicator location. It is through the center plane of the torus atits base point.With the torus still selected, Tab into the Inspector Bar and enter 45 in the Y Rotation field. Press Enter.Select the Workplane by Entity tool from the Workplane toolbar.Left mouse click the torus. Note the workplane indicator moves to line up with the central base plane ofthe torus.48
Donald B. Chekewww.textualcreations.caLike so. Note the grid change, the workplane indicator change and the UCS icon change. Note also thedirection of the Z indicator in the UCS icon. It is pointing up in this case.Switch to Front view. Note the workplane indicator location.Switch to Isometric SE view.Select the Cylinder tool from the 3D Object toolbar.N SEKE snap the first point of the circle to diagonal line on the top of the box. Move cursor to the left ashort distance and then left mouse click to place the second point. In progress below.Move the cursor upward and at the same time note the direction of Z on the UCS icon and the numbersin the Height field of the Inspector Bar. Z is pointing upward in which case the numbers in the Height fieldshould be positive numbers, and they are.53
Donald B. Chekewww.textualcreations.caMove the cursor downward and at the same time note the direction of Z on the UCS icon and thenumbers in the Height field of the Inspector Bar. Z is pointing upward in which case the numbers in theHeight field should be negative numbers, and they are.The illustration below shows the positive / negative relationship of the coordinate system as it pertains toworkplanes.54