EFIS-D60 Installation Guide - Dynon Avionics
EFIS-D60 Installation Guide - Dynon Avionics EFIS-D60 Installation Guide - Dynon Avionics
Instrument InstallationPanel Location and MountingThe diagram below shows the outside dimensions of the front bezel of the EFIS-D60. Note thatthe instrument and tray extend about 4.5” behind the panel, and the supplied harness extendsthree inches more. Use the dimensions (in inches) found on the diagram to plan for the spacerequired by the instrument. Take the following considerations into account when selecting amounting location for the EFIS-D60.Avoid placing the instrument near heater vents or any source of extremely hot or cold air. Keepin mind that the air surrounding the EFIS-D60 during operation may be no warmer than 50 °C.Plan a panel location that allows convenient viewing of the instrument with no obstruction.When flying straight and level, the panel angle from vertical may not be greater than +/- 30degrees. The unit must be aligned as close as possible with the longitudinal and lateral axes ofthe aircraft. The firmware supports an adjustment for panel tilt, but not for mounting errors inyaw or roll. Correct attitude performance depends on mounting the EFIS-D60 square with thedirection of flight.To mount the EFIS-D60, you must make a rectangular cutout in your panel. Ensure that thedimensions of the cutout are: 6.780” wide and 4.750” tall. Place the D100-series mounting traybehind the cutout. Secure it to your panel in whatever way you desire. Riveting it to the panel isideal, but drilling holes for mounting screws and nuts will work as well. You may cut off 2horizontal or vertical tabs from the mounting tray to minimize the space taken up behind thepanel. Upon securing the mounting rack to the back of your panel, slide the EFIS-D60 into it.Use the included 7/64” Allen wrench to secure the mounting screw (at the bottom left of thefront bezel) into mounting rack. At your discretion, you can also screw a #6-32 screw into theback of the mounting rack on the opposite side. This screw should penetrate into the instrumentno further than ¼”.3-8 EFIS-D60 Installation Guide
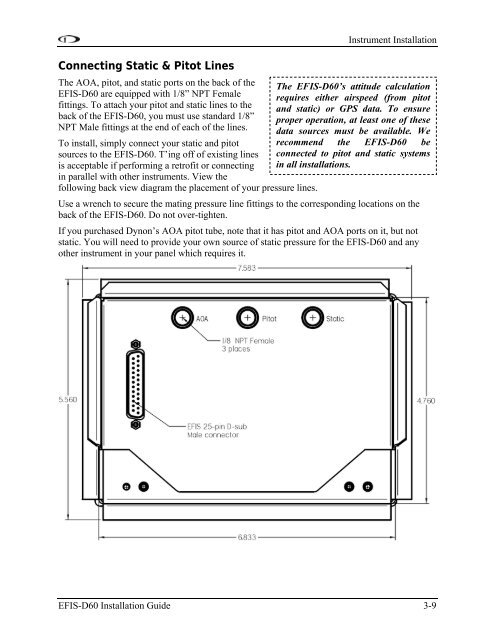
Connecting Static & Pitot LinesThe AOA, pitot, and static ports on the back of theEFIS-D60 are equipped with 1/8” NPT Femalefittings. To attach your pitot and static lines to theback of the EFIS-D60, you must use standard 1/8”NPT Male fittings at the end of each of the lines.To install, simply connect your static and pitotsources to the EFIS-D60. T’ing off of existing linesis acceptable if performing a retrofit or connectingin parallel with other instruments. View thefollowing back view diagram the placement of your pressure lines.Instrument InstallationThe EFIS-D60’s attitude calculationrequires either airspeed (from pitotand static) or GPS data. To ensureproper operation, at least one of thesedata sources must be available. Werecommend the EFIS-D60 beconnected to pitot and static systemsin all installations.Use a wrench to secure the mating pressure line fittings to the corresponding locations on theback of the EFIS-D60. Do not over-tighten.If you purchased Dynon’s AOA pitot tube, note that it has pitot and AOA ports on it, but notstatic. You will need to provide your own source of static pressure for the EFIS-D60 and anyother instrument in your panel which requires it.EFIS-D60 Installation Guide 3-9
- Page 1: EFIS-D60Installation GuideThis prod
- Page 5: Table of ContentsContact Informatio
- Page 8 and 9: IntroductionAbout this GuideIn the
- Page 10 and 11: Wiring Overview25-Pin Female EFIS H
- Page 12 and 13: Wiring OverviewWIRING SYSTEM OVERVI
- Page 14 and 15: Instrument Installation• All moun
- Page 16 and 17: Instrument InstallationPC CONNECTIO
- Page 18 and 19: Instrument InstallationSERIAL ALTIT
- Page 23 and 24: 4. EFIS CALIBRATION AND CONFIGURATI
- Page 25 and 26: EFIS Calibration and ConfigurationE
- Page 27 and 28: 5. APPENDIXThe appendices contain a
- Page 29 and 30: Alert Message Description End condi
- Page 31 and 32: AppendixProblemAfter performing a m
- Page 33 and 34: AppendixAppendix B: Dynon AOA/Pitot
- Page 35 and 36: Appendixinstructions on the followi
- Page 37 and 38: Appendixcontroller. Remember that e
- Page 39 and 40: AppendixBoom mountPLUMBINGNOTE: Bec
- Page 41 and 42: AppendixAppendix C: Encoder Serial-
- Page 43 and 44: AppendixEFISDB25Pin#13Dynon EFIShar
- Page 45: AppendixAppendix F: WeightsAdding a
Connecting Static & Pitot LinesThe AOA, pitot, and static ports on the back of the<strong>EFIS</strong>-<strong>D60</strong> are equipped with 1/8” NPT Femalefittings. To attach your pitot and static lines to theback of the <strong>EFIS</strong>-<strong>D60</strong>, you must use standard 1/8”NPT Male fittings at the end of each of the lines.To install, simply connect your static and pitotsources to the <strong>EFIS</strong>-<strong>D60</strong>. T’ing off of existing linesis acceptable if performing a retrofit or connectingin parallel with other instruments. View thefollowing back view diagram the placement of your pressure lines.Instrument <strong>Installation</strong>The <strong>EFIS</strong>-<strong>D60</strong>’s attitude calculationrequires either airspeed (from pitotand static) or GPS data. To ensureproper operation, at least one of thesedata sources must be available. Werecommend the <strong>EFIS</strong>-<strong>D60</strong> beconnected to pitot and static systemsin all installations.Use a wrench to secure the mating pressure line fittings to the corresponding locations on theback of the <strong>EFIS</strong>-<strong>D60</strong>. Do not over-tighten.If you purchased <strong>Dynon</strong>’s AOA pitot tube, note that it has pitot and AOA ports on it, but notstatic. You will need to provide your own source of static pressure for the <strong>EFIS</strong>-<strong>D60</strong> and anyother instrument in your panel which requires it.<strong>EFIS</strong>-<strong>D60</strong> <strong>Installation</strong> <strong>Guide</strong> 3-9


