Cisco AP541N Dual-band Single-radio Access Point Administration ...
Cisco AP541N Dual-band Single-radio Access Point Administration ... Cisco AP541N Dual-band Single-radio Access Point Administration ...
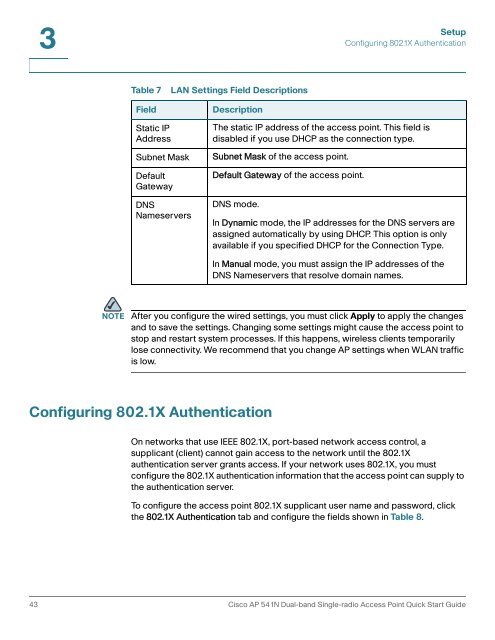
3SetupConfiguring 802.1X AuthenticationTable 7FieldLAN Settings Field DescriptionsDescriptionStatic IPAddressSubnet MaskDefaultGatewayDNSNameserversThe static IP address of the access point. This field isdisabled if you use DHCP as the connection type.Subnet Mask of the access point.Default Gateway of the access point.DNS mode.In Dynamic mode, the IP addresses for the DNS servers areassigned automatically by using DHCP. This option is onlyavailable if you specified DHCP for the Connection Type.In Manual mode, you must assign the IP addresses of theDNS Nameservers that resolve domain names.NOTEAfter you configure the wired settings, you must click Apply to apply the changesand to save the settings. Changing some settings might cause the access point tostop and restart system processes. If this happens, wireless clients temporarilylose connectivity. We recommend that you change AP settings when WLAN trafficis low.Configuring 802.1X AuthenticationOn networks that use IEEE 802.1X, port-based network access control, asupplicant (client) cannot gain access to the network until the 802.1Xauthentication server grants access. If your network uses 802.1X, you mustconfigure the 802.1X authentication information that the access point can supply tothe authentication server.To configure the access point 802.1X supplicant user name and password, clickthe 802.1X Authentication tab and configure the fields shown in Table 8.43 Cisco AP 541N Dual-band Single-radio Access Point Quick Start Guide
SetupConfiguring 802.1X Authentication3Figure 11IEEE 802.1X AuthenticationTable 8FieldIEEE 802.1X Authentication Field DescriptionsDescription802.1X Supplicant Click Enabled to enable the Administrative status of the802.1X Supplicant.Click Disabled to disable the Administrative status of the802.1X Supplicant.Cisco AP 541N Dual-band Single-radio Access Point Quick Start Guide 44
- Page 1 and 2: ADMINISTRATIONGUIDECisco Small Busi
- Page 3 and 4: ContentsNetwork Interfaces 28Wired
- Page 5 and 6: ContentsNavigating to an Access Poi
- Page 7 and 8: PrefaceTable 1 describes the typogr
- Page 9 and 10: 1Getting StartedThe Cisco Access Po
- Page 11 and 12: Getting StartedConnecting the Acces
- Page 13 and 14: Getting StartedConnecting the Acces
- Page 15 and 16: Getting StartedConnecting the Acces
- Page 17 and 18: Getting StartedConnecting the Acces
- Page 19 and 20: Getting StartedConnecting the Acces
- Page 21 and 22: Getting StartedTroubleshooting Your
- Page 23 and 24: Getting StartedConfiguring the Acce
- Page 25 and 26: Getting StartedWireless Client Requ
- Page 27 and 28: Getting StartedConfiguring Security
- Page 29 and 30: 2StatusThe Status page provides inf
- Page 31 and 32: 2Table 3FieldDevice Information Pag
- Page 33 and 34: StatusTraffic Statistics2Figure 7Vi
- Page 35 and 36: StatusAssociated Clients2Associated
- Page 37 and 38: StatusRogue AP Detection2Link Integ
- Page 39 and 40: StatusRogue AP Detection2Table 6Fie
- Page 41 and 42: StatusRogue AP Detection2Table 6Fie
- Page 43 and 44: 3SetupLAN SettingsThe default wired
- Page 45: 3Table 7 describes the fields to vi
- Page 49 and 50: SetupEnabling the Network Time Prot
- Page 51 and 52: SetupEnabling the Network Time Prot
- Page 53 and 54: SetupEnabling the Network Time Prot
- Page 55 and 56: 4WirelessModifying Wireless Radio S
- Page 57 and 58: 4Table 10FieldModeRadio Settings Fi
- Page 59 and 60: WirelessModifying Virtual Access Po
- Page 61 and 62: WirelessModifying Virtual Access Po
- Page 63 and 64: WirelessModifying Virtual Access Po
- Page 65 and 66: WirelessModifying Virtual Access Po
- Page 67 and 68: WirelessModifying Virtual Access Po
- Page 69 and 70: WirelessModifying Virtual Access Po
- Page 71 and 72: WirelessModifying Virtual Access Po
- Page 73 and 74: WirelessModifying Virtual Access Po
- Page 75 and 76: WirelessModifying Virtual Access Po
- Page 77 and 78: WirelessModifying Virtual Access Po
- Page 79 and 80: WirelessClient Connection Control4C
- Page 81 and 82: WirelessClient Connection Control4T
- Page 83 and 84: WirelessModifying Advanced Settings
- Page 85 and 86: WirelessModifying Advanced Settings
- Page 87 and 88: WirelessModifying Advanced Settings
- Page 89 and 90: WirelessModifying Advanced Settings
- Page 91 and 92: WirelessModifying Advanced Settings
- Page 93 and 94: WirelessModifying Advanced Settings
- Page 95 and 96: WirelessConfiguring the Wireless Di
3SetupConfiguring 802.1X AuthenticationTable 7FieldLAN Settings Field DescriptionsDescriptionStatic IPAddressSubnet MaskDefaultGatewayDNSNameserversThe static IP address of the access point. This field isdisabled if you use DHCP as the connection type.Subnet Mask of the access point.Default Gateway of the access point.DNS mode.In Dynamic mode, the IP addresses for the DNS servers areassigned automatically by using DHCP. This option is onlyavailable if you specified DHCP for the Connection Type.In Manual mode, you must assign the IP addresses of theDNS Nameservers that resolve domain names.NOTEAfter you configure the wired settings, you must click Apply to apply the changesand to save the settings. Changing some settings might cause the access point tostop and restart system processes. If this happens, wireless clients temporarilylose connectivity. We recommend that you change AP settings when WLAN trafficis low.Configuring 802.1X AuthenticationOn networks that use IEEE 802.1X, port-based network access control, asupplicant (client) cannot gain access to the network until the 802.1Xauthentication server grants access. If your network uses 802.1X, you mustconfigure the 802.1X authentication information that the access point can supply tothe authentication server.To configure the access point 802.1X supplicant user name and password, clickthe 802.1X Authentication tab and configure the fields shown in Table 8.43 <strong>Cisco</strong> AP 541N <strong>Dual</strong>-<strong>band</strong> <strong>Single</strong>-<strong>radio</strong> <strong>Access</strong> <strong>Point</strong> Quick Start Guide


