Instructions Gas Oven Heat Control - Airstream
Instructions Gas Oven Heat Control - Airstream
Instructions Gas Oven Heat Control - Airstream

You also want an ePaper? Increase the reach of your titles
YUMPU automatically turns print PDFs into web optimized ePapers that Google loves.
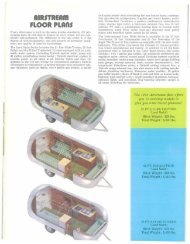
RECIPESAs there are many excellent recipe books, it is nol the intention of thisbooklet 10 lid detailed recipes, but to provide general imlructions forthe use of the oYen thermostat. On the following pages will be foundon approved time and temperature cooking chort. By following thischort, you can cook foods 10 your tosle.DIRECTIONS FOR USING YOUR Cf)filcola/o!t OVEN THERMOSTATRead carefully before using Ihe oven.l-Push diol in and turn to desired temperature.2--ligh. burner. On sloves equipped with automatic ignition, it is notnecessary to light burner. Follow Ihe range manufacturer's instructionsfor oven equipped .....ith automatic ignition.3-Prepare food while the oven is heating."SOME DON'TS"1-00n'l place food in oven until the large flame hos outomaticallyreduced to (I small flame. (Unless the recipe specifically directs tothe controry.)2-Don't turn the Wi1colatar to 0 higher temperature than required.Thili walites bath time and gali and will probably spoil your bakingproduct.3-Doll't worry becaulie the flame remain Ii low after the selected dialtemperature is reached. "doesn't toke much gas to keep the ovenhoi once it is heoted........ ..., ...6_1 ....,.. hat,.....2
UEf51"ndi"g lib6-1 Po,",nchL.u thon 6 'ou""....__.. .lolled .ibl __~_.r....p (High Quality)Sianding . ••lolled _._. _....'" L.g . _lolled S~ould~ ----,cShoo/kl•• (bo....·,,, or
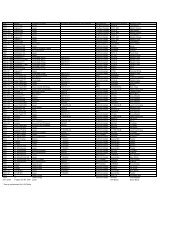
BAKINGTI... inMin.'..1......'0••'......, To'000BAKING ICont'dl~, Ti... i.T......,....,. /oI'ne'.'r......,c.u,.R•••• 1"n... in/oIin~'•••BREADS,IVeelll)"ead, Yea.IlIread, " Yeo,lRolls, Yeo.t ....Cofl"u, (like, Yeod....•&READS, (Quick)Saking Powder 8'.."" •....Co,n Bread ......................•......Ginge,b"od .lool, Nul lIreod, .Ic, .Muffin•..........__....._._ .Fopou'lCAKESAng,,1 Food ._ .Sponge Coh _...•.••.....................__Loye. Coke ..............••..C~o
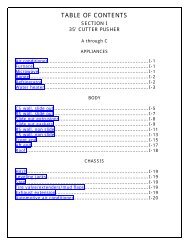
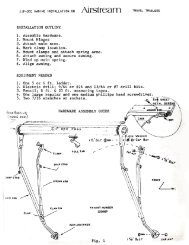
0) Dial ~ @ ...1otV....@ Cent... Ring~ Range"'.......@ BRoI @ GaR..0Cent...0Calib«ltionScrew@ @ Cap_Indicator @ V....@ lodSa....@0Sa-. ®V.... SpriogV.... Face and V__(!) @V.... PIug V....Cap.......bIy@ Nut(!) Plug@>I @ 0-.__Ilooinside ....I@ CO_fln.1I1III ....@ OHoC......@ puon...@'~pau VaIq@ 1WIows", .............,10II
SERVICE INSTRUCTIONS TYPE "C" rpf~To secure the Msi rftUlts from the Wikolotor. the minimum fIa.... andpiJoIlieltt ""'" be adlulted to your local gas pressur. at the time yourrange is installed. Voriatlon in '01 prelSUl'ft in d....*olitia pNventth... acfIusttMnts being mad. eacepr in your hOlM. Th. d__or ICil COMpany from whoM you purchaHd your range wl1l mak. the..-....... adI-'" to< you.AI WDcalator•••~ acfIust" few '-",perature at .... fodoryand it Is not ........, to .... theM with 0 thenncMHter when the rangeis .........OPEU1ION Of nil TYPE ''C''t1)f~............1he 1JpII"C" Wlc:oIaIar......' for operation Oft the expansion ...._._"'. .... 10 ... _ ..... _ of ...When cIaI of ...-.. I, ....... IM,and ... GAS ON pasiIIan.gal is to flow through the control to the D\WI ..... Wh.-... ow. __ II and the __ t••p.,....--. ....liquid caslla'ud 1ft bulb ThIs expcIftIion 110I_1s MOtioII10'" wWch II to atic waI¥ec••I to torworcI 'I'CIIM Melt. Th continues to __torworcI wIN Melt the op.... betw th_ • lust .......... to the I'tMIlIfrtd a-.nt of.. to ....nain in the....... I_petal for which .... dial is .... More .. is NCIUiNd to"nt... high own teMperatures thCIfl low own teMp4ratureI, to theopening between Ihe valve and the valve seol varies with Ihe oventemperature.If in the operation of Ihe control the valve were to close completely,the oven burner WOlJld 90 oul. To supply enough gas to keep the ovenburner lighted under this condition, there is incorporated a byponvalve, which when properly adiusted for the local gas prenure, willsupply only enough gas to keep the burner lighted. The size of thisflame should be such that it will not maintain 0 temperature abovethe lowest coiled for on the diol. To relight the oven burner, in theevent it is accidentally extinguished, the control is equipped with apilot light.SERVICE ADJUSTMENTS ON THE TYPE "C" ~~l--flame adjustments (by.pon, or minimum flame, and pilot light.)2-Temperature odjustment.3-1!egreasing oven valve.4--Cleaning thermostat valve.FLAME ADJUSTMENTSEvery type "C" oven heat control is thoroughly tested and calibratedbefore leaving the factory, but as gas conditions vary in different localities,it is necenary thai two adjustments be made when the range isinstalled in the hame to insure proper operation under local conditions.These adjustments are:l-Pilot light.2--!y-pon or minimum flome.1213
PILOT FLAMEFor proper oven operation this adjustment musl be mode when theslove is installed:1-Turn the gas on full and quickly light the burner. ITo turn the gason, press in on dial (II ond turn to the righi, clockwise.)2-Set the dial 01 350°.3-Remove the dial {ll by pulling forward.4-While the oven is healing, adjust the length of the pilot flame byturning pilot valve {IJI with (I screw driver until (I pilot flame*" to I" long is secured. This flame not to be over one inch inlength and is 10 be in very close prollimity 10 the oven burner parh.S_Moke the oi, shutter adjustment. (See siove manufacturer's burneradjustment instructions.!,....,.' Ie••ay•• In c.e of 1M .r ~I_._..._ _.......TO ADJUST THEBY·PASS FLAME PROCEED AS FOLLOWS:I-Allow oven 10 continue healing until oven burner flame hos reduced.2-lnstol1the dialll) by pushing on and lurn to 250 0 to insure that thethermostat control valve is completely closed.3-Remove dial III by pulli09 forward.4-With a strew driver, turn bypass valve (121 until the burner flameis about ~" long and appears as a small bead flame at each. burner port. III proper mioimum flame caonaf be secured. seeinstructions for cleaoing thermostat valve.)5----1!:eplace dial (l J on control 01 250 0settiog by pushing on.1415
saVICING GAS VALVE AND THaMOSTAT VALVEThe Iype "C" Wikotator i. designed 10 that the O¥en .,.. core mevbe ealily removed hom th. fro"' without di,turbing any of the pipingand without ,...O¥inlil the th.....ostat from the....It dirty oven valve i, generally indicated by the thermostat dial notturning smoothly. If it tum, hard. it I'nOY be Mlily ,e1vbrieated.TO REGREASE OVEN VALVEl-TUIN Off AU GAS TO THE STOVE.2-$01 ofiaI at "Off"_,3-hMote diClil (1) by puling fOIward.4---a_Oft bel.. (3) fronI manifold panel _ follows: Push in oncenter ring 12}, tum left Ccounter-dodwi..1 01 for QI it WI" goand ...... put fcM••d.5-To IIMIk. nrYiono easi.... we suggest NIlIICW""I .... lIMII'IifoId cowerpanel m- the stoft.6--R.-ove lCI'ews 171. Note ....at one screw is larger than the other.this insures that r.auembly of the YO'" mUll be correctly made.Place th.... in the relative position in which they w.... ,....owed.7 --RetftO'Ita valve plUG oll....bly (8) by pulling it straight out fromthe control. Do nol attempt 10 remove or adjust any of the componentparis thai make up the valve plug assembly.NOTE: The holes in the die costing 1I1l. through which the screwspan, correspond to the different sizes of the screws. This willassist in re-ouembJing the valve plug in the correct position.a-Cleon the face of the plug t9l thoroughly, making sure that nolint or grit adheres to the plug. This should be carefully done. Donot attempt to clean the inside bore 1101 of the valve body.9--Regreose the plug, using the best grade of high temperaturevalve grease. Ploce a small quantity on the plug and work itaround with the tingers until the entire surface is thoroughlycovered with a thin film of greose.10-Re-install volve plug ossembly (81 carefully in the same positionin which it was removed with the solid side of plug towords themonifold pipe. (See instructions 71. You will observe inside ofvalve plug ° tongued shoft. The tongue must enter the grooveof the moting shoh inside the body without rotating eithermember.ll-Re-install screws (71 in same relative position. Replace manifoldponel, bezel (31 ond dial (II in reverse order of the manner fnwhich they were removed.12-Moke sure all permanent pilots on range are re-lighted afterturning on main gos valve.1617
TO CLEAN THERMOSTAT VALVEThe condruclion of the type "C" Wilcolator allows the thermostat valveto be easily and quickly cleaned. A dirty thermostat valve is generallyindicated by inability to reduce the bypass or minimum flame lowenough, regardlen of the adjustment of the bypass (121.T(I c1eon the valve. best results will be obtained by removing thecontrol from the range, following the instructions given.TO REMOVE CONTROL FROM RANGEl-TURN OFF ALL GAS TO THE STOVE.2-Remove dial III by pulling forward.3---Remove bezel13l. as previously instructed. Remove manifold panel.4-Disconect oven burner gas line 122) from control by turning nut1211 counter-clockwise.5-Disconnect pilot tube 1241 from control by turning compressionnut 1231 counter·dcx:kwise.6-Remove cop screws 1161.7 -.Remove control from range being careful in removing the bulbfrom the oven not to break the smart tubing.18