Roller Chain - Tsubaki
Roller Chain - Tsubaki
Roller Chain - Tsubaki

Create successful ePaper yourself
Turn your PDF publications into a flip-book with our unique Google optimized e-Paper software.
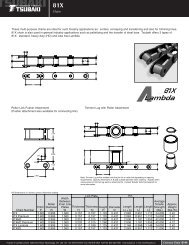
<strong>Roller</strong> <strong>Chain</strong>Installation & MaintenanceDrive <strong>Chain</strong>1.4 How to cut Lambda <strong>Chain</strong>1) Support the chain with a chain vice or something similar, andgrind down one end of the outer link plate’s two pins (sameside) to the surface of the link plate. Be careful that the chaindoes not overheat during the grinding process. Grinding shouldbe carried out slowly so as not to overheat the bushings.2) The chain is then cut using an exclusive cradle (refer to <strong>Chain</strong>Tools section) and an RS <strong>Roller</strong> <strong>Chain</strong> punch. Important pointsfor cutting are outlined in 4) and 5) in 1.1. However, please usean exclusive cradle instead of a vice.3) When removing the pins with a punch, alternately hit the pins.Take extra care not to remove or cause any damage to thebushing. Make sure not to use this part if the bushing has comeloose or been damaged.2. How to Connect <strong>Roller</strong> <strong>Chain</strong>2.1 When connecting chain on sprocket teethWhen connecting or disconnecting roller chain, it is convenient touse the sprocket teeth. Carry out the following steps.1) Wind the chain around one of the sprockets such that both endsof the chain are facing each other on the sprocket.2) Apply oil and grease to the connecting link.3) Insert the connecting link into the two end links of the chain.4) Insert the connecting link plate of the connecting link and fastenthe plate using the clips/cotter pins or spring clips supplied.5) When using a press-fit connecting link or semi-press-fitconnecting link, insertthe connecting linkplate by tapping it witha hammer until itmoves into position.Then fasten it usingthe clips/cotter pins orspring clips supplied.6) When using thesprocket teeth toconnect the chain,take care not todamage the teeth, Fig. 8 Connecting on a sprocketparticularly whenusing a cast iron sprocket.2.2 When connecting between shaftsIf the sprocket cannot be used due to the layout, please carry outthe following steps.1) Wind the chainaround the sprocketsand pull the chainends together using achain puller (refer to<strong>Chain</strong> Tools section)or wire.2) Apply oil and greaseto the connecting link.3) Insert the connectinglink into the two endlinks of the chain. Fig. 9 Connecting between shafts4) Insert the connecting link plate of the connecting link andfasten the plate using the clips/cotter pins or spring pinssupplied.2.3 Spring Clips and Cotter Pins1) Spring ClipsSpring Clips are used for small size roller chain (under RS60)connecting links. When connecting the chain, the clip shouldbe inserted securely into the slot ofthe pin on the connecting link afterthe connecting plate has beeninserted on the pin. If the legs ofthe clips are spread too far theywill not catch properly and will falloff during operation of the chain.Care should be taken when insertingthem. The direction in which the clipis installed is generally opposite tothe direction of travel for the chain asshown in Fig.10.Directionof travelFig. 10 Direction inwhich the clipis installed2) Cotter PinsTSUBAKI’s cotter pins are heat treated. The legs of the cotterpins should be bent to an angle of approx. 60 degrees. Cotterpins should not be reused, and commercially available cotterpins other than those produced by TSUBAKI should beavoided.Cotter pinT-pinZ-pinFig. 11 Angle of legs for cotter pins0Safety Precautions(1) Avoid using offset links wherever possible by varying thecenter distance between shafts or using an idler.(2) In the case of pins and connecting link plate holes beingpress-fit or semi-press-fit type connecting links, avoidwidening the connecting link plate hole or narrowing thepin diameter. Doing so will result in a reduction in rollerchain strength.(3) The outer link of cotter pin type roller chain can be usedas a substitute for the connecting link. However, due tothe press fit connection, the outer link plate must becarefully driven onto the pin parallel to the connecting link.If the connecting link plate is installed without due care toparallelism, chain damage or increased wear may result.(4) Do not reuse press fit type link plates that have beendetached.A-108