Create successful ePaper yourself
Turn your PDF publications into a flip-book with our unique Google optimized e-Paper software.
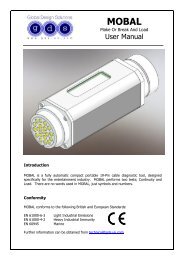
User <strong>Manual</strong>
Table of ContentsTable of Contents1. Before You Begin ................................................................................................ 1What Is Included ................................................................................................................. 1Unpacking Instructions ........................................................................................................ 1Typographic Conventions ................................................................................................... 1Icon Meaning ....................................................................................................................... 1Product at a Glance ............................................................................................................ 1Safety Notes ........................................................................................................................ 2Expected LED Lifespan ...................................................................................................... 22. Introduction ......................................................................................................... 3Product Description ............................................................................................................. 3Features .............................................................................................................................. 3Product Overview ................................................................................................................ 4Product Dimensions ............................................................................................................ 53. Setup .................................................................................................................... 6AC Power ............................................................................................................................ 6AC Plug ....................................................................................................................................... 6Power Linking .............................................................................................................................. 6DMX Linking ........................................................................................................................ 7DMX Modes ................................................................................................................................. 7Master/Slave Connectivity ........................................................................................................... 7Mounting ............................................................................................................................. 8Orientation ................................................................................................................................... 8Rigging ........................................................................................................................................ 84. Operation ............................................................................................................. 9Control Panel Description ................................................................................................... 9Control Options ................................................................................................................... 9Programming ....................................................................................................................... 9DMX Personality .......................................................................................................................... 9DMX Control .............................................................................................................................. 10Loss of Signal Setting ................................................................................................................ 10<strong>Zoom</strong> Limit Setting ..................................................................................................................... 10Static Color ................................................................................................................................ 11Auto Programs ........................................................................................................................... 11Edit Customs ............................................................................................................................. 11Master/Slave .............................................................................................................................. 12Color Settings ............................................................................................................................ 12Dimmer Curves .......................................................................................................................... 12Control Panel Lock .................................................................................................................... 13Program Upload ........................................................................................................................ 13Reset ......................................................................................................................................... 14Whites Setting ........................................................................................................................... 14White Calibration ....................................................................................................................... 14TOUR Notes ...................................................................................................................... 15Master Dimmer .......................................................................................................................... 15Red, Green, Blue, and White Color Selection............................................................................ 15Color Macros ............................................................................................................................. 15Strobe ........................................................................................................................................ 15Auto/Custom .............................................................................................................................. 15Dimmer Speed ........................................................................................................................... 15<strong>Zoom</strong> Selection .......................................................................................................................... 15<strong>Zoom</strong> Reset ............................................................................................................................... 15Menu Map ......................................................................................................................... 16DMX Values ...................................................................................................................... 18COLORado <strong>Zoom</strong> <strong>Tour</strong> User <strong>Manual</strong> Rev. 11-i-
Table of ContentsTOUR ........................................................................................................................................ 18TOUR (Cont.) ............................................................................................................................ 19ARC.1 ........................................................................................................................................ 19AR1.D ........................................................................................................................................ 19ARC.2 ........................................................................................................................................ 19AR2.D ........................................................................................................................................ 19AR2.S ........................................................................................................................................ 20HSV ........................................................................................................................................... 205. Technical Information ....................................................................................... 21Product Maintenance ........................................................................................................ 21Troubleshooting Guide ...................................................................................................... 22Returns Procedure ............................................................................................................ 23Claims ............................................................................................................................... 23Contact Us ........................................................................................................................ 23Technical Specifications ................................................................................................... 24-ii- COLORado <strong>Zoom</strong> <strong>Tour</strong> User <strong>Manual</strong> Rev. 11
1. Before You BeginWhat IsIncluded• One COLORado <strong>Zoom</strong> <strong>Tour</strong>• One Gel Frame• One Neutrik® powerCON® to Edison Plug Input Power Cord• One Safety Cable• One Warranty Card• One Quick Reference GuideBefore You BeginUnpackingInstructionsTypographicConventionsImmediately upon receiving this product, carefully unpack it and check the container inwhich you received it. Make sure that you have received all the parts indicated above andthat they are all in good condition. If the material inside the container (this product and anyother accessory included with it) appears damaged from shipping, or if the container showssigns of mishandling, notify the shipper immediately. In addition, retain the container and allthe packing material for inspection.See the Claims section in the Technical Information chapter for more information.Convention Meaning1~512 A range of values in the text50/60 A set of mutually exclusive values in the textCOLORado 1 The name of another publication, manual, or section A button on the product’s control panelSettings A product function or a menu optionMENU > Settings A sequence of menu options1~10 A range of menu values from which to choose in a menuYes/No A set of two mutually exclusive menu options in a menuON A unique value to be entered or selected in a menuIcon Meaning Icon MeaningCritical installation, configuration, or operation information. Failureto comply with this information may render the product partially orcompletely inoperative, damage third-party equipment, or causeharm to the user.Important installation or configuration information. Failure tocomply with this information may prevent the product fromfunctioning correctly.Useful non-critical information.Product at aGlanceThe term “DMX” used throughout this document refers to the USITT DMX512-Atransmission protocol.Use on Dimmer Auto Programs Outdoor Use Auto-ranging Power Supply Sound Activated Replaceable Fuse DMX User Serviceable Master/Slave Duty Cycle COLORado <strong>Zoom</strong> <strong>Tour</strong> User <strong>Manual</strong> Rev. 11 -1-
Before You BeginSafety NotesIt is important to read all these notes before starting to work with this product. The SafetyNotes include important safety information about the installation, usage, and maintenanceof this product.There are no user-serviceable parts inside this product. Any reference to servicingin this User <strong>Manual</strong> applies only to properly CHAUVET® certified technicians. Donot open the housing or attempt any repairs unless you are certified to do so.Please refer to all applicable local codes and regulations for the proper installationof this product.Personal SafetyMounting and RiggingPower and WiringOperation• Avoid direct eye exposure to the light source while the product is on.• Always disconnect this product from its power source before servicing.• Always connect this product to a grounded circuit to avoid the risk of electrocution.• Do not touch this product’s housing when operating because it may be very hot.• This product is for indoor use only! To prevent risk of fire or shock, do not expose thisproduct to rain or moisture.• Make sure there are no flammable materials close to this product while operating.• When hanging this product, always secure it to a fastening device using a safety cable(included).• Always make sure that you are connecting this product to the proper voltage, as perthe specifications in this manual or on the product’s sticker.• Never connect this product to a dimmer pack or rheostat.• Never disconnect this product by pulling or tugging on the power cable.• Do not operate this product if you see damage on the housing, lenses, or cables. Inany of these cases, have the damaged parts replaced by an authorized technician atonce.• Do not cover the ventilation slots when this product is operating to avoid internaloverheating.• The maximum ambient temperature (Ta) is 104° F (40° C). Do not operate this productat a higher temperature.• In case of a serious operating problem, stop using this product immediately!In the unlikely event that your product may require service, contact CHAUVET®Technical Support.Expected LEDLifespanLEDs gradually decline in brightness over time, mostly because of heat. Packaged inclusters, LEDs exhibit higher operating temperatures than in ideal, single LED conditions.For this reason, using clustered LEDs at their fullest intensity significantly reduces theLEDs’ lifespan. Under normal conditions, this lifespan can be 40,000 to 50,000 hours. Ifextending this lifespan is vital, lower the operating temperature by improving theventilation around the product and reducing the ambient temperature to an optimaloperating range. In addition, limiting the overall projection intensity may also help toextend the LEDs’ lifespan.-2- COLORado <strong>Zoom</strong> <strong>Tour</strong> User <strong>Manual</strong> Rev. 11
Introduction2. IntroductionProductDescriptionThe COLORado <strong>Zoom</strong> <strong>Tour</strong> is an RGBW LED wash product. This product consists of asingle module that houses the internal power supply, the control panel, the LED drivers,the LED boards, and motorized moving lenses, as well as the power and signalconnectors. The COLORado <strong>Zoom</strong> <strong>Tour</strong> features a variable zoom, which enables theuser to change the beam angle of the product via DMX or control panel, and one mountingbracket that doubles as a floor mount and hanging support bracket.Features• DMX channels: 3, 4, 5, 6, or 12• Operating modes:3-channel: Red, Green, Blue3-channel: Hue, Saturation, Value4-channel: Dimmer, Red, Green, Blue4-channel: Red, Green, Blue, White5-channel: Dimmer, Red, Green, Blue, White6-channel: Dimmer, Red, Green, Blue, White, Strobe12-channel: Dimmer, Red, Green, Blue, White, Color Macro, Strobe,Auto programs, Auto Speed Adjust, Dimmer Speed,<strong>Zoom</strong>, <strong>Zoom</strong> Reset• RGBW color mixing and zoom with or without DMX control• 8°~27.5° zoom control with or without DMX control• 11 color temperature presets• Built-in automated programs via master/slave or DMX• Recall custom programs via master/slave or DMX• Five distinct dimming curves• RGBW LEDs• Electronic dimmer• Color macros with speed adjustment included• Electronic power supply• Neutrik® powerCon® connectors• 3-pin and 5-pin DMX input and output connectors• Additional power output: max 7 products @ 120 V• LED display with password protection• Gel frame holder (4 mm max thickness)• Double-bracketed yoke doubles as floor stand• Color calibration• Flicker-free operation for HD VideoCOLORado <strong>Zoom</strong> <strong>Tour</strong> User <strong>Manual</strong> Rev. 11 -3-
IntroductionProduct OverviewPower In/Power OutDMX In/DMX OutBottom ViewDouble-bracketed yokeFront View-4- COLORado <strong>Zoom</strong> <strong>Tour</strong> User <strong>Manual</strong> Rev. 11
IntroductionProduct DimensionsCOLORado <strong>Zoom</strong> <strong>Tour</strong> User <strong>Manual</strong> Rev. 11 -5-
Setup3. SetupAC PowerThe COLORado <strong>Zoom</strong> <strong>Tour</strong> has an auto-ranging power supply that can work with aninput voltage range of 100~240 VAC, 50/60 Hz.Make sure that you are connecting this product to the proper voltage, as per the TechnicalSpecifications in this manual or on the product’s sticker.Always connect this product to a protected circuit with an appropriate electricalground to avoid the risk of electrocution or fire.To determine the power requirements for the COLORado <strong>Zoom</strong> <strong>Tour</strong>, refer to the labelaffixed to the side of the product. Alternatively, you may refer to the TechnicalSpecifications chart.The listed current rating indicates the maximum current draw during normal operation. Formore information, download Sizing the Circuit Breakers from: www.chauvetpro.com.Never connect this product to a rheostat (variable resistor) or dimmer circuit, even ifthe rheostat or dimmer channel serves only as a 0 to 100% switch.AC PlugThe COLORado <strong>Zoom</strong> <strong>Tour</strong> comes with a power input cord terminated with a Neutrik®powerCON® A connector on one end and an Edison plug on the other end (U.S. market). Ifthe power input cord that came with your product has no plug or you need to change theEdison plug, use the table below to wire the new plug.Connection Wire (U.S.) Wire (Europe) Screw ColorAC Live Black Brown Yellow or BrassAC Neutral White Blue SilverAC Ground Green/Yellow Green/Yellow GreenPower LinkingThe COLORado <strong>Zoom</strong> <strong>Tour</strong> supports power linking for up to 7 other COLORado <strong>Zoom</strong><strong>Tour</strong> products at 120 VAC, 12 at 208 VAC, or 14 products at 230 VAC. This product comeswith a power input cord, but no power linking cord. However, a power linking cable isavailable as an option.-6- COLORado <strong>Zoom</strong> <strong>Tour</strong> User <strong>Manual</strong> Rev. 11
SetupDMX LinkingDMX ModesMaster/SlaveConnectivityYou may link the COLORado <strong>Zoom</strong> <strong>Tour</strong> to a DMX controller using a standard DMXserial connection. If using other DMX compatible products with this product, you cancontrol them individually with a single DMX controller.If you are not familiar with the DMX standard, or if you need information about the DMXcables needed to link this product to a DMX controller, download the DMX Primer fromwww.chauvetpro.com.The COLORado <strong>Zoom</strong> <strong>Tour</strong> uses the standard DMX data connection for its TOUR,ARC.1, AR1.D, ARC.2, AR2.D, AR2.S, and HSV DMX modes. You will find informationabout these DMX mode(s) in the Introduction chapter (brief description), the Operationchapter (configuration details), and the DMX Values section (individual channel values).The Master/Slave mode allows a COLORado <strong>Zoom</strong> <strong>Tour</strong> (the “master product”) tocontrol one or more COLORado <strong>Zoom</strong> <strong>Tour</strong>s (the “slave products”) without a DMXcontroller. A COLORado <strong>Zoom</strong> <strong>Tour</strong> becomes the master product when running an Autoor Custom program, or by being in STAT mode. You must configure the slave products tooperate in “SLAVE” mode from their respective control panels. During the Master/Slaveoperation, the slave products will operate in unison with the master product.DO NOT connect a DMX controller to the product’s operating in Master/Slave mode.Otherwise, the signals from the DMX controller may interfere with the signals fromthe master product.The Operation chapter of this manual provides detailed instructions on how toconfigure the Master and Slave products.COLORado <strong>Zoom</strong> <strong>Tour</strong> User <strong>Manual</strong> Rev. 11 -7-
SetupMountingOrientationRiggingBefore mounting this product, read and follow the safety recommendations indicated in theSafety Notes section.Always mount this product in a safe position making sure there is adequate room around itfor ventilation, configuration, and maintenance.The COLORado <strong>Zoom</strong> <strong>Tour</strong> consists of the double-bracketed yoke and the body of theproduct. CHAUVET® recommends following the general guidelines below when mountingthis product.• When selecting an installation location, consider ease of access to this product foroperation, programming adjustments, and routine maintenance.• Make sure to mount this product away from any flammable material as indicated in theSafety Notes section.• Never mount the product in places where rain, high humidity, extreme temperaturechanges, or restricted ventilation may affect it.• If hanging this product, make sure that the location where you are mounting it cansupport its weight and always secure it to a fastening device using a safety cable(included). Please refer to the Technical Specifications for the weight requirements ofthis product.ProcedureThe COLORado <strong>Zoom</strong> <strong>Tour</strong> comes with a double-bracketed yoke to which you canattach mounting clamps or the yolk can serve as floor stand. You must supply your ownmounting clamps. Make sure the clamps are capable of supporting the weight of thisproduct. You will have to use at least one mounting point per product.ClampSafetyCableProduct MountingDiagramDoublebracketedyokeOverhead MountingFloor Mounting-8- COLORado <strong>Zoom</strong> <strong>Tour</strong> User <strong>Manual</strong> Rev. 11
Operation4. OperationControl PanelDescriptionButtonFunctionExits from the current menu or functionEnables the currently displayed menu orsets the currently selected value into thecurrent functionNavigates upward through the menu list andincreases the numeric value when in afunctionNavigates downward through the menu listand decreases the numeric value when in afunctionControl OptionsProgrammingDMX PersonalityYou can set the COLORado <strong>Zoom</strong> <strong>Tour</strong> start address in the 001~512 DMX range. Thisallows for the control of up to 42 products in the 12-channel TOUR personality.Refer to the Menu Map to learn how the menu options relate to each other. The Menu Maphas a Main Level and a variable number of programming levels for each option.• To go to an option in the Main Level, press repeatedly until the optionappears on the display. Press to select. You will go to the first programminglevel for that option.• To select an option or value within the current programming level, press or until shown on the display. Press to select. If there is anotherprogramming level, you will see the level’s first option. If not, you will see the selectedvalue.• To exit to the previous menu level, press .This setting allows the user to choose a particular DMX personality.1. Go to PERS.2. Select the desired personality (TOUR, ARC.1, AR1.D, ARC.2, AR2.D, AR2.S,or HSV).• See the DMX Values section for the highest starting address you can select foreach personality.• Make sure that the starting addresses on the various products do not overlapdue to the new personality setting. See the DMX Values section.COLORado <strong>Zoom</strong> <strong>Tour</strong> User <strong>Manual</strong> Rev. 11 -9-
OperationDMX ControlLoss of SignalSetting<strong>Zoom</strong> Limit SettingIn this mode, each product will respond to a unique starting address from the DMXcontroller. All products with the same starting address will respond in unison.1. Select a DMX personality as shown in DMX Personality.2. Set the running mode:a. Go to RUN.b. Select DMX.3. Set the starting address:a. Go to DMX.b. Select the starting address (001~512).The highest recommended starting address for each DMX mode is as follows:DMX Mode DMX Address DMX Mode DMX Address DMX Mode DMX AddressTOUR 501 ARC.2 509 HSV 510ARC.1 510 AR2.D 508AR1.D 509 AR2.S 507This setting controls how the product will respond when the DMX signal is lost.1. Go to the SET main level, then select DERR.a. Select SAVE to make the product use the last command used when thesignal is lost.b. Select BLAK to turn off the all the LED’s when the signal is lost.2. Set the master product:a. Set the running mode to DMX as explained in DMX Control.b. Select an auto or custom program as explained in Auto Programs, or a staticmix of colors.This setting allows you to limit the zoom range using 3 different modes.Basic mode is the default setting and allows the zoom to be moved full range (0~255) andhas no adjustable limit.Position 1 and Position 2 modes allow you to set limits on how far the zoom moves.1. Set the mode to be used:a. Go to the SET main level.b. Select ZOOMc. Select a mode (BASE, POS.1, or POS.2).2. Set the limit for each mode:a. Go to the CAL main level.b. Enter the master access password as described in Control Panel Lockc. When CAL shows, press .d. Go to the ZOOM.e. Select a mode (POS.1 or POS.2).f. Select a zoom limit value (P.000~255).-10- COLORado <strong>Zoom</strong> <strong>Tour</strong> User <strong>Manual</strong> Rev. 11
OperationStatic ColorAuto ProgramsThe Static Color mode allows for permanent RGBW color mixing without a DMX controller.1. Go to STAT.2. Select the desired color (R., G., B., W., or Z.).3. Select the desired color and zoom value (000~255).4. Select (S.)5. Select the desired frequency (00~20).Auto programs allow for dynamic RGBW color mixing without a DMX controller.1. Go to AUTO.2. Select the desired auto (AT 01~10) or custom program (PR. C1~10).You cannot edit any of the auto programs (AT. 01~10). However, you can edit thecustom programs (PR. C1~10). See Edit Customs for details.Edit CustomsThis setting allows the programming of up to 30 scenes for each of the 10 customizableprograms, including colors and effects.1. Go to EDIT.2. Select the desired custom program (PR. C1~10).3. Select the desired scene (SC. 01~30).4. Select the desired color or effect (R, G, B, W, Z, S, T, or F).5. Select the color or effect value (000~255) for colors, zoom, and timers, or (00~20)for strobe).6. Repeat for the other colors or effects.7. Return to the scene level (step 3).8. Repeat the settings of colors and effects for the other scenes.COLORado <strong>Zoom</strong> <strong>Tour</strong> User <strong>Manual</strong> Rev. 11 -11-
OperationMaster/SlaveThe Master/Slave mode allows a group of COLORado <strong>Zoom</strong> <strong>Tour</strong>s (the slave products)to simultaneously duplicate the output of another COLORado <strong>Zoom</strong> <strong>Tour</strong> (the masterproduct) without a DMX controller.1. Set each of the slave products:a. Go to RUN.b. Select SLAV.2. Set the master product:a. Set the running mode to DMX as explained in DMX Control.b. Select an auto or custom program as explained in Auto Programs, or astatic mix of colors.• The master product is the one that runs a program, whether Auto, Custom, orStatic mode.• Do not connect a DMX controller to the products configured for Master/Slaveoperation.• The master product should be the first in the DMX string.Color SettingsThe COLOR setting determines how the COLORado <strong>Zoom</strong> <strong>Tour</strong> generates the whitecolor based on various RGB settings.1. Go to SET.2. Select COLO.3. Select OFF, RGBW, or UC.OFF: When the RGB faders are all set to 255, the output is maximum, althoughthe resulting white color may not be balanced.RGBW: When the RGB faders are all set to 255, the resulting output is defined bythe configured white color (see White s Settings).UC: When the RGB faders are all set to 255, the output matches that of lessefficient products (Universal Color).Dimmer CurvesThis setting determines how fast the output of the COLORado <strong>Zoom</strong> <strong>Tour</strong> changes whenthe operator modifies the values of the Red, Green, Blue, White, and Dimmer faders. Thissetting gives the user four different options to simulate the dimming curve of anincandescent lighting product.1. Go to SET.2. Select DIM.3. Select a dimmer curve (OFF, DIM1, DIM2, DIM3, or DIM4).OFF: The output is proportional (linear) to the Dimmer and RGBW channelvalues.DIM1~4: The output follows the Dimmer and RGBW channel values based on thecorresponding dimmer curve. DIM1 is the fastest and DIM4 is the slowest.-12- COLORado <strong>Zoom</strong> <strong>Tour</strong> User <strong>Manual</strong> Rev. 11
OperationControl PanelLockThis setting allows the user to activate or disable the control panel lock, which keepsnon-authorized personnel from changing the product’s settings.1. Go to KEY.2. Select ON or OFF.When the control panel lock is active, the product will prompt the user to enter thepassword after 30 seconds of control panel inactivity or after turning on the product.After being prompted to enter the password:Press , , , , .Program UploadThis option allows the user to copy the custom programs of one COLORado <strong>Zoom</strong> <strong>Tour</strong>product onto other COLORado <strong>Zoom</strong> <strong>Tour</strong> products by using the Master/Slave mode.1. Configure and connect the products in a Master/Slave arrangement, where themaster product has the custom programs you want to transfer to the slaveproducts.2. At the master product, go to SET.3. Select UPLD.4. When PASS shows, press .5. Enter the master access password as shown in Control Panel Lock.6. When SEND shows, press to start the upload.7. Wait for the upload process to finish (the display will show END/MAIN) beforecontinuing or turning the products off.The master and slave products will light up to provide the status of the process, asfollows:• Yellow indicates that the upload process is running.• Green indicates that the upload process completed successfully.• Red indicates that the upload process failed due to an error. Recheck all cableconnections and restart the process. If the issue persists, contact CHAUVET®Technical Support.DO NOT upload the program from a COLORado <strong>Zoom</strong> <strong>Tour</strong> to a different product.You could render the other product inoperative.COLORado <strong>Zoom</strong> <strong>Tour</strong> User <strong>Manual</strong> Rev. 11 -13-
OperationResetWhites SettingWhite CalibrationThis setting allows the user to reset the COLORado <strong>Zoom</strong> <strong>Tour</strong> to its default values,including the custom programs.1. Go to SET.2. Select REST.3. When PASS shows, press .4. Enter the master access password as shown in Control Panel Lock.5. Wait for the reset process to finish.This setting allows the user to select and edit the temperature of the white colors used inchannel 6 (Macros) when in the TOUR mode. It also allows the user to define themaximum RGB values when RGB to White (RGB.W) is active.1. Go to CAL main level.2. Enter the master access password as described in Control Panel Lock.3. When CAL shows, press .4. Go to WT.5. Select a white color (WH. 1~11).6. Select a color (R., G., B., or W.).7. Select a color value (000~255).8. Repeat for the other colors.This setting allows the user to select the white color shown by the COLORado <strong>Zoom</strong><strong>Tour</strong> when the color setting is RGBW and the DMX controller’s Red, Green, and Bluefaders are set to 255.1. Go to CAL main level.2. Enter the master access password as described in Control Panel Lock.3. When CAL shows, press .4. Go to RGBW.5. Select RGB.W level.6. Select a value for each color (R.000~255), (G.000~255), and (B.000~255).When selecting CAL > RGBW > RGB.W you will only be able to define the values ofR. (red), G. (green), and B. (blue).The values of R. (red), G. (green), and B. (blue) configured from CAL > RGBW >RGB.W will define the color temperature shown when the RGB faders are set to 255if SET > COLO > RGBW is active.-14- COLORado <strong>Zoom</strong> <strong>Tour</strong> User <strong>Manual</strong> Rev. 11
OperationTOUR NotesMaster DimmerRed, Green, Blue,and White ColorSelectionColor MacrosThese notes intend to clarify the way the TOUR DMX personality works.• Channel 1 controls the intensity of the currently projected color.• When the slider is at the highest position (100%), the intensity of the output is at itsmaximum.• Channels 2 through 5 control the intensity ratio of each of the Red, Green, Blue, andWhite LEDs.• When the slider is at the highest position (100%), the intensity of each color is at itsmaximum if SET > COLO is OFF.• You can combine channels 2 through 5 to create over one trillion colors.• Channel 6 selects the required Color Macro.• Channel 6 has priority over channels 2 through 5.• Channel 1 controls the intensity of the Color Macro.Strobe • Channel 7 controls the strobe frequency (not the intensity) of channels 2 through 6.• Channel 7 can strobe channels 2 through 7 when not running macros, allowing theindividual faders (RGB and W) as well as channel 1 (D) to control the output intensity.• Channel 7 can strobe channel 6 when running macros, allowing channel 6 to select themacro and channel 1 to control the output intensity.Auto/CustomDimmer Speed<strong>Zoom</strong> Selection<strong>Zoom</strong> Reset• Channel 8 selects the preset auto programs AT. 01~10 or the custom programs PR.C1~10.• When activating the custom Auto programs PR. C1~10, it is possible to control the StepTime and Fade Time using channels 2 and 3 respectively.• Channel 9 has priority over channels 2 through 7.• Channel 9 controls the speed at which each auto programs plays.• Channel 10 selects the dimmer mode and speed. When DIMMER is set to OFF, thechanges in the RGBW and Master Dimmer faders are linear. Otherwise, DIM1 is thefastest dimmer curve, while DIM4 is the slowest.• Channel 11 controls the zoom function.• Channel 12 resets the zoom function to the starting position.COLORado <strong>Zoom</strong> <strong>Tour</strong> User <strong>Manual</strong> Rev. 11 -15-
OperationMenu MapMain Level Programming Levels DescriptionR.G.Combines Red, Green, Blue, and WhiteSTATB.000~255 to generate a custom color (0~100%)W.Z. Sets 8~27.5° zoomS. 00~20 Strobe frequency (0~20 Hz)AT.Choose from 10 automatic programsAUTOC1~10Choose from 10 customizablePR.programsRUNDMXReceives signals from DMX controllerSLAVReceives signals from Master productDMX 001~512 Sets the DMX starting addressTOUR12-channel: RGBW, D, A/C, AS, DS,Macro, S, Z, ZRARC.13 channel: RGBPERSAR1.D4-channel: RGB, DARC.24-channel: RGBWAR2.D5-channel: RGBW, DAR2.S6-channel: RGBW, D, SHSV3 channel: HSVR.G.B. 000~255 Combines Red, Green, Blue, White,EDITPR. SC. W.and <strong>Zoom</strong>, as well as strobe and timers(C1~10) (01~30) Z.to create the scenes of a customS. 00~20 programT.F.000~255Continues on the next page-16- COLORado <strong>Zoom</strong> <strong>Tour</strong> User <strong>Manual</strong> Rev. 11
OperationCALMain Level Programming Levels DescriptionUPLOAD Enter password Transfers custom programsREST Enter password Defaults productDIMOFFNo dimmerDIM1~4 Dimmer curveAll LED’s turn off when DMX signal isBLAKlostDERRAll LED’s stay on the last commandSAVESETused when the DMX signal is lost.OFFRGB set to “255”= max. outputCOLRRGBW RGB set to “255” = balanced whiteUCUniversal color balanceSets default zoom position (fullBASEmovement)ZOOMPOS.1 Sets position 1 setting for zoom limitPOS.2 Sets position 2 setting for zoom limitKEY ON/OFF Turns the password on or offR.WHWH. G.Modifies the color macros used in the000~25501~11 B.TOUR personalityW.PASS(Enter) CALRGBW RGB.W<strong>Zoom</strong>R.G. 000~255BPOS.1P.000~255POS.2Defines the color temperature usedwhen COLOR is set to RGB to WSets the min/max position of the zoomfunctionCOLORado <strong>Zoom</strong> <strong>Tour</strong> User <strong>Manual</strong> Rev. 11 -17-
OperationDMX ValuesTOUR Channel Function Value Percent/Setting1 Dimmer 000 255 0~100%2Red0~100%000 255Step TimeWhen CUS. 01-10 in CH. 8 is activated3Green0~100%000 255Step TimeWhen CUS. 01-10 in CH. 8 is activated4 Blue 000 255 0~100%5 White 000 255 0~100%6Color Macro + WhiteBalance7 Strobe8Auto + CustomPrograms000 010011 030031 050051 070071 090091 110111 130131 150151 170171 200201 205206 210211 215216 220221 225226 230231 235236 240241 245246 250251 255000 009010 255000 040041 049050 059060 069070 079080 089090 099100 109110 119120 129130 139140 149150 159160 169170 179180 189190 199200 209Continues on the next pageNo FunctionR: 100% G: 0~100% B: 0%R: 100~0% G: 100% B: 0%R: 0% G: 100% B: 0~100%R: 0% G: 100~0% B: 100%R: 0~100% G: 0% B: 100%R: 100% G: 0% B: 100~0%R: 100% G: 0~100% B: 0~100%R: 100~0% G: 100~0% B: 100%R: 100% G: 100% B: 100% W: 100%White 1White 2White 3White 4White 5White 6White 7White 8White 9White 10White 11No Function0~20 HzNo functionAuto 1Auto 2Auto 3Auto 4Auto 5Auto 6Auto 7Auto 8Auto 9Auto 10Custom 1Custom 2Custom 3Custom 4Custom 5Custom 6Custom 7-18- COLORado <strong>Zoom</strong> <strong>Tour</strong> User <strong>Manual</strong> Rev. 11
OperationTOUR(Cont.)Channel Function Value Percent/Setting8(Cont.)Auto + CustomPrograms210 219220 229230 255Custom 8Custom 9Custom 109 Auto Speed 000 255 Only when CH. 8 is 041~13910 Dimmer Speed000 009010 029030 069070 129130 189190 25511 <strong>Zoom</strong> 000 255 0~100%12 <strong>Zoom</strong> Reset000 200201 220221 255Dimmer speed as per Control PanelLinear dimmerNon-linear dimmer 1 (fastest)Non-linear dimmer 2Non-linear dimmer 3Non-linear dimmer 4 (slowest)No function<strong>Zoom</strong> resetNo functionARC.1 Channel Function Value Percent/Setting1 Red 000 255 0~100%2 Green 000 255 0~100%3 Blue 000 255 0~100%AR1.D Channel Function Value Percent/Setting1 Master Dimmer 000 255 0~100%2 Red 000 255 0~100%3 Green 000 255 0~100%4 Blue 000 255 0~100%ARC.2 Channel Function Value Percent/Setting1 Red 000 255 0~100%2 Green 000 255 0~100%3 Blue 000 255 0~100%4 White 000 255 0~100%AR2.D Channel Function Value Percent/Setting1 Master Dimmer 000 255 0~100%2 Red 000 255 0~100%3 Green 000 255 0~100%4 Blue 000 255 0~100%5 White 000 255 0~100%COLORado <strong>Zoom</strong> <strong>Tour</strong> User <strong>Manual</strong> Rev. 11 -19-
OperationContinued from previous pageAR2.S Channel Function Value Percent/Setting1 Master Dimmer 000 255 0~100%2 Red 000 255 0~100%3 Green 000 255 0~100%4 Blue 000 255 0~100%5 White 000 255 0~100%6 Strobe000 009010 255No Function0~20 HzHSV Channel Function Value Percent/Setting1 Hue 000 255 0~100%2 Saturation 000 255 0~100%3 Value 000 255 0~100%-20- COLORado <strong>Zoom</strong> <strong>Tour</strong> User <strong>Manual</strong> Rev. 11
Technical Information5. Technical InformationProductMaintenanceTo maintain optimum performance and minimize wear, the user should clean this productfrequently. Use and environment are contributing factors in determining the cleaningfrequency.As a rule, clean this product at least twice a month. Dust build-up reduces light outputperformance and can cause overheating. This can lead to reduced light source life andincreased mechanical wear.To clean a COLORado <strong>Zoom</strong> <strong>Tour</strong>, follow the recommendations below:• Unplug the product from power.• Wait until the product is cool.• Use a vacuum (or dry compressed air) and a soft brush to remove dust collected onthe external vents and accessible internal components.• Clean all external glass surfaces with a mild solution of non-ammonia glass cleaner orisopropyl alcohol.• Apply the solution directly to a soft, lint-free cotton cloth or a lens cleaning tissue.• Wipe any dirt or grime to the outside edges of the glass surface.• Gently polish the glass surfaces until they are free of haze and lint.Always dry the external glass surfaces carefully after cleaning them.COLORado <strong>Zoom</strong> <strong>Tour</strong> User <strong>Manual</strong> Rev. 11 -21-
Technical InformationTroubleshooting GuideSymptom Cause(s) Action(s)<strong>Zoom</strong> does not moveProduct does not light upThe wrong LEDs light upwhen using DMXThe wrong LEDs light upwhen using DMXCircuit breaker/fusekeeps tripping/blowingProduct does notpower upProduct does not respondto wired DMX orresponds erraticallyPosition settings are incorrectFaulty zoom motor/motorsWrong personalityDimmer fader set to “0”All color faders set to “0”All colors in STAT are set to “0”No powerFaulty internal power supplyFaulty main control boardWrong personalityWrong DMX addressWrong personalityWrong DMX addressExcessive circuit loadShort circuit along the power wiresNo powerLoose or damaged power cordFaulty internal power supplyWrong DMX addressingDamaged DMX cablesWrong polarity on the controllerLoose DMX cablesNon DMX cablesBouncing signalsLong cable / low level signalToo many productsInterference from AC wiresFaulty Display/Main/DMX interface boardCheck settings as explained in <strong>Zoom</strong> LimitSettingSend product for repairChange the personalityIncrease the value of the dimmer channelIncrease the value of the color channelsIncrease the values of the colorsVerify external power circuit and wiringSend product for repairChange the personalityChange the DMX addressChange the personalityChange the DMX addressReduce total load placed on the electrical circuitCheck electrical wiringCheck for voltage on outletCheck power cordSend product for repairCheck product addressingCheck DMX cablesCheck polarity switch settings on the controllerCheck cable connectionsUse only DMX compatible cablesInstall terminator as suggestedInstall an optically coupled DMX splitter before along section of cable or right after the productwith the strong signalInstall an optically coupled DMX splitter afterproduct #32Keep DMX cables separated from power cablesor fluorescent/black lightsSend product for repairIf you still experience technical problems after trying these solutions, or to send theproduct for repair, contact CHAUVET® Technical Support.-22- COLORado <strong>Zoom</strong> <strong>Tour</strong> User <strong>Manual</strong> Rev. 11
Technical InformationReturnProcedureSend the merchandise prepaid, in the original box, and with its original packing andaccessories. CHAUVET® does not issue call tags.Call CHAUVET® and request a Return Merchandise Authorization (RMA) number beforeshipping the product. Be prepared to provide the model number, serial number, and a briefdescription of the cause for the return.The user must clearly label the package with an RMA number. CHAUVET® will refuse anyproduct returned without an RMA number.DO NOT write the RMA number directly on the box. Instead, write it on a properlyaffixed label.Once you have received the RMA number, include the following information on a piece ofpaper inside the box:• Your name• Your address• Your phone number• The RMA number• A brief description of the problemBe sure to pack the product properly. Any shipping damage resulting from inadequatepackaging will be the customer’s responsibility. FedEx packing or double boxing arerecommended.CHAUVET® reserves the right to use its own discretion to repair or replace returnedproduct(s).ClaimsThe carrier is responsible for any damage incurred during shipping to this product or anypart that shipped with it. Therefore, if the received merchandise appears to have damagescaused during shipping, the customer must submit the damage report and any relatedclaims with the carrier, not CHAUVET®. The customer must submit the report uponreception of the damaged merchandise. Failure to do so in a timely manner may invalidatethe customer’s claim with the carrier.For other issues such as missing components or parts, damage not related to shipping, orconcealed damage, the customer must make claims to CHAUVET® within 7 days ofreceiving the merchandise.Contact UsWorld HeadquartersCHAUVET®General InformationAddress:5200 NW 108th AvenueSunrise, FL 33351Voice: (954) 929-1115Fax: (954) 929-5560Toll free: (800) 762-1084Technical SupportVoice: (954) 929-1115 (Press 4)Fax: (954) 756-8015Email:tech@chauvetlighting.comWorld Wide Webwww.chauvetpro.comUnited Kingdom & IrelandCHAUVET® Europe Ltd.General InformationAddress:Unit 1CBrookhill Road Industrial EstatePinxton, Nottingham, UKNG16 6NTVoice: +44 (0)1773 511115Fax: +44 (0)1773 511110Technical SupportEmail: uktech@chauvetlighting.comWorld Wide Webwww.chauvetlighting.co.ukCOLORado <strong>Zoom</strong> <strong>Tour</strong> User <strong>Manual</strong> Rev. 11 -23-
Technical InformationTechnical SpecificationsDimensions andWeightLength Width Height Weight8.0 in (203 mm) 9.8 in (250 mm) 13.1 in (334 mm) 14.5 lbs (6.6 kg)Note: Dimensions in inches rounded to the nearest decimal digit.Electrical Power Supply Type Range Voltage SelectionSwitching (internal) 100~240 V, 50/60 Hz Auto-rangingParameter 120 V, 60 Hz 230 V, 50 HzConsumption 132 W 122 WOperating current 1.026 A .566 APower linking products 7 14Power I/O US/Worldwide EuropePower input connector Neutrik® powerCON® A Neutrik® powerCON® APower output connector Neutrik® powerCON® B Neutrik® powerCON® BPower cord plug Edison (US) Local plugLight Source Type Power LifespanLED 2 & 3 W 50,000 hoursColor Quantity CurrentRed 10 664 mAGreen 10 952 mABlue 10 944 mAWhite 7 964 mAPhoto OpticParameterIlluminance @ 5 m3171 lxBeam angle 8~27.5ºField angle 15~42ºThermal Max. External Temperature Cooling System104° F (40° C) ConvectionDMX I/O Connectors Connector Type Channel Range3- and 5-pin XLR Sockets 3, 4, 5, 6, 12Ordering Product Name Item Code Item NumberCOLORado <strong>Zoom</strong> <strong>Tour</strong> 01030306 COLORADOZOOMTOUR-24- COLORado <strong>Zoom</strong> <strong>Tour</strong> User <strong>Manual</strong> Rev. 11
CHAUVET®5200 NW 108th AvenueSunrise, FL 33351 (USA)(800) 762-1084 – (954) 929-1115FAX (954) 929-5560www.chauvetpro.comCOLORado <strong>Zoom</strong> <strong>Tour</strong> User <strong>Manual</strong> Rev. 11February 2012COLORado <strong>Zoom</strong> <strong>Tour</strong> User <strong>Manual</strong> Rev. 11 -25-