Weather Defender fitting instructions - Sparesmaster
Weather Defender fitting instructions - Sparesmaster
Weather Defender fitting instructions - Sparesmaster
- No tags were found...

You also want an ePaper? Increase the reach of your titles
YUMPU automatically turns print PDFs into web optimized ePapers that Google loves.
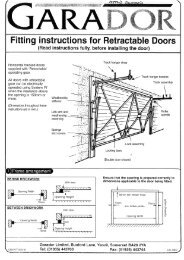
Fitting InstructionsPlease read the following and then select the section that applies to your particular Garage Doorprior to commencing the installation of your floor seal. The <strong>fitting</strong> <strong>instructions</strong> are intended as aguide and you may decide after reading them to fit the floor seal in accordance with your ownideas.The <strong>Weather</strong> <strong>Defender</strong> is a versatile Garage Door Floor Seal that can be fitted to Up and Over,Sectional, Roller (Shutter) and Side Hinged Garage Doors, whether they be Manual or Automatic.When fitted to Automatic Doors, there is a slight chance on some installations that the down limitand or sensitivity settings may need adjusting if the door auto reverses when closing onto the floorseal. If this is so please consult your owner’s handbook, local dealer or call us for over the phoneassistance.When using the sealant we recommend it is applied carefully and to use disposable gloves.Preparatory WorkFor the best results we recommend that the ground is in clean, sound condition and free from dust,oil, or grease. You should abrade painted surfaces to ensure good adhesion.Recommended Installation ImplementsTape MeasureMarker PenSharp Knife or HacksawSealant GunStraightedgeDisposable GlovesSection 1 - Up and Over DoorsSection 2 - Sectional DoorsSection 3 – Roller (Shutter) DoorsSection 4 – Side Hinged Doors1
Section 1 – Up and Over DoorsThe Floor Seal can be positioned in different ways depending on whether or not there are gapsunder the frame legs (posts, jambs). If there are gaps it is recommended that the seal is cut aroundthe back edge of the jambs to help provide a good seal.Stage 1A) Fitting Option 1 – Seal cut around JambsIf cutting the back edge of the seal to fit around the frame legs with the Garage Door in the openposition, measure the aperture width between the frame legs and add the width of each frame leg.Now cut the floor seal length (if required) to the aperture width including the frame leg width x 2.Position the floor seal so that when the Garage Door closes, the raised section of the seal is touchingthe bottom inside edge of the door and the thin detachable strip at the front of the floor seal issitting under the door. If the door binds on this strip (due to the gap being too small) simply tear off.Mark where the back edge of the floor seal needs to be cut around the back of both frame legs ateither end of the seal and cut to suit using a sharp knife or hacksaw. Now go to Stage 2.Stage 1B) Fitting Option 2 – Seal not cut around JambsMeasure the aperture width between the frame legs and cut the floor seal length to requiredaperture width.Position the floor seal so that when the Garage Door closes, the raised section of the seal is touchingthe bottom inside edge of the door and the thin detachable strip at the front of the floor seal issitting under the door. If the door binds on this strip (due to the gap being too small), simply tear off.Now go to Stage 2.Stage 2From inside the Garage, with the door closed, position the floor seal so that the raised section istouching the bottom inside edge of the door. Mark along the floor at the back edge of the floor sealusing a marker pen.Open the door and mark a line along the floor at the front edge of the floor seal using the samemarker pen.Remove the floor seal and mark two parallel lines roughly 10mm (7/16”) inside the lines that youmarked on the floor. Using the sealant supplied, (once you have finished applying the sealantimmediately position the floor seal), apply to the two parallel lines then apply in a zigzag formationbetween the lines at roughly 3” spacing. Recommended application temperature +5 c to +25 c, andduring winter months it is recommended you keep the sealant at room temperature before using.Finally, starting at one end place the floor seal over the sealant on the floor and press firmlydownwards, continue the same process until the entire seal has been fitted. Cut back any exposedexcess sealant once dry and avoid driving over the seal for 24 hours.2
Section 2 – Sectional DoorsStage 1The fixing position of the floor seal can be varied to best suit your door and the gap or level thatneeds to be taken up. The floor seal can either be positioned to sit between the frame legs or behindthe frame legs. We recommend that you lay the floor seal on the ground and experiment with itsposition.If <strong>fitting</strong> the floor seal between the frame legs, measure the aperture width between the frame legsand cut the floor seal to this length.ORIf <strong>fitting</strong> the floor seal behind the frame legs, measure the aperture width between the frame legsand add the width of the frame legs x 2 and cut the floor seal to the overall length.Now locate the floor seal and close the door onto the seal, then adjust the position of the floor sealas required. The detachable thin strip should be at the front of the opening and can be left in placeor removed, if removing simply tear off.Stage 2From inside the Garage, with the floor seal positioned to your requirements, now close the door.Mark along the floor at the back edge of the floor seal using a marker pen.Open the door and mark a line along the floor at the front edge of the floor seal using the samemarker pen.Remove the floor seal and mark two parallel lines roughly 10mm (7/16”) inside the lines that youmarked on the floor. Using the sealant supplied, (once you have finished applying the sealantimmediately position the floor seal), apply to the two parallel lines then apply in a zigzag formationat roughly 3” spacing. Recommended application temperature +5c to + 25c and during wintermonths it is recommended you keep the sealant at room temperature before using.Finally, starting at one end place the floor seal over the sealant on the floor and press firmlydownwards, continue the same process until the entire seal has been fitted. Cutback any exposedexcess sealant once dry and avoid driving over the seal for 24 hours.Section 3 – Roller (Shutter) DoorsStage 1When <strong>fitting</strong> the floor seal with this type of door, for best results tear off the thin detachable strip.Then lay the floor seal on the ground and experiment with its position. Measure the aperture widthbetween the frame legs (guides) and cut the floor seal to this length.Now position the floor seal and close the door onto the front section of the seal then adjust theposition of the floor seal as required.3
Stage 2From inside the Garage, with the floor seal positioned to your requirements, now close the door.Mark along the floor at the back edge of the floor seal using a marker pen.Open the door and mark a line along the floor at the front edge of the floor seal using the samemarker pen.Remove the floor seal and mark two parallel lines roughly 10mm (7/16”) inside the lines that youmarked on the floor. Using the sealant supplied, (once you have finished applying the sealantimmediately position the floor seal), apply to the two parallel lines then apply in a zigzag formationat roughly 3” spacing. Recommended application temperature +5c to + 25c and during wintermonths it is recommended you keep the sealant at room temperature before using.Finally, starting at one end place the floor seal over the sealant on the floor and press firmlydownwards, continue the same process until the entire seal has been fitted. Cut back any exposedexcess sealant once dry and avoid driving over the seal for 24 hours.Section 4 – Side Hinged DoorsThe floor seal can be positioned in different ways depending on whether or not there are gaps underthe frame legs (posts, jambs).If there are gaps under the jambs it is recommended that the seal is cut around the back edge of thejambs to help provide a good seal.Stage 1A) Fitting Option 1 – Seal cut around JambsIf cutting the back edge of the seal to fit around the frame legs with the Garage Doors in the openposition, measure the aperture width between the frame legs and add the width of each frame leg.Now cut the floor seal length (if required) to the aperture width including the frame leg width x 2.Position the floor seal so that when the Garage Doors are closed, the raised section of the seal istouching the bottom inside edge of the doors and the thin detachable strip at the front of the floorseal is sitting under the doors. If the doors bind on the strip (due to the gap being too small) simplytear off. Mark where the back edge of the floor seal needs to be cut around the back of the bothframe legs at either end of the seal and cut to suit using a sharp knife or hacksaw. Now go to Stage2.Stage 1B) Fitting Option 2 – Seal not cut around JambsMeasure the aperture width between the frame legs and cut the floor seal length to requiredaperture width.Position the floor seal so that when the Garage Doors are closed, the raised section of the seal istouching the bottom inside edge of the doors and the thin detachable strip at the front of the floorseal is sitting under the doors. If the doors bind on the strip (due to the gap being too small), simplytear off. Now go to Stage 2.4
Stage 2From inside the Garage, with the doors closed, position the floor seal so that the raised section istouching the bottom inside edge of the door. Mark along the floor at the back edge of the floor sealusing a marker pen.Open the doors and mark a line along the floor at the front edge of the floor seal using the samemarker pen.Remove the floor seal and mark two parallel lines roughly 10mm (7/16”) inside the lines that youmarked on the floor. Using the sealant supplied, (once you have finished applying the sealantimmediately position the floor seal), apply to the two parallel lines then apply in a zigzag formationbetween the lines at roughly 3” spacing. Recommended application temperature +5 c to + 25c andduring winter months it is recommended you keep the sealant at room temperature before using.Finally starting at one end place the floor seal over the sealant on the floor and press firmlydownwards, continue the same process until the entire seal has been fitted. Cut back any exposedexcess sealant once dry and avoid driving over the seal for 24 hours.Manufactured exclusively for:<strong>Sparesmaster</strong> LtdGenesis HousePriestley WayCrawleyWest SussexRH10 9PRTel: 01293 652479Email: sales@sparesmaster.co.uk5