Using the JVC Mini DV Camera
Using the JVC Mini DV Camera Using the JVC Mini DV Camera
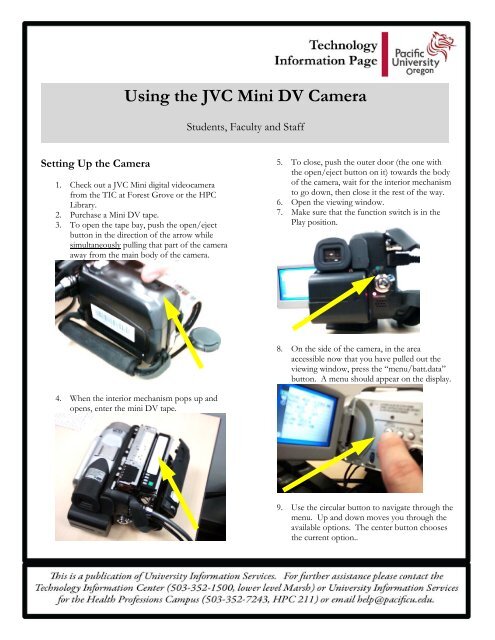
Using the JVC Mini DV CameraStudents, Faculty and StaffSetting Up the Camera1. Check out a JVC Mini digital videocamerafrom the TIC at Forest Grove or the HPCLibrary.2. Purchase a Mini DV tape.3. To open the tape bay, push the open/ejectbutton in the direction of the arrow whilesimultaneously pulling that part of the cameraaway from the main body of the camera.5. To close, push the outer door (the one withthe open/eject button on it) towards the bodyof the camera, wait for the interior mechanismto go down, then close it the rest of the way.6. Open the viewing window.7. Make sure that the function switch is in thePlay position.8. On the side of the camera, in the areaaccessible now that you have pulled out theviewing window, press the “menu/batt.data”button. A menu should appear on the display.4. When the interior mechanism pops up andopens, enter the mini DV tape.9. Use the circular button to navigate through themenu. Up and down moves you through theavailable options. The center button choosesthe current option..
- Page 2 and 3: Using the Camera1. Move the functio
- Page 4 and 5: 4. You should see notifications tha
<strong>Using</strong> <strong>the</strong> <strong>JVC</strong> <strong>Mini</strong> <strong>DV</strong> <strong>Camera</strong>Students, Faculty and StaffSetting Up <strong>the</strong> <strong>Camera</strong>1. Check out a <strong>JVC</strong> <strong>Mini</strong> digital videocamerafrom <strong>the</strong> TIC at Forest Grove or <strong>the</strong> HPCLibrary.2. Purchase a <strong>Mini</strong> <strong>DV</strong> tape.3. To open <strong>the</strong> tape bay, push <strong>the</strong> open/ejectbutton in <strong>the</strong> direction of <strong>the</strong> arrow whilesimultaneously pulling that part of <strong>the</strong> cameraaway from <strong>the</strong> main body of <strong>the</strong> camera.5. To close, push <strong>the</strong> outer door (<strong>the</strong> one with<strong>the</strong> open/eject button on it) towards <strong>the</strong> bodyof <strong>the</strong> camera, wait for <strong>the</strong> interior mechanismto go down, <strong>the</strong>n close it <strong>the</strong> rest of <strong>the</strong> way.6. Open <strong>the</strong> viewing window.7. Make sure that <strong>the</strong> function switch is in <strong>the</strong>Play position.8. On <strong>the</strong> side of <strong>the</strong> camera, in <strong>the</strong> areaaccessible now that you have pulled out <strong>the</strong>viewing window, press <strong>the</strong> “menu/batt.data”button. A menu should appear on <strong>the</strong> display.4. When <strong>the</strong> interior mechanism pops up andopens, enter <strong>the</strong> mini <strong>DV</strong> tape.9. Use <strong>the</strong> circular button to navigate through <strong>the</strong>menu. Up and down moves you through <strong>the</strong>available options. The center button chooses<strong>the</strong> current option..
<strong>Using</strong> <strong>the</strong> <strong>Camera</strong>1. Move <strong>the</strong> function switch to A (for automatic).10. Choose <strong>the</strong> Video sub-menu, go down to RecMode. The LP mode will give you <strong>the</strong> mostrecording time (45 minutes on a normal mini<strong>DV</strong> tape).11. Return from <strong>the</strong> Video sub-menu and choose<strong>the</strong> System sub-menu. Make sure that DemoMode is Off. If it’s on, <strong>the</strong> camera may showrandom special effects during capture.12. Press <strong>the</strong> “menu/batt.data” button again toexit <strong>the</strong> menu.13. To make sure you are at <strong>the</strong> beginning of <strong>the</strong>tape, press <strong>the</strong> left side of <strong>the</strong> circular buttonfor rewind.14. It is suggested that, instead of relying onbattery power, you plug in <strong>the</strong> camera. An ACadapter is included with <strong>the</strong> camera and plugsin to <strong>the</strong> jack under <strong>the</strong> rubber flap on <strong>the</strong> toprightof <strong>the</strong> front of <strong>the</strong> camera as you look at<strong>the</strong> viewfinder.2. Make sure that <strong>the</strong> lens cap has been removed.3. You should now see live video in <strong>the</strong> viewingwindow. The word “pause” should appear toindicate that you are not currently recording.4. To begin recording, press <strong>the</strong> button in <strong>the</strong>center of <strong>the</strong> function switch. The word RECshould appear in <strong>the</strong> viewing window toindicate that you are currently recording.5. To pause recording, hit <strong>the</strong> same button.When you are done recording, move <strong>the</strong> functionswitch to <strong>the</strong> off positionTransferring Video From <strong>the</strong> <strong>Camera</strong>There are three ways to transfer video from <strong>the</strong> camerato your computer.<strong>Using</strong> <strong>the</strong> Video Campure Device1. Lift <strong>the</strong> rubber flap covering <strong>the</strong> DC powerjack.
2. Get <strong>the</strong> 3.5 mm to RCA adapter (included in<strong>the</strong> camera bag), plug <strong>the</strong> 3.5 mm jack into <strong>the</strong>jack directly above <strong>the</strong> power.3. Plug <strong>the</strong> RCA (red, yellow, white) ends of <strong>the</strong>adapter into <strong>the</strong> corresponding jacks on <strong>the</strong>video capture device.<strong>Using</strong> Firewire and Windows Movie Maker (XPand Vista users)This option is only available if you have a firewire jackon your computer. Your computer may or may nothave a firewire jack, depending on <strong>the</strong> model. Tocheck to see if your computer has firewire, take <strong>the</strong>grey and black cables from <strong>the</strong> camera bag and checkto see if <strong>the</strong>re is a jack on your computer in which <strong>the</strong>ywill fit. If you do have firewire, use <strong>the</strong> following stepsto capture <strong>the</strong> video as a file on your computer:1. Make sure <strong>the</strong> function switch is in <strong>the</strong> Playposition.2. Plug one end of <strong>the</strong> firewire cable into yourcomputer. If you have a small-type firewirejack, use <strong>the</strong> black cable. If you have a largetypefirewire jack use <strong>the</strong> grey cable.4. Move <strong>the</strong> function switch to <strong>the</strong> Play position.5. Press <strong>the</strong> rewind button (left on large circularbutton on <strong>the</strong> left side of <strong>the</strong> camera) torewind <strong>the</strong> tape.3. Plug <strong>the</strong> o<strong>the</strong>r end of <strong>the</strong> cable into <strong>the</strong>firewire jack on <strong>the</strong> camera. This is foundunder <strong>the</strong> rubber flap directly to <strong>the</strong> right of<strong>the</strong> viewfinder eyepiece.6. Follow <strong>the</strong> instructions on <strong>the</strong> “<strong>Using</strong> <strong>the</strong>Video Capture Device” TIP Sheet. When thatTIP Sheet instructs you to “Start <strong>the</strong> videoplaying” press <strong>the</strong> play button (up on <strong>the</strong>circular button on <strong>the</strong> left side of <strong>the</strong> camera).
4. You should see notifications that windows hasfound and is loading drivers for a new device.Next, a screen should come up asking whataction you want to take. Choose CaptureVideo <strong>Using</strong> Windows Movie Maker and clickOK.5. Windows Movie Maker should load. Whenprompted, give <strong>the</strong> video a name. By default itwill want to save <strong>the</strong> video in a “My Videos”subfolder under your my Documents folder.If you want to save elsewhere, change thisnow.8. Click Next.9. If you want to capture all <strong>the</strong> video on <strong>the</strong>tape, choose “Capture <strong>the</strong> entire tapeautomatically.” O<strong>the</strong>rwise, choose “Captureparts of <strong>the</strong> tape manually.”6. Click Next.7. Here you will be asked to select <strong>the</strong> videoformat. If this is a long video (e.g. a classlecture) that you want to put up on iTunes U,choose “Video for broadband (512 Kbps)”from <strong>the</strong> pull down menu.10. Click Next.11. Remove <strong>the</strong> check from <strong>the</strong> check-box next to“Create clips when wizard finishes.”12. If you have chosen “Capture <strong>the</strong> entire tapeautomatically,” <strong>the</strong> system will automaticallyrewind <strong>the</strong> tape, start <strong>the</strong> tape playing and stop<strong>the</strong> recording when <strong>the</strong> video ends. You canend <strong>the</strong> recording early by clicking “Stopcapture.”
13. If you’ve chosen to “Capture parts of <strong>the</strong> tapemanually,” follow <strong>the</strong> instructions below:a. Use <strong>the</strong> navigation buttons on <strong>the</strong>screen to rewind (<strong>the</strong> two trianglespointing left) to <strong>the</strong> beginning of <strong>the</strong>tape, and <strong>the</strong>n play (<strong>the</strong> one trianglepointing right).b. When you see <strong>the</strong> video starting in <strong>the</strong>preview screen, click <strong>the</strong> Start Capturebutton. This will begin capturing <strong>the</strong>video.c. When you come to a part which youdo not wish to capture, click <strong>the</strong> StopCapture button.d. When you are finished recordingaltoge<strong>the</strong>r, click Finish.14. Close Windows Movie Maker.The file is now on your hard drive. See <strong>the</strong> TIP Sheet:“How To Convert Media Files to iTunes-FriendlyFormats” for information on changing this file to aformat that can be uploaded to iTunes U.<strong>Using</strong> Firewire and iMovie (Mac users)If you have a Mac, <strong>the</strong> easiest way to capture videofrom <strong>the</strong> digital videocamera is to use <strong>the</strong> iMovieapplication, which comes with iLife on most new Macs.1. Make sure <strong>the</strong> function switch is in <strong>the</strong> Playposition.2. Plug one end of <strong>the</strong> firewire cable into yourcomputer. If you have a small-type firewirejack, use <strong>the</strong> black cable. If you have a largetypefirewire jack use <strong>the</strong> grey cable.3. Plug <strong>the</strong> o<strong>the</strong>r end of <strong>the</strong> cable into <strong>the</strong>firewire jack on <strong>the</strong> camera. This is foundunder <strong>the</strong> rubber flap directly to <strong>the</strong> right of<strong>the</strong> viewfinder eyepiece.4. Start iMovie.5. A video capture screen should appear.6. Click <strong>the</strong> Play button.7. Click <strong>the</strong> Import button.8. Give <strong>the</strong> event a name.9. When you are finished recording, click <strong>the</strong>Stop button.10. Click Done.11. Your clip will be saved as a .dv movie in afolder with <strong>the</strong> same name you gave to <strong>the</strong>event.12. This clip will show up in iMovie. You can addit to a new project, <strong>the</strong>n go to Share -> Export<strong>Using</strong> Quicktime -> Movie to iPod to save itin an iTunes-friendly format.last updated 3/24/2009


