Dynatek Coil Kit DCK7-1
Dynatek Coil Kit DCK7-1
Dynatek Coil Kit DCK7-1

Create successful ePaper yourself
Turn your PDF publications into a flip-book with our unique Google optimized e-Paper software.
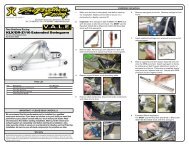
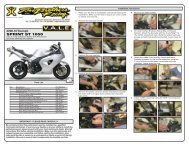
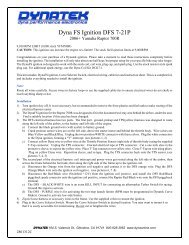
<strong>Dynatek</strong> <strong>Coil</strong> <strong>Kit</strong> <strong>DCK7</strong>-1Yamaha Raptor 700R EFI 2006+Congratulations on your purchase of a <strong>Dynatek</strong> Ignition <strong>Coil</strong> <strong>Kit</strong>. Please take a moment to read these instructionscompletely before installing the ignition coil. The installation will only take about 15 minutes.This kit includes: (1) <strong>Dynatek</strong> 3.0 ohm Mini-<strong>Coil</strong>, single output (2) Bolts, M5 x 30(1) Spark plug wire, 9” (2) Flat washers, #10(1) Primary wiring adaptor, OrangeThis is a complete kit, and includes everything needed to install the ignition coil.Note: The stock sparkplug boot will be reused in this application.Note: Route all wires carefully. Secure wires in factory loops or use cable ties to ensure electrical wires do not chafe ortouch anything hot. Pay close attention to the wiring detail and wire crimping, successful installation depends on this.Tools Required:Metric socket/ wrench setScrew driver setNeedle nose PliersInstallation1) Turn ignition key off.2) Disconnect the stock coil primary wire (Orange wire with spade connector).3) Disconnect the stock coil +12v wire (Red/Black wire with spade connector).4) Unplug the sparkplug boot from the spark plug.5) Remove the two coil mounting bolts.6) Remove the stock ignition coil from the ATV.7) Remove the stock spark plug boot from the sparkplug wire. Hold the sparkplug wire near the boot and unscrewthe boot counterclockwise.8) Press in and screw the stock sparkplug boot onto the <strong>Dynatek</strong> supplied sparkplug wire. Screw it in clockwiseuntil it is bottomed out.9) Plug the sparkplug wire boot onto the coil output, push the rubber boot onto the coil tower to eliminate any gapas this is a potential source of high-voltage arcing.10) Install the Orange Primary wire adaptor onto the Dyna coil negative terminal (not the red dot).11) Install the <strong>Coil</strong> to the stock location, using the supplied M5 x 30 mounting bolts. Put a flat washer under eachbolt head. Tighten securely.12) Connect the Orange Primary adaptor wire to the stock coil primary wire (Orange wire).13) Connect the +12V wire (Red with Black stripe) to the ignition coil terminal with the red dot.14) Route the sparkplug wire in the stock location, and plug the sparkplug boot onto the sparkplug,15) Check the wiring. Make sure connections are tight and secure.16) Start the engine. Installation is complete!2801249B REV. 3-3-09DYNATEK 164 S. Valencia St., Glendora, CA 91741 800-928-3962 www.dynaonline.com
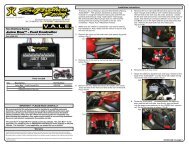
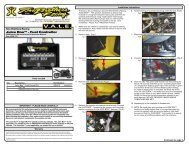
Step 1: Mount coil in original location.Step 2: Screw original spark plug cap onto wire.Press secondary wire onto coil and spark plug.Step 3: Attach coil primary wires.Step 4: Red/Black wire on terminal with Red dot.Orange wire to adaptor to opposite terminal.DYNATEK 164 S. Valencia St., Glendora, CA 91741 800-928-3962 www.dynaonline.com