1967-1969 Camaro Rear Torque Arm Install Sheet - Total Cost ...
1967-1969 Camaro Rear Torque Arm Install Sheet - Total Cost ...
1967-1969 Camaro Rear Torque Arm Install Sheet - Total Cost ...
- No tags were found...

You also want an ePaper? Increase the reach of your titles
YUMPU automatically turns print PDFs into web optimized ePapers that Google loves.
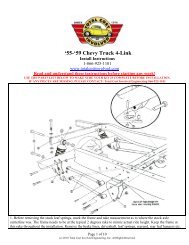
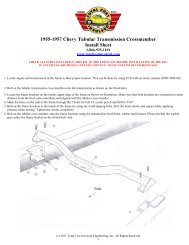
Using a 3/8 inch drill bit and using the 3/8 inch holesin the channel bracket, drill the inside holes throughthe frame rail. Then using the furnished drill guide,align the drill bit in the guide with the drill bit in thepreviously drilled hole and clamp the guide aspictured. This will facilitate in keeping the drill bit inline with the outside holes in the bracket.<strong>Install</strong> the four 3/8 x 16 x 3 ½ inch bolts washersand Nylock nuts. Note: On mini-tub applications use3 inch long bolts with ½ nuts. With the link bar boltinstalled the clearance is tight.<strong>Install</strong> the 1¾ neoprene end caps in the sub-frameconnectors. If using a TCI front clip, position theconnector tube as shown and install the front ½ x 20x 3½ inch bolts with the bolt heads on the inside ofthe clip tube and the nuts go on the curved receiverside of the connector tube. The rear bolts takewashers on both sides and go through the bracketwith the nuts on the inside. Bolting on the connectorsfor a stock clip will require drilling six 3/8 holesusing a furnish template. Comes with an inside reenforcingplate and hardware.The coil-over cross-member is next. Remove anyhanger brackets that will interfere.On the <strong>1967</strong> <strong>Camaro</strong>, the cross-member is installedup flush with the rear frame rails and measured 133/16 inches from the flat vertical body panel to thefront edge of the cross-member. The ends of thecross-member are angled in at the front.The 1968-69 <strong>Camaro</strong> coil-over cross-member islocated by the two existing 3/8 x 16 threaded holes inthe frame rail. Using the four 3/8 x 16 x 1 inch bolts,fasten the front flange of the cross-member to theframe and push the saddle of the cross-member flushbefore tightening.With the channel bracket pressed flush against theframe rail, use a 3/8 drill bit and drill the two outsideholes in each frame rail using the holes in the channelbracket as a guide.Using the drill bushing guide over the previouslydrilled hole, clamped the guide to the bracket, drillhorizontally through the other side of the frame andthrough the hole in the bracket.Finish by installing the four 3/8 x 16 x 3 inch bolts,washers and Nylock nuts and tighten.