

SnowSport ATV Snow Plow Owners Manual and ... - RealTruck.com
SnowSport ATV Snow Plow Owners Manual and ... - RealTruck.com
SnowSport ATV Snow Plow Owners Manual and ... - RealTruck.com

Create successful ePaper yourself
Turn your PDF publications into a flip-book with our unique Google optimized e-Paper software.
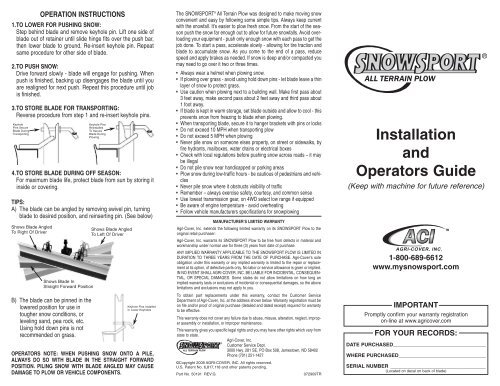
OPERATION INSTRUCTIONS1.TO LOWER FOR PUSHING SNOW:Step behind blade <strong>and</strong> remove keyhole pin. Lift one side ofblade out of retainer until slide hinge fits over the push bar,then lower blade to ground. Re-insert keyhole pin. Repeatsame procedure for other side of blade.2.TO PUSH SNOW:Drive forward slowly - blade will engage for pushing. Whenpush is finished, backing up disengages the blade until youare realigned for next push. Repeat this procedure until jobis finished.3.TO STORE BLADE FOR TRANSPORTING:Reverse procedure from step 1 <strong>and</strong> re-insert keyhole pins.KeyholePins SecureBlade DuringTransportingKeyhole PinsReinstalledTo SecureBlade During<strong>Plow</strong>ing4.TO STORE BLADE DURING OFF SEASON:For maximum blade life, protect blade from sun by storing itinside or covering.TIPS:A) The blade can be angled by removing swivel pin, turningblade to desired position, <strong>and</strong> reinserting pin. (See below)Shows Blade AngledTo Right Of DriverShows Blade InStraight Forward PositionB) The blade can be pinned in thelowered position for use intougher snow conditions, orleveling s<strong>and</strong>, pea rock, etc.Using hold down pins is notre<strong>com</strong>mended on grass.Shows Blade AngledTo Left Of DriverKeyhole Pins InstalledIn Lower KeyholesOPERATORS NOTE: WHEN PUSHING SNOW ONTO A PILE,ALWAYS DO SO WITH BLADE IN THE STRAIGHT FORWARDPOSITION. PILING SNOW WITH BLADE ANGLED MAY CAUSEDAMAGE TO PLOW OR VEHICLE COMPONENTS.The SNOWSPORT ® All Terrain <strong>Plow</strong> was designed to make moving snowconvenient <strong>and</strong> easy by following some simple tips. Always keep currentwith the snowfall. It’s easier to plow fresh snow. From the start of the seasonpush the snow far enough out to allow for future snowfalls. Avoid overloadingyour equipment - push only enough snow with each pass to get thejob done. To start a pass, accelerate slowly - allowing for tire traction <strong>and</strong>blade to accumulate snow. As you <strong>com</strong>e to the end of a pass, reducespeed <strong>and</strong> apply brakes as needed. If snow is deep <strong>and</strong>/or <strong>com</strong>pacted youmay need to go over it two or three times.• Always wear a helmet when plowing snow.• If plowing over grass - avoid using hold down pins - let blade leave a thinlayer of snow to protect grass.• Use caution when plowing next to a building wall. Make first pass about3 feet away, make second pass about 2 feet away <strong>and</strong> third pass about1 foot away.• If blade is kept in warm storage, set blade outside <strong>and</strong> allow to cool - thisprevents snow from freezing to blade when plowing.• When transporting blade, secure it to hanger brackets with pins or locks• Do not exceed 10 MPH when transporting plow• Do not exceed 5 MPH when plowing• Never pile snow on someone elses property, on street or sidewalks, byfire hydrants, mailboxes, water drains or electrical boxes• Check with local regulations before pushing snow across roads – it maybe illegal• Do not pile snow near h<strong>and</strong>icapped or parking areas• <strong>Plow</strong> snow during low-traffic hours - be cautious of pedestrians <strong>and</strong> vehicles• Never pile snow where it obstructs visibility of traffic• Remember – always exercise safety, courtesy, <strong>and</strong> <strong>com</strong>mon sense• Use lowest transmission gear, on 4WD select low range if equipped• Be aware of engine temperature - avoid overheating• Follow vehicle manufacturers specifications for snowplowingMANUFACTURER’S LIMITED WARRANTYAgri-Cover, Inc. extends the following limited warranty on its SNOWSPORT <strong>Plow</strong> to theoriginal retail purchaser:Agri-Cover, Inc. warrants its SNOWSPORT <strong>Plow</strong> to be free from defects in material <strong>and</strong>workmanship under normal use for three (3) years from date of purchase.ANY IMPLIED WARRANTY APPLICABLE TO THE SNOWSPORT PLOW IS LIMITED INDURATION TO THREE YEARS FROM THE DATE OF PURCHASE. Agri-Cover’s soleobligation under this warranty or any implied warranty is limited to the repair or replacementat its option, of defective parts only. No labor or service allowance is given or implied.IN NO EVENT SHALL AGRI-COVER, INC. BE LIABLE FOR INCIDENTAL, CONSEQUEN-TIAL, OR SPECIAL DAMAGES. Some states do not allow limitations on how long animplied warranty lasts or exclusions of incidental or consequential damages, so the abovelimitations <strong>and</strong> exclusions may not apply to you.To obtain part replacements under this warranty, contact the Customer ServiceDepartment of Agri-Cover, Inc. at the address shown below. Warranty registration must beon file <strong>and</strong>/or proof of original purchase (detailed <strong>and</strong> dated receipt) required for warrantyto be effective.This warranty does not cover any failure due to abuse, misuse, alteration, neglect, improperassembly or installation, or improper maintenance.This warranty gives you specific legal rights <strong>and</strong> you may have other rights which vary fromstate to state.Agri-Cover, Inc.Customer Service Dept.3000 Hwy. 281 SE, PO Box 508, Jamestown, ND 58402Phone (701) 251-1427©Copyright 2008 AGRI-COVER, INC. All rights reserved.U.S. Patent No. 6,817,118 <strong>and</strong> other patents pending.Part No. 50191 REV:G072909TRInstallation<strong>and</strong>Operators Guide(Keep with machine for future reference)1-800-689-6612www.mysnowsport.<strong>com</strong>IMPORTANTPromptly confirm your warranty registrationon-line at www.agricover.<strong>com</strong>FOR YOUR RECORDS:DATE PURCHASED_________________________________WHERE PURCHASED_______________________________SERIAL NUMBER __________________________________(Located on decal on back of blade)
NOTE: Install plow mount onto machine beforeassembling plow.TOOLS NEEDED:3/8” power drill with drill bit <strong>and</strong> 5/16” bit9/16” socket with ratchet3/4” box wrench (2)7/16” wrench (1)Protective eyewear1a) Each end of the rubber cutting edge has two factorymarks (to match with holes in skid bracket). Drill themout with 5/16” bit.b) Mount skid bracket there. Tighten bolts until head sinksflush with rubber surface. Repeat at other end.TIP: When mounted - skid bracket should align flush with orslightly above bottom of rubber.2407951/4 x 1-1/2”BoltRubber CuttingEdgea) Align groove on rubberwith groove in blade, so skidbrackets face back of blade.b) Slide rubber into bladeuntil it is flush witheach end. (SeeIllustration innumber 3).AluminumBladeFactoryMarked HoleLocationsLock Washer30623Nut 30625Flat Washer 90212Skid Bracket 40799Back SideOf BladeSkid Brackets FaceBack Side OfAluminum BladeTIP: Rubber should be roomtemperature before assembly.3a) Locate factory marks on back ofblade. Place slide hinge onblade <strong>and</strong> align bothlower holes withmarks onblade.Rubber AndBlade EvenAt Endsa) Insert 2 square nuts in channel at end of blade, <strong>and</strong> slideover to line up with holes at top of slide hinge.b) Insert bolts through holes in slide hinge <strong>and</strong> thread ontonuts inside blade.c) Make sure both lower holes in slide hinge are stillin linewith mark on blade, then tighten2 top bolts. Repeat at other end.Slide Hinge40743Factory Marks For Hole Locations On BladeTIP: When mounted - slide hinges should measure about 14-1/2” apart.43/8 x 3/4” Bolt10183Washer101852 SquareNuts FlatSide Up101725These Holes In Hinge Line UpW/Factory Marks On Bladea) First, with rubber even at ends of blade, use both lowerholes in each slide hinge as guide to drill 5/16” holesthrough first layer of aluminum <strong>and</strong> partially into rubber.Then turn 3/8” thread cutting bolt into each hole <strong>and</strong>tighten to secure each hinge.b) Second, at factory mark neareach end of blade, drill 5/16”hole through first layer ofaluminum <strong>and</strong> partiallyinto rubber. Turn3/8” threadcutting bolt intohole <strong>and</strong> tighten.2ndSlideHinge1st3/8 x 1” ThreadCutting Bolt2nd6a) Insert interceptor into plow mount -leg up- as shown indiagrams. Insert pin through mount <strong>and</strong> hole ininterceptor <strong>and</strong> lock tab.b) Hold push frame up in line with pair of holes oninterceptor, that when bolted, will hold push frame 6 to8 inches above grade. Note: If lowest hole pattern istoo high, turninterceptor legdown.c) Insert bolts, turnlock nuts on <strong>and</strong>tighten.PushFrameBolts 1/2 x 4”With FlatWasher7Push Frame40687Tether CordAngle InterceptorShown With LegUp 40666Mount Push Frame6” TO 8”Above GradeInterceptorLeg UpKeyhole Pin30489Bolt 1/2” x 4”With FlatWasherSwivel Pin20608Lock NutWith FlatWasherLock NutWith FlatWasher<strong>Plow</strong>Mounta) Hang blade assembly into retainer groove on pushframe.b) Attach tether cord to pins.c) Insert keyhole pins intoholes on push frame.KeyholePinHair Pin20534Hitch Pin60035Lead Cord Through Hole In PinAnd Tie Square Knot As Shown.Repeat At Opposite End.


