Bosch Rexroth IndraDyn S - MKE Project Planning Manual
Bosch Rexroth IndraDyn S - MKE Project Planning Manual
Bosch Rexroth IndraDyn S - MKE Project Planning Manual
- No tags were found...

Create successful ePaper yourself
Turn your PDF publications into a flip-book with our unique Google optimized e-Paper software.
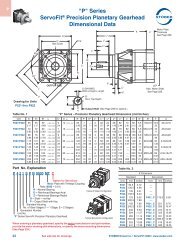
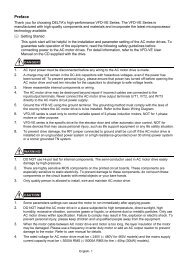
102/131 <strong>Bosch</strong> <strong>Rexroth</strong> AG | Electric Drivesand Controls<strong>Rexroth</strong> <strong>MKE</strong> Synchronous Motors | <strong>Project</strong> <strong>Planning</strong> <strong>Manual</strong>Installation1 Sealing2 Screwed connection3 Cable sealing4 Pressure piece5 Union nut6 Encoder cable7 Power cables8 Lid screws9 Terminal box lidFig.11-2: Connection of <strong>MKE</strong>037, -047, -0981. Remove the lid screws (8) and take off the terminal box lid (9).The lid screws are coated with TFL. By screwing in resp. out of lidscrews, the coating will be destroyed. When assembling the terminalbox lid, use only the added, coated lid screws.The Eexd-Cable screwings are mounted factory-attached. The sealing(1) is screwed with with the screwing (2) on the terminal box lid (9)(tightening torque of Nm). – The terminal box includes the complete accessoryincl. assembly instruction.2. Insert the union nut (5), the preasure piece (4) and the cable sealing (3)in the indicated order over the power cable (7)3. Tighten the screwing (2) with the sealing (1) within the terminal box lid (9)with tightening torque of 50 Nm.4. Insert the power cable (7) through the screwing (2) into the terminal boxlid (9).5. Remove the EExd-Cable screwing for the encoder cable.When using the ready-made cables of <strong>Rexroth</strong>, the EExd cablescrewing on the motor is not needed.6. Insert the encoder cable (6) into the terminal box lid (9) (see Fig.11-4 ).7. Tighten the screwing of the encoder cable (2) with the sealing (1) withinthe terminal box lid (9) with tightening torque of 50 Nm.8. Pull back the cable until the shrinking sleeve penetrates the inside of theterminal box by about 16mm (see Fig.: 11-4).