Wega 401 M2.40 FKW - EWM Hightec Welding GmbH
Wega 401 M2.40 FKW - EWM Hightec Welding GmbH Wega 401 M2.40 FKW - EWM Hightec Welding GmbH
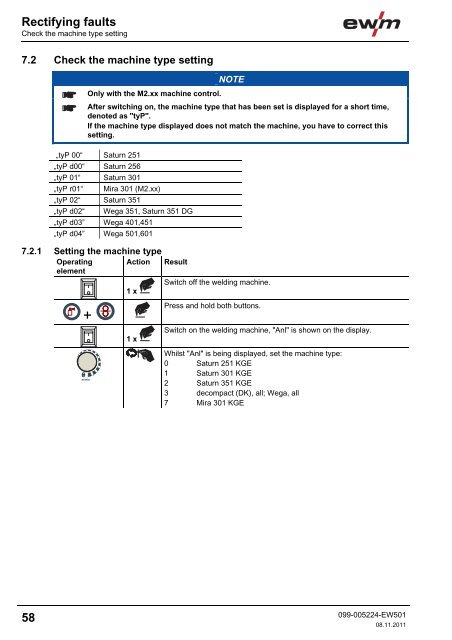
Rectifying faultsCheck the machine type setting7.2 Check the machine type settingOnly with the M2.xx machine control.NOTEAfter switching on, the machine type that has been set is displayed for a short time,denoted as "tyP".If the machine type displayed does not match the machine, you have to correct thissetting.„tyP 00“ Saturn 251„tyP d00“ Saturn 256„tyP 01“ Saturn 301„tyP r01“ Mira 301 (M2.xx)„tyP 02“ Saturn 351„tyP d02“ Wega 351, Saturn 351 DG„tyP d03” Wega 401,451„tyP d04” Wega 501,6017.2.1 Setting the machine typeOperating Action ResultelementSwitch off the welding machine.1 x+m/min1 xPress and hold both buttons.Switch on the welding machine, "Anl" is shown on the display.Whilst "Anl" is being displayed, set the machine type:0 Saturn 251 KGE1 Saturn 301 KGE2 Saturn 351 KGE3 decompact (DK), all; Wega, all7 Mira 301 KGE58099-005224-EW50108.11.2011
Rectifying faultsResetting the control (Reset all)7.3 Resetting the control (Reset all)NOTEM2.xx controlThe first action should always be to check and if necessary correct the machine typesetting.All user settings will be overwritten with factory settings and must therefore be checkedafterwards, or set up again!After resetting the machine control to the factory settings, it is essential that the machinetype used is checked and reset if necessary.OperatingelementAction1 xResultSwitch off the welding machine.Press and hold both buttons.t1+t21 xSwitch on the welding machine, "rES" is shown briefly on the display.099-005224-EW50108.11.201159
- Page 9: Safety instructionsGeneralWARNINGEx
- Page 12 and 13: Safety instructionsTransport and in
- Page 14 and 15: Safety instructionsAmbient conditio
- Page 16 and 17: Machine description - quick overvie
- Page 18 and 19: Machine description - quick overvie
- Page 20 and 21: Machine description - quick overvie
- Page 22 and 23: Machine description - quick overvie
- Page 24 and 25: Machine description - quick overvie
- Page 26 and 27: Design and functionGeneral5 Design
- Page 28 and 29: Design and functionMains connection
- Page 30 and 31: Design and functionWelding torch co
- Page 32 and 33: Design and functionWelding torch an
- Page 34 and 35: Design and functionShielding gas su
- Page 36 and 37: Design and functionShielding gas su
- Page 38 and 39: Design and functionInserting the wi
- Page 40 and 41: Design and functionSelect welding t
- Page 42 and 43: Design and functionSelect welding t
- Page 44 and 45: Design and functionSelect welding t
- Page 46 and 47: Design and functionSelect welding t
- Page 48 and 49: Design and functionSelect welding t
- Page 50 and 51: Design and functionMIG/MAG function
- Page 52 and 53: Design and functionMIG/MAG function
- Page 54 and 55: Design and functionMIG/MAG function
- Page 57: Rectifying faultsCustomer checklist
- Page 61 and 62: Technical dataWega 4018 Technical d
- Page 63 and 64: Replaceable partsWire feed rollers1
- Page 65 and 66: Appendix ARecommended settings11 Ap
Rectifying faultsCheck the machine type setting7.2 Check the machine type settingOnly with the M2.xx machine control.NOTEAfter switching on, the machine type that has been set is displayed for a short time,denoted as "tyP".If the machine type displayed does not match the machine, you have to correct thissetting.„tyP 00“ Saturn 251„tyP d00“ Saturn 256„tyP 01“ Saturn 301„tyP r01“ Mira 301 (M2.xx)„tyP 02“ Saturn 351„tyP d02“ <strong>Wega</strong> 351, Saturn 351 DG„tyP d03” <strong>Wega</strong> <strong>401</strong>,451„tyP d04” <strong>Wega</strong> 501,6017.2.1 Setting the machine typeOperating Action ResultelementSwitch off the welding machine.1 x+m/min1 xPress and hold both buttons.Switch on the welding machine, "Anl" is shown on the display.Whilst "Anl" is being displayed, set the machine type:0 Saturn 251 KGE1 Saturn 301 KGE2 Saturn 351 KGE3 decompact (DK), all; <strong>Wega</strong>, all7 Mira 301 KGE58099-005224-EW50108.11.2011


