Wega 401 M2.40 FKW - EWM Hightec Welding GmbH
Wega 401 M2.40 FKW - EWM Hightec Welding GmbH Wega 401 M2.40 FKW - EWM Hightec Welding GmbH
Design and functionShielding gas supply5.8.2 Setting the shielding gas quantityWelding processRecommended shielding gas quantityMAG weldingMIG brazingMIG welding (aluminium)TIGWire diameter x 11.5 = l/minWire diameter x 11.5 = l/minWire diameter x 13.5 = l/min (100 % argon)Gas nozzle diameter in mm corresponds to l/min gas throughputHelium-rich gas mixtures require a higher gas volume!The table below can be used to correct the gas volume calculated where necessary:Shielding gasFactor75% Ar/25% He 1.1450% Ar/50% He 1.3525% Ar/75% He 1.75100% He 3.16NOTEIncorrect shielding gas setting!If the shielding gas setting is too low or too high, this can introduce air to the weld pooland may cause pores to form.• Adjust the shielding gas quantity to suit the welding task!36099-005224-EW50108.11.2011
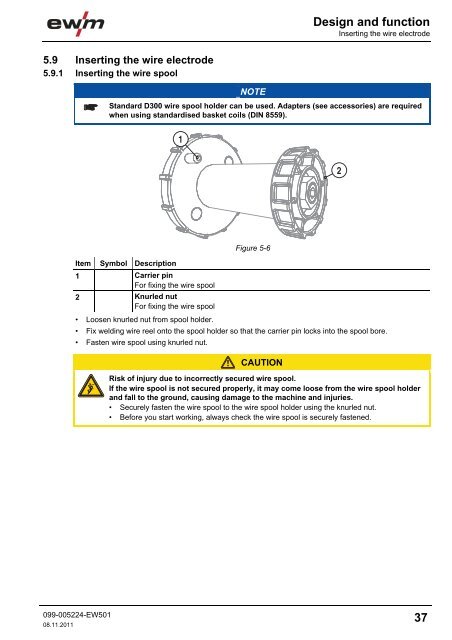
Design and functionInserting the wire electrode5.9 Inserting the wire electrode5.9.1 Inserting the wire spoolNOTEStandard D300 wire spool holder can be used. Adapters (see accessories) are requiredwhen using standardised basket coils (DIN 8559).12Item Symbol Description 01 Carrier pinFor fixing the wire spool2 Knurled nutFor fixing the wire spoolFigure 5-6• Loosen knurled nut from spool holder.• Fix welding wire reel onto the spool holder so that the carrier pin locks into the spool bore.• Fasten wire spool using knurled nut.CAUTIONRisk of injury due to incorrectly secured wire spool.If the wire spool is not secured properly, it may come loose from the wire spool holderand fall to the ground, causing damage to the machine and injuries.• Securely fasten the wire spool to the wire spool holder using the knurled nut.• Before you start working, always check the wire spool is securely fastened.099-005224-EW50108.11.201137
- Page 6: Safety instructionsNotes on the use
- Page 9: Safety instructionsGeneralWARNINGEx
- Page 12 and 13: Safety instructionsTransport and in
- Page 14 and 15: Safety instructionsAmbient conditio
- Page 16 and 17: Machine description - quick overvie
- Page 18 and 19: Machine description - quick overvie
- Page 20 and 21: Machine description - quick overvie
- Page 22 and 23: Machine description - quick overvie
- Page 24 and 25: Machine description - quick overvie
- Page 26 and 27: Design and functionGeneral5 Design
- Page 28 and 29: Design and functionMains connection
- Page 30 and 31: Design and functionWelding torch co
- Page 32 and 33: Design and functionWelding torch an
- Page 34 and 35: Design and functionShielding gas su
- Page 38 and 39: Design and functionInserting the wi
- Page 40 and 41: Design and functionSelect welding t
- Page 42 and 43: Design and functionSelect welding t
- Page 44 and 45: Design and functionSelect welding t
- Page 46 and 47: Design and functionSelect welding t
- Page 48 and 49: Design and functionSelect welding t
- Page 50 and 51: Design and functionMIG/MAG function
- Page 52 and 53: Design and functionMIG/MAG function
- Page 54 and 55: Design and functionMIG/MAG function
- Page 57 and 58: Rectifying faultsCustomer checklist
- Page 59 and 60: Rectifying faultsResetting the cont
- Page 61 and 62: Technical dataWega 4018 Technical d
- Page 63 and 64: Replaceable partsWire feed rollers1
- Page 65 and 66: Appendix ARecommended settings11 Ap
Design and functionInserting the wire electrode5.9 Inserting the wire electrode5.9.1 Inserting the wire spoolNOTEStandard D300 wire spool holder can be used. Adapters (see accessories) are requiredwhen using standardised basket coils (DIN 8559).12Item Symbol Description 01 Carrier pinFor fixing the wire spool2 Knurled nutFor fixing the wire spoolFigure 5-6• Loosen knurled nut from spool holder.• Fix welding wire reel onto the spool holder so that the carrier pin locks into the spool bore.• Fasten wire spool using knurled nut.CAUTIONRisk of injury due to incorrectly secured wire spool.If the wire spool is not secured properly, it may come loose from the wire spool holderand fall to the ground, causing damage to the machine and injuries.• Securely fasten the wire spool to the wire spool holder using the knurled nut.• Before you start working, always check the wire spool is securely fastened.099-005224-EW50108.11.201137


