LT-2061 MR-GRID-II Installation Guide Rev0 112707 - Secutron
LT-2061 MR-GRID-II Installation Guide Rev0 112707 - Secutron LT-2061 MR-GRID-II Installation Guide Rev0 112707 - Secutron
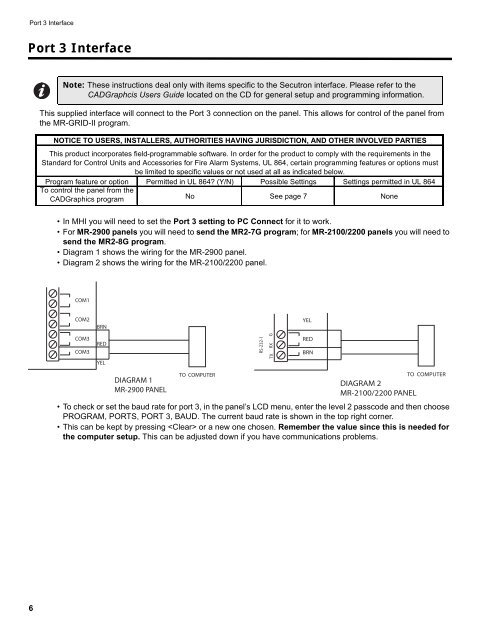
Port 3 InterfacePort 3 InterfaceNote: These instructions deal only with items specific to the Secutron interface. Please refer to theCADGraphcis Users Guide located on the CD for general setup and programming information.This supplied interface will connect to the Port 3 connection on the panel. This allows for control of the panel fromthe MR-GRID-II program.NOTICE TO USERS, INSTALLERS, AUTHORITIES HAVING JURISDICTION, AND OTHER INVOLVED PARTIESThis product incorporates field-programmable software. In order for the product to comply with the requirements in theStandard for Control Units and Accessories for Fire Alarm Systems, UL 864, certain programming features or options mustbe limited to specific values or not used at all as indicated below.Program feature or option Permitted in UL 864? (Y/N) Possible Settings Settings permitted in UL 864To control the panel from theCADGraphics program No See page 7 None• In MHI you will need to set the Port 3 setting to PC Connect for it to work.•For MR-2900 panels you will need to send the MR2-7G program; for MR-2100/2200 panels you will need tosend the MR2-8G program.• Diagram 1 shows the wiring for the MR-2900 panel.• Diagram 2 shows the wiring for the MR-2100/2200 panel.COM1COM2BRNYELCOM3COM3REDYELRS-232-1GTX RXREDBRNDIAGRAM 1MR-2900 PANELTO COMPUTERDIAGRAM 2MR-2100/2200 PANELTO COMPUTER• To check or set the baud rate for port 3, in the panel’s LCD menu, enter the level 2 passcode and then choosePROGRAM, PORTS, PORT 3, BAUD. The current baud rate is shown in the top right corner.• This can be kept by pressing or a new one chosen. Remember the value since this is needed forthe computer setup. This can be adjusted down if you have communications problems.6
MR-GRID-II Installation & Activation GuideCopy the files in the Panel Drivers/Port 3 – PC Connect directory on the CD into the CADgraphics directory on thecomputer.Note: It is recommended that you put a short cut to the CG-Secutron.exe in the Windows Start Up folder.You should also create a short cut to the System Monitor program as well in the Start Up. If you wishto have CADgraphics start automatically, you can include a short cut to the System Watch program aswell.• Right-Click Start.• Select Explore.• Locate the Startup folder (My Computer/Local Disk C:/Documents and Settings/All Users/StartMenu/Programs/Startup.)• Drag and Drop CG-Secutron.exe into the Startup folder.7
- Page 3: MR-GRID-II Installation GuideTable
- Page 7 and 8: MR-GRID-II Installation & Activatio
- Page 9: MR-GRID-II Installation & Activatio
- Page 13 and 14: MR-GRID-II Installation & Activatio
- Page 15: MR-GRID-II Installation & Activatio
- Page 18 and 19: Printer Port InterfaceConfiguration
- Page 20 and 21: Activation ProcedureActivation Proc
- Page 22 and 23: Activation ProcedureGenerate an Act
- Page 24 and 25: Activation ProcedureCompose an E-Ma
- Page 28: © 2007 Secutron, Inc.No part of th
Port 3 InterfacePort 3 InterfaceNote: These instructions deal only with items specific to the <strong>Secutron</strong> interface. Please refer to theCADGraphcis Users <strong>Guide</strong> located on the CD for general setup and programming information.This supplied interface will connect to the Port 3 connection on the panel. This allows for control of the panel fromthe <strong>MR</strong>-<strong>GRID</strong>-<strong>II</strong> program.NOTICE TO USERS, INSTALLERS, AUTHORITIES HAVING JURISDICTION, AND OTHER INVOLVED PARTIESThis product incorporates field-programmable software. In order for the product to comply with the requirements in theStandard for Control Units and Accessories for Fire Alarm Systems, UL 864, certain programming features or options mustbe limited to specific values or not used at all as indicated below.Program feature or option Permitted in UL 864? (Y/N) Possible Settings Settings permitted in UL 864To control the panel from theCADGraphics program No See page 7 None• In MHI you will need to set the Port 3 setting to PC Connect for it to work.•For <strong>MR</strong>-2900 panels you will need to send the <strong>MR</strong>2-7G program; for <strong>MR</strong>-2100/2200 panels you will need tosend the <strong>MR</strong>2-8G program.• Diagram 1 shows the wiring for the <strong>MR</strong>-2900 panel.• Diagram 2 shows the wiring for the <strong>MR</strong>-2100/2200 panel.COM1COM2BRNYELCOM3COM3REDYELRS-232-1GTX RXREDBRNDIAGRAM 1<strong>MR</strong>-2900 PANE<strong>LT</strong>O COMPUTERDIAGRAM 2<strong>MR</strong>-2100/2200 PANE<strong>LT</strong>O COMPUTER• To check or set the baud rate for port 3, in the panel’s LCD menu, enter the level 2 passcode and then choosePROGRAM, PORTS, PORT 3, BAUD. The current baud rate is shown in the top right corner.• This can be kept by pressing or a new one chosen. Remember the value since this is needed forthe computer setup. This can be adjusted down if you have communications problems.6


