HomeWorks Technical Reference Guide International Edition - Lutron
HomeWorks Technical Reference Guide International Edition - Lutron
HomeWorks Technical Reference Guide International Edition - Lutron
- No tags were found...

Create successful ePaper yourself
Turn your PDF publications into a flip-book with our unique Google optimized e-Paper software.
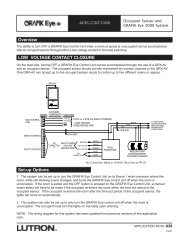
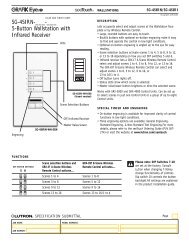
1 2 3 4 56 72-Button Keypads – Wiring and Mounting4321321MUXMUX+15VCOMCOMClass 2/PELV wiringconnections to<strong>HomeWorks</strong>® processoror other keypadsARRETEZAPAGUELELACOURANT CORRENTELUTRONTURN POWER OFFCOMButton 231 2 31 4253 6 4 5 6 Button 24DIP Switch 6 Down1 2 Closure 31 42 inputs 53 6 4 match 5 6 buttons on front ofkeypad.1 2 13 24 35 465 6COMButton 21 2 13 24 53 64 5 6 Button 1DIP Switch 6 UpClosure inputs separate from buttons onfront of keypad.Figure 1 – keypad rear viewFigure 2 – button assignment for contact closureinputsPins 1 and 2 – 1 pair 1.0mm 2 (#18 AWG) for power.Pins 3 and 4 – 1 pair 0.5-1.0mm 2 (#22-18 AWG) twisted/shielded for data.<strong>Lutron</strong>® wire, model GRX-CBL-346S-500, may be used.432143214321321321321<strong>HomeWorks</strong> processor(8 series shown)Class 2/PELV wiring connections from customer suppliescontact closure devices.1. Switch inputs must be momentary dry contact closures.2. Switch closures must be from common to selected input.3. Momentary switch inputs require a minimum closure timeof 40 msec.COMPONENTSFigure 3 – wiring diagramWallbox model 241218ControlFaceplateadapterFaceplateFigure 4 – mounting diagram<strong>Technical</strong> Support: hwisupport@lutron.com7.15