Download the Japanese M9/J12 Quick Guide here - North Sails
Download the Japanese M9/J12 Quick Guide here - North Sails
Download the Japanese M9/J12 Quick Guide here - North Sails

You also want an ePaper? Increase the reach of your titles
YUMPU automatically turns print PDFs into web optimized ePapers that Google loves.
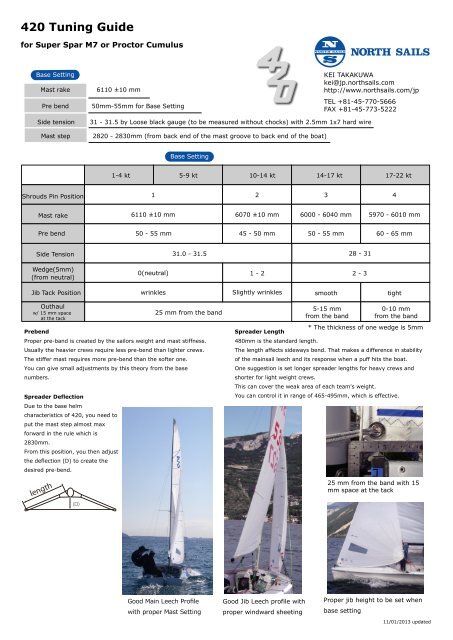
420 Tuning <strong>Guide</strong>for Super Spar M7 or Proctor CumulusBase SettingMast rakePre bend6110 ±10 mm50mm-55mm for Base SettingKEI TAKAKUWAkei@jp.northsails.comhttp://www.northsails.com/jpTEL +81-45-770-5666FAX +81-45-773-5222Side tensionMast step31 - 31.5 by Loose black gauge (to be measured without chocks) with 2.5mm 1x7 hard wire2820 - 2830mm (from back end of <strong>the</strong> mast groove to back end of <strong>the</strong> boat)Base Setting1-4 kt 5-9 kt 10-14 kt 14-17 kt 17-22 ktShrouds Pin Position1 2 3 4Mast rake6110 ±10 mm 6070 ±10 mm 6000 - 6040 mm 5970 - 6010 mmPre bend 50 - 55 mm 45 - 50 mm 50 - 55 mm60 - 65 mmSide Tension31.0 - 31.528 - 31Wedge(5mm)(from neutral)Jib Tack Position0(neutral) 1 - 2 2 - 3wrinkles Slightly wrinklessmooth tightOuthaulw/ 15 mm spaceat <strong>the</strong> tack25 mm from <strong>the</strong> bandPrebendProper pre-band is created by <strong>the</strong> sailors weight and mast stiffness.Usually <strong>the</strong> heavier crews require less pre-bend than lighter crews.The stiffer mast requires more pre-bend than <strong>the</strong> softer one.You can give small adjustments by this <strong>the</strong>ory from <strong>the</strong> basenumbers.Spreader DeflectionDue to <strong>the</strong> base helmcharacteristics of 420, you need toput <strong>the</strong> mast step almost maxforward in <strong>the</strong> rule which is2830mm.From this position, you <strong>the</strong>n adjust<strong>the</strong> deflection (D) to create <strong>the</strong>desired pre-bend.length5-15 mmfrom <strong>the</strong> band0-10 mmfrom <strong>the</strong> band* The thickness of one wedge is 5mmSpreader Length480mm is <strong>the</strong> standard length.The length affects sideways bend. That makes a difference in stabilityof <strong>the</strong> mainsail leech and its response when a puff hits <strong>the</strong> boat.One suggestion is set longer spreader lengths for heavy crews andshorter for light weight crews.This can cover <strong>the</strong> weak area of each team's weight.You can control it in range of 465-495mm, which is effective.25 mm from <strong>the</strong> band with 15mm space at <strong>the</strong> tackGood Main Leech Profilewith proper Mast SettingGood Jib Leech profile withproper windward sheetingProper jib height to be set whenbase setting11/01/2013 updated
TUNING TIPSIn <strong>the</strong> breeze you need to chock quite hard as you need to use a lot of vang tension in <strong>the</strong> wind.Traveller - have <strong>the</strong> adjustable traveller system allowed in <strong>the</strong> class rule.- invery light winds have it set up so you can pull it to windward. Once it is above5 knots it is too hard to do this, but <strong>the</strong> sailors need to make sure <strong>the</strong> bridle isat <strong>the</strong> correct height w<strong>here</strong> you have small margin to tighten <strong>the</strong> mainsheet incase wind increase - To keep <strong>the</strong> boom position as close as possible to centeris vital to point higher.The shorter <strong>the</strong> distance between two blocks,<strong>the</strong> closer<strong>the</strong> boom comes to center.(if <strong>the</strong> bridle height is too low <strong>the</strong>n <strong>the</strong> boom is toofar down resulting in suffering in pointing, if too loose <strong>the</strong>n you can't get <strong>the</strong>correct leech tension tightness.)Cunningham - Do not use any until you are overpowered, <strong>the</strong>n start to use gradually,you have to take it veryhard on when strong wind.To archieve it,it is good to have a bowline tied at <strong>the</strong> end of <strong>the</strong> rope so crew could get<strong>the</strong>ir foot in <strong>the</strong> loop to get more cunningham tension on.Jiba) Windward SheetWindward sheeting is important to hold <strong>the</strong> jib leech position at <strong>the</strong>proper inside position to create <strong>the</strong> best performance, even though it isnot easy to use it properly.We suggest to use two marks on each side of <strong>the</strong> jib sheet to be usedas a guide.One mark is around 380mm and <strong>the</strong> o<strong>the</strong>r is 1500mm to be used withmark on <strong>the</strong> deck as you can see in right-hand side circle image.The o<strong>the</strong>r marks on <strong>the</strong> spreader could be a helpful by watching <strong>the</strong> jibleech through <strong>the</strong> window.After tacking, first you sheet <strong>the</strong> jib to <strong>the</strong> proper position, <strong>the</strong>n set <strong>the</strong>windward sheet to go for final trim.You do not have to use windward sheet in very light wind 1-3knots, orin very windy conditions.The knot to fasten <strong>the</strong> sheet to <strong>the</strong> clew eyelet has to be fixed as closeas possible to <strong>the</strong> eyelet hole, so that windward sheeting workseffectively.b) Jib heightThe peak rope fixed at <strong>the</strong> head of jib controls <strong>the</strong> jib height.Normally it must be fixed by having a proper deck sweeping effect.However, for <strong>the</strong> 420 class it is important to know <strong>the</strong> height should beadjusted to provide <strong>the</strong> optimum jib lead angle. As <strong>the</strong> sheeting point isfixed, you should adjust <strong>the</strong> peak rope to move <strong>the</strong> jib clew up or downto achieve <strong>the</strong> desired sheeting angle. So you can use it for this sake.Clear understanding about <strong>the</strong> relationship between jib lead angle, jibheight and mast rake will let you set up <strong>the</strong> jib to suit <strong>the</strong> conditions.Spinnaker Pole Height - When using <strong>the</strong> spinnaker in choppy waves on a flat run, it is best to set up <strong>the</strong>spinnaker pole height so <strong>the</strong> tack (corner of spinnaker <strong>the</strong> pole is closet to) is slightly lower than <strong>the</strong> clew.Centreboard - You needed to have a good action to play <strong>the</strong> centerboard as it is hard to adjust <strong>the</strong> o<strong>the</strong>r controlsreadily. The centreboard slot needs to be packed well with <strong>the</strong> centreboard to allow <strong>the</strong> centreboard to be changedeasily.