Setting up a Maintenance Plan for SQL Server
Setting up a Maintenance Plan for SQL Server
Setting up a Maintenance Plan for SQL Server
- No tags were found...
Create successful ePaper yourself
Turn your PDF publications into a flip-book with our unique Google optimized e-Paper software.
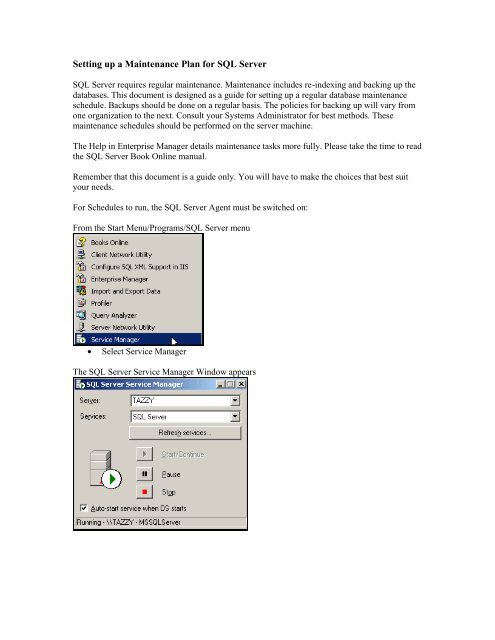
<strong>Setting</strong> <strong>up</strong> a <strong>Maintenance</strong> <strong>Plan</strong> <strong>for</strong> <strong>SQL</strong> <strong>Server</strong><strong>SQL</strong> <strong>Server</strong> requires regular maintenance. <strong>Maintenance</strong> includes re-indexing and backing <strong>up</strong> thedatabases. This document is designed as a guide <strong>for</strong> setting <strong>up</strong> a regular database maintenanceschedule. Back<strong>up</strong>s should be done on a regular basis. The policies <strong>for</strong> backing <strong>up</strong> will vary fromone organization to the next. Consult your Systems Administrator <strong>for</strong> best methods. Thesemaintenance schedules should be per<strong>for</strong>med on the server machine.The Help in Enterprise Manager details maintenance tasks more fully. Please take the time to readthe <strong>SQL</strong> <strong>Server</strong> Book Online manual.Remember that this document is a guide only. You will have to make the choices that best suityour needs.For Schedules to run, the <strong>SQL</strong> <strong>Server</strong> Agent must be switched on:From the Start Menu/Programs/<strong>SQL</strong> <strong>Server</strong> menu• Select Service ManagerThe <strong>SQL</strong> <strong>Server</strong> Service Manager Window appears
• From Services, select <strong>SQL</strong> <strong>Server</strong> Agent• Check ‘Auto-start service when OS starts’• Select Start/Continue to start the <strong>SQL</strong> <strong>Server</strong> Agent• Close the windowTo set <strong>up</strong> a back<strong>up</strong> and re-index scheduleFrom the Start Menu/Programs/<strong>SQL</strong> <strong>Server</strong> menu• Select Enterprise Manager
• Double-click on Microsoft <strong>SQL</strong> <strong>Server</strong>s• Select the <strong>Server</strong> computer (in this case the server is called Tazzy)• From the Tools menu, select Database <strong>Maintenance</strong> <strong>Plan</strong>ner…• Click Next
• Select the Acuity database (called 30018 in this example)• Select the system databases (master, model and msdb)• Click Next• Check the Reorganize data and index pages field and select Change
This example will run the schedule daily at 2:00 am• Set<strong>up</strong> a schedule to suit your needs• Click OK• Click Next
• Select Check Database Integrity• Select Include indexes• Select Attempt to repair any minor problems• Select Change• Set<strong>up</strong> this operation to happen at the same time as be<strong>for</strong>e
• Specify the Back<strong>up</strong> destination that suits your needs• Select Change• Set<strong>up</strong> this operation to happen at the same time as be<strong>for</strong>e – or as required.• Select OK, Select Next
• Specify a back<strong>up</strong> destination – This might be Disk or Tape• Select Next• Specify the Transaction Log Back<strong>up</strong> <strong>Plan</strong> as required.• Select Next
• Specify the Transaction Log back<strong>up</strong> destination• Select Next• Select a destination <strong>for</strong> Reports as required. Select Next
• Click Next• Give the <strong>Maintenance</strong> plan a suitable name• Click Finish
• Click OKThe <strong>Maintenance</strong> <strong>Plan</strong> should execute as per your instructions.Please check that the Reports confirm this on a regular basis.Make sure your back<strong>up</strong> destinations have enough free space to accommodate all the back<strong>up</strong>s,now and into the future.You may need to modify your plan from time to time.Use the wizard to do this as your needs change.This is done by selecting the maintenance plan you wish to change from the Database<strong>Maintenance</strong> option, under Management in the Enterprise Manager.


