
Create successful ePaper yourself
Turn your PDF publications into a flip-book with our unique Google optimized e-Paper software.
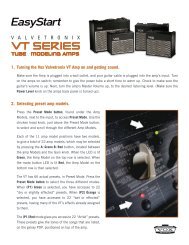
CREATING YOUR OWN SOUNDS1. Press the top panel MANUAL button.<strong>The</strong> MANUAL LED will light which means you’re in <strong>Manual</strong> mode.HINT: You can also create your own sounds in Preset mode or Channel Select mode.However, the process is a bit easier to understand in <strong>Manual</strong> mode, since the positions ofall knobs (except the EDIT 1 knob) are exactly what you’re hearing. In other words, whatyou see is what you get!2. Use the STYLE selector switch to select a style, and adjust the GAIN, VOL-UME, TREBLE, MIDDLE, and BASS.3. If you want to use an effect, use the EFFECTS selector to select an effecttype, and use the EDIT 1 knob to adjust the depth of the effect. For modulation-typeeffects like CHORUS or TREMOLO, or the DELAY/REVERB effect,just press the TAP button twice to set the modulation speed or the delay/reverb time to the corresponding interval — it doesn’t get much easier thanthat!If you don’t want to use an effect, press the BYPASS button. You can edit moreeffect parameters but you’ll have to read the manual to find out how.4. When you’ve come up with a sound you like, write it as described in “Storingyour program” (page 15).6
TREBLE, MIDDLE, and BASSThis trio of knobs allows you to dial in the exact amount of high, mid, and low frequencies.Also, as you’d expect (and hope!), the exact manner in which each oneof these controls behaves and also interacts with the others is dependant on thetype of sound selected. Turn to the “Sound Styles and Effects” section (page 18)for more information.MASTERThis adjusts the overall volume. This setting will vary the amount of distortion createdby the power amp.NOTE: <strong>The</strong> MASTER volume control is NOT programmable.NOTE: <strong>The</strong> GAIN control also affects the amount of distortion. For some settings,there may be virtually no distortion.3. EFFECT SECTIONHere you can make settings for effects and noise reduction. For details on each effect,refer to “Sound Styles and Effects” (page 18).EFFECTSSelects the type of effect. You can use the TAP button, EDIT 1 knob and Bypassbutton to adjust the parameters of each effect. When you select an effect type, theeffect parameters will be initialized and Effect Bypass will be defeated.EDIT 1Use this to adjust the parameters of each effect. By using this knob in conjunctionwith the TAP and BYPASS buttons as described below, you can adjust three differentparameters.• Turn EDIT 1 (without pressing a button) (EDIT 1)• Turn EDIT 1 while pressing TAP (EDIT 2)• Turn EDIT 1 while pressing BYPASS (EDIT 3)If the BYPASS LED is lit the effect is bypassed.If you want to adjust the noisereduction sensitivity you can hold down the TAP button and turn the EDIT 1 knobsimultaneously.NOTE: You can’t adjust the effect parameters while the BYPASS LED is lit.TAP (EDIT 2) and LEDThis button enables you to set the speed of a modulation-type effect such asCHORUS or FLANGER, or set DELAY times or REVERB lengths; simply pressthe button twice at the desired interval.<strong>The</strong> LED blinks at the specified speed or time.HINT: To set the time to exactly match the tempo of a song, press the TAP button severaltimes along with the song.8
HINT: You can also adjust the speed or time, by holding down the TAP button andturning the EDIT 1 knob. (This is the EDIT 2 mode)NOTE: If the BYPASS LED is lit, you won’t be able to use the TAP switch to set thetime. (<strong>The</strong> TAP LED will be dark.)BYPASS (EDIT 3) and LEDIf you don’t want to use an effect, press this button to turn the effect off (i.e.,bypassed). If the effect is bypassed, this LED will be lit.NOTE: You can’t adjust the effect parameters if the BYPASS LED is lit.HINT: While the effect is bypassed, you can adjust the noise reduction sensitivity byholding down the TAP button and turning the EDIT 1 knob.HINT: <strong>The</strong> bypass setting is remembered even when you switch modes, switch programsor turn off the power.HINT: <strong>The</strong> Bypass button can be used to modify effect parameters (EDIT 3). Pressand hold Bypass and simultaneously turn the EDIT 1 knob. See the chart on page 20for what parameters can be controlled.4. PRESET/MANUAL/CHANNEL SECTIONPRESET and LEDThis button puts your amp into Preset mode and you can use the STYLE selectorto select a “typical” setting for each type of amp sound. If the PRESET LED is lit,you’re in Preset mode!MANUAL and LEDThis button puts your amp into <strong>Manual</strong> mode which means the physical position ofeach knob (except for the EDIT 1 knob) determines exactly what you will hear.This means that the amp will operate just like a conventional guitar amp. If theMANUAL LED is lit, you’re in <strong>Manual</strong> mode.CH (Channel), CH1/CH2 LEDsThis button switches between the two channels and the LED of the selected channelwill light. In Preset or <strong>Manual</strong> mode, the CH1 and CH2 LEDs will be dark. Iffrom either of these modes you then press this CH button, you’ll switch to ChannelSelect mode, and the channel (CH1 or CH2) that you selected most recently willbecome active.WRITE buttonUse this button to save a new program into CH1 or CH2. Refer to “Storing yourprogram” (page 15).5. POWER SWITCHWhen the power is on, the indicator located above the switch will be lit.9
B. Rear Panel1 2 31. AC POWERThis is where you connect the included power cord.2. FOOT SWYou can connect the optional VFS2 dual foot switch here, and use it to switch programs orbypass the effect while you perform.3. LINE/PHONEUse this jack if you’re plugging directly in to a mixer, recording device, or if you’re usingheadphones. <strong>The</strong> output signal from this jack is taken before the power amp, and thecharacter of the guitar amp cabinet is applied to it.NOTE: Connecting headphones to this jack will mute the internal speaker.10
About the three operating modes<strong>The</strong> <strong>DA15</strong> contains eleven preset programs. To select one of these, enter Presetmode by pressing the PRESET button and turn the STYLE selector.<strong>The</strong>re are also two rewritable channel programs which you can select by pressingthe CH button or by using the optional VFS2 foot switch.PRESET MODE (SELECTING A PRESET PROGRAM)In Preset mode, simply turn the STYLE selector to choose a preset program that contains“typical” settings for each type of sound Style. <strong>The</strong> GAIN, VOLUME, TREBLE, MIDDLE,BASS, and effect settings will switch automatically.GETTING TO PRESET MODEIf the PRESET LED is dark, you’re not in Preset mode. Press the PRESET button tomake the PRESET LED light.NOTE: If the CH1 or CH2 LED is blinking (i.e., when you’re in the middle of selecting awriting-destination for the program) the PRESET LED won’t light when you press thePRESET button the first time. In this case, just press the PRESET button once again.SELECTING A PRESET PROGRAMWith the PRESET LED lit, turn the STYLE selector and the preset program for eachsound style will be selected. <strong>The</strong> physical settings of the top panel control knobs andEFFECTS selector are ignored at this time.HINT: If you want to bypass the effect, press the BYPASS button so the LED lit. If youwant to enable the effect, press the BYPASS button once again to cancel bypass. <strong>The</strong><strong>DA15</strong> remembers the bypass setting even if you switch modes, programs, or turn off thepower.CHANNEL SELECT MODE (SELECTING A CHANNEL PROGRAM)In Channel Select mode you can press the CH button to recall the program saved in eachchannel (CH1 and CH2), automatically switching all of the sound and effect parameters.GETTING TO CHANNEL SELECT MODEIf the CH1 and CH2 LEDs are dark, you’re not in Channel Select mode. Press the CHbutton so the CH1 or CH2 LED is lit, and you’ll be in Channel Select mode.NOTE: If the CH1 or CH2 LED is blinking (i.e., when you’re in the middle of selecting awriting-destination for the program), the program won’t switch when you press the CH buttonthe first time. In this case, press the TAP button to stop the blinking.11
SWITCHING CHANNELSWith either the CH1 or CH2 LED lit, press the CH switch. <strong>The</strong> channel will change eachtime you press the button, and the program stored in each channel will be recalled. (<strong>The</strong>physical settings of the top panel selector knobs and control knobs are ignored at thistime.)HINT: If the optional VFS2 dual foot switch is connected to the rear panel, you canuse it to switch programs. For details, refer to “Using the VSF2 dual foot switch”(page 17).HINT: If you want to bypass the effect, press the BYPASS button so the LED lit. Ifyou want to enable the effect press the BYPASS button once again to cancel bypass.<strong>The</strong> <strong>DA15</strong> remembers the bypass setting even if you switch modes, programs, or turnoff the power.MANUAL MODEWhen the <strong>DA15</strong> is in <strong>Manual</strong> mode, it works just like a conventional guitar amp. In otherwords, the positions of all top panel selectors and knobs (except for the EDIT 1 knob)indicate exactly what you’re hearing.GETTING TO MANUAL MODEIf the MANUAL LED is dark, you’re not in <strong>Manual</strong> mode. Press the MANUAL button; theMANUAL LED will light, and you’ll be in <strong>Manual</strong> mode.NOTE: If the CH1 or CH2 LED is blinking (i.e., when you’re in the middle of selecting awriting-destination for the program), the MANUAL LED won’t light when you press theMANUAL button the first time. In this case, simply press the MANUAL button once again.NOTE: In <strong>Manual</strong> mode when you edit parameters that aren’t defined by a knob setting(i.e., effect parameters or noise reduction settings), those settings are saved automatically,and will be recalled the next time you enter <strong>Manual</strong> mode. However if the EFFECTSselector is at a different position than it was when you were last in <strong>Manual</strong> mode, thedefault settings for the selected effect type will be loaded.HINT: If you want to bypass the effect, press the BYPASS button so the LED lit. If youwant to enable the effect press the BYPASS button once again to cancel bypass. <strong>The</strong><strong>DA15</strong> remembers the bypass setting even if you switch modes, programs, or turn off thepower.12
Creating and storing your own program<strong>The</strong>re are two ways you can do this; by tweaking an existing preset program that’sclose to what you have in mind, or by starting from scratch.CREATING YOUR OWN PROGRAMLet’s start from scratch.1. Choose any program in Preset or Channel Select mode, or select <strong>Manual</strong>mode.HINT: Since we’re starting from scratch it doesn’t matter what program you choose.2. Use the BYPASS button to bypass the effect. (<strong>The</strong> BYPASS LED is lit.) If youwant to use an effect, you can add it at the end of this process.3. Use the STYLE selector to select the type of amp sound you want to use.HINT: For details on the sound Styles, refer to “Sound Styles and Effects” (page 18).4. Adjust the top panel GAIN, VOLUME, TREBLE, MIDDLE, and BASS knobs.5. Hold down the TAP button and turn the EDIT 1 knob to adjust the noisereduction. This setting is also saved as part of your program. For details,refer to “Adjusting the noise reduction” (page 14)HINT: Adjust the noise reduction so that you don’t hear noise when you’re not playingyour guitar.6. If you want to use an effect, press the BYPASS switch once again to turnbypass off (the BYPASS LED goes dark).7. Select an effect, and make adjustments. For example if you want to adddelay, turn the EFFECT selector to “DELAY.” If the selector is already set to“DELAY,” you’ll have to turn it to a different effect and then back to “DELAY.”Use the TAP button or EDIT 1 knob to adjust the delay time and delay level (theamount of the delayed sound).DELAY TIME:DELAY LEVEL:DELAY FEEDBACK:Press the TAP button twice (at the desired interval), or holddown the TAP button and turn EDIT 1.Turn EDIT 1 (without pressing any button).Turn EDIT 1 while holding down the BYPASS button.HINT: For details on the effects, refer to “Sound Styles and Effects” (page 18).13
8. When you’ve come up with a sound you like, store the program.NOTE: In Preset or Channel Select mode, the changes you made will be lost if youswitch to a different program, <strong>Manual</strong> mode or turn off the power without storing theprogram first.NOTE: <strong>The</strong> effect bypass setting isn’t stored as part of the program.ADJUSTING THE NOISE REDUCTIONHere’s how to adjust the noise reductionHINT: When you use a high-gain amp type such as “HIGAIN1,” “HIGAIN2” or“HIGAIN3,” we recommend that you use noise reduction.NOTE: <strong>The</strong> noise reduction setting is part of each program. In Preset and ChannelSelect modes, your setting will be lost if you switch to a different program, to <strong>Manual</strong>mode or turn off the power without storing your edited program first.1. Press the BYPASS button to make the BYPASS LED light.2. Hold down the TAP button and turn the EDIT 1 knob to adjust the noisereduction sensitivity. Turning the knob toward the right will produce morenoise reduction (less noise). If you turn the knob all the way to the left, noisereduction will be off.NOTE: Depending on the guitar and pickups you’re using, excessively high noisereduction settings may cause notes to be cut off in an unwanted manner!3. If you want to use effects, press the BYPASS button to make the BYPASSLED go dark and the effect(s) will be heard.14
STORING YOUR PROGRAMWhen you’ve come up with a sound you like, you should store (write) the program.1. Press the WRITE button. <strong>The</strong> CH1 or CH2 LED will blink.2. Press the CH button to select the channel to where you want to store yourprogram. <strong>The</strong> program will be stored in the channel where the indicator isblinking.HINT: If, during this process, you decide that you really don’t want to store the program,you can press the TAP button to cancel at this point. <strong>The</strong> LED will stop blinking,and you’ll return to the mode which you were in.3. Press the WRITE button once again. Your program will be saved in the specifiedchannel, and the LED of the destination channel will stop blinking andremain lit.NOTE: <strong>The</strong> program that was previously stored in that channel will be overwritten; inother words, the settings that used to be stored in the channel you selected in step 2will be erased.NOTE: <strong>The</strong> effect bypass setting isn’t stored as part of the program.NOTE: If you’re creating your sound in Preset or Channel Select mode, your changeswill be lost if you switch to a different program or to <strong>Manual</strong> mode before storing.CHECKING THE SETTINGS OF A PROGRAM (ORIGINAL VALUES)If you want to find out exactly what settings are saved in a preset or user program, youcan use the Original Value function.When you’re turning a knob to adjust the value of a parameter, and the value at thatmoment matches the value that is saved in the program (i.e., the “original value”), thePRESET LED will blink if you’re in Preset mode, or the channel LED will blink if you’re inChannel Select mode.HINT: When you’ve found a program you like, and want to know just what settings itcontains, simply use this Original Value function!NOTE: <strong>The</strong> settings of the top panel MASTER volume and the rear panel POWERLEVEL controls aren’t part of the program, which means that the Original Value functionisn’t available for these knobs. Also, the Original Value function doesn’t operate inmanual mode.15
RESTORING THE FACTORY SETTINGSHere’s how you can restore the factory settings.NOTE: If you do this, the programs you saved in Channel 1 and 2 will be completelyerased, and will be reset to the factory settings.NOTE: Effect and noise reduction settings made in the <strong>Manual</strong> mode will also be erased.NOTE: Never turn off the power while initialization is taking place.1. Turn the power off.2. While holding down both the CH and WRITE buttons, turn the power on.When the CH1 and CH2 LEDs begin blinking, release these two buttons.HINT: If you decide to abort this operation, press the TAP switch at this point.3. Now press the WRITE switch and the CH1 and CH2 LEDs will change fromblinking to lit. Initialization will be completed in a few seconds, and the ampwill switch to Preset mode.16
Using the VFS2 dual foot switchIf the optional VFS2 dual foot switch is connected to the rear panel FOOT SW jack, youcan use it to switch programs or turn effect bypass on/off.VFS2 left switch (switch 1): Switches channel programsVFS2 right switch (switch 2): Switches bypass on/off, or turn<strong>Manual</strong> mode onSWITCHING THE CHANNEL PROGRAM (SWITCH 1)Each time you press the VFS2’s left switch (switch 1), you’ll alternate between CH1 andCH2.NOTE: Switch 1 has the same function as the channel select switch on the top panel. Ifyou press switch 1 in Preset mode or <strong>Manual</strong> mode, you’ll change over to Channel Selectmode. Also, pressing switch 1 during the process of storing a program (the CH1 or CH2LED is blinking) will change the store-destination.TURNING EFFECT BYPASS ON/OFF (SWITCH 2)Hold down the top panel BYPASS switch and press the VFS2’s right switch (switch 2).This assigns the function of switch 2 as “bypass on/off.” Now when you press switch 2,effect bypass will alternately be turned on/off.HINT: <strong>The</strong> amp will remember the switch 2 assignment. This setting is remembered evenif you switch modes, programs or turn off the power.SWITCHING TO MANUAL MODE (SWITCH 2)Hold down the top panel MANUAL switch and press the VFS2’s right switch (switch 2).This assigns the function of switch 2 as “<strong>Manual</strong> mode.” Now when you press switch 2,the amp will switch to <strong>Manual</strong> mode.HINT: <strong>The</strong> amp will remember the switch 2 assignment. This setting is remembered evenif you switch modes, programs or turn off the power.17
Sound Styles and EffectsIn this section, we’ll discuss the eleven sound styles and effects.STYLESYou know that there is a plethora of great sounding amps out there, and that the quest forthe ultimate sound can be endless. After countless hours of soul searching, earnest discussions(not to mention the occasional friendly argument!), calls to tone-wise friends(some professional players, some not ... but all blessed with great ears)—plus, of course,listening and playing—a top eleven list was finally drawn up. As you’re about to discover,the ones we went with are not only the cream of the crop but also offer up the widest possiblearray of the greatest guitar tones known to humans—from pristine clean to outrageousoverdrive and all points in-between.1. CLEAN 1This style has a beautifully responsive, rounded low-end, delightfully transientmid-range attack and sweet treble making it the perfect partner for single- coilpickups. Strummed chords just ring out and blossom.2. CLEAN 2This style’s clean sound is very tight “n” twangy, with a deep, taut, piano-like bass.3. BLUES 1This style is very responsive to picking dynamics and guitar volume settings.Backing-off your guitar’s volume can produce a beautifully clean and full tone. Italso means that you can make notes or chords more distorted or clean dependingon how hard or soft you pick.4. BLUES 2This style has a thick tone with second and third order harmonics that increase asthe amp is cranked.5. BLUES 3This instantly recognisable signature tone produces clean sounds that are rich andjangly with a smooth yet detailed top end, and overdrives that have a glorious, throatybark.6. CRUNCH 1This organic sounding style is dynamically rich and warm, yet biting and distinct!Rolling back your guitar’s volume results in a unique and highly usable cleansound.18
7. CRUNCH 2This style has a fat, roaring sound with a distinctive, cranium-crushing crunch.Rolling back your guitar’s volume produces a bright, clean sound that’s perfect forchord work and will cut through any mix.8. HIGAIN 1This style’s toneful, high gain punch and girth results in a highly aggressive, tonebreathingmonster capable of mondo-gain while retaining individual note definition.9. HIGAIN 2<strong>The</strong> deep, loose low-end, some-what “fizzy” top and monstrousgain will make this style a mainstay for modern, players who tune low.At low GAIN settings, this produces a distinctive, bright clean sound bolstered byrich, upper harmonics that add fullness and dimension.10. HIGAIN 3This is capable of a powerful, heavily saturated sound that combines an open lowendwith compressed mids and highs. <strong>The</strong> result is a tone that remains focusedand well defined at even the most extreme gain settings.11. DRIVEThis style has a spectacular overdriven sound that’s perfect for sax-like, legatosoloing. With its GAIN control wide-open, it produces a stunning sustain which isvery smooth and soulful.19
COMPWant to play a clean passage that needs to be nice, smooth, and even? Need a bit moresustain on a lead line? <strong>The</strong>n look no further; COMP is the effect for you. It’s modeled on acompressor pedal that is hugely popular due to the percussive clean sound it can produce— making it perfect for ’80s and ’90s pop and funk rhythm work. It can also add asinging, mellow, sustain to lead lines — clean or dirty.EDIT 1 “SENS” Adjusts the sensitivity of the compressor. Turningthe knob toward the right will increase the amount ofcompression and sustain. If you turn the knob all theway to the left, the effect is OFF.EDIT 2[TAP+EDIT 1]“ATTACK” Adjusts the strength of the attack.HINT: In the COMP+PHASER and COMP+CHORUS combination effects, the ATTACKparameter is already set to the optimal value.PHASERA model of a much respected and popular analogue phaser, housed in a banana yellowbox!TAP “SPEED” Sets the modulation speed in a range of 0.1...10 [Hz].EDIT 2[TAP+EDIT 1]“SPEED”This lets you use the knob to make fine adjustmentsto the parameter.EDIT 3“RESONANCE” Adjusts the amount of resonance.[BYPASS+EDIT 1]CHORUSThis models the rich sound of an analog chorus unit.TAP “SPEED” Sets the modulation speed in a range of 0.1...10 [Hz].EDIT 2[TAP+EDIT 1]“SPEED”This lets you use the knob to make fine adjustmentsto the parameter.HINT: In the CHORUS+DELAY combination effect, the SPEED parameter is already setto the optimal value.EDIT 3“MIX”[BYPASS+EDIT 1]Adjusts the mix amount of the effect.21
FLANGERA model of a truly classic flanger that “unchained” a highly influential modern guitaristwho many hail as the “godfather of two-handed tapping.”TAP “SPEED” Sets the modulation speed in a range of 0.1...10 [Hz].EDIT 2[TAP+EDIT 1]“SPEED”This lets you use the knob to make fine adjustmentsto the parameter.EDIT 3“RESONANCE” Adjusts the amount of resonance.[BYPASS+EDIT 1]TREMOLOThis effect is based on the highly acclaimed tremolo circuit found in some guitar amps.TAP “SPEED” Sets the tremolo speed in a range of 2.5...10 [Hz].EDIT 2“SPEED”[TAP+EDIT 1]EDIT 3“DEPTH”[BYPASS+EDIT 1]This lets you use the knob to make fine adjustmentsto the parameter.Adjusts the tremolo depth.ROTARYThis models a rotary speaker.TAP “SPEED” Sets the rotational speed of the speaker in a range of0.8...10 [Hz].EDIT 2“SPEED”[TAP+EDIT 1]EDIT 3“SENS”[BYPASS+EDIT 1]This lets you use the knob to make fine adjustmentsto the parameter.By adjusting this parameter you can make the rotationalspeed change automatically in response to thevolume of your guitar. If you use this function, set theSPEED to a slow setting.22
DELAYThis is a model of one of the most respected analogue tape echo machines ever made.In the original, the “echo” is produced by a playback head and the exact “delay time” isset by varying the motor speed. Many professionals prefer these “lo-fi” units because ofthe warm, dark echoes they produce.TAP “TIME” Sets the delay time in a range of 1...1486 [ms].EDIT 1 “MIX” Adjusts the mix amount of the delay.EDIT 2“TIME”[TAP+EDIT 1]EDIT 3“FEEDBACK”[BYPASS+EDIT 1]This lets you use the knob to make fine adjustmentsto the parameter.Adjusts the amount of feedback.HINT: In the CHORUS+DELAY combination effect, the FEEDBACK parameter is alreadyset to the optimal value.WARNING! If you crank up the FEEDBACK too much, an uncontrollable, cascading “runaway”of echoes will occur. So, use your ears and your common sense when setting this!REVERBA model of the most popular spring reverb system used in guitar amps.TAP “TIME” Sets the reverb time in a range of 0.8...8 [seconds].EDIT 1 “MIX” Adjusts the mix amount of the reverb.EDIT 2“TIME” This lets you use the knob to adjust the reverb time.[TAP+EDIT 1]EDIT 3[BYPASS+EDIT 1]“HI DAMP” Adjusts the dampening of the high-frequency range.HINT: In combination effects, the TIME and HI DAMP parameters are already set to optimalvalues.23
Troubleshooting1. <strong>The</strong> amp isn’t powering up when the POWER switch is ON.➢ Is the power cable plugged into the AC power connector on the rear panel of theamp?➢ Is the power cable plugged into an AC outlet?➢ Is the AC outlet switched on and actually working?➢ Does the power cable work?2. <strong>The</strong>re’s no sound coming from the amp➢ Is your guitar turned up?➢ Are both ends of your guitar cable plugged into where they should be?➢ Is your guitar cable working?➢ Is the top panel MASTER volume turned up?➢ Do you have headphones or anything else plugged into the amp’s rear panelLINE/PHONE jack? If “yes,” unplug!➢ Check the settings of the GAIN, VOLUME, TREBLE, MIDDLE and BASS. On certainstyles, if the TREBLE, MIDDLE, and BASS controls are all turned down, therewill be little or no sound coming from the amp due to the way the circuit of the originalworks.➢ If you’re in <strong>Manual</strong> mode (the MANUAL LED lit), turn the following controls abovetheir minimum setting: GAIN, VOLUME, TREBLE, MIDDLE, and BASS.3. <strong>The</strong> amp doesn’t seem very loud➢ Is your guitar turned up?➢ Is the amp’s MASTER volume turned down low?➢ Check the settings of the GAIN, VOLUME, TREBLE, MIDDLE, and BASS controls.On certain styles, if the TREBLE, MIDDLE, and BASS controls are all turneddown, there will be little or no sound coming from the amp due to the way the circuitof the original works.➢ If you’re in <strong>Manual</strong> mode (the MANUAL LED lit), turn the following controls abovetheir minimum setting: GAIN, VOLUME, TREBLE, MIDDLE, and BASS.24
4. <strong>The</strong>re’s no sound from the LINE/PHONE jack when you use it.➢ Check that the top panel MASTER volume isn’t turned all the way down.➢ Make sure sound is coming from the amp.IMPORTANT NOTE: You’ll need to unplug your headphones or cable from the LINE/PHONE jack to do this, since plugging something into this jack automatically mutesthe amp’s speakers. If there’s still no sound from the amp, go to page 24 “<strong>The</strong>re’s nosound coming from the amp.” If you do hear sound, check the headphones or cableyou are hooking up to this jack.5. You can’t hear any effects.➢ Check that the BYPASS LED isn’t lit. If it is lit, the effect is bypassed. Press theBYPASS button to disengage it; the BYPASS LED will go off.➢ Is the EDIT 1 knob turned down too low? Adjust the EDIT 1 knob.25
SpecificationsNumber of styles: 11Number of effects: 11Noise reduction: 1Number of programs: 11 preset, 2 userInput/output jacksTop panel: 1 x INPUTRear panel: 1 x FOOT SW jack, 1 x LINE/PHONE jackPower amp output:Maximum 15W RMS @ 8 ohmsSpeaker:1 x <strong>VOX</strong> original (8 inch 8 ohm)Signal processingA/D conversion: 24-bitD/A conversion: 24-bitSampling frequency: 44.1 kHzPower supply requirements: AC, local voltagePower consumption:23WDimensions (W x D x H): 427 x 226 x 387 (mm)/16.81 x 8.90 x 15.24 (inches)Weight:10 Kg/22.05 (lbs.)Included items:Power cableOptions (sold separately): VFS2 dual foot switch* Appearance and specifications of this product are subject to change withoutnotice.URL = http://www.voxamps.co.uk26
Programmer’s Cheat SheetWanna remember how you set up your favorite programs? Well, this is the place to do it!Simply copy the sheet below and mark up by drawing lines or coloring. Don't forget tomake notes on NR!PROGRAM NAME:EDIT2(TAP + EDIT):/TAPNOTE:EDIT3(BYPASS + EDIT):NR (NOISE REDUCTION):PROGRAM NAME:EDIT2(TAP + EDIT):/TAPNOTE:EDIT3(BYPASS + EDIT):NR (NOISE REDUCTION):27
IMPORTANT NOTICE TO CONSUMERSThis product has been manufactured according to strict specifications and voltage requirements that are applicablein the country in which it is intended that this product should be used. If you have purchased this product via theinternet, through mail order, and/or via a telephone sale, you must verify that this product is intended to be used inthe country in which you reside.WARNING: Use of this product in any country other than that for which it is intended could be dangerous and couldinvalidate the manufacturer’s or distributor’s warranty.Please also retain your receipt as proof of purchase otherwise your product may be disqualified from themanufacturer’s or distributor’s warranty.Owner’s <strong>Manual</strong> E 1© 2005 <strong>VOX</strong> AMPLIFICATION LTD.