RX/RX DI/GTX DI - Sea-Doo.net
RX/RX DI/GTX DI - Sea-Doo.net
RX/RX DI/GTX DI - Sea-Doo.net

You also want an ePaper? Increase the reach of your titles
YUMPU automatically turns print PDFs into web optimized ePapers that Google loves.
2000Shop ManualVOLUME 2<strong>RX</strong><strong>RX</strong> <strong>DI</strong><strong>GTX</strong> <strong>DI</strong>
Legal deposit:National Library of Quebec2 nd trimester 2000National Library of CanadaAll rights reserved. No parts of this manual may be reproduced in anyform without the prior written permission of Bombardier Inc.©Bombardier Inc. 2000Technical PublicationsBombardier Inc.Valcourt (Quebec) CanadaPrinted in Canada®*Registered trademarks of Bombardier Inc.Loctite ® is a trademark of Loctite CorporationSnap-on ® is a trademark of Snap-on Tools CorporationGelcote ® is a trademark of Gelcote International Limited
TABLE OF CONTENTSSECTION SUBSECTION PAGESAFETY NOTICE ....................................................................................................................................... IIIINTRODUCTION ....................................................................................................................................... IV01 SERVICE TOOLSAND PRODUCTS01 - Table of contents .......................................................................... 01-01-102 - Mandatory service tools................................................................ 01-02-103 - Optional service tools.................................................................... 01-03-104 - Service products ........................................................................... 01-04-102 MAINTENANCE 01 - Table of contents .......................................................................... 02-01-102 - Periodic inspection chart ............................................................... 02-02-103 - Flushing and lubrication................................................................. 02-03-104 - Water-flooded engine.................................................................... 02-04-105 - Storage.......................................................................................... 02-05-103 TROUBLESHOOTING 01 - Troubleshooting chart ................................................................... 03-01-104 ENGINE 01 - Table of contents .......................................................................... 04-01-102 - Leak test ....................................................................................... 04-02-103 - Removal and installation................................................................ 04-03-104 - Mag<strong>net</strong>o system ........................................................................... 04-04-105 - Top end ......................................................................................... 04-05-106 - Bottom end ................................................................................... 04-06-107 - Exhaust system............................................................................. 04-07-105 ENGINEMANAGEMENT (<strong>DI</strong>)01 - Table of contents .......................................................................... 05-01-102 - Overview ....................................................................................... 05-02-103 - Component inspection and adjustment ........................................ 05-03-104 - Diagnostic procedures................................................................... 05-04-106 COOLING SYSTEM 01 - Table of contents .......................................................................... 06-01-102 - Circuit, components and care........................................................ 06-02-107 FUEL SYSTEM 01 - Table of contents .......................................................................... 07-01-102 - Fuel circuit..................................................................................... 07-02-103 - Air intake ....................................................................................... 07-03-104 - Carburetor ..................................................................................... 07-04-108 LUBRICATIONSYSTEM09 ELECTRICALSYSTEM10 PROPULSIONSYSTEM01 - Table of contents .......................................................................... 08-01-102 - Oil injection system....................................................................... 08-02-103 - Oil injection pump ......................................................................... 08-03-101 - Table of contents .......................................................................... 09-01-102 - Ignition system.............................................................................. 09-02-103 - Charging system ........................................................................... 09-03-104 - Starting system ............................................................................. 09-04-105 - Instruments and accessories ........................................................ 09-05-106 - Digitally encoded security system (DESS) .................................... 09-06-101 - Table of contents .......................................................................... 10-01-102 - Jet pump ....................................................................................... 10-02-103 - Drive system ................................................................................. 10-03-104 - Reverse system ............................................................................ 10-04-105 - Variable trim system...................................................................... 10-05-1SMR2000_036_00A2.FMI
TABLE OF CONTENTSSECTION SUBSECTION PAGE11 STEERING SYSTEM 01 - Table of contents .......................................................................... 11-01-102 - Steering system............................................................................ 11-02-103 - Adjustable steering ....................................................................... 11-03-104 - Alignment ..................................................................................... 11-04-112 HULL/BODY 01 - Table of contents .......................................................................... 12-01-102 - Adjustment and repair .................................................................. 12-02-113 TECHNICAL DATA 01 - <strong>RX</strong> ................................................................................................. 13-01-102 - <strong>RX</strong> <strong>DI</strong> and <strong>GTX</strong> <strong>DI</strong> ......................................................................... 13-02-114 WIRING <strong>DI</strong>AGRAMS 01 - Wiring diagrams............................................................................ 14-01-1IISMR2000_036_00A2.FM
SAFETY NOTICESAFETY NOTICE 0This manual has been prepared as a guide to correctly service and repair some 2000 SEA-DOO watercraft.See model list below.This edition was primarily published to be used by watercraft mechanic technicians who are alreadyfamiliar with all service procedures relating to Bombardier made watercraft. Mechanic technicians shouldintent to continuous training courses given by Bombardier Training Dept.Please note that the instructions will apply only if proper hand tools and special service tools are used.This Shop Manual uses technical terms which may be slightly different from the ones used in the PartsCatalog.It is understood that this manual may be translated into another language. In the event of any discrepancy,the English version shall prevail.The content depicts parts and/or procedures applicable to the particular product at time of writing. Serviceand Warranty Bulletins may be published to update the content of this manual. Make sure to read andunderstand these.In addition, the sole purpose of the illustrations throughout the manual, is to assist identification of thegeneral configuration of the parts. They are not to be interpreted as technical drawings or exact replicasof the parts.The use of Bombardier parts is most strongly recommended when considering replacement of any component.Dealer and/or distributor assistance should be sought in case of doubt.The engines and the corresponding components identified in this document should not be utilized onproduct(s) other than those mentioned in this document.Torque wrench tightening specifications must be strictly adhered to. Locking devices (ex.: locking tab,self-locking fasteners, etc.) must be installed or replaced with new ones. If the efficiency of a lockingdevice is impaired, it must be renewed.This manual emphasizes particular information denoted by the wording and symbols: WARNINGIdentifies an instruction which, if not followed, could cause serious personal injury includingpossibility of death.CAUTION: Denotes an instruction which, if not followed, could severely damage vehicle components.NOTE: Indicates supplementary information needed to fully complete an instruction.Although the mere reading of such information does not eliminate the hazard, your understanding of theinformation will promote its correct use. Always use common shop safety practice.Bombardier Inc. disclaims liability for all damages and/or injuries resulting from the improper use of thecontents. We strongly recommend that any services be carried out and/or verified by a highly skilledprofessional mechanic. It is understood that certain modifications may render use of the vehicle illegalunder existing federal, provincial and state regulations.SMR2000_036_00A2.FMIII
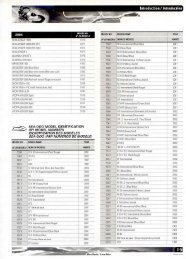
INTRODUCTIONINTRODUCTION 0This Shop Manual covers the following BOMBAR-<strong>DI</strong>ER made SEA-DOO ® 2000 watercraft models.MODELSMODELNUMBER<strong>RX</strong> ........................................................ 5513<strong>RX</strong> International .................................. 5514<strong>RX</strong> <strong>DI</strong> .................................................... 5646<strong>RX</strong> <strong>DI</strong> International ............................. 5656<strong>GTX</strong> <strong>DI</strong> ................................................ 5649<strong>GTX</strong> <strong>DI</strong> International .......................... 5659<strong>GTX</strong> ModelsIt is located on floorboard at the rear of the watercraft.HULL IDENTIFICATION NUMBER(H.I.N.)<strong>RX</strong> ModelsIt is located on footboard at the rear of watercraft.F08L0QA 1TYPICAL1. Hull Identification Number (H.I.N.)All ModelsThe Hull Identification Number is composed of 12digits:Z Z N 1 2 3 4 5 L 4 9 5F00A0CBSerialnumber*ManufacturerModel yearYear of productionMonth of production*A letter may also be used as a digit.F00L2EA 1<strong>RX</strong>/<strong>DI</strong> MODELS1. Hull Identification Number (H.I.N.)IVSMR2000_036_00A2.FM
INTRODUCTIONENGINE IDENTIFICATIONNUMBER (E.I.N.)The Engine Identification Number is located on theupper crankcase on MAGNETO side.F06D15A 11. Engine Identification Number (E.I.N.)ARRANGEMENT OF THISMANUALThe manual is divided into 14 major sections:01 SERVICE TOOLS AND PRODUCTS02 MAINTENANCE03 TROUBLESHOOTING04 ENGINE05 ENGINE MANAGEMENT (<strong>DI</strong>)06 COOLING SYSTEM07 FUEL SYSTEM08 LUBRICATION SYSTEM09 ELECTRICAL SYSTEM10 PROPULSION SYSTEM11 STEERING SYSTEM12 HULL/BODY13 TECHNICAL DATA14 WIRING <strong>DI</strong>AGRAMSSeveral sections are divided in various subsections.There is a table of contents at the beginning ofmany sections.SMR2000_036_00A2.FMV
INTRODUCTIONTYPICAL PAGEPage headingindicates sectionand subsectiondetailed.Subsection titleindicatesbeginning of thesubsection.Subsection 04(MAGNETO SYSTEM)Italic sub-titleabove explodedview indicatepertaining models.Drop representsa liquid productto be applied to asurface. In this caseLoctite 243 toscrew threads.Loctite243Exploded view assitsyou in identifyingparts and relatedpositions.Loctite243Loctite243Loctite243Dotted boxcontains parts ofa particularmodel or anexploded view.Loctite243Bold face numberindicates specialprocedureconcerning this part.Loctite648145 N•m(107 lbf•ft)Anti-seizelubricantIllustration numberfor publishingprocess.F01D4WS03-04-1Page numbering system:03: ENGINE section04: MAGNETO SYSTEM subsection1: First page of this subsectionF01A0CSVISMR2000_036_00A2.FM
INTRODUCTIONTYPICAL PAGESub-title with partname(s) fromexploded view.Section 06 FUEL SYSTEMSubsection 03 (CARBURETORS)Title indicates mainprocedure to becarried-out.Service tool to beused to perform acertain procedure.Title in italic indicates aparticular procedureconcerning a model.CARBURETOR REMOVALTo remove carburetors from engine, proceed as follows:Remove air vent tube support.Unlock retaining slides holding air intake silencer base.Remove air intake silencer base from watercraft.Remove screws holding flame arrester base supportto cylinder head cover.Unscrew base retaining screws then remove base fromcarburetors and move to front of watercraft.Turn the valve to OFF position.NOTE: For fuel line removal, use pliers (P/N 295000 054).Disconnect pulse line from fuel pump.Disconnect fuel fuel supply line from fuel pump.Disconnect fuel return line.Disconnect oil injection pump cable, throttle cable andchoke cable.XP Model OnlyRemove screws no. 6 and lock washers no. 7 retainingcarburetors.<strong>DI</strong>SASSEMBLY AND INSPECTIONInspect parts for corrosion dammage (shaft, butterfly,spring screw, check valve housing, etc.).DiaphragmPUMP <strong>DI</strong>APHRAGM LEAK TESTUsing a suitable pump gauge tester, perform the followingtest proceeding as follows:- Install pump gauge tester (P/N 295 000 083) on pulsenipple.- Pump tester until it reaches 28 kPa (4 PSI).1ASub-sub-title incapital indicates aparticular testing,adjustment orrepair procedure.Illustrationalways followstext it ispertained to.Sub-sub-title in thiscase indicates thatparticular procedurefor XP is finished, sofrom this point, allothers models areconcerned.All Others ModelsRemove 4 bolts no. 8 and lock washers no. 12 fromrotary valve cover then move carburetors and rotaryvalve cover on top of engine.NOTE: When removing rotary valve cover , payattention that the rotary valve stay in place, other-wiseit must be timed.Remove carburetors from intake manifold.Disconnect fuel bypass line between carburetors (twincarburetors).Remove carburetor(s) from rotary valve cover.F01F0XBTYPICAL1221 2Diaphragm must stand pressure for 10 seconds. Ifpressure drops, replace diaphragm."TYPICAL" mentionindicates a generalview which does notrepresent full detail.Numbers in a frameare used to give asequence to beperfomed.Letters are used forany measures.06-03-4Bold numbers in thetext refer to the partsshown in the explodedview at the beginningof the subsection.Numbers are usedfor description ofcomponents.F01A0BSSMR2000_036_00A2.FMVII
INTRODUCTIONLIST OF ABBREVIATIONS USE<strong>DI</strong>N THIS MANUALACAPSATSB.U.D.S.C<strong>DI</strong>CPSCSIDCDESSE.I.N.ECUEPAHPLEDMAGMPEMMPHMPIN.A.OPTP/NPFDPSIPTORAVERFIRPMSTDTPSVDCVCKVDCVTSWTSAlternate CurrentDESCRIPTIONAir Pressure SensorAir Temperature SensorBombardier Utility and DiagnosticSoftwareCapacitor Discharge IgnitionCrankshaft Position SensorCooling System IndicatorDirect CurrentDigitally Encoded Security SystemEngine Identification NumberElectronic Control UnitEnvironmental Protection Agency (USA)Horse PowerLight Emitting DiodeMag<strong>net</strong>oMulti-Purpose Electronic ModuleMile Per HourMulti Protocol InterfaceNot ApplicableOptionalPart NumberPersonal Flotation DevicePound Per Square InchPower Take OffRotax Adjustable Variable ExhaustRotax Fuel InjectionRevolution Per MinuteStandardThrottle Position SensorVolt Direct CurrentVehicle Communication KitVolt Direct CurrentVariable Trim SystemWater Temperature SensorGENERAL INFORMATIONThe use of RIGHT and LEFT indications in the text,always refers to driving position (when sitting onwatercraft).F01L45B1. Left (port)2. Right (starboard)1 2The information and component/system descriptionscontained in this manual are correct at timeof publication. Bombardier Inc. however, maintainsa policy of continuous improvement of itsproducts without imposing upon itself any obligationto install them on products previously manufactured.Bombardier Inc. reserves the right at any time todiscontinue or change specifications, designs,features, models or equipment without incurringobligation.This Shop Manual uses technical terms whichmay be different from the ones of the Parts Catalogs.When ordering parts always refer to the specificmodel Parts Catalogs.ILLUSTRATIONS ANDPROCEDURESThe illustrations show the typical construction ofthe different assemblies and, in all cases, may notreproduce the full detail or exact shape of the partsshown, however, they represent parts which havethe same or a similar function.CAUTION: These watercraft are designed withparts dimensioned in both the metric and theimperial systems. When replacing fasteners,make sure to use only those recommended byBombardier.As many of the procedures in this manual are interrelated,we suggest, that before undertakingany task, you read and thoroughly understand theentire section or subsection in which the procedureis contained.VIIISMR2000_036_00A2.FM
INTRODUCTIONA number of procedures throughout the book requirethe use of special tools. Before undertakingany procedure, be sure that you have on hand allthe tools required, or approved equivalents.ENGINE EMISSIONSINFORMATIONManufacturer’s ResponsibilityBeginning with 1998 model year engines, manufacturersof marine engines must determine the exhaustemission levels for each engine horsepowerfamily and certify these engines with the UnitedStates Environmental Protection Agency (EPA). Acertification decal/emissions control informationlabel, showing emission levels and engine specificationsdirectly related to emissions, must beplaced on each vehicle at the time of manufacture.Dealer ResponsibilityWhen performing service on all 1998 and later watercraftsthat carry a certification, attention mustbe given to any adjustments that are made thataffect emission levels.Adjustments must be kept within published factoryspecifications.Replacement or repair of any emission relatedcomponent must be executed in a manner thatmaintains emission levels within the prescribedcertification standards.Dealers are not to modify the engine in any mannerthat would alter the horsepower or allow emissionlevels to exceed their predetermined factoryspecifications.Exceptions include manufacturers prescribedchanges, such as that for altitude adjustments.Owner ResponsibilityThe owner/operator is required to have enginemaintenance performed to maintain emission levelswithin prescribed certification standards.The owner/operator is not to modify the engine inany manner that would alter the horsepower orallow emissions levels to exceed their predeterminedfactory specifications.Single engine exceptions may be allowed withpermission from the EPA for racing and testing.EPA Emission RegulationsAll new 1998 and later watercrafts manufacturedby Bombardier are certified to the United StatesEnvironmental Protection Agency as conformingto the requirements of the regulations for the controlof air pollution from new watercraft engines.This certification is contingent on certain adjustmentsbeing set to factory standards. For this reason,the factory procedure for servicing the productmust be strictly followed and, wheneverpracticable, returned to the original intent of thedesign.The responsibilities listed above are general and in noway a complete listing of the rules and regulationspertaining to the EPA laws on exhaust emissions formarine products. For more detailed information onthis subject, you may contact the following locations:VIA U.S. POSTAL SERVICE:Office of Mobile SourcesEngine Programs and Compliance DivisionEngine Compliance Programs Group (6403J)401 M St. NWWashington, DC 20460VIA EXPRESS or COURIER MAIL:Office of Mobile SourcesEngine Programs and Compliance DivisionEngine Compliance Programs Group (6403J)501 3 rd St. NWWashington, DC 20001EPA INTERNET WEB SITE:http:/www.epa.gov/omswwwSELF-LOCKING FASTENERSPROCEDUREThe following describes the most common applicationprocedures when working with self-lockingfasteners.Use a metal brush or a screwtap to clean the holeproperly then use a solvent (Methyl-Chloride), letact during 30 minutes and wipe off. The solventutilization is to ensure the adhesive works properly.SMR2000_036_00A2.FMIX
INTRODUCTIONLOCTITE APPLICATIONPROCEDUREThe following describes the most common applicationprocedures when working with Loctiteproducts.NOTE: Always use proper strength Loctite productas recommended in this Shop Manual.ThreadlockerUncovered Holes (bolts and nuts)Blind Holes21A00A3MA2A00A3LA1. Apply here2. Do not apply11. Clean threads (bolt and nut) with solvent.2. Apply Loctite Primer N (P/N 293 800 041) onthreads and allow to dry.3. Choose proper strength Loctite threadlocker.4. Fit bolt in the hole.5. Apply a few drops of threadlocker at proposedtightened nut engagement area.6. Position nut and tighten as required.1. On threads2. On threads and at the bottom of hole1. Clean threads (bolt and hole) with solvent.2. Apply Loctite Primer N (P/N 293 800 041) onthreads (bolt and nut) and allow to dry for 30seconds.3. Choose proper strength Loctite threadlocker.4. Apply several drops along the threaded hole andat the bottom of the hole.5. Apply several drops on bolt threads.6. Tighten as required.Stud in Blind Holes21 3A00A5RA1. On threads2. On threads and in the hole3. Onto nut threadsXSMR2000_036_00A2.FM
INTRODUCTION1. Clean threads (stud and hole) with solvent.Adjusting Screw2. Apply Loctite Primer N (P/N 293 800 041) onthreads and allow to dry.3. Put several drops of proper strength Loctitethreadlocker on female threads and in hole.124. Apply several drops of proper strength Loctiteon stud threads.5. Install stud.6. Install cover, etc.7. Apply drops of proper strength Loctite on uncoveredthreads.8. Tighten nuts as required.Preassembled PartsA00A3PA1. Apply here2. Plunger11. Adjust screw to proper setting.2. Apply drops of proper strength Loctite threadlockeron screw/body contact surfaces.3. Avoid touching metal with tip of flask.NOTE: If it is difficult to readjust, heat screw witha soldering iron (232°C (450°F)).Stripped Thread RepairStripped Threads2A00A3OA1. Apply here2. Do not apply1. Clean bolts and nuts with solvent.2. Assemble components.215863. Tighten nuts.4. Apply drops of proper strength Loctite on bolt/nutcontact surfaces.35. Avoid touching metal with tip of flask.A00A3QA47NOTE: For preventive maintenance on existingequipment, retighten nuts and apply properstrength Loctite on bolt/nut contact surfaces.1. Release agent2. Stripped threads3. Form-A-Thread4. Tape5. Cleaned bolt6. Plate7. New threads8. ThreadlockerSMR2000_036_00A2.FMXI
INTRODUCTIONStandard Thread Repair1. Follow instructions on Loctite FORM-A-THREAD(P/N 413 708 600) package.2. If a plate is used to align bolt:a. Apply release agent on mating surfaces.b. Put waxed paper or similar film on the surfaces.3. Twist bolt when inserting it to improve threadconformation.NOTE: NOT intended for engine stud repairs.• Repair of Small Holes/Fine ThreadsOption 1: Enlarge damaged hole, then followStandard Thread Repair procedure.Option 2: Apply FORM-A-THREAD on the screwand insert in damaged hole.Permanent Stud Installation (light duty)1. Use a stud or thread on desired length.2. DO NOT apply release agent on stud.3. Do a Standard Thread Repair.4. Allow to cure for 30 minutes.5. Assemble.1. Remove old gasket and other contaminantswith Loctite Chisel remover (P/N 413 708 500).Use a mechanical mean if necessary.NOTE: Avoid grinding.2. Clean both mating surfaces with solvent.3. Spray Loctite Primer N on both mating surfacesand on both sides of gasket. Allow to dry 1 or 2minutes.4. Apply GASKET ELIMINATOR 518 (P/N 293 800038) on both sides of gasket, using a clean applicator.5. Place gasket on mating surfaces and assembleimmediately.NOTE: If the cover is bolted to blind holes (above),apply proper strength Loctite in the hole and onthreads. Tighten.If holes are sunken, apply proper strength Loctiteon bolt threads.6. Tighten as usual.Mounting on ShaftMounting with a PressGasket CompoundAll Parts121213A00A3UA1. Bearing2. Proper strength Loctite3. ShaftA00A3SA1 31. Proper strength Loctite2. Loctite Primer N (P/N 413 708 100) and Gasket Eliminator 515(P/N 293 800 038) on both sides of gasket3. Loctite Primer N onlyXIISMR2000_036_00A2.FM
INTRODUCTIONStandard1. Clean shaft external part and element internalpart.2. Apply a strip of proper strength Loctite on shaftcircumference at insert or engagement point.NOTE: Retaining compound is always forced outwhen applied on shaft.3. DO NOT use anti-seize Loctite or any similarproduct.4. No curing period is required.Mounting in Tandem1. Apply retaining compound on internal elementbore.2. Continue to assemble as shown above.Case-In ComponentsMetallic Gaskets1. Clean inner housing diameter and outer gasketdiameter.2. Spray housing and gasket with Loctite Primer N(P/N 293 800 041).3. Apply a strip of proper strength Loctite on leadingedge of outer metallic gasket diameter.NOTE: Any Loctite product can be used here. Alow strength liquid is recommended as normalstrength and gap are required.4. Install according to standard procedure.5. Wipe off surplus.6. Allow it to cure for 30 minutes.NOTE: Normally used on worn-out housings toprevent leaking or sliding.It is generally not necessary to remove gasketcompound applied on outer gasket diameter.A00A3VA 11. Proper strength LoctiteSMR2000_036_00A2.FMXIII
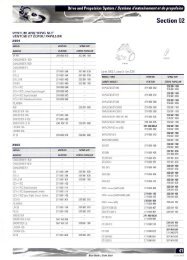
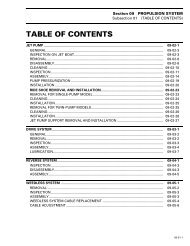
INTRODUCTIONTIGHTENING TORQUESTighten fasteners to torque mentioned in explodedviews and text. When they are not specifiedrefer to following table.The table also gives themetric conversion.N•m FASTENER SIZE (8.8) Lbf•in1 92 M4 183 274 M5 355 446 537 628 719 8010 M6 8911 9712 10613 11514 12415 13316 14217 15018 15919 168N•m FASTENER SIZE (8.8) Lbf•ft20 1521 1522 1623 M8 1724 1825 1826 1927 2028 2129 2130 2231 2332 2433 2434 2535 2636 2737 27N•m FASTENER SIZE (8.8) Lbf•ft38 2839 2940 3041 3042 3143 3244 3245 3346 3447 3548 M10 3549 3650 3751 3852 3853 3954 4055 4156 4157 4258 4359 4460 4461 4562 4663 4664 4765 4866 4967 4968 5069 5170 5271 5272 5373 5474 5575 5576 5677 5778 5879 5880 M12 5981 6082 60XIVSMR2000_036_00A2.FM
INTRODUCTIONN•m FASTENER SIZE (8.8) Lbf•ft83 6184 6285 6386 6387 6488 6589 6690 6691 6792 6893 6994 6995 7096 7197 7298 7299 73100 74101 74102 75103 76104 77105 77106 78107 79108 80109 80110 81111 82112 83113 83114 84115 85116 86117 86N•m FASTENER SIZE (8.8) Lbf•ft118 87119 88120 89121 89122 90123 91124 91125 92126 93127 94128 94129 95130 96131 97132 97133 98134 99135 M14 100136 100137 101138 102139 103140 103141 104142 105143 105144 106145 107146 108147 108148 109149 110150 111TIGHTENING TORQUES FOR 8.8 GRADE BOLTS AND NUTSTechnical PublicationsBombardier Inc.Valcourt (Quebec), CanadaSMR2000_036_00A2.FMXV