Download - Parent Directory - Foxit
Download - Parent Directory - Foxit Download - Parent Directory - Foxit
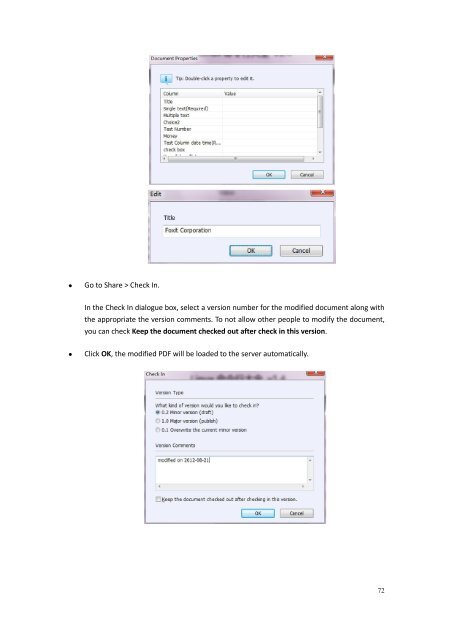
Go to Share > Check In.In the Check In dialogue box, select a version number for the modified document along withthe appropriate the version comments. To not allow other people to modify the document,you can check Keep the document checked out after check in this version.Click OK, the modified PDF will be loaded to the server automatically.72
Creating PDFsCreating PDF is easy to use with Foxit Reader. Users can easily and quickly create PDFs fromMicrosoft® Word®, PowerPoint®, and Excel® through the Foxit Reader plug-in or export existingPDF file to text with one click. Just follow the steps below, and you can easily experience this newfeature to the utmost.Creating from FileChoose Home and clickin Create ribbon.Navigate to and select the file to be created and choose Open.Type a filename and specify a location in pop-up Save dialog box.(Alternatively) You can simply drag the file to be created to Foxit Reader, or right-click the fileand choose Convert to PDF in Foxit Reader.Creating from ScannerChoose Home and click From Scanner in Create ribbon.Choose AutoDetect Color Mode/Black&White Document/Grayscale Document/ColorDocument as you need.AutoDetect Color Mode: Let appicaiton determin the apater document’s content type.Black&White Document: Scan with Black & White colormode.Grayscale Document: Scan with Grayscale color mode.Color mode: Scan with color mode.Choose Custom Scan to customize the scan settings.73
- Page 26 and 27: ABCDEFUser Interface in Ribbon Mode
- Page 28 and 29: About Menu BarGenerally speaking, i
- Page 30 and 31: A: Basic Toolbar B: Search Toolbar1
- Page 32 and 33: Create PDFCreate PDF feature allows
- Page 34 and 35: The General Preferences setting pro
- Page 36 and 37: B. Display transparency grid: Displ
- Page 38 and 39: To view the PDF properties, please
- Page 40 and 41: About Navigation PaneThe navigation
- Page 42 and 43: Use default language—Makes Englis
- Page 44 and 45: Email Application: In most email ap
- Page 46 and 47: Multi-Tab BrowsingThe multi-tab bro
- Page 48 and 49: Note: You can change all aspects pe
- Page 50 and 51: Choose View and click or on the too
- Page 52 and 53: Page vs. Documents:1. Only read the
- Page 54 and 55: Full Screen Mode & Fit the Window M
- Page 56 and 57: MagnifierChoose View and click Magn
- Page 58 and 59: Put the cursor in the Document Pane
- Page 60 and 61: C. In the Single Page Displaying Mo
- Page 62 and 63: The advanced search box can float o
- Page 64 and 65: Note: Currently this feature can be
- Page 66 and 67: Copying ImagesYou can copy and past
- Page 68 and 69: To hide a layer, uncheck the layer.
- Page 70 and 71: To flip the measurement and annotat
- Page 72 and 73: Moving Ruler GuidesClick and hold t
- Page 74 and 75: Download and install - http://evern
- Page 78 and 79: 1. Scanner: select an installed sca
- Page 80 and 81: Signing the Document1. Sign directl
- Page 82 and 83: Choose Edit in DocuSign ID Card and
- Page 84 and 85: Select the download button or print
- Page 86 and 87: Note: Once applied, the signature c
- Page 88 and 89: Note: All the stamps that you impor
- Page 90 and 91: Manage Custom Stamps Dialog BoxNote
- Page 92 and 93: Mode”.Click OK.Note:1. If you wan
- Page 94 and 95: Always ask: Foxit Reader will alway
- Page 96 and 97: Note iconClose buttonOptions menuTe
- Page 98 and 99: Tool, Strikeout Text Tool, Squiggly
- Page 100 and 101: Arrow ToolLine ToolRectangleToolOva
- Page 102 and 103: Select the Hand Tool , Annotation S
- Page 104 and 105: Moving the Typewriter CommentDo one
- Page 106 and 107: To change horizontally the font sca
- Page 108 and 109: Viewing CommentsTo view comments in
- Page 110 and 111: 2. In the Note Properties dialog bo
- Page 112 and 113: Note: You can press ESC to return t
- Page 114 and 115: 2. In Create Comment Summary dialog
- Page 116 and 117: Chapter 6 - FormFoxit Reader is ext
- Page 118 and 119: Note: If the current form field is
- Page 120 and 121: Importing & Exporting Form DataPlea
- Page 122 and 123: To export as a FDFA. Choose Comment
- Page 124 and 125: 4. Click the New Bookmark icon at t
Go to Share > Check In.In the Check In dialogue box, select a version number for the modified document along withthe appropriate the version comments. To not allow other people to modify the document,you can check Keep the document checked out after check in this version.Click OK, the modified PDF will be loaded to the server automatically.72


