Download - Parent Directory - Foxit
Download - Parent Directory - Foxit Download - Parent Directory - Foxit
Note: You can change all aspects pertaining to text view font in the Font dialog box, or you canalso use individual options on Context Menu to change font color and toggle between regularstyle and Bold or Italic styles.2. Toggling between regular style and Bold styleSelect the text and right click on it. Choose Font Setting from the Context Menu, and then selectthe Bold option.3. Toggling between regular style and Italic styleSelect the text and right click on it. Choose Font Setting from the Context Menu, and then selectthe Italic option.4. Changing Text Viewer settingsRight-click the text, and choose Setting from the Context menu.The text Viewer Settings dialog box pops up.44
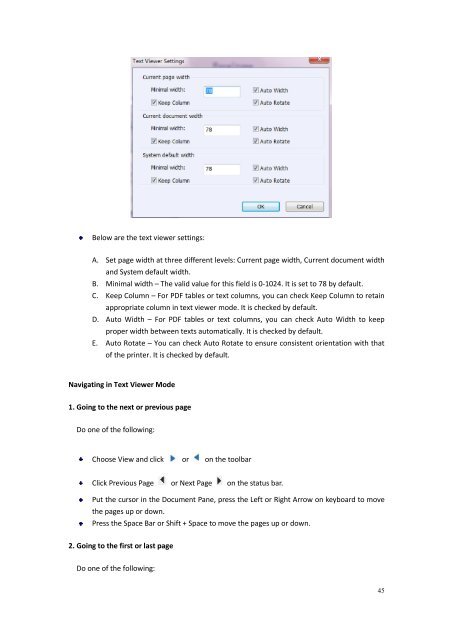
Below are the text viewer settings:A. Set page width at three different levels: Current page width, Current document widthand System default width.B. Minimal width – The valid value for this field is 0-1024. It is set to 78 by default.C. Keep Column – For PDF tables or text columns, you can check Keep Column to retainappropriate column in text viewer mode. It is checked by default.D. Auto Width – For PDF tables or text columns, you can check Auto Width to keepproper width between texts automatically. It is checked by default.E. Auto Rotate – You can check Auto Rotate to ensure consistent orientation with thatof the printer. It is checked by default.Navigating in Text Viewer Mode1. Going to the next or previous pageDo one of the following:Choose View and click or on the toolbarClick Previous Page or Next Page on the status bar.Put the cursor in the Document Pane, press the Left or Right Arrow on keyboard to movethe pages up or down.Press the Space Bar or Shift + Space to move the pages up or down.2. Going to the first or last pageDo one of the following:45
- Page 2 and 3: Copyright © 2013 Foxit Corporation
- Page 4 and 5: Using the Drawing Markup Tools ....
- Page 6 and 7: use license, all which is protected
- Page 8 and 9: 5.4. Consideration. In payment of t
- Page 10 and 11: DAMAGES. TO THE MAXIMUM EXTENT PERM
- Page 12 and 13: 16. Should You have any questions c
- Page 14 and 15: which provides better display quali
- Page 16 and 17: Chapter 2 - Getting StartedThis sec
- Page 18 and 19: If you choose custom installation,
- Page 20 and 21: Updating from the Help Menu1. Choos
- Page 22 and 23: A. Quick Access Toolbar B. Menu C.
- Page 24 and 25: Fig. 8 Protect MenuShare MenuUnder
- Page 26 and 27: ABCDEFUser Interface in Ribbon Mode
- Page 28 and 29: About Menu BarGenerally speaking, i
- Page 30 and 31: A: Basic Toolbar B: Search Toolbar1
- Page 32 and 33: Create PDFCreate PDF feature allows
- Page 34 and 35: The General Preferences setting pro
- Page 36 and 37: B. Display transparency grid: Displ
- Page 38 and 39: To view the PDF properties, please
- Page 40 and 41: About Navigation PaneThe navigation
- Page 42 and 43: Use default language—Makes Englis
- Page 44 and 45: Email Application: In most email ap
- Page 46 and 47: Multi-Tab BrowsingThe multi-tab bro
- Page 50 and 51: Choose View and click or on the too
- Page 52 and 53: Page vs. Documents:1. Only read the
- Page 54 and 55: Full Screen Mode & Fit the Window M
- Page 56 and 57: MagnifierChoose View and click Magn
- Page 58 and 59: Put the cursor in the Document Pane
- Page 60 and 61: C. In the Single Page Displaying Mo
- Page 62 and 63: The advanced search box can float o
- Page 64 and 65: Note: Currently this feature can be
- Page 66 and 67: Copying ImagesYou can copy and past
- Page 68 and 69: To hide a layer, uncheck the layer.
- Page 70 and 71: To flip the measurement and annotat
- Page 72 and 73: Moving Ruler GuidesClick and hold t
- Page 74 and 75: Download and install - http://evern
- Page 76 and 77: Go to Share > Check In.In the Check
- Page 78 and 79: 1. Scanner: select an installed sca
- Page 80 and 81: Signing the Document1. Sign directl
- Page 82 and 83: Choose Edit in DocuSign ID Card and
- Page 84 and 85: Select the download button or print
- Page 86 and 87: Note: Once applied, the signature c
- Page 88 and 89: Note: All the stamps that you impor
- Page 90 and 91: Manage Custom Stamps Dialog BoxNote
- Page 92 and 93: Mode”.Click OK.Note:1. If you wan
- Page 94 and 95: Always ask: Foxit Reader will alway
- Page 96 and 97: Note iconClose buttonOptions menuTe
Below are the text viewer settings:A. Set page width at three different levels: Current page width, Current document widthand System default width.B. Minimal width – The valid value for this field is 0-1024. It is set to 78 by default.C. Keep Column – For PDF tables or text columns, you can check Keep Column to retainappropriate column in text viewer mode. It is checked by default.D. Auto Width – For PDF tables or text columns, you can check Auto Width to keepproper width between texts automatically. It is checked by default.E. Auto Rotate – You can check Auto Rotate to ensure consistent orientation with thatof the printer. It is checked by default.Navigating in Text Viewer Mode1. Going to the next or previous pageDo one of the following:Choose View and click or on the toolbarClick Previous Page or Next Page on the status bar.Put the cursor in the Document Pane, press the Left or Right Arrow on keyboard to movethe pages up or down.Press the Space Bar or Shift + Space to move the pages up or down.2. Going to the first or last pageDo one of the following:45


