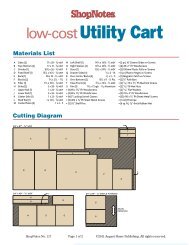
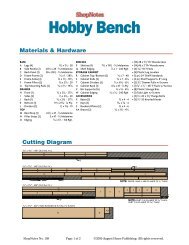
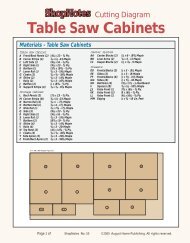
Download A PDF Of These Pages (505 KB) - ShopNotes
Download A PDF Of These Pages (505 KB) - ShopNotes
Download A PDF Of These Pages (505 KB) - ShopNotes

Create successful ePaper yourself
Turn your PDF publications into a flip-book with our unique Google optimized e-Paper software.
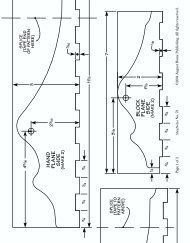
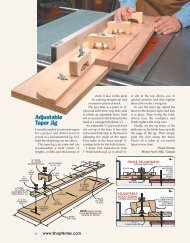
a.you need to know. Once the dogholes are complete, glue the strip tothe tail vise assembly.To complete the tail vise, I addeda “pinch” block to the inside face ofthe vise. This gives the mountingcollar and handle for the vise a“centered” look and covers the endof the vise hardware (Figure 13).Finally, add the handle to the vise.You can make your own or buy one(see sources on page 51).15FIGUREADDING THE FACE VISEAll that’s left to complete the benchis to add a face vise. The nice thingis, there are only two parts to make— a face vise block and a collar supportstrip, as shown in Figure 15.Like the tail vise, you’ll need todisassemble and reassemble thevise a few times. Plus, drillingslightly oversized holes (detailed inthe drawings) helps avoid anyalignment problems.Mounting the Vise. The first stepis to disassemble the vise and boltthe mounting plate to the bottom ofthe bench (Figures 15a and 15b).The next step is to make the supportblock for the metal collars thatprovide extra support for the guiderods (Figure 15). Note: You’ll needto cut a couple notches where thestrip covers the bench dog holes.After drilling a pair of oversizedholes in the collar support block forthe guide rods and screw, bolt theblock to the bench, as in Figure 15.Now, slide the support collarsonto the shafts and assemble thevise by feeding the rods throughthe collar support block, into thevise mounting plate.The next step is to slide the supportcollars up to the support blockand trace around the outsideedges. Now, disassemble the vise(again) and using the tracing as aguide, drill a counterbore for thesupport collars. Note: The counterborecan be slightly oversized withthe supports collars flush with theface of the support block.With that complete, bolt the supportstrip back in place andreassemble the vise. Then, slide thecollars into the counterbores andscrew them in place.All that’s left to do now is makethe face vise block (Figure 15). Aftergluing up the block and roundingthe edges, drill a set of holes for theguide rods and threaded shaft.<strong>These</strong> holes should align with theholes in the support block. And besure to locate the holes so the blockends up flush with the left end andtop edge of the bench.After slipping the face vise blockover the rods and shaft, tighten thevise to “clamp” the block to thebench. Then simply screw theblock in place, as shown in Figure15b. Then all that’s left to do is adda handle to the vise and startworking at your new bench.b.FACE VISEwww.<strong>ShopNotes</strong>.com 41