Winegard MV-3500T In Motion RV Satellite System - TALCO ...
Winegard MV-3500T In Motion RV Satellite System - TALCO ...
Winegard MV-3500T In Motion RV Satellite System - TALCO ...

Create successful ePaper yourself
Turn your PDF publications into a flip-book with our unique Google optimized e-Paper software.
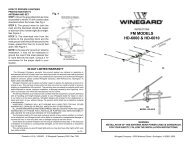
Parts <strong>In</strong>cluded • Tools Needed • How to UnpackThe <strong>Winegard</strong> <strong>MV</strong><strong>3500T</strong> is designed specifically for use with motorized recreationalvehicles. <strong>Winegard</strong> recommends using a qualified installer familiar with <strong>RV</strong> structure andwiring to ensure proper installation and to prevent damage to <strong>RV</strong> or dish.PARTS INCLUDED:1 Radome1 Power switch1 Wall plate (white)1 Surface mount box1 Cable entry plate3 Base feetlarge yellow flag connector2 small red flag connectorsAll required screws, washers, bolts, and nylocks1 base with electronics, dish, dual LNBFSilicone sealantSurface Wipes30’ Coax Cable30’ Power CableTOOLS NEEDED FOR UNPACKING & INSTALLATION:LevelDrill w/3/4” bit1-1/4” hole saw (if mounting switch in wall)Phillips screw driver #23/8” Open end wrench7/16” Open end wrenchSealant (consult <strong>RV</strong> manufacturer for proper typefor your roof material)UNPACKING THE UNIT1. Open box and remove packing material.!!If using knife to opencarton, BE CAREFUL.Do not cut the dome onthe unit.BE CAREFUL whenremoving unit. Dome isattached to base byonly 3 pieces of tape,NOT BY SCREWS.LIFT UNIT STRAIGHT UPOUT OF CARTON!2. Lift dome out of box vertically. Then lift unit out ofbox vertically. Do not turn box and “roll” out, or turnupside down to remove.USE 2 PEOPLEwhen removing the unitfrom the carton.!DO NOT PAINT DOME!Painting dome willcause signaldegradation.2REV. 12/05
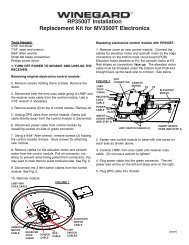
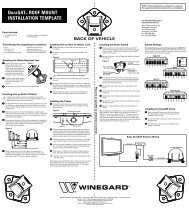
<strong>In</strong>stallation DiagramControl UnitCENTERLINE OF THEVEHICLELNBFREAR FOOTMUST BEPARALLELTO THECENTER LINEOF THEVEHICLEAND FACETHE REAR OFVEHICLEGPS ANTENNAELEVATIONMOTORAZIIMUTHMOTORGPS CABLEControl Box detailModel <strong>MV</strong><strong>3500T</strong>(#1 represents Switch DOWN; #0 represents Switch up)Sat. Rcvr.Switch Set Position........................... 1 2 3 4 5 6 7 8DISH NETWORK ................................ 0 .. 0 .. 0 .. 1 .. 0 .. 0 .. 1 .. 1DIRECTV .................................. 0 .. 0 .. 0 .. 0 .. 0 .. 0 .. 0 .. 1(FACTORY PRESET)ExpressVu ................................. 0 .. 1 .. 0 .. 1 .. 1 .. 0 .. 1 .. 1RECEIVERP4ELEVATIONP3AZIMUTHLNBFELECTRONICS INTERIOR VIEW3
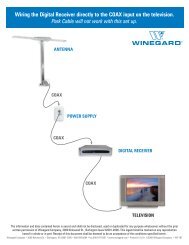
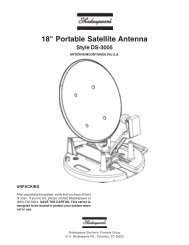
<strong>In</strong>stallation • WiringConnecting the receiver —Connecting one receiver1. Connect the coax cable from the <strong>MV</strong><strong>3500T</strong> tothe “SATELLITE IN” on the receiver.2. See page 5 of Operations Manual for receiverset-up.Connecting two receivers1. Connect the coax cable coming from the<strong>MV</strong><strong>3500T</strong> to the “ SATELLITE IN” input on theprimary receiver. The primary receiver is thereceiver used most often and will toggle betweensatellites.2. Run a second cable through the empty Heycoopening and connect to the ground block-typefeed through and connect the other end of thiscable to “<strong>Satellite</strong> IN” input on the second receiver.NOTE: Secondary receiver will nottoggle.3. See page 5 of Operations Manual for receiverset-up.<strong>In</strong>itializing & replacing the dome afterconnecting the receiver(s) —1. Be sure vehicle is in a location free of all obstructionsand with a clear view of the southern sky.2. DO NOT MOVE VEHICLE during the first initialization.Power up unit, turn on receiver. FOR THEFIRST TIME ONLY, the unit may take up to 10 minutesto initially find the satellite signal. The GPS isalso initalizing at this time. After the GPS initializes,the unit will begin searching for the correct satellite.3. If the GPS does not initialize at this time, turnoff the unit. You may need to move the GPS antennato a different location on your roof. After youmove the GPS, DO NOT SECURE TO ROOF.4. TEST YOUR SYSTEM BEFORE SECURINGTHE GPS ANTENNA. Make sure the TV/receiverhas found the correct satellite.5. After the correct satellite has been found, secureGPS antenna by removing adhesive backing andsecuring to roof.CONNECTORGROUND BLOCKCUSTOMER/INSTALLERPROVIDES COAX FORSECOND RECEIVERUNIT BASEAPPLY SILICONE BEADAT BASE OF CONNECTORAPPLY SILICONE BEAD IN HOLEWHERE COAX ENTERSPRIMARYRECEIVERUSED ONLY WITHA SECONDARYRECEIVER7
PROBLEMSOLUTIONTroubleshootingThe <strong>MV</strong><strong>3500T</strong> does not attempt to find a satellite orit never moves.1. Check your Power switch to verify that it is in the ON position.2. Check +12 V wires at unit to verify power. Check fuse on electronics.The dish never stops on any of the signals thatit sees.1. Make sure that your receiver is set up correctly.For DISH Network, the check switch should read either “Unknown”or “SW42”.For DirecTV the receiver should be set for a Two <strong>Satellite</strong> OvalDish.With DIRECTV, the dish will find the alternatesatellite but it never finds the primary satellite.Make sure that the Switches on the Electronics Control Box areset for DirecTV. See page 3. These switches are found underthe dome, inside the Electronics Control Box.I am not getting all the DISH Network channelsI subscribed to.1. Go to the check switch menu in receiver. Make sure that it’sset for SW42 and lists both even and odd transponders on satellites110° and 119°.The <strong>MV</strong><strong>3500T</strong> never sees any signals, it just keepssearching.1. Rain, Snow or excessive Dew on the dome can interrupt thesignal. Snow and Dew can be brushed off the dome. If Heavyrain or Snow fall is blocking the signal, it may be necessary towait until the weather clears.2. Check to see if the Southern sky is clear. Trees, Buildings, Largesigns or an Overpass can block the signal. Find an area where youcan be sure that this is not the problem and try again.3. Make sure the receiver has power and the satellite dish isconnected to the “Sat <strong>In</strong>”.I have switched satellite service providers. How doI set my dish for my new provider?You will need to remove the dome, and set switches to correctprovider. See page 4.9
Features and specifications• One button operation.• Dual receiver capable.• Depending on receiver type, you can accesssatellites 119°, 110°, 101° or 92°.• No user input required.• No data port required for DISH Network ® ,DIRECTV ® or ExpressVu.• Elevation range 20° to 74.5°;azimuth +360° (0-720°)• 30’ power cable and 30’ coaxial cable included.• Dome UV protected.• Compact size —32” diameter, 15-3/4” heightWeight of unit - 28 lbs.Shipping weight - 41 lbs.• Operating temperature-13°F to +140°F• Specifications for max amperage 3.0A• Specifications for unit operatating voltage.-10.5 - 13.8V• Specifications for supply voltage. 12 - 13.8V<strong>Winegard</strong> supplies 30’ of 16 AWG wire for connecting theunit. When making connections or adding wire, <strong>Winegard</strong>recommends using 16 AWG stranded wire or larger forconnection up to 60 feet. When making connectionslonger than 60 feet, insure that specifications for unit operatingvoltage are met by measuring voltage at the unit.10
WINEGARD MOBILE PRODUCTS LIMITED WARRANTY(2 YEARS PARTS; 1 YEAR LABOR)<strong>Winegard</strong> Company warrants this product against defects in materials or workmanship for a period of two (2) years from the date oforiginal purchase. During year one (1) of such warranty, <strong>Winegard</strong> Company will also pay authorized labor costs to an authorized<strong>Winegard</strong> dealer to repair or replace defective products. No warranty claim will be honored unless at the time the claim is made,Customer presents proof of purchase to an authorized <strong>Winegard</strong> dealer (to locate the nearest authorized <strong>Winegard</strong> dealer, contact<strong>Winegard</strong> Company, 3000 Kirkwood Street, Burlington, Iowa 52601, Telephone 319-754-0600 or visit www.winegard.com). Customermust provide proof of purchase with a dated sales receipt for the <strong>Winegard</strong> product to verify the product is under warranty. If the dateof purchase cannot be verified, the warranty period shall be considered to begin thirty (30) days after the date of manufacture.If a defect in material or workmanship is discovered, Customer may take the product to an authorized <strong>Winegard</strong> dealer for service.Customer must provide proof of purchase to verify the product is under warranty. If the product is brought to an authorized <strong>Winegard</strong>dealer for service prior to expiration of year one (1) of the warranty period and a defect in material or workmanship is verified by<strong>Winegard</strong> Technical Services, <strong>Winegard</strong> Company will cover the <strong>Winegard</strong> dealer’s labor charges for warranty service. The <strong>Winegard</strong>dealer must contact <strong>Winegard</strong> Technical Services in advance for pre-approval of the service. Approval of the service is at the solediscretion of <strong>Winegard</strong> Company.Alternatively, Customer may ship the product prepaid to <strong>Winegard</strong> Technical Services (located at 3000 Kirkwood Street, Burlington,Iowa 52601, Telephone 319-754-0600). Customer must return the product along with a brief description of the problem and provide<strong>Winegard</strong> Technical Services with Customer’s name, address, and phone number. Customer must also provide proof of purchase toverify the product is under warranty. If the product is returned before the expiration of the warranty period, <strong>Winegard</strong> Company will (atits option) either repair or replace the product.This Limited Warranty does not apply if the product has been damaged, deteriorates, malfunctions or fails from: improperinstallation, misuse, abuse, neglect, accident, tampering, modification of the product as originally manufactured by <strong>Winegard</strong> in anymanner whatsoever, removing or defacing any serial number, usage not in accordance with product instructions or acts of naturesuch as damage caused by wind, lightning, ice or corrosive environments such as salt spray and acid rain.RETURN AUTHORIZATION POLICYA Return Material Authorization (RMA) is required prior to returning any product to <strong>Winegard</strong> Company or <strong>Winegard</strong> WarrantyServices under this warranty policy. Please call our Technical Services Department at (800) 788-4417 or send an e-mail towarranty@winegard.com to obtain the RMA number. Please furnish the date of purchase when requesting an RMA number. Enclosethe product in a prepaid package and write the RMA number in large, clear letters on the outside of the package. To avoid confusionor misunderstanding, a shipment(s) without an RMA number(s) or an unauthorized return(s) will be refused and returned to Customerfreight collect.WINEGARD COMPANY DOES NOT ASSUME ANY LIABILITIES FOR ANY OTHER WARRANTIES, EXPRESS OR IMPLIED,MADE BY ANY OTHER PERSON.ALL OTHER WARRANTIES WHETHER EXPRESS, IMPLIED OR STATUTORY INCLUDING WARRANTIES OF FITNESS FOR APARTICULAR PURPOSE AND MERCHANTABILITY ARE LIMITED TO THE TWO YEAR PERIOD OF THIS WARRANTY.<strong>In</strong> states that do not allow limitations on implied warranties, or the exclusion of limitation of incidental or consequential damages,the above limitations or exclusions do not apply.Some states do not allow limitations on how long an implied warranty lasts, or the exclusion of limitation of incidental orconsequential damages, so the above limitations or exclusions may not apply to you.This warranty gives Customer specific legal rights. Customer may also have other rights that may vary from state to state.Rev. 12/19/05<strong>Winegard</strong> Company • 3000 Kirkwood Street • Burlington, IA 52601 • 319/754-0600 Fax 319/754-0787 • www.winegard.comPrinted in U.S.A. © 2005 <strong>Winegard</strong> Company 2452071 Rev. 12/19/0512