Installation instructions and user guide - Fisher & Paykel
Installation instructions and user guide - Fisher & Paykel
Installation instructions and user guide - Fisher & Paykel

You also want an ePaper? Increase the reach of your titles
YUMPU automatically turns print PDFs into web optimized ePapers that Google loves.
<strong>Installation</strong> <strong>instructions</strong><br />
<strong>and</strong> <strong>user</strong> <strong>guide</strong><br />
Front loading dryers<br />
ED56, AD55, AD39 models<br />
NZ AU GB IE
Contents<br />
Introduction 2<br />
Safety <strong>and</strong> warnings<br />
<strong>Installation</strong> <strong>instructions</strong><br />
3<br />
<strong>Installation</strong> options 5<br />
<strong>Installation</strong> – Electronic <strong>and</strong> Manual 4.5 kg dryers 6<br />
<strong>Installation</strong> – Manual 3.5 kg dryers 8<br />
Specifications 8<br />
Dryer wall mounting <strong>instructions</strong><br />
Before you dry<br />
9<br />
Sorting <strong>and</strong> loading 11<br />
Cleaning the lint filter<br />
Electronic dryer<br />
12<br />
Using your dryer 13<br />
Dryness levels 13<br />
1 hour settings 14<br />
Key Lock 14<br />
Temperature settings 15<br />
Delay start 15<br />
Wrinkle guard<br />
Manual dryers<br />
15<br />
Using your dryer 16<br />
Drying times 17<br />
Drying rack 18<br />
Operating problems 19<br />
Manufacturers warranty 20<br />
Customer care 21<br />
Important!<br />
SAVE THESE INSTRUCTIONS<br />
The models shown in this <strong>user</strong> <strong>guide</strong> may not be available in all markets <strong>and</strong> are subject to<br />
change at any time. For current details about model <strong>and</strong> specification availability in your country,<br />
please go to our website www.fisherpaykel.com or contact your local <strong>Fisher</strong> & <strong>Paykel</strong> dealer.<br />
1
2<br />
Introduction<br />
Congratulations on purchasing a <strong>Fisher</strong> & <strong>Paykel</strong> dryer. Your new dryer will give you the<br />
convenience of tumble drying <strong>and</strong> your clothes the advantage of not being subjected to the<br />
harsh overdrying effects of the sun. Your clothes will feel softer, retain their shape better <strong>and</strong> will<br />
require less ironing.<br />
At <strong>Fisher</strong> & <strong>Paykel</strong> we aim to provide products that are simple to use, ergonomic <strong>and</strong> energy<br />
efficient. Thous<strong>and</strong>s of tonnes of washing <strong>and</strong> 70 years of laundry experience have been<br />
programmed into you dryer to help give you the best possible performance.<br />
We hope you enjoy your new dryer. We have certainly enjoyed designing it.<br />
Cost to dry<br />
Many people are reluctant to use a dryer because<br />
they believe they are expensive to run. True enough,<br />
sunshine is free, but we don’t always have sunshine<br />
<strong>and</strong> the benefits to you <strong>and</strong> your clothes can make<br />
machine drying worthwhile.<br />
The following example of a 2.5 kg load is used to<br />
demonstrate the cost of drying.<br />
4 T-shirts<br />
1 Sweat Shirt<br />
5 Pair Underpants<br />
5 Pairs Socks<br />
1 Pair Tro<strong>user</strong>s<br />
2 Pair Shorts<br />
3 H<strong>and</strong>kerchiefs<br />
This load was spun at a high spin speed (1000 rpm) <strong>and</strong> dried in an Electronic dryer on dryness<br />
level 4 (Medium dry <strong>and</strong> Extra dry lights on). The load took 60 minutes to dry.<br />
For example if power costs 10 cents / unit, the load will cost approximately 15 cents to dry (1.48<br />
units x 10c). Check with your local Electricity Supply Authority for your domestic tariff.<br />
Before using your dryer<br />
Ensure the correct installation has been used for the dryer type. The Electronic <strong>and</strong> Manual 4.5 kg<br />
dryers are rear venting dryers while the Manual 3.5 kg dryer is a front venting dryer.<br />
Read the Safety <strong>and</strong> <strong>Installation</strong> Instructions.
Dryer use<br />
WARNING!<br />
Safety <strong>and</strong> warnings<br />
Fire Hazard<br />
Only dry fabrics that have been washed with water.<br />
Do not use heat to dry articles containing foam rubber or similarly textured<br />
rubber-like materials. Dry on Airing.<br />
A clothes dryer produces combustible lint <strong>and</strong> must be exhausted outdoors.<br />
Take care to prevent the accumulation of lint around the exhaust opening<br />
<strong>and</strong> surrounding area.<br />
Failure to follow these <strong>instructions</strong> can result in death or personal injury.<br />
The tumble dryer is intended only for drying textile material washed in water.<br />
Undergarments that contain metal reinforcements should not be placed in the dryer. Damage<br />
to the dryer can result if the metal reinforcements come loose during drying. If you wish to dry<br />
these items use a drying rack.<br />
Never dry rubber articles, fibreglass, or any plastic items or film eg plastic lined tablecloths <strong>and</strong><br />
baby bibs.<br />
Clothes should go through the cool down/airing phase of the cycle. If for any reason the dryer is<br />
stopped before the cycle has finished, dry clothes should be removed immediately <strong>and</strong> not left<br />
in the dryer.<br />
Clothes should be spread out to cool <strong>and</strong> not left bunched up eg in a clothes basket.<br />
This dryer has been designed for domestic use only, not for commercial applications, such as<br />
massage/beauty clinics where there may be increased lint accumulation or flammable materials<br />
in the atmosphere or load.<br />
This dryer is not intended for use by young children or infirm persons without supervision.<br />
Young children should be supervised to ensure they do not play with the dryer.<br />
Important!<br />
If you are using an extension cord or a portable electrical outlet device (eg multi-socket outlet<br />
box), ensure that it is positioned so that it does not come into contact with water or moisture.<br />
Lint<br />
Accumulated lint in the dryer can become a fire hazard, it also reduces the efficiency of the dryer<br />
by causing longer drying times <strong>and</strong> increased power consumption.<br />
Clean the lint filter before every load.<br />
Ensure the area around the dryer is clear of lint.<br />
At regular intervals have the interior of the dryer cleaned of any accumulated lint. This must be<br />
done by a qualified person for electrical safety.<br />
If you change the mounting of the dryer from upright to inverted or vice versa, the dryer must<br />
be cleaned internally by a serviceman.<br />
3
4 Safety <strong>and</strong> warnings<br />
Spontaneous combustion<br />
Important!<br />
To reduce the risk of fire in a tumble dryer the following should be observed:<br />
Items that have been spotted or soaked with vegetable oil or cooking oil are a fire hazard <strong>and</strong><br />
should not be placed in a tumble dryer.<br />
Oil-affected items can ignite spontaneously, especially when exposed to heat sources such as a<br />
tumble dryer.<br />
The items become warm causing an oxidation reaction in the oil. This oxidation creates heat.<br />
If the heat cannot escape the items can become hot enough to catch fire. Piling, stacking or<br />
storing oil-affected items can prevent heat from escaping creating a fire hazard.<br />
If it is unavoidable that fabrics that contain vegetable oil, cooking oil or have been contaminated<br />
by hair care products be placed in a tumble dryer, they should first be washed in hot water with<br />
extra detergent – this will reduce, but not eliminate the fire hazard. The cool down cycle of the<br />
dryer should be used to reduce the temperature of these items. They should not be removed<br />
from the tumble dryer or piled or stacked while hot.<br />
Items that have previously been cleaned in, washed in, soaked in or spotted with flammable<br />
liquids or solids eg petrol/gasoline, kerosene, dry cleaning solvents, vegetable or cooking oil,<br />
waxes or other flammable or explosive substances should not be placed in a tumble dryer.<br />
Highly flammable substances commonly used in domestic environments include acetone,<br />
denatured alcohol, petrol/gasoline, kerosene, some br<strong>and</strong>s of spot removers, turpentine, waxes<br />
<strong>and</strong> wax removers.<br />
Fabric Softeners or similar products should not be used in a tumble dryer to eliminate the effects<br />
of static electricity, unless this practice is specifically recommended by the manufacturer of the<br />
fabric softener product.<br />
Rubber backed articles, clothes fitted with foam rubber pads, pillows, fibreglass, shoes<br />
containing rubber, plastic items such as shower caps, <strong>and</strong> babies waterproof napkin covers<br />
should not be placed in the dryer.<br />
Items containing rubber (also known as latex foam) or similarly textured rubber like materials<br />
should not be dried on any heat setting. Dry these garments on Airing. Foam rubber material can<br />
when heated produce fire by spontaneous combustion.
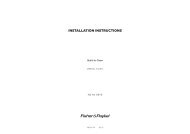
There are several different ways you can install your dryer.<br />
1. Free st<strong>and</strong>ing<br />
The dryer st<strong>and</strong>s on the floor <strong>and</strong> can easily be moved into position.<br />
2. Plinth*<br />
Electronic <strong>and</strong> Manual 4.5 kg only<br />
A plinth, with adjustable feet, allows the dryer to be:<br />
– matched in height to your washer.<br />
– installed under a bench.<br />
Plinths can be purchased from your dealer.<br />
115 mm Plinth Part No. 94832<br />
60 mm Plinth Part No. 94852<br />
3. Upright wall mounting*<br />
All models<br />
The wall mounting kit allows the dryer to be installed at any desired<br />
height minimising the amount of bending <strong>and</strong> stretching.<br />
Wall Mounting Kit Part No. 502067<br />
4. Inverted wall mounting*<br />
All models<br />
A wall mounting kit <strong>and</strong> inverted panel allows you to<br />
install the dryer above the washer or tub.<br />
AD39 Inverted Panel Part No. 427560P<br />
AD55 Inverted Panel Part No. 427560<br />
ED56 Inverted Panel Part No. 427562<br />
Wall Mounting Kit Part No. 502067<br />
*Contact your dealer for assistance with plinths,<br />
inversion kits <strong>and</strong> wall mounting kits<br />
<strong>Installation</strong> options<br />
Min. clearance<br />
for dryer = 840 mm<br />
Washer<br />
5 series = 415 mm<br />
6 series = 455 mm<br />
7 series = 505 mm<br />
Fig. 1 Free st<strong>and</strong>ing<br />
Fig. 2 Plinth height<br />
Fig. 3 Upright wall<br />
mounting<br />
Minimum<br />
lid clearance<br />
115 mm<br />
5<br />
925 mm<br />
Fig. 4 Inverted wall mounting
6<br />
<strong>Installation</strong> – Electronic <strong>and</strong> Manual 4.5 kg dryers<br />
Correct installation is very important for all dryers to ensure maximum efficiency <strong>and</strong> safety.<br />
Important!<br />
Never run the dryer unless the airflow system is free from obstruction.<br />
There must be adequate ventilation to avoid the backflow of gases into the room from<br />
appliances burning fuels, including open fires, when operating the dryer.<br />
Exhaust air must not be discharged into a flue which is used for exhausting fumes from<br />
appliances burning gas or other fuels.<br />
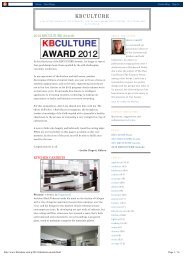
External venting<br />
The dryer has been designed to be externally vented to provide the following advantages:<br />
Ensures optimum efficiency by preventing recirculation of moist air.<br />
Eliminates condensation on walls <strong>and</strong> ceilings.<br />
Reduces the chance of lint being sucked into the dryer.<br />
Prevents lint <strong>and</strong> other fine particles being blown into the<br />
room.<br />
All external venting systems should be:<br />
Made from galvanised metal pipe or be sleeved with<br />
a galvanised metal pipe where the vent system goes<br />
through a wall or ceiling.<br />
Exhausted outside <strong>and</strong> not into another confined space.<br />
Fitted with a vent cap outside to stop rain water entering<br />
Fig. 5 External venting<br />
the dryer exhaust system.<br />
Angled to avoid condensation running back into the dryer.<br />
Less than 2 m long. Special installation is required for ducting over 2 m. Contact your Authorised<br />
Service Centre.<br />
DO NOT use the internal vent deflector as an external weather cap as this will cause restriction of<br />
the airflow <strong>and</strong> a loss in performance.
<strong>Installation</strong> – Electronic <strong>and</strong> Manual 4.5 kg dryers<br />
Flush venting<br />
The dryer is vented through a hole in the wall, using a<br />
galvanised metal pipe or flexible hose. This is suitable for floor<br />
<strong>and</strong> wall mounted dryers installed against an outside wall.<br />
Flexible Hose 400 mm Part No. 460754<br />
Movable venting<br />
The dryer is vented using a flexible hose through a hole in the<br />
wall. This allows the dryer to be moved from the wall slightly.<br />
Suitable for floor mounted dryers only.<br />
Flexible Hose 2 m Part No. 503858<br />
Window venting<br />
A flexible hose is used to vent the dryer through a window.<br />
Maximum hose length is 2 metres.<br />
Flexible Hose 2 m Part No. 503858<br />
Venting duct<br />
The dryer is vented using an extendible duct that allows<br />
venting to a window or through an existing wall vent. The<br />
duct can be used with a flexible hose. Specially suitable for<br />
inverted dryers.<br />
Venting Duct Kit Part No. 460886<br />
Flexible Hose 2 m Part No. 503858<br />
Internal venting<br />
Included with the dryer is a vent deflector. This screws on<br />
to the back of the dryer over the exhaust outlet. If external<br />
venting is not possible the deflector must be fitted. The<br />
outlet of the vent deflector must be clear of any obstructions<br />
to ensure normal <strong>and</strong> safe operation.<br />
Fig. 6 Flush venting<br />
Fig. 7 Movable venting<br />
Fig. 8 Venting duct<br />
Fig. 9 Internal venting<br />
7
8<br />
<strong>Installation</strong> – Manual 3.5 kg dryer<br />
Dryer position<br />
The Manual 3.5 kg dryer is front venting. The air<br />
is taken in through the grill at the rear of the dryer<br />
<strong>and</strong> vented out through the grill in the door.<br />
The dryer should be positioned so that the air<br />
intake at the rear is unrestricted. The minimum<br />
clearance needed from the wall is 50 mm.<br />
Included with this dryer are two plastic spacers.<br />
Fitting these on the rear of the dryer will ensure<br />
the dryer is correctly positioned away from the wall.<br />
Use screws provided to fit the spacers. (As shown<br />
in the diagram.)<br />
Directional outlet grill<br />
The outlet grill can be rotated to direct the exhaust<br />
air. It should be adjusted so that it points towards<br />
an external window or door.<br />
Specifications<br />
Fig. 10 Spacers<br />
Fig. 11 Directional outlet grill<br />
Electronic <strong>and</strong><br />
Manual dryers<br />
Manual dryers<br />
Capacity (Dry)<br />
Dimensions<br />
4.5 kg (Dry) 3.5 kg (Dry)<br />
Width 565 mm 565 mm<br />
Depth 560 mm 440 mm<br />
Height 790 mm 790 mm<br />
Electrical NZ/AUS NZ/AUS<br />
Volts 230/240 230/240<br />
Hz 50 50<br />
Amps 8.0 8.0<br />
Note: if the electrical supply cord is damaged it must be replaced by the manufacturer or its<br />
service agent or similar qualified person in order to avoid a hazard.
Tools <strong>and</strong> parts required:<br />
1 drill <strong>and</strong> 3 mm bit<br />
1 Phillips screw driver<br />
2 wood screws 14 x 50 timbertite screws<br />
1 screw driver<br />
1 helper to lift dryer onto bracket<br />
Extra tools <strong>and</strong> parts for mounting onto a concrete wall:<br />
1 6 mm bit<br />
2 M6 x 50 exp<strong>and</strong>ing bolts<br />
1 adjustable spanner<br />
Dryer wall mounting <strong>instructions</strong><br />
Note: read these <strong>instructions</strong> in conjunction with venting <strong>instructions</strong>.<br />
1 Determine the position of the dryer on the wall <strong>and</strong> mark the bracket position.<br />
A minimum of 70 mm is needed between the top of the bracket <strong>and</strong> the ceiling for ease<br />
of installation.<br />
If mounting over a washer allow sufficient room to open the lid of the washer or use a lid<br />
catch retainer – Part no. 479273.<br />
If the dryer is vented through the mounting wall ensure the venting hole clears any studs.<br />
2 Fit the bracket to the wall. Ensure the bracket is securely fastened at both ends (eg into the stud).<br />
Fit a timber slat between the studs to mount the bracket onto if the stud position is too wide.<br />
3 Fit the spacers using screws provided. If timber slat has been used with wall mounting bracket,<br />
pack spacers away from wall by same amount.<br />
4 Mount the dryer on the bracket. Tilt the dryer out from below, engage the bracket in the back<br />
panel slots then lower the dryer <strong>and</strong> rest against the wall.<br />
WARNING!<br />
Weight Hazard<br />
Use two or more people to move <strong>and</strong> install the dryer.<br />
Failure to do so can result in back or other injury.<br />
5 Fit inverted control panel over the existing panel if necessary.<br />
9
125 mm<br />
10<br />
Dryer wall mounting <strong>instructions</strong><br />
95 mm<br />
Dryer Bracket<br />
127 mm<br />
D = 100 mm<br />
114.5 mm<br />
Fit inverted control<br />
panel over the existing<br />
panel if necessary<br />
Fit spacers<br />
as shown<br />
Fig. 12 Wall mounting <strong>instructions</strong><br />
519 mm<br />
For the average<br />
person the<br />
recommended<br />
height for the<br />
bracket is 2070 mm<br />
from the floor<br />
Note: if you change mounting from upright to inverted or vice versa the dryer must be cleaned<br />
internally by a serviceman.<br />
Floor<br />
Ensure bracket is securely<br />
fastened at both ends<br />
(eg into the stud). Fit<br />
timber slats if necessary<br />
Ceiling<br />
70 mm<br />
Bracket holes
To get the most efficient use of your dryer we recommend you sort your loads.<br />
Before drying<br />
Look for a care label on your clothes. This will tell you if they can be safely tumble dried.<br />
Close zippers, hooks <strong>and</strong> eyes, etc to reduce snagging <strong>and</strong> tangling.<br />
Drying times<br />
Drying very small loads is inefficient. Try to dry medium to large loads.<br />
Sort your clothes into loads that take a similar time to dry eg heavier items (towels, T-shirts,<br />
flannelette sheets) from light items (synthetics <strong>and</strong> polycotton sheets <strong>and</strong> shirts). This will<br />
prevent some garments becoming overdried while others are still damp.<br />
Spin clothes at the highest spin speed suitable for the load type. The more water you remove in<br />
the wash, the less time it will need to dry. (NEVER put dripping wet clothes in or on top of the<br />
dryer as excessive water could cause an electrical hazard.)<br />
Lint<br />
Dry lint givers <strong>and</strong> lint collectors separately.<br />
Lint Givers Lint Collectors<br />
Towels Synthetics<br />
Chenille Corduroy<br />
Nappies Poly Cotton<br />
Socks<br />
To reduce creasing<br />
Sorting <strong>and</strong> loading<br />
Shake clothes out <strong>and</strong> load individually to help clothes dry evenly.<br />
Launder permanent press garments separately eg business shirts.<br />
Allow enough room for clothes to tumble freely when loading.<br />
Hang garments as soon as the dryer cycle is completed to reduce the need for ironing.<br />
11
12<br />
Cleaning the lint fi lter<br />
Electronic <strong>and</strong> Manual 4.5 kg dryers<br />
It is important to clean the lint filter regularly,<br />
as the lint produced in the drying process<br />
can become a fire hazard if it is allowed to<br />
accumulate in or around your dryer.<br />
The lint filter is located in the door opening.<br />
1 Remove the lint filter, open it out <strong>and</strong> wipe<br />
clean with your h<strong>and</strong>.<br />
2 Close the lint filter <strong>and</strong> place it back in the<br />
opening.<br />
Manual 3.5 kg dryers<br />
The lint filter is located on the door of the dryer<br />
behind the directional outlet grill.<br />
1 To remove the outlet grill grasp the hub in the<br />
centre of the grill <strong>and</strong> pull. Wipe the filter clean<br />
with your h<strong>and</strong>.<br />
2 To replace the grill, locate the hub over the boss<br />
in the centre of the door <strong>and</strong> push firmly.<br />
Note: do not clean your lint filter by vacuuming<br />
or wetting it, as this may block the fine pores<br />
essential for maximum airflow.<br />
Fig. 13 Lint filter – 4.5 kg dryers<br />
Fig. 14 Lint filter – Manual 3.5 kg dryer
Your Electronic dryer takes the guess work out of choosing drying times by sensing the dryness<br />
of the load. When your dryer senses that the clothes have dried to the dryness level you have<br />
selected, the dryer will automatically turn itself off.<br />
Using your dryer<br />
1 Clean the lint filter before every load.<br />
2 Load the clothes into the dryer.<br />
3 Press POWER.<br />
4 Select the dryness level.<br />
5 Select the temperature setting <strong>and</strong> other drying options.<br />
6 Press START/PAUSE.<br />
The dryer will beep 5 times at the end of the cycle.<br />
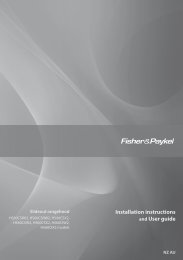
Dryness levels<br />
The Electronic dryer has 5 dryness<br />
levels from Light Dry through to Extra<br />
Dry. Choose the dryness level to suit<br />
your load using the <strong>guide</strong> opposite.<br />
If you find the load is not dry enough,<br />
select the next dryness level up. The<br />
higher the level, the longer the drying<br />
time <strong>and</strong> the drier your clothes will be.<br />
Two lights are sometimes used to show<br />
the dryness level. For example the<br />
Light-Medium Dry <strong>and</strong> Medium-Extra<br />
Dry settings.<br />
Airing / Cool down<br />
Fig. 15 Control panel – Electronic dryer<br />
Electronic dryer<br />
Light to Medium Settings<br />
Delicate fabrics eg synthetics<br />
Fabrics prone to shrinking eg sweatshirts<br />
Or if you want the clothes slightly damp for ironing<br />
Medium to Extra Dry Settings<br />
Heavier fabrics eg towels<br />
Durable fabrics eg denim<br />
When the dryer has sensed that the load is dry it will automatically go into a 10 minute airing or<br />
cool down cycle. During airing the drum tumbles <strong>and</strong> cool air is blown through the clothes. This<br />
reduces creasing if the clothes are left in the dryer.<br />
13
14<br />
Electronic dryer<br />
1 hour setting<br />
The 1 hour setting is a manual cycle which dries continuously for<br />
60 minutes. The manual cycle does not sense when your clothes<br />
are dry.<br />
You can use the 1 hour setting when using a drying rack to dry<br />
shoes, hats <strong>and</strong> other items that are best dried without tumbling.<br />
Note: it is important to check the clothes throughout the manual<br />
cycle to avoid overdrying.<br />
Key Lock<br />
Setting Key Lock prevents the dryer from being accidentally<br />
switched off, or the programme being altered when the dryer<br />
is running.<br />
1 Select drying cycle <strong>and</strong> press START/PAUSE.<br />
2 Press KEY LOCK (the lock shaped button) <strong>and</strong> hold for 2 seconds.<br />
3 The Key Lock light will flash <strong>and</strong> the dryer will give 2 quick beeps.<br />
4 The Key Lock light will remain on <strong>and</strong> all other keys will now<br />
be locked.<br />
To remove the key lock repeat steps 2 <strong>and</strong> 3.<br />
Pausing the dryer<br />
Opening the door or pressing START/PAUSE will stop the dryer tumbling. To start again close the<br />
door <strong>and</strong> press START/PAUSE.<br />
Note: if the door is opened when the dryer is running, <strong>and</strong> left open for more than 8 minutes, or<br />
the door is opened during airing the dryer will automatically switch off.<br />
Drum reversal<br />
To minimise tangling <strong>and</strong> to ensure your clothes dry efficiently, the dryer reverses the tumbling<br />
during the cycle.
Temperature settings<br />
This dryer has 3 temperature settings; regular, low<br />
<strong>and</strong> airing.<br />
The REGULAR setting is for drying most fabrics.<br />
The LOW setting is for drying delicates <strong>and</strong><br />
synthetics. It is half heat so the temperatures are<br />
lower for maximum care of the fabrics.<br />
The AIRING setting is a cycle designed to freshen<br />
up garments. The airing setting operates only on<br />
the 1 hour manual cycle.<br />
The regular <strong>and</strong> low settings will operate on both<br />
the manual <strong>and</strong> the auto–sensing cycles.<br />
Delay start<br />
DELAY START will delay the start of the drying<br />
cycle by 3, 6 or 9 hours.<br />
1 Select drying cycle.<br />
2 Press DELAY START once for a delay of 3 hours.<br />
Press again for 6 hours, a third time for 9 hours <strong>and</strong><br />
again to return to normal.<br />
Selecting DELAY START will cancel the ‘beeping’ at<br />
the end of the cycle.<br />
Note: the DELAY START will not operate when the<br />
1 hour manual cycle is selected.<br />
Important!<br />
Do not leave non-colourfast materials to sit wet in<br />
the dryer as the dye may run.<br />
Wrinkle guard<br />
Use WRINKLE GUARD to minimise the creasing that<br />
occurs when the clothes are left to sit in the dryer.<br />
At the end of the cycle the drum will rotate briefly<br />
every 5 minutes while cool air is blown through<br />
the clothes. WRINKLE GUARD will continue for 12<br />
hours or until the dryer is turned off. The dryer will<br />
beep to remind you that the cycle is finished.<br />
WRINKLE GUARD can be turned on or off at any<br />
time during the cycle.<br />
Electronic dryer<br />
15
16<br />
Manual dryers<br />
The Manual dryers have been designed so you can select how long you want the clothes to dry<br />
for. So you know exactly when your clothes will be ready.<br />
Using your dryer<br />
1 Clean the lint filter before every load.<br />
2 Load the clothes into the dryer.<br />
3 Turning the knob clockwise only, select the desired cycle <strong>and</strong> drying time.<br />
4 Try to remove the clothes from the dryer as soon as the cycle is completed to help prevent<br />
creasing.<br />
Note: the 3.5 kg dryer will stop every 5 – 6 minutes, to allow clothes to redistribute.<br />
Drying cycles<br />
The Manual dryers have two drying cycles designed to take care of all your drying needs.<br />
The REGULAR cycle is for drying more durable fabric or garment types eg cotton, denim.<br />
Here the heater remains on until the airing phase of the cycle.<br />
The DELICATE cycle is for drying delicates <strong>and</strong> synthetics.<br />
Here the heater pulses on <strong>and</strong> off, so garments are dried at lower temperatures.<br />
Note: the dryers will not dry if the knob is turned anti–clockwise.<br />
Airing / Cool down<br />
Fig. 16 Control panel – Manual dryer<br />
When the Manual dryer has finished drying it will automatically go into a 13 – 15 minute airing<br />
or cool down cycle. During airing the drum tumbles <strong>and</strong> cool air is blown through the clothes.<br />
This reduces creasing if the clothes are left in the dryer.<br />
This phase of the drying cycle can be used to air clothes.
Drying times<br />
Manual dryers<br />
With your new dryer it may take a few trials before you can accurately predict the correct drying<br />
time for each individual load.<br />
As a <strong>guide</strong> we have included some examples of loads <strong>and</strong> drying times. These times are<br />
approximate only, based on the garments being spun at the maximum spin speed suitable for<br />
the wash load.<br />
Load comparison Approximate drying times<br />
7 Towels 60 – 80 mins<br />
10 Shirts (cotton/polyester) 20 – 40 mins<br />
4 T-shirts plus 5 Towels 60 – 80 mins<br />
9 Small Delicates 20 – 30 mins<br />
17
18 Drying rack<br />
4.5 kg dryers only<br />
A drying rack is available to dry shoes, hats <strong>and</strong> other items that are best dried without tumbling.<br />
How to use the drying rack<br />
1 Place the locating pin at the end of the drying rack into the hole in the centre of the rear of the<br />
dryer drum.<br />
2 Adjust the rack so that it is flat.<br />
3 For the Electronic dryer we recommend using the 1 hour manual cycle, <strong>and</strong> the low temperature<br />
setting (fully featured models).<br />
For the Manual dryer we recommend using the Delicate cycle.<br />
Important!<br />
Check the articles throughout the cycle to avoid overdrying.<br />
The dryer rack is an optional extra. (Part No. 427228). In New Zeal<strong>and</strong>, contact your<br />
<strong>Fisher</strong> & <strong>Paykel</strong> Dealer. In Australia, contact <strong>Fisher</strong> & <strong>Paykel</strong> on 1300 650 590.
Operating problems<br />
If your dryer is not operating properly use the checklist below to find the possible solution.<br />
Pressing POWER or setting the timer does not turn the machine on.<br />
Is the electrical cord plugged in?<br />
Is the power switched on at the wall?<br />
Is the door securely closed?<br />
Could your household power supply be at fault. Try plugging in another electrical appliance.<br />
Make sure the timer is not in the OFF position.<br />
Clothes are still damp.<br />
If you have turned the knob anti–clockwise on the Timer dryers the dryer will not dry.<br />
Try selecting a higher dryness level.<br />
Very small loads in the Electronic dryer may under-dry. Increase the load size.<br />
Pressing START/PAUSE does not start the Electronic dryer.<br />
Try pressing START/PAUSE again.<br />
Has the KEY LOCK been set?<br />
Dryer is taking a long time to dry.<br />
Is the lint filter clean?<br />
Is the airflow system free from obstruction?<br />
The dryer keeps stopping <strong>and</strong> starting.<br />
Has Wrinkle Guard been turned on?<br />
The dryer is beeping <strong>and</strong> the pattern of lights is unfamiliar.<br />
Turn the dryer off at the wall. Wait 15 seconds <strong>and</strong> turn it back on. Press POWER <strong>and</strong> restart.<br />
If the problem persists contact your Dealer or Authorised Service Centre.<br />
19
20 Manufacturers warranty<br />
The purchaser automatically receives a 2 year Manufacturer’s Warranty with the purchase of this<br />
Product covering parts <strong>and</strong> labour for servicing within the country of purchase.<br />
<strong>Fisher</strong> & <strong>Paykel</strong> undertakes to:<br />
Repair or, at its option, replace without cost to the owner either for material or labour any part of<br />
the Product, the serial number of which appears on the Product, which is found to be defective<br />
within TWO YEARS of the date of purchase.<br />
This warranty DOES NOT cover<br />
A Service calls which are not related to any defect in the Product. The cost of a service call will be<br />
charged if the problem is found not to be a Product fault. For example:<br />
1. Correcting the installation of the Product.<br />
2. Instructing you how to use the Product.<br />
3. Replacing house fuses or correcting house wiring or plumbing.<br />
4. Correcting fault(s) caused by the <strong>user</strong>.<br />
5. Noise or vibration that is considered normal, eg drain/fan sounds, regeneration noises<br />
or <strong>user</strong> warning beeps.<br />
6. Correcting damage caused by pests, eg rats, cockroaches etc.<br />
7. Poor drying performance due to incorrect installation eg no venting system fitted, dryer<br />
vent against a wall, blocked lint filter.<br />
8. Poor drying performance due to incorrect loading eg overloading or underloading.<br />
9. Damage from articles in the drum eg bra wires, pens, crayons, dye transfer or flammable<br />
material.<br />
10. Dryer not heating due to timer knob being turned anticlockwise.<br />
B Defects caused by factors other than:<br />
1. Normal domestic use or<br />
2. Use in accordance with the Product’s User Guide.<br />
C Defects to the Product caused by accident, neglect, misuse or Act of God.<br />
D The cost of repairs carried out by non-authorised repairers or the cost of correcting such<br />
unauthorised repairs.<br />
E Normal recommended maintenance as set out in the Product’s User Guide.<br />
F Repairs when the appliance has been dismantled, repaired or serviced by other than an<br />
AUTHORISED CUSTOMER SERVICE CENTRE or the selling dealer.<br />
G Pick-up <strong>and</strong> delivery.<br />
H Transportation or travel costs involved in the repair when the Product is installed outside the<br />
AUTHORISED CUSTOMER SERVICE CENTRE’S normal service area.<br />
An Authorised Service Agent must provide service under this Manufacturer’s Warranty (Refer<br />
to the Customer care section at the back of this book). Such service shall be provided during<br />
normal business hours. This warranty certificate should be shown when making any claim.<br />
Note<br />
This Warranty is an extra benefit <strong>and</strong> does not affect your legal rights under local consumer laws<br />
<strong>and</strong> applies only to Product purchased in New Zeal<strong>and</strong> <strong>and</strong> Australia.<br />
Please keep this User Guide in a safe place.
Check the things you can do yourself. Refer to your User Guide <strong>and</strong> check:<br />
1 Your appliance is correctly installed<br />
2 You are familiar with its normal operation<br />
3 You have read the Trouble Shooting section<br />
If after checking these points you still need assistance please refer to the following:<br />
In New Zeal<strong>and</strong> if you need assistance...*<br />
Call your <strong>Fisher</strong> & <strong>Paykel</strong> retailer who is trained to provide information on your appliance, or<br />
if we can be of any further help, please contact our Customer Care Centre,<br />
Toll Free: 0800 FP CARE or 0800 37 2273 Fax: (09) 273 0656<br />
Email: customer.care@fp.co.nz Postal address: P.O.Box 58732, Greenmount, Auckl<strong>and</strong><br />
If you need service...*<br />
<strong>Fisher</strong> & <strong>Paykel</strong> has a network of independent <strong>Fisher</strong> & <strong>Paykel</strong> AUTHORISED SERVICE CENTRES<br />
whose fully trained technicians can carry out any service necessary on your appliance. Your dealer<br />
or our Customer Care Centre can recommend an AUTHORISED SERVICE CENTRE in your area.<br />
In Australia if you need assistance...*<br />
Call the <strong>Fisher</strong> & <strong>Paykel</strong> Customer Care Centre <strong>and</strong> talk to one of our Customer Care Consultants.<br />
Toll Free: 1300 650 590 Fax: (07) 3826 9298<br />
Email: customer.care@fp.com.au Postal address: PO Box 798, Clevel<strong>and</strong>, QLD 4163<br />
If you need service...*<br />
<strong>Fisher</strong> & <strong>Paykel</strong> Australia Pty Ltd has a network of independent <strong>Fisher</strong> & <strong>Paykel</strong> AUTHORISED SERVICE<br />
CENTRES whose fully trained technicians can carry out any service necessary on your appliance. Our<br />
Customer Care Centre can recommend an AUTHORISED SERVICE CENTRE in your area.<br />
*If you call or write, please provide: name, address, model number, serial number, date of purchase<br />
<strong>and</strong> a description of the problem. This information is needed in order to better respond to your<br />
request for assistance.<br />
Product details can be found on a sticker situated on the back of the dryer cabinet, or on the<br />
inside of the dryer door.<br />
Product details<br />
<strong>Fisher</strong> & <strong>Paykel</strong> Appliances Ltd<br />
Model/Serial No.<br />
Date of Purchase Purchaser<br />
Dealer Suburb<br />
Town Country<br />
Customer care<br />
21
22 Header<br />
Copyright © <strong>Fisher</strong> & <strong>Paykel</strong> 2006. All rights reserved.<br />
The product specifications in this booklet apply to<br />
the specific products <strong>and</strong> models described at the<br />
date of issue. Under our policy of continuous product<br />
improvement, these specifications may change at any<br />
time. You should therefore check with your Customer<br />
Care Centre to ensure this booklet correctly describes<br />
the product currently available.<br />
www.fisherpaykel.com<br />
NZ AU GB IE<br />
Dryer<br />
<strong>Installation</strong> <strong>instructions</strong> <strong>and</strong> <strong>user</strong> <strong>guide</strong><br />
Published: 12/2006<br />
Part No. 427621 B