OAKTON pH 10 manual 8/00 rev - Oakton Instruments
OAKTON pH 10 manual 8/00 rev - Oakton Instruments
OAKTON pH 10 manual 8/00 rev - Oakton Instruments

Create successful ePaper yourself
Turn your PDF publications into a flip-book with our unique Google optimized e-Paper software.
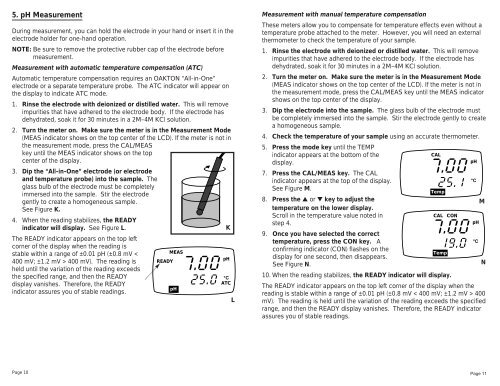
5. <strong>pH</strong> MeasurementDuring measurement, you can hold the electrode in your hand or insert it in theelectrode holder for one-hand operation.NOTE: Be sure to remove the protective rubber cap of the electrode beforemeasurement.Measurement with automatic temperature compensation (ATC)Automatic temperature compensation requires an <strong>OAKTON</strong> “All-in-One”electrode or a separate temperature probe. The ATC indicator will appear onthe display to indicate ATC mode.1. Rinse the electrode with deionized or distilled water. This will removeimpurities that have adhered to the electrode body. If the electrode hasdehydrated, soak it for 30 minutes in a 2M–4M KCl solution.2. Turn the meter on. Make sure the meter is in the Measurement Mode(MEAS indicator shows on the top center of the LCD). If the meter is not inthe measurement mode, press the CAL/MEASkey until the MEAS indicator shows on the topcenter of the display.3. Dip the “All-in-One” electrode (or electrodeand temperature probe) into the sample. Theglass bulb of the electrode must be completelyimmersed into the sample. Stir the electrodegently to create a homogeneous sample.See Figure K.4. When the reading stabilizes, the READYindicator will display. See Figure L.KThe READY indicator appears on the top leftcorner of the display when the reading isstable within a range of ±0.01 <strong>pH</strong> (±0.8 mV 4<strong>00</strong> mV). The reading isheld until the variation of the reading exceedsthe specified range, and then the READYdisplay vanishes. Therefore, the READYindicator assures you of stable readings.MEASREADY<strong>pH</strong><strong>pH</strong>°CATCLMeasurement with <strong>manual</strong> temperature compensationThese meters allow you to compensate for temperature effects even without atemperature probe attached to the meter. However, you will need an externalthermometer to check the temperature of your sample.1. Rinse the electrode with deionized or distilled water. This will removeimpurities that have adhered to the electrode body. If the electrode hasdehydrated, soak it for 30 minutes in a 2M–4M KCl solution.2. Turn the meter on. Make sure the meter is in the Measurement Mode(MEAS indicator shows on the top center of the LCD). If the meter is not inthe measurement mode, press the CAL/MEAS key until the MEAS indicatorshows on the top center of the display.3. Dip the electrode into the sample. The glass bulb of the electrode mustbe completely immersed into the sample. Stir the electrode gently to createa homogeneous sample.4. Check the temperature of your sample using an accurate thermometer.5. Press the mode key until the TEMPindicator appears at the bottom of theCALdisplay.<strong>pH</strong>7. Press the CAL/MEAS key. The CALindicator appears at the top of the display.°CSee Figure M.Temp8. Press the ▲ or ▼ key to adjust thetemperature on the lower display.MScroll in the temperature value noted inCAL CONstep 4.<strong>pH</strong>9. Once you have selected the correcttemperature, press the CON key. A°Cconfirming indicator (CON) flashes on theTempdisplay for one second, then disappears.See Figure N.N<strong>10</strong>. When the reading stabilizes, the READY indicator will display.The READY indicator appears on the top left corner of the display when thereading is stable within a range of ±0.01 <strong>pH</strong> (±0.8 mV < 4<strong>00</strong> mV; ±1.2 mV > 4<strong>00</strong>mV). The reading is held until the variation of the reading exceeds the specifiedrange, and then the READY display vanishes. Therefore, the READY indicatorassures you of stable readings.Page <strong>10</strong>Page 11