Regency P33 Sunrise™ Gas Fireplace
Regency P33 Sunrise™ Gas Fireplace
Regency P33 Sunrise™ Gas Fireplace

You also want an ePaper? Increase the reach of your titles
YUMPU automatically turns print PDFs into web optimized ePapers that Google loves.
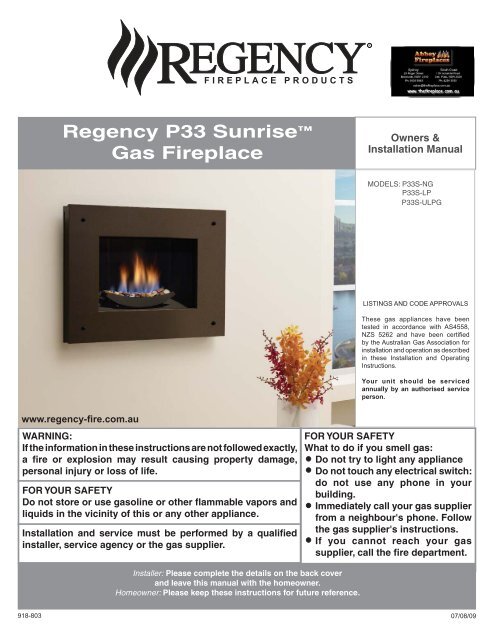
<strong>Regency</strong> <strong>P33</strong> Sunrise <strong>Gas</strong> <strong>Fireplace</strong>Owners &Installation ManualMODELS: <strong>P33</strong>S-NG<strong>P33</strong>S-LP<strong>P33</strong>S-ULPGLISTINGS AND CODE APPROVALSThese gas appliances have beentested in accordance with AS4558,NZS 5262 and have been certifi edby the Australian <strong>Gas</strong> Association forinstallation and operation as describedin these Installation and OperatingInstructions.Your unit should be servicedannually by an authorised serviceperson.www.regency-fire.com.auWARNING:If the information in these instructions are not followed exactly,a fire or explosion may result causing property damage,personal injury or loss of life.FOR YOUR SAFETYDo not store or use gasoline or other flammable vapors andliquids in the vicinity of this or any other appliance.Installation and service must be performed by a qualifiedinstaller, service agency or the gas supplier.FOR YOUR SAFETYWhat to do if you smell gas:Do not try to light any applianceDo not touch any electrical switch:do not use any phone in yourbuilding.Immediately call your gas supplierfrom a neighbour's phone. Followthe gas supplier's instructions.If you cannot reach your gassupplier, call the fire department.Installer: Please complete the details on the back coverand leave this manual with the homeowner.Homeowner: Please keep these instructions for future reference.918-80307/08/09
TABLE OF CONTENTSDATA BADGEData Badge....................................................................4DIMENSIONSUnit Dimensions ............................................................5INSTALLATIONImportant Message ......................................................6Before You Start ............................................................6General Safety Information............................................6Installation Checklist ......................................................7Locating Your <strong>Gas</strong> <strong>Fireplace</strong> .........................................7Clearances ....................................................................8Mantel Clearances.........................................................9Mantel Leg Clearances..................................................9Framing & Finishing.....................................................10Framing Dimensions.................................................... 11Unit Assembly Prior to Installation ...............................12Venting Introduction .....................................................12Exterior Flue Termination Locations ............................13<strong>Regency</strong> ® Direct Vent fl ex System ..............................14Rigid Pipe Venting Systems ........................................154" X 6-5/8" Rigid Pipe Cross Reference Chart ............16Rigid Pipe Venting Arrangements ...............................18Venting Arrangements - Vertical Terminations ............19Unit installation with Horizontal termination .................24Unit installation with Vertical Termination ....................25<strong>Gas</strong> Line Installation ....................................................25Pilot Adjustment ...........................................................26High Elevation .............................................................26S.I.T. Valve Description ................................................26<strong>Gas</strong> Pipe Pressure Testing ..........................................26Conversion from NG to LPG........................................27Conversion from NG to ULPG .....................................29DC Spark Box Battery Replacement ...........................31DC Spark Box Replacement........................................31Optional Wall Thermostat ...........................................32Optional Remote Control .............................................32Wall Switch ..................................................................32Aeration Adjustment ....................................................33Wiring Diagram ...........................................................33Optional Stainless Steel ..............................................34Refl ective Panel Installation ........................................34Glass Crystal Installation On Burner ...........................35Optional pebble Installation On fi rebox base ...............35Glass Door installation.................................................36Standard Flush Door ...................................................36Screen Installation .......................................................37Faceplate Installation...................................................38OPERATING INSTRUCTIONSOperating Instructions .................................................40First Fire ......................................................................40Lighting Procedure ......................................................40Shutdown Procedure ...................................................40Normal Operating Sounds of <strong>Gas</strong> Appliances .............40Copy of Lighting Plate Instructions ..............................41MAINTENANCEMaintenance Instructions.............................................42General Vent Maintenance ..........................................42Thermopile / Thermocouple .........................................42Glass Door...................................................................42Glass Replacement .............................................42Valve Tray Replacement ..............................................43Removing Valve ...........................................................43Installing Valve .............................................................43Trouble shooting guide.................................................44PARTS LISTMain Assembly ............................................................46WARRANTYWarranty ......................................................................47<strong>Regency</strong> <strong>P33</strong> Sunrise TM <strong>Gas</strong> <strong>Fireplace</strong> 3
DATA BADGEThis is a copy of the label that accompanies each <strong>P33</strong> <strong>Gas</strong> <strong>Fireplace</strong>.We have printed a copy of the contents here for your review.DATA BADGE NOTE: <strong>Regency</strong> ® units are constantly being improved.Check the label on the unit and if there is a difference, the label on theunit is the correct one.INSTALLATIONModel<strong>Regency</strong> <strong>Gas</strong> <strong>Fireplace</strong><strong>Gas</strong> Type NG LPG ULPGModel <strong>P33</strong>S-NG <strong>P33</strong>S-LPG <strong>P33</strong>S-ULPG<strong>Gas</strong> Consumption 18.0 mj. 16.4 mj. 14.8 mj.Manifold Pressure 0.88 kPa 2.49 kPa 2.49 kPaInjector Size 1 x #47 1 x #56 1 x #571.99mm 1.18 mm 1.09 mmAGA Approval number to: # 7500Code AS4558-NZ5262Distributed by:Western Australia:Air Group Australia28 Division StWelshpool WA 6106Eastern Australia:<strong>Fireplace</strong> ProductsAustralia Pty. Ltd.21-23 South Link Blvd.Dandenong, VIC 3175To be installed by an authorised person inaccordance with installation instructions providedwith the appliance.N2134349WARNING:“PRIMARILY A DECORATIVEAPPLIANCE NOT CERTIFIEDAS A SPACE HEATER”909-133(Australia Only)4<strong>Regency</strong> <strong>P33</strong> Sunrise TM <strong>Gas</strong> <strong>Fireplace</strong>
DIMENSIONSUNIT DIMENSIONSINSTALLATION<strong>Regency</strong> <strong>P33</strong> Sunrise TM <strong>Gas</strong> <strong>Fireplace</strong> 5
INSTALLATIONINSTALLATIONIMPORTANT MESSAGESAVE THESEINSTRUCTIONSThe <strong>P33</strong> Sunrise <strong>Fireplace</strong> must be installedin accordance with these instructions. Carefullyread all the instructions in this manual fi rst.Consult the "authority having jurisdiction" todetermine the need for a permit prior to startingthe installation. It is the responsibility of theinstaller to ensure this fi replace is installed incompliance with manufacturers instructions andall applicable codes.BEFORE YOU STARTSafe installation and operation of this appliancerequires common sense, however, we arerequired by the safety standards to make youaware of the following:YOUNG CHILDREN SHOULD BECAREFULLY SUPERVISED WHENTHEY ARE IN THE SAME ROOM ASTHE APPLIANCE.CLOTHING OR OTHER FLAMMABLEMATERIAL SHOULD NOT BE PLACEDON OR NEAR THE APPLIANCE.GENERAL SAFETYINFORMATION1) a) The appliance installation must conformwith local codes or, in the absence of localcodes, with the current Canadian or National<strong>Gas</strong> Codes, CAN1-B149 or ANSI Z223.1Installation Codes AS5601/AG601.11) Under no circumstances should this appliancebe modified. Parts that have to be removedfor servicing should be replaced prior tooperating this appliance.12) Installation and any repairs to this applianceshould be done by an authorized serviceperson. A professional service person shouldbe called to inspect this appliance annually.Make it a practice to have all of your gasappliances checked annually.13) Do not slam shut or strike the glass door.14) Under no circumstances should any solidfuels (wood, paper, cardboard, coal, etc.) beused in this appliance.15) The appliance area must be kept clear andfree of combustible materials, (gases andother fl ammable vapours and liquids).INSTALLATION AND REPAIR SHOULDBE DONE BY AN AUTHORIZEDSERVICE PERSON. THE APPLIANCESHOULD BE INSPECTED BEFOREUSE AND AT LEAST ANNUALLY BY APROFESSIONAL SERVICE PERSON.MORE FREQUENT CLEANING MAYBE REQUIRED DUE TO EXCESSIVELINT FROM CARPETING, BEDDINGMATERIAL, ETC. IT IS IMPERATIVETHAT CONTROL COMPARTMENTS,BURNERS AND CIRCULATING AIRPASSAGEWAYS OF THE APPLIANCEBE KEPT CLEAN.DUE TO HIGH TEMPERATURES, THEAPPLIANCE SHOULD BE LOCATEDOUT OF TRAFFIC AND AWAY FROMFURNITURE AND DRAPERIES.b) Slight carbon deposition may be possibleon appliances incorporating live fuel effectto operate with a luminous fl ame.2) The appliance when installed, must be electricallygrounded in accordance with localcodes, or in the absence of local codes withthe current National Electrical Code, ANSI/NFPA 70 or CSA C22.1 Canadian ElectricalCode / AG5601/AG601.3) See general construction and assemblyinstructions. The appliance and vent shouldbe enclosed.4) This appliance must be connected to thespecified vent and termination cap to theoutside of the building envelope. Never ventto another room or inside a building. Makesure that the vent is fi tted as per Ventinginstructions.5) Inspect the venting system annually forblockage and any signs of deterioration.WARNING: FAILURE TO INSTALL THISAPPLIANCE CORRECTLY WILL VOIDYOUR WARRANTY AND MAY CAUSEA SERIOUS HOUSE FIRE.6) Venting terminals shall not be recessed intoa wall or siding.7) Any safety glass removed for servicingmust be replaced prior to operating the appliance.CHILDREN AND ADULTS SHOULD BEALERTED TO THE HAZARDS OF HIGHSURFACE TEMPERATURES, ESPE-CIALLY THE FIREPLACE GLASS, ANDSHOULD STAY AWAY TO AVOID BURNSOR CLOTHING IGNITION.8) To prevent injury, do not allow anyone whois unfamiliar with the operation to use thefi replace.9) Wear gloves and safety glasses for protectionwhile doing required maintenance.10) Be aware of electrical wiring locations inwalls and ceilings when cutting holes fortermination.6<strong>Regency</strong> <strong>P33</strong> Sunrise TM <strong>Gas</strong> <strong>Fireplace</strong>
INSTALLATIONINSTALLATIONCHECKLIST1) Locate appliancea) Room location (Refer to "Locating Your<strong>Gas</strong> fi replace" section)b) Clearances to Combustibles (Refer to"Clearances" section)c) Mantle Clearances (Refer to "MantelClearances" section)d) Framing & Finishing Requirements (Referto "Framing & Finishing" section)e) Venting Requirements (Refer to "Venting"section)2) Assemble Top and Side Standoffs (Refer to"Unit Assembly Prior to Installation).3) Slide unit into place.This includes:1) Clocking the appliance to ensure the correctfi ring rate (rate noted on label), after burningappliance for 15 minutes.2) If required, adjusting the primary air to ensurethat the fl ame does not carbon. First allowthe unit to burn for 15-20 min. to stabilize.CAUTION: Any alteration to the product thatcauses sooting or carboning that resultsin damage is not the responsibility of themanufacturer.LOCATING YOURGAS FIREPLACE4) This appliance is Listed for bedroominstallations when used with a listed MillivoltThermostat. Some areas may have furtherrequirements, check local codes beforeinstallation.5) The <strong>P33</strong> Sunrise <strong>Gas</strong> <strong>Fireplace</strong> is approvedfor alcove installations, see "Clearances"section for details.6) We recommend that you plan your installationon paper using exact measurements forclearances and floor protection beforeactually installing this appliance. Have anauthorized inspector, dealer, or installerreview your plans before installation.Note: For vent terminations refer to"Exterior Vent Termination Locations"section.INSTALLATION4) Install vent (Refer to "Venting Arrangement"sections).1) When selecting a location for your fi replace,ensure that the clearances are met.5) Make gas connections (Refer to "<strong>Gas</strong> LineInstallation section).Adjust aeration setting depending onlocation/fuel used.6) Test the pilot (Refer to "Pilot Adjustment"section).7) Test <strong>Gas</strong> Pressure (Refer to "<strong>Gas</strong> Pipe PressureTesting" section).8) Install 1 AA battery in the DC Sparker(see P 32).2) The appliance must be installed on a fl at,solid, continuous surface For example awood, metal or concrete floor or in a raised (onthe wall) application. The appliance must beinstalled on a metal or wood panel extendingthe full width and depth of the appliance.3) The <strong>P33</strong> Sunrise <strong>Gas</strong> <strong>Fireplace</strong> can beinstalled in a recessed position or framedout into the room as in A, B, C and D. SeeDiagram 1.9) Install standard and optional features.Refer to the following sections:a) Optional Stainless Steel Refl ectivePanelsb) Glass Crystals or Optional CeramicStonesc) Optional Firebox Base Pebblesd) Remote Control or Wall Thermostate) FaceplateDiagram 110) Wall Mounted ON/OFF Switch:Use the toggle wall switch supplied with themanual package. Use of a “decor” switchcauses higher resistance which is a problemon gas fi replaces.11) Final check.Before leaving this unit with the customer, theinstaller must ensure that the appliance is fi ringcorrectly and operation fully explained tocustomer.A) Flat on WallB) Flat on Wall CornerC) Recessed into Wall/AlcoveD) Corner<strong>Regency</strong> <strong>P33</strong> Sunrise TM <strong>Gas</strong> <strong>Fireplace</strong> 7
INSTALLATIONCLEARANCESThe clearances listed below are Minimum distances unless otherwise stated:INSTALLATIONA major cause of chimney related fires is failure to maintain required clearances (air space) to combustible materials. It is of the greatestimportance that this fireplace and vent system be installed only in accordance with these instructions.Caution RequirementsThe top, back and sides of the fi replace are defi ned bystandoffs. The metal ends of the standoff may NOT berecessed into combustible construction.WARNINGFire hazard is an extreme riskif these clearances (air space) to combustible materials are notadhered to. It is of greatest importance that this fireplace and ventsystem be installed only in accordance with these instructions.CBClose to CeilingClearance: Dimension Measured From:A: *Front Floor Clearance (min.) 1" (25mm) Underside of UnitB: *Sidewall (on one side) 7-1/2" (241mm) Side of UnitC: *Ceiling(room and/or alcove) 30" (889mm) Top of UnitD: Alcove Width 48" (1219mm) Sidewall to Sidewall (Minimum)E: Alcove Depth 36" (914mm) Front to Back Wall (Maximum)Flue ClearancesHorizontal - Top 2-1/2" 64mmHoriztonal - Side 1-1/2" 38mmHoriztonal - Bottom 1-1/2" 38mmVertical (Flex Vent) 1-1/2" 38mmVertical (Rigid) 1-1/4" 32mm*Note: All measurements are from the top/side of the unit, not from facade.8<strong>Regency</strong> <strong>P33</strong> Sunrise TM <strong>Gas</strong> <strong>Fireplace</strong>
INSTALLATIONMANTEL CLEARANCESDue to the extreme heat this fireplace emits, themantel clearances are critical. Combustible mantelclearances from top of front facing are shown in thediagram on the right.Note: A non-combustible mantel may beinstalled at a lower height if the framingis made of metal studs covered with anon-combustible board.Mantel Clearances12 10 8 6 420DrywallINSTALLATIONNote: Ensure the paint that is used on the manteland the facing is "heat resistant" or thepaint may discolour.121012" (305mm)7-1/2"(191mm)80” - 3-1/2" (89mm)64211"(279mm)9"(229mm)7"(178mm)3"(76mm)Standoff041"(1041mm)to flooror 29”(737mm)to base of unitTop ofUnitSide ViewCombustible mantel leg clearances from side of unitas per diagram:MANTEL LEG CLEARANCES<strong>Regency</strong> <strong>P33</strong> Sunrise TM <strong>Gas</strong> <strong>Fireplace</strong> 9
INSTALLATIONFRAMING & FINISHINGINSTALLATION1) Determine the total thickness of facing material (e.g. drywall, woodplus ceramic tiles) to allow the fi nished surface to be fl ush with thefront of the unit. Total facing thickness can vary from 1/2" (13mm) to1-1/4" (32mm) thick.NOTE: Facing material may not protrude beyond unit, otherwise theoptional accesories will not be able to be mounted to the unit.Install Side Nailing Strips, and Top FacingSupport before unit is slipped into position.See "Unit Assembly Prior to Installation"Section4) Combustible material may be brought up to the top and sides ofthe unit and be covered with wood, drywall, ceramic tiles, bricks,rock or other suitable combustible fi nishing materials.Note: The unit does not have to be completely enclosed in a chase.The clearance on top of the unit is 0" to the standoffs socombustible building materials can be laid directly on topof the standoffs. You must maintain clearance from the ventto combustible materials for flex or for Rigid Vent (Referto "Clearances" Section).5) Use steel studs for framing where the 1-1/2" (38mm) clearancefrom the vent to combustible material cannot be maintained.2) Frame in the enclosure for the unit with framing material.The top of the glass door frame must not be closer than 35" (889mm)to the ceiling.Note: When constructing the framed opening, please ensure thereis access to install the gas lines when the unit is installed.3) For exterior walls, insulate the enclosure to the same degree as therest of the house, apply vapour barrier and drywall, as per local installationcodes. (Do not insulate the fireplace itself.)WARNING: Failure to insulate and add vapor barriers to the insideof the exterior wall will result in operational and performanceproblems including, but not limited to: excessive condensationon glass doors, poor flame package, carbon, blue flames etc.These are not product related issues.10<strong>Regency</strong> <strong>P33</strong> Sunrise TM <strong>Gas</strong> <strong>Fireplace</strong>
INSTALLATIONFRAMING DIMENSIONSMIINSTALLATIONTop HeaderWood, drywallor other facing.H10" (254mm)dia. Hole throughwall Vent.IGNOTE: If this is an outside corner, theminimum distance between the ventand the outside corner is 6" (15cm)with AstroCap termination cap or 12"(30cm) with Rigid Vent termination cap.(For example Dura-Vent)KJJFloorNIOLOpening for gasconnectionFraming Dimensions Description <strong>P33</strong>SG Framing Width 33-1/4"(845mm)H Framing Height * 31-3/4" (806mm)I Framing Rise from Floor 1" (25mm) Min.JFraming DepthHorizontal with rise /verticalHorizontal without rise19-1/2" (495mm)Vertical /Vertical Rise terminating horizontally16-1/2" (419mm) Rigid / 12-3/4" (324mm) FlexK Corner Wall Length 37-1/2" (953mm)L Corner Facing Wall Width 53-1/4" (1353mm)M Framed Chase Ceiling* 36" (914mm) Rigid 32" (812mm) FlexN Vent Centerline Height* 30" (762mm) Rigid 26" (660mm) FlexO <strong>Gas</strong> Connection Height* 1 1/2" (38mm)P <strong>Gas</strong> Connection Inset* 4" (102mm)Q <strong>Gas</strong> Connection Width* 3" (76mm)PQ* Measured from base of unit.<strong>Regency</strong> <strong>P33</strong> Sunrise TM <strong>Gas</strong> <strong>Fireplace</strong> 11
INSTALLATIONUNIT ASSEMBLY PRIOR TO INSTALLATIONINSTALLATIONThe Top Facing Support, the Side Nailing Stripsand the 2 Top Standoffs must be correctlypositioned and attached to the top before theunit is put into position.Top Standoff AssemblyThe top standoffs are shipped in a fl at positionand must be pulled up and bent into the correctshape.1) Remove the standoffs from on top of thefi rebox by undoing the screws.Top Facing Support &Side Nailing StripsDetermine the total thickness of facing material(e.g. drywall, wood plus ceramic tiles) to allowthe fi nished surface to be fl ush with the front ofthe unit. Total facing thickness can vary from1/2" (13mm) to 1-1/4" (32mm) thick.The Top Facing Support & Side Nailing Stripscan be mounted in various positions dependingon the thickness of the facing material.Top FacingSupportSideNailingStrip2) Take each standoff and bend into the correctshape. Bend up at the bend lines until thescrew holes in the standoff and the prepunchedscrew holes on the fi rebox topline-up.3) Attach the standoffs securely to the top with4 screws per standoff.Note: Secure the standoffs to the holesclosest to the edge of the fi rebox top.Top Standoffafter bendingTop Standoff(flat shippingposition)1) Mount Top Facing Support using the 3supplied screws into the three pre-punchedscrew holes on the top front of the unit. Adjustsupport to desired facing material depth.2) Mount Side Nailing Strip using the 3supplied screws into the three pre-punchedscrew holes at the front sides of the unit.Adjust support to desired facing materialthickness.For a facing material depth of1-1/4"(32mm), the top facingsupport must be reversed.BeforeAfterBendhereVENTING INTRODUCTIONThe <strong>P33</strong> Sunrise uses the "balanced fl ue" technology Co-Axial system. The inner liner vents products of combustion to the outside while theouter liner draws outside combustion air into the combustion chamber thereby eliminating the need to use heated room air for combustion and losingwarm room air up the chimney.There are 5 vent systems approved for use with the <strong>P33</strong>S: the <strong>Regency</strong> ® Direct Vent Flex System for Horizontal Terminations only and the SimpsonDura-Vent, Selkirk Direct-Temp, Amerivent Direct Vent and Security Secure Vent Systems for Horizontal and Vertical Terminations (see following"Venting" Sections for more details).Note: These flue pipes must not be connected to any other appliance.The gas appliance and vent system must be vented directly to the outside of the building, and never be attached to a chimney serving a separatesolid fuel or gas burning appliance. Each direct vent gas appliance must use it's own separate vent system. Common vent systems are prohibited.(See "Rigid Pipe Venting System" for more details and exceptions).NOTE: Ensure compliance with the outside vent terminal location before cutting hole as both dimensions must be met.12<strong>Regency</strong> <strong>P33</strong> Sunrise TM <strong>Gas</strong> <strong>Fireplace</strong>
EXTERIOR FLUE TERMINATION LOCATIONSINSTALLATIONINSTALLATIONMinimum clearances required for balanced flue terminals orthe flue terminals of outdoor appliancesaccording to AS5601-2004 (AGA gas installation code) or NZS 5262 (New Zealand)and local authorities having jurisdiction.Minimum Clearance (mm)a Below eaves, balconies or other projections:- Appliances up to 50 MJ/h input 300- Appliances over 50 MJ/h input 500b From the ground or above a balcony 300c From a return wall or external corner 500d From a gas meter (M) 1000e From an electricity meter or fuse box (P) 500f From a drain or soil pipe 150g Horizontal from any building structure (unless appliance is approvedfor closer installation) or obstruction facing a terminal 500h From any other fl ue terminal, cowl or combustion air intake 500j Horizontally from an openable window, door, or non-mechanical air inlet, orany other opening into a building, with the exception of sub-fl oor ventilation(see also Note (I)):- Appliances up to 150 MJ/h input 500- Appliances over 150 MJ/h input 1500k Vertically below an openable window, door, or non-mechanical air inlet,or any other opening into a building, with the exception of sub-fl oor ventilation(see also Note (I)): see table belowClearance 'k' in mmSpace HeatersUp to 50 MJ/hinputAll Other AppliancesUp to 50 MJ/hOver 50 MJ/h inputto 150 MJ/h inputOver 150 MJ/hinput150 500 1000 1500(I) For mechanical air inlets, including spa blowers, the clearance 'j' and 'k' shall be 1500 mm in all cases.(II) All distances shall be measured vertically or horizontally along the wall to a point in line with the nearest par to of the terminal.(III) Prohibited area below electricity meter or fuse box extends to ground level.(IV) A fl ue terminal of this type shall not be located under a roofed area unless the roofed area is fully open on at least two sides and a free fl ow ofair at the appliance is achieved.<strong>Regency</strong> <strong>P33</strong> Sunrise TM <strong>Gas</strong> <strong>Fireplace</strong> 13
INSTALLATIONREGENCY ® DIRECT VENT FLEX SYSTEMHorizontal Terminations OnlyINSTALLATIONThis venting system, in combination with the <strong>P33</strong>S-4 Direct Vent <strong>Gas</strong> <strong>Fireplace</strong>, have been tested and listed as a direct vent heater system by Austraiian<strong>Gas</strong> Association. The location of the termination cap must conform to the requirements in the "Exterior Vent Terminal Locations" Section .<strong>Regency</strong> ® Direct Vent Flex Termination Kit (Part # 946-513) includes all the parts needed to install the <strong>P33</strong>S-4 with a maximum run of 2 feet(0.6m). If installing the <strong>P33</strong>S-4 with a continuous vent length of more than 2 ft (.6m) to a maximum of 10 ft. (3.0m) use Kit # 946-515 (4 ft) or 946-516 (10 ft) or see "Rigid Pipe Venting Systems" Section for alternate venting arrangements.AstroCap Flex Kits1 6-7/8"(175mm) dia. flexible liner (kit length)2 4"(102mm) dia. flexible liner (kit length)3 spring spacers (3)4 thimble (2)5 AstroCap termination cap (1)6 screws (12)7 tube of Mill Pac (1)8 plated screws (8)Notes:1) Liner sections should be continuouswithout any joints or seams.2) Only Flex pipe purchased from <strong>Regency</strong> ®may be used for Flex installations.MINIMUMRIGID PIPE CENTER-LINEMINIMUMFLEX KIT CENTER-LINENote: - Unit must be raised by 1".14<strong>Regency</strong> <strong>P33</strong> Sunrise TM <strong>Gas</strong> <strong>Fireplace</strong>
INSTALLATIONRIGID PIPE VENTING SYSTEMSHorizontal or Vertical TerminationsThe minimum components required for a basichorizontal termination are:1 AstroCap Horizontal Termination Cap1 45 o Elbow1 Rigid Pipe Adaptor1 Wall Thimble1 Length of pipe to suit wall thickness(see chart)For siding other than vinyl furring strips maybe used, instead of the vinyl siding standoff,to create a level surface to mount the ventterminal. The Terminal must not be recessedinto siding.If a Vinyl Siding Standoff is required (it mustbe used with vinyl siding), measure to outsidesurface of wall without siding and add 2inches.VerticalTerminalFlashingPipe Lengtho90 ElbowPipe LengthVinyl SidingStandoff (Optional)Adj.Pipe Length11" - 14-5/8”Wall ThimbleHorizontalTermination Cap# 946-523/PHorizontalTermination Cap#946-523/PINSTALLATIONWall ThimblePipe Lengtho45 ElbowRigid Pipe Adapter# 510-994WARNING:Do not combine venting components fromdifferent venting systems.16-1/2”(419mm)23-3/4”(603mm)7-1/4” (184mm)max. Wall thickneswith 6” (152mm)vent length.Flat Wall InstallationMax. WallVent LengthThickness (mm) Required (mm)184mm152mm260mm229mm337mm305mm210mm76mm to 178mm Slip337mm76mm to 368mm SlipException: However, use of the the AstroCap TMis acceptable with all systems.This product has been evaluated by AGA forusing a Rigid Pipe Adaptor in conjunction withDuravent Direct-Vent , Selkirk Direct-Temp,Ameri Vent Direct venting and Security SecureVent systems. Use of these systems with theRigid Pipe adaptor is deemed acceptable anddoes not affect the listing of components.When using Rigid Vent other thanSimpson Dura-Vent, 3 screws must beused to secure rigid pipe to adaptor.The FPI AstroCap TM is certifi ed for installations using FPI venting systems as well as Simpson Dura-Vent ® Direct Vent,American Metal Products Ameri Vent Direct Vent, Security Secure Vent ® , Selkirk Direct-Temp. AstroCap TM is a proprietary trademark of FPI <strong>Fireplace</strong>Products International Ltd. Dura-Vent® and Direct Vent are registered and/or proprietary trademarks of Simpson Dura-Vent Co. Inc.<strong>Regency</strong> <strong>P33</strong> Sunrise TM <strong>Gas</strong> <strong>Fireplace</strong> 15
INSTALLATION4" X 6-5/8" RIGID PIPE CROSS REFERENCE CHARTComponents from different Manufacturers may not be mixed. Not all Rigid Pipe components are available directly from FPI.INSTALLATIONDescriptionSimpsonDirect Vent Pro ®SelkirkDirect TempAmerican MetalProducts®Amerivent DirectMetal-FabSure SealSecuritySecure- Vent®ICC ExcelDirect6” Pipe Length-Galvanized 46DVA-06 4DT-6 N/A 4D6 SV4L6 TC-4DL66” Pipe Length-Black 46DVA-06B 4DT-6B N/A 4D6B SV4LB6 TC-4DL6B7” Pipe Length-Galvanized N/A N/A 4D7 N/A N/A N/A7” Pipe Length-Black N/A N/A 4D7B N/A N/A N/A9” Pipe Length-Galvanized 46DVA-09 4DT-9 N/A N/A N/A N/A9” Pipe Length-Black 46DVA-09B 4DT-9B N/A N/A N/A N/A12” Pipe Length-Galvanized 46DVA-12 4DT-12 4D12 4D12 SV4L12 TC-4DL112” Pipe Length-Black 46DVA-12B 4DT-12B 4D12B 4D12B SV4LB12 TC-4DL1B18” Pipe Length-Galvanized 46DVA-18 4DT-18 4D18 4D18 SV4LA TC-4DL1818” Pipe Length-Black 46DVA-18B 4DT-18B 4D18B 4D18B SV4LA TC-4DL18B24” Pipe Length-Galvanized 46DVA-24 4DT-24 4D24 4D24 SV4L24 TC-4DL224” Pipe Length-Black 46DVA-24B 4DT-24B 4D24B 4D24B SV4LB24 TC-4DL2B36” Pipe Length-Galvanized 46DVA-36 4DT-36 4D36 4D36 SV4L36 TC-4DL336” Pipe Length-Black 46DVA-36B 4DT-36B 4D36B 4D36B SV4LB36 TC-4DL3B48” Pipe Length-Galvanized 46DVA-48 4DT-48 4D48 4D48 SV4L48 TC-4DL448” Pipe Length-Black 46DVA-48B 4DT-48B 4D48B 4D48B SV4LB48 TC-4DL4B60” Pipe Length-Galvanized 46DVA-60 4DT-60 N/A N/A N/A N/A60” Pipe Length-Black 46DVA-60B 4DT-60B N/A N/A N/A N/AAdjustable Length 3”-10”-Galvanized N/A N/A N/A 4DAL N/A TC-4DLTAdjustable Length 3”-10”-Black N/A N/A N/A 4DALB N/A TC-4DLTBAdjustable Length 7”-Galvanized N/A N/A 4D7A N/A N/A N/AAdjustable Length 7”-Black N/A N/A 4D7AB N/A N/A N/AExtension Pipe 8-1/2”-Galvanized 46DVA-08A N/A N/A N/A N/A N/AExtension Pipe 8-1/2”-Black 46DVA-08AB N/A N/A N/A N/A N/AAdjustable Length 12”-Galvanized N/A N/A 4D12A N/A SV4LA12 N/AAdjustable Length 12”-Black N/A N/A 4D12A N/A SV4LBA12 N/AExtension Pipe 16”-Galvanized 46DVA-16A N/A N/A N/A N/A N/AExtension Pipe 16”-Black 46DVA-16AB N/A N/A N/A N/A N/A45º Elbow-Galvanized 46DVA-E45 4DT-EL45 4D45L N/A N/A TE-4DE4545º Elbow-Black 46DVA-E45B 4DT-EL45B 4DT-EL45B N/A N/A TE-4DE45B45º Elbow Swivel-Galvanized See 46DVA-E45 N/A N/A 4D45L SV4E45 N/A45º Elbow Swivel-Black See 46DVA-E45B N/A N/A 4D45LB SV4EB45 N/A90º Elbow-Galvanized 46DVA-E90 4DT-EL90S 4DT-EL90S N/A N/A TE-4DE9090º Elbow-Black 46DVA-E90B 4DT-EL90SB 4DT-EL90SB N/A SV4EBR90-1 TE-4DE90B90º Elbow, Swivel-Galvanized See 46DVA-E90 N/A N/A 4D90L SV4E90-1 N/A90º Elbow, Swivel-Black See 46DVA-E90B N/A N/A 4D90LB SV4EB90-1 N/A90º Starter Elbow, Swivel-Galvanized N/A N/A N/A 4D90A N/A N/AAdaptor* N/A N/A N/A 4D90L N/A N/ACeiling Support N/A 4DT-CS 4DFSP 4DSP SV4SD TE-4DE45Cathedral Support Box 46DVA-CS 4DT-CSS 4DRSB 4DRS SV4CSB TE-4DE45BWall Support/Band 46DVA-WS 4DT-WS/B 4DWS 4DWS SV4BM N/AOffset Support 46DVA-ES (N/A - FPI) 4DT-OS N/A N/A SV4SU N/AWall Thimble-Black 46DVA-WT 4DT-WT 4DWT 4DWT SV4RSM TE-4DE90Wall Thimble Support/Ceiling Support 46DVA-DC N/A N/A N/A SV4PF TE-4DE90BFirestop Spacer 46DVA-FS 4DT-FS 4DFSP 4DFS SV4BF N/ATrim Plate-Black N/A 4DT-TP 4DFPB 4DCP SV4LA N/A16<strong>Regency</strong> <strong>P33</strong> Sunrise TM <strong>Gas</strong> <strong>Fireplace</strong>
INSTALLATIONDescriptionSimpsonDirect Vent Pro ®SelkirkDirect TempAmerican MetalProducts®Amerivent DirectMetal-FabSure SealSecuritySecure- Vent®Attic Insulation Shield 12” 46DVA-IS N/A@ FPI N/A 4DAIS12 N/A SV4RSA N/AAttic Insulation Shield - Cold Climates 36” N/A N/A 4DAIS12 N/A N/A TM-4ASBasic Horizontal Termination Kit (A) Disc. 4DT-HKA 4DHTK2 4DHTKA SV-SHK N/AHorizontal Termination Kit (B)46DVA-KHA 4DT-HKB 4DHTK1 4DHTKB SV-HK N/A(Changed Components)Vertical Termination Kit Disc. 4DT-VKC 4DHTK 4DHTK SV-FK N/AICC ExcelDirectINSTALLATIONHigh Wind Vertical Cap 46DVA-VCH N/A N/A N/A N/A TM-4VTHigh Wind Horizontal Cap 46DVA-HC N/A N/A N/A N/A TM-4DHTHorizontal Square Termination Cap See 46DVA-HC 4DT-HHC 4DHC 4DHT SV4CHC-1 TM-4HTVertical Termination Cap N/A 4DT-HVC 4DVC 4DVT SV4CGV-1 TM-4VTStorm Collar 46DVA-08A 4DT-SC 4DSC 4DSC SV4FC TM-SCAdjustable Flashing 0/12-6/12 N/A 4DT-ST14 4D12S 4DST14 SV4STC14 TF-4FAAdjustable Flashing 6/12-12/12 N/A 4DT-ST36 4D36S 4DST36 SV4STC36 TF-4FBVinyl Siding Standoff 46DVA-VSS 4DT-VS N/A 4DVS SV4VS TM-VSSVinyl Siding Shield Plate N/A 4DT-VSP N/A N/A SV4VS N/ASnorkel Termination 14” 46DVA-VCH N/A N/A N/A N/A TM-4ST14Snorkel Termination 36” 46DVA-HC N/A N/A N/A N/A TM-4ST36Restrictor Disk 46DVA-RD N/A N/A N/A N/A TM-4DSExtended Vertical Termination Cap 46DVA-VCE N/A N/A N/A N/A N/AChimney Conversion Kit A (USA only) 46DVA-KCA N/A N/A N/A N/A TM-4CA6Chimney Conversion Kit B (USA only) 46DVA-KCB N/A N/A N/A N/A TM-4CA7Chimney Conversion Kit C (USA only) 46DVA-KCC N/A N/A N/A N/A TM-4CA8Chimney Conversion Kit Masonry(USA only)46DVA-KMC N/A N/A N/A N/A N/AWall Firestop 46DVA-WFS N/A N/A N/A N/A TM-4TRColinear Flex Connectors 46DVA-ADF N/A N/A N/A N/A N/AFPI946-506/P Vent Guard (Optional) for AstroCap 946-205 Vinyl Siding Shield for Riser Vent Terminal510-994 Rigid Pipe Adaptor (Must use with all rigid piping) 946-208/P Vent Guard (Optional) for Riser Vent Terminal640-530/P Riser Vent Terminal 946-523/P AstroCap Horizontal Cap946-605 Starter Collar Increaser 4” x 6-5/8” to 5” x 8” 946-206 Vinyl Siding Standoff for AstroCapNote: When using Metal-Fab Sure Seal Rigid Piping - please note that the Adaptor (4DDA) must be used in conjunction with FPI Rigid Pipe Adaptor (510-994).Offset Pipe Selection: Use this table to determine offset pipe lengths.Pipe Length4” x 6-5/8” Venting For specifi c instructions on venting components - visit the(L)Run (X)Rise (Y)manufacturers website listed below.0” (0mm) 4-7/8” (124mm) 13-7/8” (340mm) Simpson Direct Vent Pro: www.duravent.com6” (152mm) 8” (203mm) 16-1/2” (419mm) Selkirk Direct-Temp: www.selkirkcorp.com9” (229mm) 10-1/8” (257mm) 18-5/8” (473mm) American Metal Products: www.americanmetalproducts.com12” (305mm) 12-1/4” (311mm) 20-3/4” (527mm) Metal-Fab Sure Seal: www.mtlfab.com24” (610mm) 20-5/8” (524mm) 29-1/8” (740mm) Security Secure Vent: www.securitychimneys.com36” (914mm) 29” (737mm) 37-1/2” (953mm) Industrial Chimney Company: www.icc-rsf.com48” (1219mm) 37-7/16” (951mm) 45-15/16” (1167mm)Note: Horizontal runs of vent must be level, or have a 1/4” rise for every 1 foot of run towards the termination.Never allow the vent to run downward - this could cause high temperatures and may present a possible fi re hazard.<strong>Regency</strong> <strong>P33</strong> Sunrise TM <strong>Gas</strong> <strong>Fireplace</strong> 17
INSTALLATIONRIGID PIPE VENTING ARRANGEMENTSVertical TerminationsINSTALLATIONThe shaded area in the diagram shows all allowable combinations of straight vertical and offset to vertical terminations, using one 90 o elbow, withrigid pipe vent systems.• Unit must be raised 1" (25mm).• Firestops are required at each floor level and whenever passing through a wall.• Maintain clearances to combustibles.• Vent must be supported at offsets.Note: Must use optional rigid pipe adapter when using rigid vent systems (Part # 510-994).18<strong>Regency</strong> <strong>P33</strong> Sunrise TM <strong>Gas</strong> <strong>Fireplace</strong>
30”(762mm)30”(762mm)30”(762mm)INSTALLATIONVENTING ARRANGEMENTS - VERTICAL TERMINATIONSwith Co-linear Flex System for bothResidential & Manufactured Homesinto Masonry <strong>Fireplace</strong>sThe shaded area in the diagrams show the allowable vertical terminations.INSTALLATION303030Vertical Height (feet)8' (2.4m) Min.30' (9.1m) Max.Vertical Height (feet)2’ (51mm) max.8' (2.4m) Min.30' (9.1m) Max.Vertical Height (feet)8' (2.4m) Min.30' (9.1m) Max.Horizontal Distance (Feet)Horizontal Distance (Feet)Horizontal Distance (Feet)The shaded area in the diagrams showthe allowable vertical terminations."THIS UNIT MUST ALWAYSTERMINATE / VENTDIRECTLY TO THE OUTDOORS."<strong>Regency</strong> <strong>P33</strong> Sunrise TM <strong>Gas</strong> <strong>Fireplace</strong> 19
00INSTALLATIONRIGID PIPE VENTING ARRANGEMENTSHorizontal TerminationsREGENCY ® DIRECT VENT SYSTEM (FLEX)INSTALLATIONThis diagram shows all allowable combinations of vertical runs with horizontal terminations, using one 45 o and one 90 o elbow (two 45 o elbowsequal one 90 o elbow).Note: Must use optional rigid pipe adaptor (Part # 510-994) when using rigid pipe vent systems. (Refer "Rigid Pipe Venting Systems"Section)02Horizontal (Feet)4 6 8 10 12 14161820161412Vertical Height (Feet)1086A vent guard should be used whenever thetermination is lower than the specified minimumor as per local codes.4208"(0.2m)2’ (0.6m)30” (762mm)MinimumHeightRequirementNote: <strong>Regency</strong> ® Direct Vent System (Flex)is only approved for horizontalterminations.• Maintain clearances to combustibles.• Horizontal vent must be supported every 3 feet.• Firestops are required at each floor level and whenever passing through a wall.MinimumSimpson Dura-Vent Center-LineMinimumFlex Kit Center-LineHorizontal (Feet)24 6 8Horizontal (Feet)24 6 8Vertical Height (Feet)86420Max. 24"(0.6m)Min. 30"(762mm)Vertical Height (Feet)86420Max. 24"(0.6m)Min. 26”(660mm)"THIS UNIT MUST ALWAYSTERMINATE / VENTDIRECTLY TO THE OUTDOORS."20<strong>Regency</strong> <strong>P33</strong> Sunrise TM <strong>Gas</strong> <strong>Fireplace</strong>
INSTALLATIONHorizontal Venting with Two (2) 90 o ElbowsHorizontal Venting with Two (2) 90 o ElbowsOne 90 o elbow = Two 45 o elbows.Option V H+ H1A) .3m Min. .9m Max.With these options, max.total pipe length is 9m withB) .6m Min. 1.2m Max. min. of 1.8m total vertical andC) .9m Min. 1.5m Max.max. 2.4m total horizontal.D) 1.2m Min. 1.8m Max.E) 1.5m Min. 2.1m Max.F) 1.8m Min. 2.7m Max.Please note minimum .3m between 90 o elbows is required.One 90 o elbow = Two 45 o elbows.Option H V H+ H1+H2A) .3m Max. .3m Min. .9m Max.With theseoptions, max.B) .6m Max. .9m Min. 1.5m Max total pipe lengthC) .9m Max. 1.5m Min. 1.8m Max.is 9m with min. of3.3m total verticalD) 1.2m Max. 2.1m Min. 2.1m Max. and max. 2.7mE) 1.5m Max. 2.7m Min. 2.4m Max. total horizontal.F) 1.8m Max. 3.3m Min. 2.7m Max.Please note minimum .3m between 90 o elbows is required.INSTALLATIONHorizontal Venting with Two (2) 90 o ElbowsOne 90 o elbow = Two 45 o elbows.Option H V H+ H1A) .3m Max. .3m Min. .9m Max.With theseoptions, max.B) .6m Max. .6m Min. 1.5m Max total pipe lengthC) .9m Max. 1.2m Min. 1.8m Max.is 9m with min. of2.4m total verticalD) 1.2m Max. 1.8m Min. 2.1m Max. and max. 2.4mE) 1.5m Max. 2.4m Min. 2.4m Max. total horizontal.Please note minimum .3m between 90 o elbows is required.<strong>Regency</strong> <strong>P33</strong> Sunrise TM <strong>Gas</strong> <strong>Fireplace</strong> 21
INSTALLATIONOne 90 o elbow = Two 45 o elbows.Horizontal Venting with Three (3) 90 o ElbowsINSTALLATIONOption V H V +V1 H+ H1A) .6m Min. .3m Max. .9m Min. 1.2m Max.B) .9m Min. .6m Max. 1.2m Min. 1.5m MaxC) 1.2.m Min. .9m Max. 1.8m Min. 1.8m Max.D) 1.5m Min. 1.2m Max. 2.4m Min. 2.1m Max.E) 1.8m Min. 1.5m Max. 3m Min. 2.4m Max.F) 2.1m Min. 1.8m Max. 3.6m Min. 2.7m Max.Please note minimum .3m between 90 o elbows is required.With theseoptions,max. totalpipe lengthis 9m withmin. of 3.mtotal verticaland max.2.7m totalhorizontal.Vertical Venting with Two (2) 90 o ElbowsOne 90 o elbow = Two 45 o elbows.Option V H V+ V1A) .3m Min. 1.2m Max. .6m Min.With theseoptions, max.B) .6m Min. 1.5m Max. .9m Min. total pipe lengthC) .9m Min. 1.8m Max. 1.2m Min.is 9m with min. of1.2m total verticalD) 1.2m Min. 2.1m Max. 1.5m Min. and max. 2.4mE) 1.5m Min. 2.4m Max. 1.8m Min. total horizontal.Please note minimum .3m between 90 o elbows is required.Vertical Venting with Two (2) 90 o ElbowsOne 90 o elbow = Two 45 o elbows.Option V H+ H1 With these options, max. totalA) .6m Max. .6m Min.pipe length is 9m with min. of1.8m total vertical and max.B) .9m Max. .9m Min. 1.8m total horizontal.C) 1.2m Max. 1.2m Min.Please note minimum .3mD) 1.5m Max. 1.5m Min. between 90 o elbows isE) 1.8m Max. 1.8m Min. required.For additional vertical venting with2 x 90 o elbows, refer to "Rigid PipeVenting Arrangements" Section.22<strong>Regency</strong> <strong>P33</strong> Sunrise TM <strong>Gas</strong> <strong>Fireplace</strong>
INSTALLATIONVertical Venting with Three (3) 90 o ElbowsOne 90 o elbow = Two 45 o elbows.Option H V H+ H1 V+ V1 With these options, max. totalA) .3m Max. .3m Min. .9m Max. .9m Min.pipe length is 9m with min. of3.3m total vertical and max.B) .6m Max. .6m Min. 1.2m Max. 1.5m Min. 2m total horizontal.C) .9m Max. .9m Min. 1.5m Max. 2.1m Min.Please note minimum .3mD) 1.2m Max. 1.2m Min. 1.8m Max. 2.7m Min. between 90 o elbows isE) 1.5m Max. 1.5m Min. 2.1m Max. 3.3m Min. required.INSTALLATIONVertical Venting with Three (3) 90 o ElbowsOne 90 o elbow = Two 45 o elbows.Option V H+ H1 V+ V1 With these options,A) .6m Min. .9m Max. 1.2m Min.max. total pipe length is9m with min. of 3m totalB) .9m Min. 1.2m Max. 1.8m Min. vertical and max. 2.4mC) 1.2m Min. 1.5m Max. 2.1m Min.total horizontal.D) 1.5m Min. 1.8m Max. 2.4m Min. Please note minimumE) 1.8m Min. 2.1m Max. 2.7m Min. .3m between 90 oelbows is required.F) 2.7m Min. 2.4m Max. 3m Min.<strong>Regency</strong> <strong>P33</strong> Sunrise TM <strong>Gas</strong> <strong>Fireplace</strong> 23
INSTALLATIONUNIT INSTALLATION WITH HORIZONTAL TERMINATIONINSTALLATIONInstall the vent system according to themanufacturer's instructions included with thecomponents.1) Set the unit in its desired location. Checkto determine if wall studs or roof raftersare in the way when the venting system isattached. If this is the case, you may wantto adjust the location of the unit. Rough inthe gas preferably on the right side of theunit and the electrical (junction block is onthe left side) on the left.2) Direct Vent pipe and fi ttings are designedwith special twist-lock connections toconnect the venting system to the appliancefl ue outlet. A twist-lock appliance adaptoris an available option that must be used inconjunction with the Simpson Dura-VentDirect Vent GS system.3) Put a bead of silicone inside the outer sectionof the adapter and a bead of <strong>Fireplace</strong> Mateon the inner collar. Slip the adapter over theexisting inner and outer flue collar and fastento the outer collar only with the 3 suppliedscrews (drilling pilot holes will make thiseasier). Level the fi replace and fasten it tothe framing using nails or screws throughthe nailing strips.4) Assemble the desired combination of pipeand elbows to the appliance adaptor andtwist-lock for a solid connection.Note:a) Twist-lock procedure: Four indentations,located on the female ends of pipes andfi ttings, are designed to slide straightonto the male ends of adjacent pipesand fi ttings, by orienting the four pipeindentations so they match and slidein to the four entry slots on the maleends, Dia. 1. Push the pipe sectionscompletely together, then twist-lockone section clockwise approximatelyone-quarter turn, until the two sectionsare fully locked. The female locking lugswill not be visible from the outside, onthe Black Pipe or fi ttings. They may belocated by examining the inside of thefemale ends.b) Horizontal runs of vent must besupported every three feet. Wall strapsare available for this purpose.5) Mark the wall for a 254mm x 254mm squarehole. The center of the square hole shouldline up with the centerline of the horizontalpipe. Cut and frame the 254mm squarehole in the exterior wall where the vent willbe terminated. If the wall being penetratedis constructed of non-combustible material,i.e. masonry block or concrete, a 7"(178mm)diameter (7-1/2"(191mm) dia. for fl ex) holeis acceptable.Note:a) The horizontal run of vent must be level,or have a 6mm rise for every 305mmof run towards the termination. Neverallow the vent to run downward. Thiscould cause high temperatures and maypresent the possibility of a fi re.b) The location of the horizontal venttermination on an exterior wall must meetall local and national building codes,and must not be blocked or obstructed.See "Exterior Vent Terminal Locations"Section.6) The arrow on the vent cap shouldbe pointing up. Insure that the 38mmclearances to combustible materials aremaintained (Dia. 3). Install the terminationcap. AstroCap TM or all other approvedHorizontal Termination Caps may be used.Diagram 2*As specifi ed in CGA B149 Installation CodeAS5601/AG601. Local codes or regulations mayrequire different clearances.The four wood screws provided should be replacedwith appropriate fasteners for stucco,brick, concrete, or other types of sidings.Diagram 1NOTE: For best results and optimumperformance with each approved ventingsystem, it is highly recommended to apply“Mill-Pac” sealant (supplied) to every innerpipe connection. Failure to do so mayresult in drafting or performance issues notcovered under warranty. Silicone (red RTV)is optional.Note: If installing termination on a sidingcovered wall, a vinyl siding standoff orfurring strips must be used to ensurethat the termination is not recessedinto the siding.7) Before connecting the horizontal run of ventpipe to the vent termination, slide the WallThimble (Part # 620-926) over the vent pipe.24<strong>Regency</strong> <strong>P33</strong> Sunrise TM <strong>Gas</strong> <strong>Fireplace</strong>
INSTALLATION8) Slide the appliance and vent assemblytowards the wall carefully inserting thevent pipe into the vent cap assembly. It isimportant that the vent pipe extends into thevent cap suffi cient distance so as to result ina minimum pipe overlap of 1-1/4" (32mm).Secure the connection between the vent pipeand the vent cap 3 sheet metal screws.9) Install wall thimble in the center of the 10"(254mm) square and attach with woodscrews (Diagram 4).Diagram 4UNIT INSTALLATIONWITH VERTICALTERMINATION4) Assemble the desired lengths of pipe andelbows. Ensure that all pipes and elbowconnections are in the fully twist-lockedposition and sealed.NOTE: For best results and optimumperformance with each approved ventingsystem, it is highly recommended to apply“Mill-Pac” sealant (supplied) to every innerpipe connection. Failure to do so mayresult in drafting or performance issues notcovered under warranty. Silicone (red RTV)is optional.5) Cut a hole in the roof centered on the smalldrilled hole placed in the roof in Step 2. Thehole should be of suffi cient size to meetthe minimum requirements for clearanceto combustibles of 1-1/2" (38mm). Slip theflashing under the shingles (shingles shouldoverlap half the fl ashing) as per Diagram3.Diagram 4Roof PitchMinimum Vent HeightFeet Metersfl at to 7/12 2 0.61over 7/12 to 8/12 2 0.61over 8/12 to 9/12 2 0.61over 9/12 to 10/12 2.5 0.76over 10/12 to 11/12 3.25 0.99over 11/12 to 12/12 4 1.22over 12/12 to 14/12 5 1.52over 14/12 to 16/12 6 1.83over 16/12 to 18/12 7 2.13over 18/12 to 20/12 7.5 2.29over 20/12 to 21/12 8 2.448) Install the vertical termination cap by twistlockingit.INSTALLATION1) Maintain the 1-1/2" (38mm)clearances (airspaces) to combustibles when passingthrough ceilings, walls, roofs, enclosures,attic rafter, or other nearby combustiblesurfaces. Do not pack air spaces withinsulation. Check "Venting"Sections for the maximumvertical rise of the venting systemand the maximum horizontaloffset limitations.2) Set the gas appliance in itsdesired location. Drop a plumbbob down from the ceiling to theposition of the appliance flue exit,and mark the location wherethe vent will penetrate theceiling. Drill a small holeat this point. Next, drop aplumb bob from the roof tothe hole previously drilledin the ceiling, and mark the Diagram 1spot where the vent will penetrate the roof.3) A Firestop spacer must be installed in thefl oor or ceiling of every level. To install theFirestop spacer in a fl at ceiling or wall,cut a 10 inch square hole. Frame the holeas shown in Diagram 2 and install thefi restop.Diagram 3: The upper half of the flashing isinstalled under the roofi ng material and notnailed down until the chimney is installed.This allows for small adjustments.6) Continue to assemble pipe lengths.Note: If an offset is necessary in the attic toavoid obstructions, it is important tosupport the vent pipe every 3 feet, toavoid excessive stress on the elbows,and possible separation. Wall strapsare available for this purpose.Galvanized pipe is desirable above the rooflinedue to its higher corrosion resistance. Continueto add pipe sections through the flashing untilthe height of the vent cap meets the minimumheight requirements specified in Dia. 4 or localcodes. Note that for steep roof pitches, thevertical height must be increased. A poordraft, or down drafting can result from highwind conditions near big trees or adjoiningroof lines, in these cases, increasing thevent height may solve the problem.Note: Any closets or storage spaces, whichthe vent passes through must beenclosed.GAS LINEINSTALLATIONThe gas line is brought through the right side ofthe appliance. The gas valve is situated on theright hand side of the unit and the gas inlet ison the right hand side of the valve.The gas line connection may be made ofrigid pipe, copper pipe or an approved fl exconnector. (If you are using rigid pipe, ensurethat the valve can be removed for servicing.)Since some municipalities have additional localcodes it is always best to consult with your localauthorities and the CAN/CGA B149 installationcode and AS5601 Australia & New ZealandBuilding Codes.When using copper or fl ex connectors use onlyapproved fi ttings. Always provide a union sothat gas lines can be easily disconnected forservicing. Flare nuts for copper lines and fl exconnectors are usually considered to meet thisrequirement.Important: Always check for gas leaks with asoap and water solution or gas leak detector.Do not use open flame for leak testing.Diagram 27) Ensure vent is vertical and secure the baseof the fl ashing to the roof with roofi ng rails,slide storm collar over the pipe section andseal with a mastic.<strong>Regency</strong> <strong>P33</strong> Sunrise TM <strong>Gas</strong> <strong>Fireplace</strong> 25
INSTALLATIONINSTALLATIONPILOT ADJUSTMENTPeriodically check the pilot flames. Correctflame pattern has three strong blue flames:1 flowing around the thermopile, 1 aroundthe thermocouple and 1 flowing across theburner (it does not have to be touching theburner).Note: If you have an incorrect flamepattern, contact your FPI dealer for furtherinstructions.Incorrect flame pattern will have small,probably yellow flames, not coming intoproper contact with the rear burner orthermopile or thermocouple.HIGH ELEVATIONThis unit is approved in Canada, Australia andNew Zealand for altitude to 4500 ft. (CAN/CGA-2.17-M91). For Natural <strong>Gas</strong> installationsabove 4500 ft. follow current CAN/CGA-B149.1- AS5601/AG601 and New Zealand codes.<strong>P33</strong>S-NG System DataFor 0 to 1372m altitudeBurner Inlet Injector Sizes: #47Max. Input RatingMin. Input RatingSupply PressureManifold Pressure(High)18.0 Mj.13.2 Mj.1.13kPa0.88 kPa<strong>P33</strong>S-LP System DataFor 0 to 1372m altitudeBurner Inlet Injector Sizes: #56Max. Input RatingMin. Input RatingSupply PressureManifold Pressure(High)16.4 Mj13.6 Mj2.74kPa2.49kPa<strong>P33</strong>S-ULPG System DataFor 0 to 1372m feet altitudeBurner Inlet Injector Sizes: #57Max. Input RatingMin. Input RatingSupply PressureManifold Pressure(High)14.8 Mj11.7Mj2.74kPa2.49kPaAeration SettingsAustralia NG : 6.4mmNew Zealand NG: 10mmLP: 10mmULPG: 10mmGAS PIPE PRESSURETESTINGThe appliance must be isolated from the gassupply piping system by closing its individualmanual shut-off valve during any pressuretesting of the gas supply piping system attest pressures equal to or less than 1/2 psig.(3.45 kPa). Disconnect piping from valve atpressures over 1/2 psig.The manifold pressure is controlled by aregulator built into the gas control, and shouldbe checked at the pressure test point.Note: To properly check gas pressure,both inlet and manifold pressuresshould be checked using the valvepressure ports on the valve.1) Make sure the valve is in the "OFF"position.2) Loosen the "IN" and/or "OUT" pressuretap(s), turning counterclockwise with a3mm (1/8") wide fl at screwdriver.3) Attach manometer to "IN" and/or "OUT"pressure tap(s) using a 8mm (5/16") IDhose.4) Light the pilot and turn the valve to "ON"position.5) The pressure check should be carried outwith the unit burning and the setting shouldbe within the limits specifi ed on the safetylabel.6) When fi nished reading manometer, turnoff the gas valve, disconnect the hoseand tighten the screw (clockwise) witha 3mm (1/8") fl at screwdriver. Note:Screw should be snug, but do not overtighten.S.I.T. VALVE DESCRIPTION1) <strong>Gas</strong> on/off knob2) Manual high/low adjustment3) Pilot Adjustment4) Thermocouple Connection - option5) Outlet Pressure Tap6) Inlet Pressure Tap7) Pilot Outlet8) Main <strong>Gas</strong> Outlet9) Alternative TC Connection Point26<strong>Regency</strong> <strong>P33</strong> Sunrise TM <strong>Gas</strong> <strong>Fireplace</strong>
CONVERSION KIT# 434 - 970 FROM NG TO LPGFor <strong>P33</strong> Sunrise Using SIT 820 NOVA <strong>Gas</strong> ValveINSTALLATIONTHIS CONVERSION MUST BE DONE BY A QUALIFIED GAS FITTER IF IN DOUBT DO NOT DO THIS CONVERSION !!Each Kit contains one LPGConversion Kit # 434-970LPG Conversion Kit Contains:Qty. Part # Description1 904-241 Burner Orifi ce #561 918-590 Decal "Converted toLPG"1 908-528 Red "LPG" label1 904-529 5/32" Allen Key1 910-037 LPG Injector(Pilot Orifi ce)1 918-770 Instruction SheetDiagram 23) Remove the pebble retainer bar by liftingit out from the front of the fi rebox base(See Diagram 3).6) Unscrew the pilot orifi ce with the Allenkey and replace with the LPG pilot orifi cein the kit and replace pilot cap.(See Diagram 6)INSTALLATIONInstallation of the LPGConversion Kit:1) Shut off the gas supply.2) a) Remove the Faceplate by lifting it offof the fl ush doorb) Remove the fl ush door (see page 37).c) Remove the Colbalt Glass Crystals orCeramic Stones. Also removeStainless Steel Panels (if installed -see page 35).d) Remove the 2 screws holding theBurner Assembly to the fi rebox base.Lift out the burner assembly.(See Diagrams 1 & 2)Diagram 3Pebble Retainer Bar4) With Burner Assembly removed, lift outfi rebox base. (See Diagram 4)Diagram 4Firebox base5) Pull off the pilot cap to expose the pilotorifi ce. (Diagram 5)7) Remove burner orifi ce with a 1/2"wrench and discard. Use anotherwrench to hold on to the elbow belowthe orifi ce. (See Diagram 7)Diagram 7Diagram 6Burner Orifi ce8) Reinstall new burner orifi ce LPGstamped #56 and tighten.Diagram 1Pilot Orifi ceDiagram 5Pilot Cap<strong>Regency</strong> <strong>P33</strong> Sunrise TM <strong>Gas</strong> <strong>Fireplace</strong> 27
INSTALLATIONINSTALLATION9) Turn control knob to the “OFF” position.10) Remove the black protection cap byhand from the high-low knob (Fig.1).14) Using the Allen wrench as shown inFig.4, rotate the screw clockwise untilsnug, do not overtighten.17) Attach the label "This unit has beenconverted to LPG" near or on top of theserial # decal.18) Replace yellow "NG" label with red"LPG" label.19) Check for gas leaks.20) Check inlet and outlet pressures.21) Check operation of fl ame control.22) Check for proper fl ame appearance.Fig.423) Reverse step 2.Fig. 111) Insert a 5/32” or 4mm Allen wrench intothe hexagonal key-way of the screw(Fig. 2), rotate it counter-clockwise untilit is free and extract it.WARNING!Do not overtighten the screw.Recommended to gripthe wrench by the short side.15) Verify that if the conversion is fromNG to LPG, the screw must be reassembledwith the red o-ring visible(Fig. 5).Red o-ring visibleLPG ConfigurationFig.5Fig.216) Re-assemble the black protection cap(Fig. 6).12) Check that the screw is clean and ifnecessary remove dirt.13) Flip the screw (Fig. 3).Fig. 6Fig.3WARNING!Also check that the pilot andmain burner injectorsare appropriate for the gas type.28<strong>Regency</strong> <strong>P33</strong> Sunrise TM <strong>Gas</strong> <strong>Fireplace</strong>
INSTALLATIONCONVERSION FROM NG TO ULPGFor <strong>P33</strong> SunriseTHIS CONVERSION MUST BE DONE BY A QUALIFIED GAS FITTERIF IN DOUBT DO NOT DO THIS CONVERSION !!Each Kit contains one ULPGConversion Kit # 434-971LPG Conversion Kit Contains:Qty. Part # Description1 904-557 #57 Injector1 918-273 Red "ULPG" label1 904-529 5/32" Allen Key1 910-037 ULPG Injector(Pilot Orifi ce)1 918-805 Instruction SheetDiagram 25) Unscrew the pilot orifi ce with the Allenkey and replace with the LPG pilot orifi cein the kit and replace pilot cap.(See Diagram 5)INSTALLATION3) With Burner Assembly removed, lift outfi rebox base. (See Diagram 3)Installation of the ULPGConversion Kit:1) Shut off the gas supply.2) a) Remove the Faceplate by lifting it offof the flush doorDiagram 56) Remove burner orifi ce with a 13mm(1/2") wrench and discard. Use anotherwrench to hold on to the elbow belowthe orifi ce. (See Diagram 6)b) Remove the fl ush door.c) Remove the Cobalt Glass Crystals orCeramic Stones. Also removeStainless Steel Panels if installed.See handling instructions in manualprior to removal.Diagram 3Firebox base4) Pull off the pilot cap to expose the pilotorifi ce. (Diagram 4)d) Remove the 2 screws holding theBurner Assembly to the fi rebox base.Lift out the burner assembly.(See Diagrams 1 & 2)Diagram 6Burner Orifi ce7) Reinstall new burner orifi ce LPGstamped # and tighten.Diagram 1Pilot Orifi ceDiagram 4Pilot Cap<strong>Regency</strong> <strong>P33</strong> Sunrise TM <strong>Gas</strong> <strong>Fireplace</strong> 29
INSTALLATION8) Turn control knob to the “OFF” position.9) Remove the black protection cap byhand from the high-low knob (Fig.1).13) Using the Allen wrench as shown inFig.4, rotate the screw clockwise untilsnug, do not overtighten.16) Attach the label "This unit has beenconverted to LPG" near or on top of theserial # decal.INSTALLATIONFig. 110) Insert a 5/32” or 4mm Allen wrench intothe hexagonal key-way of the screw(Fig. 2), rotate it counter-clockwise untilit is free and extract it.Fig.4WARNING!Do not overtighten the screw.Recommended to gripthe wrench by the short side.14) Verify that if the conversion is fromNG to ULPG, the screw must be reassembledwith the red o-ring visible(Fig. 5).17) Replace yellow "NG" label with red"ULPG" label.18) Adjust aeration setting burner tube to10 mm open. Lock in position by way ofrivet or other means, to securely positionthe aeration setting.Any damage due to setting theaeration improperly - is NOT coveredunder warranty.19) Turn on gas supply.20) Check for gas leaks.21) Check inlet and outlet pressures.22) Check operation of fl ame control.23) Check for proper fl ame appearance.24) Reverse step 2.Red o-ring visibleLPG ConfigurationFig.5Fig.215) Re-assemble the black protection cap(Fig. 6).11) Check that the screw is clean and ifnecessary remove dirt.12) Flip the screw (Fig. 3).Fig. 6Fig.3WARNING!Also check that the pilot andmain burner injectorsare appropriate for the gas type.30<strong>Regency</strong> <strong>P33</strong> Sunrise TM <strong>Gas</strong> <strong>Fireplace</strong>
INSTALLATIONDC SPARK BOXBATTERY REPLACEMENTDC SPARK BOX REPLACEMENT1) Remove the faceplate by lifting it up off fl ush door.2) Remove the battery cover from the DC Spark Box.3) Remove the AA battery and replace with a new one.1) Shut the power off.2) Remove the faceplate by lifting it up off fl ush door.3) Remove the screw securing the control assembly plate to the leftside of fi re box (Diagram 1).INSTALLATIONDiagram 1DC Spark BoxDiagram 4Wire Locations4) Disconnect the 2 DC spark generator wires from the DC Spark boxfrom location shown in Diagram 4.5) Remove the 2 Phillips screws securing DC Spark Box to control panelassembly. (Diagram 5)Diagram 25) Reinstall battery cover on DC Spark Box.6) Reinstall faceplate (refer to steps 5 and 6 of Faceplate installationP. 39).Diagram 56) Replace DC Spark Box and reverse steps.<strong>Regency</strong> <strong>P33</strong> Sunrise TM <strong>Gas</strong> <strong>Fireplace</strong> 31
INSTALLATIONINSTALLATIONOptionalWALL THERMOSTATA wall thermostat may be installed if desired,connect the wires as per the wiring diagram.Use table below to determine the maximumwire length.Note: Preferable if the thermostat isinstalled on an interior wall.<strong>Regency</strong> ® offers an optional programmablethermostat but any 250-750 millivolt rated nonanticipatortype thermostat that is CSA, ULC orUL approved may be used.CAUTIONDo not wire millivoltwall thermostat wiresto 240V wire.OptionalREMOTE CONTROLUse the <strong>Regency</strong> ® Remote Control Kit approvedfor this unit. Use of other systems may voidyour warranty.The remote control kit comes with a hand heldtransmitter, a receiver and a wall mountingplate.1) Choose a convenient location on the wallto install the receiver and the receptaclebox (protection from extreme heat is veryimportant). Run wires from the fi replace tothat location. Use Thermostat Wire Table.2) Connect the two wires to the gas valve. Seediagram below.CAUTIONDo not wire millivoltremote control wiresto 240V wire.WALL SWITCH1) Run the supplied wire through the right orleft side gas inlet opening. Be careful notto damage wire.Note: We recommend a maximum of 15'(4.6m) of wire but if you wish to gowith a longer run, use the ThermostatWire Table.2) Connect the wire to the wall switch andinstall into the receptacle box. Also attachwires to the valve as shown below.CAUTIONDo not wire millivoltwall switch wireto 240V wire.Thermostat Wire TableRecommended Maximum Lead Length(Two-Wire) When Using WallThermostat (CP-2 System)Wire SizeMax. Length3) Install 3 AAA alkaline batteries in transmitterand 4 AA alkaline batteries in the receiver.Install the receiver and its cover in the wall.Switch the remote receiver to "remote"mode. The remote control is now ready foroperation.14 GA.16 GA.18 GA.20 GA.22 GA.15m9.8m6m3.7m2.7m32<strong>Regency</strong> <strong>P33</strong> Sunrise TM <strong>Gas</strong> <strong>Fireplace</strong>
<strong>Regency</strong>INSTALLATIONAERATION ADJUSTMENTThe burner aeration is factory set but may needadjusting due to either the local gas supply oraltitude. Open the air shutter for a blue fl ame orclose for a more yellow fl ame.Aeration Settings:Australia NG : 6.4mmNew Zealand NG: 10mmLP: 10mmULPG: 10mmWIRING DIAGRAMCAUTION: Carbon will be produced if air shutteris tightly closed.Note: Any damage due to carboningresulting from improperly settingthe aeration controls is NOT coveredunder warranty.INSTALLATIONCaution: Ensure that the wires do not touch anyhot surfaces and are away from sharp edges.Thermopile<strong>Gas</strong> PilotThermocoupleElectrodePilotAssemblyBurnerONOFFWhiteBlack(To THTP)(To TH)(To THTP)GroundDC SparkBoxRedWhiteTo Thermocouple INLOHIONOFF"S.I.T" ValvePILOT<strong>Gas</strong>In(To TH)ONOFFRemote Receiveror Thermostat(Millivolt) (Optional)Remote Transmitter(Optional)909-128CAUTION: Label all wires prior to disconnectionwhen servicing controls. Wiring errors can causeimproper and dangerous operation.<strong>Regency</strong> <strong>P33</strong> Sunrise TM <strong>Gas</strong> <strong>Fireplace</strong> 33
INSTALLATIONOPTIONAL STAINLESS STEELREFLECTIVE PANEL INSTALLATIONINSTALLATIONBefore you start:Stainless panels must be inspected for scratches and dimples prior to installation. All claims to be recorded at this time. Claims fordamage after installation will not receive consideration.To protect the finish during installation and handling - cotton gloves MUST be worn at all times while handling the panels (evenwhen removing protective coating).Stainless panels will discolor a little during normal operation. This is normal and should not be considered a defect.All hand and fi nger marks MUST be cleaned off with a soft cloth and a stainless steel cleaner. Most stainless steel cleaners leave afi lm/residue on the surface of the panels. Use an ammonia based cleaner (ie. glass cleaner) to remove this fi lm before applying heat tothe unit. Failure to do this will result in burn stain on panels which you will be unable to remove. This is not a warranty item.1) If already installed, remove the burner assembly and fi rebox base(See page 43 for instructions).2) Remove 4 screws prior to top panel installation.Diagram 13) Place the top Stainless panel in fi rst, secure with 4 screws.(See Diagram 1 for screw locations)Diagram 45) With the top panel in place - install back panel. The back panel fi tsunder the top panel, push the top panel up to fi t back panel intoposition. (Diagrams 3 & 4)Diagram 2Diagram 5Diagram 66) The side panels are installed last, slide in as shown in Diagram 6.Note: The bend in the metal on the side panels should face outward(toward inside of fi rebox - see Diagram 5).If the side panels have been installed incorrectly the fi rebox base willnot fi t.Back PanelDiagram 37) Reinstall the fi rebox base and burner assembly.Diagram 834<strong>Regency</strong> <strong>P33</strong> Sunrise TM <strong>Gas</strong> <strong>Fireplace</strong>
INSTALLATIONWarning:Turn off unit by way of wall switch or remote. Allow unit tocool 10 minutes prior to removing faceplate.Spread the supplied Glass Crystals (or optional Ceramic SpaStones) evenly over the burner approximately 6.5mm thick.Ensure the crystals (stones) do not overlap too much as this willeffect the fl ame pattern.If using Ceramic Stones, install Stones over top of the layer ofcrystals (see inset below).GLASS CRYSTALINSTALLATION ON BURNERGlass Crystals shown on BurnerINSTALLATIONNOTE: Only the supplied approved Cobalt Blue Glass or optionalCeramic Spa Stones (50 pieces recommended) are to be used withthis fi replace. Use of any other type of glass crystals or stones canalter the unit's performance, any damage caused by the use of anyunapproved glass or stones will not be covered under warranty.Optional Ceramic Stones shown on BurnerOPTIONAL PEBBLE INSTALLATION ON FIREBOX BASEWarning:Turn off unit by way of wall switch or remote. Allow unit to cool 10 minutes prior to removing faceplate.White River Pebbles shown surrounding the BurnerThere are 2 optional pebble packages to choose from:1) White River Pebbles2) Natural River PebblesSpread the pebbles evenly on the exposed base of the fi rebox. Pebbles are NOT to be placed anywhere on the burner or over top of the CobaltBlue Glass Crystals or optional Ceramic Spa Stones.NOTE:* Only the supplied and approved pebbles are to be used.* Use of any other type of pebbles or material can create a danger and will void warranty.<strong>Regency</strong> <strong>P33</strong> Sunrise TM <strong>Gas</strong> <strong>Fireplace</strong> 35
INSTALLATIONSTANDARD FLUSH DOORGLASS DOOR INSTALLATIONINSTALLATIONThe standard flush door comes with a black frame. To install the frameand glass door, simply hook the top door fl ange onto the top of the unitand swing the door towards the unit, diagram 1. Be careful that the glassgasket does not roll up; there must be a gap between the gasket and thedoor lip to ensure that the door sits securely on the unit. See Diagram 2.Diagram 1Diagram 2Use the hook to pull the spring out until you can put the hookinto the slot on the bottom door bracket. Repeat for 2nd spring.See diagram 3.To remove the fl ush door, reverse the above steps.Diagram 3To remove the fl ush door, reverse the above steps.36<strong>Regency</strong> <strong>P33</strong> Sunrise TM <strong>Gas</strong> <strong>Fireplace</strong>
INSTALLATIONSCREEN INSTALLATION1) Place faceplate face down on a fl at, soft surface to avoidscratching.2) Position the screen in the center of the faceplace, fl ush (fl at)side down.Note: Position screen for installation as shown in diagram below.Screen - larger fl ange with3 screw holes towards thetop of the faceplate.Top of faceplate4) Secure the 3 remaining sides by installing the 7 clips provided.Push the clips down to secure the fl ange of the screen with thefl ange of the faceplate (as shown below).INSTALLATIONScreen fl angeFaceplate fl angeDiagram below shows the location of all 7 clips.Screen - fl at side down,fl ange facing up.3) With screen in position, secure to the faceplatewith 3 x #8 self tapping screws (as shown below).5) Faceplate shown below with screen installed.To install faceplate, follow the faceplate installation instructions onthe next page.<strong>Regency</strong> <strong>P33</strong> Sunrise TM <strong>Gas</strong> <strong>Fireplace</strong> 37
INSTALLATIONFACEPLATE INSTALLATIONINSTALLATIONBefore you start:Stainless must be inspected for scratches and dimples prior to installation. All claims to be recorded at this time. Claims for damageafter installation will not receive consideration.To protect the finish during installation and handling - cotton gloves MUST be worn at all times while handling the panels (evenwhen removing protective coating).Stainless will discolor a little during normal operation. This is normal and should not be considered a defect.All hand and fi nger marks MUST be cleaned off with a soft cloth and a stainless steel cleaner. Most stainless steel cleaners leave afi lm/residue on the surface of the panels. Use an ammonia based cleaner (ie. glass cleaner) to remove this fi lm before applying heat tothe unit. Failure to do this may result in burn stains which you will be unable to remove. This is not a warranty item.<strong>P33</strong>S Faceplate434-033 Mounting Plate434-514 Faceplate Support434-032 Control Shield434-018F Heat Defl ector434-516 Faceplate - Black434-516BL Faceplate - Blue434-516R Faceplate - Red434-517 Faceplate - Stainless SteelHeat Defl ectorFaceplate Support1) Install the control shield with 2 #8 - 1/2" Phillips screws to the bottomof the flush door as shown in Diagram 1.Control ShieldMounting FrameDiagram 33) Loosen 4 phillips head screws located inside firebox, for screw locationssee Diagram 4. Install mounting frame and retighten screws.Diagram 12) Install the heat defl ector on the fi re box as shown in Diagrams 2 &3.Loosen 3 Phillips head screws already in fi rebox, slide heat defl ectoron to screws and retighten.Top of FireboxDiagram 2Heat Defl ectorDiagram 438<strong>Regency</strong> <strong>P33</strong> Sunrise TM <strong>Gas</strong> <strong>Fireplace</strong>
INSTALLATION4) After the frame has been installed, locate the 2 screws on the lowerpart of the mounting frame- see Diagram 3 for location.Slide on the 2 faceplate supports and retighten the screws.Important: Positon of bracket must be as shown in Diagram 5, withbend away from fi replace.Bend inFaceplatesupport - rightside shownFlangeINSTALLATIONFaceplateDiagram 55) The top of the faceplate has a fl ange that hooks over the top of thefl ush door.Faceplate SupportDiagram 8Diagram 6Flange6) Hook the flange on the faceplate over the top of the fl ush door andgently lower the faceplate into place until it rests against thefaceplate supports as shown in Diagrams 7 & 8.Diagram 9FaceplateDiagram 7Faceplate Support<strong>Regency</strong> <strong>P33</strong> Sunrise TM <strong>Gas</strong> <strong>Fireplace</strong> 39
OPERATING INSTRUCTIONSOPERATIONOPERATINGINSTRUCTIONS1) Read and understand these instructionsbefore operating this appliance.2) Check to see that all wiring is correct andenclosed to prevent possible shock.3) Check to ensure there are no gas leaks.4) Make sure the glass in the glass door frameis properly positioned. Never operate theappliance with the glass removed.5) Verify that the venting and cap areunobstructed.6) The unit should never be turned off, and onagain without a minimum of a 60 secondwait.FIRST FIREThe FIRST FIRE in your heater is part of the paintcuring process. To ensure the paint is properlycured, it is recommended you burn your fireplacefor at least four (4) hours the fi rst time.When fi rst operated, the unit will release anodour caused by the curing of the paint and theburning off of any oils remaining from manufacturing.Smoke detectors in the house may go offat this time. Open a few windows to ventilatethe room for a couple of hours. The glass mayrequire cleaning.NOTE: When the glass is cold and the applianceis lit, it may cause condensation and fogthe glass. This condensation is normaland will disappear in a few minutes asthe glass heats up.DO NOT ATTEMPT TO CLEAN THEGLASS WHILE IT IS STILL HOT!LIGHTINGPROCEDUREIMPORTANTTo ignite or reignite the pilot, youmust first remove the glass door.NOTE: The <strong>Gas</strong> ON/OFF knob cannot beturned from "ON", "PILOT" or "OFF" unlessit is partially depressed.1) Ensure the wall mounted switch or remoteis in the "OFF" position.2) Turn the gas control knob so the indicatorpoints to the "OFF" position and wait 5 minutesfor any gas in the combustion chamberto escape.3) Turn the gas control knob counterclockwiseso the indicator points to the "PILOT" position.Depress the gas control knob fully. Depressthe igniter button until the pilot lights. Afterapproximately one minute, release the gascontrol knob. The pilot fl ame should continueto burn.Only when the pilot holds, without pressurebeing applied to the gas control knob, re-installthe glass door to the unit. The unit must notbe operated without the glass door in place.If the pilot does not remain lit, repeat operationallowing a longer period before releasinggas control knob.4) When the pilot stays lit, turn the gas controlknob to the "ON" position.5) Use the wall switch or remote control to turnthe unit ON.NOTE: When using the remote control refer tothe remote manual.NOTE: If there is no spark present at the pilotwhen depressed, the AA battery maybe weak. Refer to "DC Spark BatteryReplacement" section.NORMAL OPERATINGSOUNDS OFGAS APPLIANCESIt is possible that you will hear some sounds fromyour gas appliance. This is perfectly normal due tothe fact that there are various gauges and typesof steel used within your appliance. Listed beloware some examples. All are normal operatingsounds and should not be considered as defectsin your appliance.Burner Tray:The burner tray is positioned directly under theburner and is made of a different gauge materialfrom the rest of the fi rebox and body. Therefore,the varying thicknesses of steel will expand andcontract at slightly different rates which can cause"ticking" and "cracking" sounds. You should alsobe aware that as there are temperature changeswithin the unit these sounds will likely re-occur.Again, this is normal for steel fi reboxes.Pilot Flame:While the pilot fl ame is on it can make a veryslight "whisper" sound.<strong>Gas</strong> Control Valve:As the gas control valve turns ON and OFF, adull clicking sound may be audible, this is normaloperation of a gas regulator or valve.Unit Body/Firebox:Different types and thicknesses of steel willexpand and contract at different rates resultingin some "cracking" and "ticking" sounds will beheard throughout the cycling process.DO NOT BURN THE UNIT WITHOUT THEGLASS DOOR IN PLACE.During the first few fires, a white filmmay develop on the glass front as part ofthe curing process. The glass should becleaned after the unit has cooled downor the film will bake on and become verydifficult to remove. Use a non-abrasivecleaner and DO NOT ATTEMPT TO CLEANTHE GLASS WHILE IT IS HOT.SHUTDOWNPROCEDURE1) Turn the wall mounted switch or remote tothe "OFF" position.2) Press "OFF" on the remote control.3) Turn the gas control knob to the "OFF" positionto turn off the pilot.40<strong>Regency</strong> <strong>P33</strong> Sunrise TM <strong>Gas</strong> <strong>Fireplace</strong>
OPERATING INSTRUCTIONSCOPY OF LIGHTING PLATE INSTRUCTIONSOPERATIONOFFa<strong>Regency</strong> <strong>P33</strong> Sunrise TM <strong>Gas</strong> <strong>Fireplace</strong> 41
MAINTENANCEMAINTENANCEMAINTENANCEINSTRUCTIONS1) Always turn off the gas valve before cleaning.For relighting, refer to lighting instructions.Keep the burner and control compartmentclean by brushing and vacuuming at leastonce a year.2) Clean appliance and door with a dampcloth (never when unit is hot). Never usean abrasive cleaner. The glass should becleaned with a gas fi replace glass cleaner.The glass should be cleaned when itstarts looking cloudy.3) The faceplate is fi nished in a heat resistantpaint and should only be refinished with heatresistant paint. <strong>Regency</strong> ® uses StoveBrightPaint - Metallic Black #6309.4) Make a periodic check of burner for properposition and condition. Visually check theflame of the burner periodically, making surethe fl ames are steady; not lifting or fl oating.If there is a problem, call a qualifi ed serviceperson.5) The appliance and venting system must beinspected before use, and at least annually,by a qualifi ed fi eld service person, to ensurethat the fl ow of combustion and ventilationair is not obstructed.Note: Never operate the appliance withoutthe glass properly secured in place.6) Do not use this appliance if any part has beenunder water. Immediately call a qualifi edservice technician to inspect the applianceand to replace any part of the control systemand any gas control which has been underwater.7) In the event this appliance has beenserviced check that the vent-air systemhas been properly resealed & reinstalledin accordance with the manufacturer'sinstructions.8) Verify operation after servicing.GENERAL VENTMAINTENANCEConduct an inspection of the venting systemsemi-annually. Recommended areas to inspectas follows:1) Check the Venting System for corrosion inareas that are exposed to the elements.These will appear as rust spots orstreaks, and in extreme cases, holes.These components should be replacedimmediately.2) Remove the Cap, and shine a fl ashlightdown the Vent. Remove any bird nests, orother foreign material.3) Check for evidences of excessivecondensation, such as water droplets formingin the inner liner, and subsequently drippingout the joints, Continuous condensation cancause corrosion of caps, pipe, and fi ttings.It may be caused by having excessivelateral runs, too many elbows, and exteriorportions of the system being exposed tocold weather.4) Inspect joints, to verify that no pipesections or fi ttings have been disturbed,and consequently loosened. Also checkmechanical supports such as Wall Straps,or plumbers' tape for rigidity.THERMOPILE /THERMOCOUPLE1) Shut the power off.2) Remove the Faceplate by lifting up off fl ushdoor.3) Remove the control assemby plate.4) Remove the standard fl ush door.5) Remove the Cobalt Glass Crystals orCeramic Stones.6) Remove the 2 screws holding the pilotcover.GLASS GASKETIf the glass gasket requires replacement use atadpole glass gasket (Part # 936-155).GLASS DOORYour <strong>Regency</strong> ® fi replace is supplied with hightemperature 5mm-Ceramic glass. If your glassrequires cleaning, we recommend using anapproved glass cleaner available at all authorizeddealers. Do not use abrasive materials.CAUTION & WARNINGS:* Do not clean when the glass is hot.* The use of substitute glass will void all productwarranties.* Care must be taken to avoid breakage of theglass.* Do not strike or abuse the glass.* Do not operate this fi replace without theglass front or with a cracked or broken glassfront.* Wear gloves when removing damaged orbroken glass.* Replacement of the glass panel(s) should bedone by a licensed or qualifi ed service person.GLASS REPLACEMENTIn the event that you break your glass by impact,purchase your replacement from an authorized<strong>Regency</strong> ® dealer only.Replacement glass is shipped already installedinto the door frame.WARNING: Do not operate theappliance with the glass panelsremoved, cracked or broken.Replacement of the glass panelsshould be done by a licensed orqualified service person.7) Loosen the thermocouple or thermopile witha 7/16" wrench.8) Disconnect thermocouple by loosening nutfrom the valve with 9mm wrench. Disconnectthermopile by loosening 2 screws markedTP on the valve.9) Drop the thermocouple or thermopile downfrom the bracket and pull it out of the unit.CAUTION: Wear gloves whenremoving damaged or brokenglass.10) Reinstall the new ones in reverse order.42<strong>Regency</strong> <strong>P33</strong> Sunrise TM <strong>Gas</strong> <strong>Fireplace</strong>
MAINTENANCEVALVE TRAY REPLACEMENTREMOVING VALVE1) Shut off the gas supply.2) Remove the faceplate.3) Open the fl ush door and remove the door.4) Remove the burner assembly by removingthe two Phillips head screws and then liftthe burner assembly out. (See Diagram 1)Diagram 1: Remove the 2 screws and then liftout the burner assembly.5) Remove the retainer bar (Diagram 2)Diagram 5: Lift out Valve Tray Assembly11) Undo the quick drop out thermocouple nuton the valve with a 9mm (metric) wrench.12) Disconnect the 2 DC Spark generator wiresfrom the DC spark box located in front of thevalve.13) Undo the "gas out" fl are nut with a 21mm(13/16") wrench.14) Undo the "gas out" fl are fi tting with an 17mm(11/16") wrench.5) Hook up the gas line and check for gas leakswith a soap and water solution or a gas leakdetector. (Do not use open fl ame for leaktesting.)6) Fire up the unit temporarily.7) Check the manifold pressure.8) Reinstall the Glass Crystals/Ceramic Stones,and Pebbles as needed.9) Reinstall the fl ush door.10) Fire up the unit again and check for properfl ame appearance.11) Reinstall the faceplate.Diagram 26) Remove the fi re box base. (Diagram 3)INSTALLING VALVE1) Install new Valve Tray Assembly. (Diagram6)Diagram 37) Disconnect the inlet gas line.8) Disconnect the 2 TP wires and the 2 TH wiresfrom the valve (Refer to wiring diagram onpage 33).2) Reinstall 10 hold down screws (see Diagram4 for locations).3) Install Burner assembly. See Step 4 inRemoving Valve for screw locations.4) Reinstall fi rebox base.MAINTENANCE9) Remove the 10 Phillips head screws securingthe valve tray assembly in place (diagram 4)and then lift the entire assembly out (Diagram5).10) Undo the pilot tube from the valve with a11mm (7/16") wrench.Diagram 6Diagram 4<strong>Regency</strong> <strong>P33</strong> Sunrise TM <strong>Gas</strong> <strong>Fireplace</strong> 43
MAINTENANCETROUBLE SHOOTING GUIDESymptom Possible Cause SolutionFaulty, disconnected orbare wire can cause agrounding of the circuitresulting in a failure tospark.Examine the wire connecting the Piezo to the electrode, properly reconnect or replace the wire as necessary.An improper gapdistance between theelectrode and the pilothood will result in afailure to spark.Examine the pilot assembly. The proper gap distance between the electrode and the pilot hood is 1/8”. Reset the proper gapdistance as necessary.Piezo igniterdoes notspark whendepressed.A broken or crackedceramic housing willresult in a failure tospark.Examine the electrode. If the ceramic housing is cracked replace the electrode (if independent of pilot assembly) or replace the pilotassembly (if a one piece system).An improperly groundedPiezo will result in afailure to spark.Examine the mounting bracket to ensure that the Piezo is properly grounded. If necessary tighten mounting nuts to ensure that thePiezo is properly grounded.An incorrectly positionedsnap on pilot hood.The pilot hood is keyed and must go back with the key lined up correctly.The piezo igniter may nolonger function.Test the Piezo by touching the tip while pressing the spark button, you should feel a small shock. If the Piezo produces no spark,replace the Piezo and test the replacement.DC Igniternotproducing asparkAn improperly groundedDC Igniter, or a drainedbattery will result in afailure to spark.Check for good ground, and test the battery. As necessary, connect wires and or replace the battery.Disconnected gas lineswill result in a failure toignite.Inspect for proper connection to all gas lines. If necessary connect the disconnected gas lines.MAINTENANCESpark ispresent, butflame willnot ignite.A shutoff valve in theOFF position will result ina failure to ignite.An empty Propane tank,will result in a failure toignite.Air in the gas lines willresult in a failure to ignite.The thermocouple /thermopile may nothave become suffi cientlyheated to produce propercurrent.The pilot fl ame may notbe properly engulfi ngthe thermocouple /thermopile.If the appliance is setup for Natural <strong>Gas</strong>, ensure that all shutoff valves are in the open position (<strong>Gas</strong>:8). Open all shutoffs andremember that there may be more than one shutoff.If the appliance is setup for Propane, please check the level of the fuel. As required refill the supply tank.Using a match or a lighter, test the gas supply for air in the gas lines (<strong>Gas</strong>:7). If their is air in the lines purge the air from the lines.(<strong>Gas</strong>:8)Continue to depress the black control knob until the pilot holds (Up to 45 seconds if necessary).If necessary adjust the pilot flame (<strong>Gas</strong>:9) and/or clean the pilot hood.Pilot lightcomes onwhen litbut will nothold.The thermocouple /thermopile may not beproperly connected tothe valve or securelyconnected to the valveterminals.The thermocouplemay not be generatingenough millivolt electricalfl ow.Ensure that connections to the valve are secure. Thermopile connected to TP/TH and TP on valve. Ensure thermocouple is properlyseated on valve.Use a multi-meter, set to MV, to test the thermocouple (<strong>Gas</strong>:10). If the reading is consistently low replace the thermocouple. If theMV reading is greater than 8 MV proceed to the Safety Magnet Test (EPU) (<strong>Gas</strong>:13).The thermopile may notbe generating enoughmillivolt electrical flow.Use a multi-meter, set to MV or VOLTS DC, to test the thermopile (<strong>Gas</strong>:10). If the reading is consistently low replace the thermopile.If the MV reading is greater than 325 MV proceed to the Safety Magnet Test (EPU) (<strong>Gas</strong>:13).Line voltage (100+V) hasbeen connected to thevalve, on terminals TP/TH and TH.Connecting line voltage to the valve has caused permanent damage. Since there is no repair possible, replace the Pilot assemblyand the control valve.44<strong>Regency</strong> <strong>P33</strong> Sunrise TM <strong>Gas</strong> <strong>Fireplace</strong>
MAINTENANCESymptom Possible Cause SolutionControl knob is not in the“ON” position.Turn the control knob to the “ON’ position.A tripped safety spillswitch (automatic inInserts, and manual inFreestanding Stoves) willresult in a failure to ignite.Allow the automatic switch (Inserts) to cool or reset the manual switch (Freestanding Stove). Then try again to ignite the fi replace.When the switch is in the closed position test the Ohms reading, a reading of 0-0.3 ohms indicates a good switch (<strong>Gas</strong>:18).Replace safety switch as necessary.Faulty or disconnectedwiring, incorrect guageor length of wiring, faultythermostat or wall switch,will result in a failure toignite.Use a jumper wire across terminals TP/TH & TH to test the valve operation. If valve ignites, examine and reconnect/replace asnecessary any required or faulty components. The wall switch should have an Ohms reading of 0-0.3 Ohms.The complete circuit should have a resistance of 35mv or less.For correct wire guage refer to the chart provided in the manual.With pilot litmain burnerwill not ignite.Insuffi cient millivolt powerfrom the thermopile.An insuffi cient gaspressure at the valve willresult in a failure to ignite.With the switch “ON” check the thermopile for a min. 110MV reading. Tighten connections and retest, if no improvement it isnecessary to replace the thermopile.Using a manometer check the gas pressure at the manifold. (<strong>Gas</strong>:14) Check the rating plate for correct settings for the fi replace.Any blockage and/orblockage in the burnerand/or burner orifi ce.Examine burner and burner orifi ce, clean or replace as necessary.A faulty operating headon the valve will result ina failure to ignite.Disconnect thermopile and wall switch/thermostat, then test the Ohms reading on the valve head. (<strong>Gas</strong>:18) Replace valve ifnecessary.An incorrectly setanticipator style wallthermostat will cause afailure to igniteReplace an anticipator style thermostat with a non-anticipator style millivolt thermostat.Remote controltransmitter has turned offthe fi replace.Check that the batteries in the remote are not expired or drained. If necessary replace with new batteries. Also check that thesettings on the remote are set correctly for the desired operation.High resistance in thewall switch can causeintermittent failures.Test the Ohms reading of the ON/OFF switch a reading of 0-0.3 ohms indicates a good switch. If necessary replace the switch(<strong>Gas</strong>:18).Main burnershuts down,pilot lightdoes not goout.High resistance inthe Spill Switch/HighLimit Switch can causeintermittent failures.High resistance in theoperating head onthe valve can causeintermittent failures.Thermopile does notgenerate enough millivoltpower under load.Test the ohms reading of switch a reading of 0-0.3 ohms indicates a good switch. If necessary replace the switch (<strong>Gas</strong>:18).Disconnect thermopile and wall switch/thermostat, then test the Ohms reading on the valve head. (<strong>Gas</strong>:18) Replace valve asnecessary.If the thermopile millivolt reading drops below 110MV, under load, replace thermopile (<strong>Gas</strong>:10).MAINTENANCESpill switch has beenactivated.Allow the automatic switch (Inserts) to cool or reset the manual switch (Freestanding Stove). When the switch is in the closedposition test the Ohms reading, a reading of 0-0.3 ohms indicates a good switch (<strong>Gas</strong>:18). Replace safety switch as necessary. Donot bypass this switch. Check for blockage in the fl ue pipe.Remote controltransmitter has turned offthe fi replace.Check that the batteries in the remote are not expired or drained. If necessary replace with new batteries. Also check that thesettings on the remote are set correctly for the desired operationPrimary air shutter isblocked or the aeration isset incorrectly.Examine and clear any blockage in the air shutter (<strong>Gas</strong>:6). Refer to the installation manual to set burner aeration (<strong>Gas</strong>:6).Carbon / Sootappearing onthe glass orlogs.Infrequent servicing ofthe appliance.Incorrect positioning oflogs and ember materialwill result in carboning.Schedule and perform regular maintenance for the appliance.Refer to the installation manual and correctly place the logs and ember material.An oversized orifi ce and/or high gas pressurewill cause overfi ring andcarboning.Verify the orifi ce size and replace if necessary. Test and correct inlet pressure as necessary (<strong>Gas</strong>:14).<strong>Regency</strong> <strong>P33</strong> Sunrise TM <strong>Gas</strong> <strong>Fireplace</strong> 45
PARTS LISTMAIN ASSEMBLYPart #DescriptionPart #Description434-907 Refl ective Panel Stainless Steel <strong>P33</strong>S (Optional)1) * Panel Rear <strong>P33</strong>S (SS)2) * Panel Top <strong>P33</strong>S (SS)3) * Panel Side Left <strong>P33</strong>S (SS)4) * Panel Side Right <strong>P33</strong>S (SS)8) 434-516 Faceplate Assembly Black434-516BL Faceplate Assembly Painted Blue434-516R Faceplate Assembly Painted Red434-517 Faceplate Assembly Stainless Steel10) 434-033 Mounting Plate13) 434-514 Faceplate Support Bracket Assembly909-924 Bumper Rubber W/Machine Screw 8-32 x 3/8"904-925 Cap Assy Brushed Stainless 3/4" diameter.14) 434-519 Control Mounting Plate15) 434-574/P Valve Assembly <strong>P33</strong>S-NG4 SIT Packaged434-576/P Valve Assembly <strong>P33</strong>S-LP4 SIT PackagedValve Assembly <strong>P33</strong>S ULPG16) 341-525 Burner Assembly NG/LP/ULPG c/w Cap17) * Outerbox Assembly18) * Firebox Assembly19) 433-538 Flush Door Assembly Complete940-088/P Glass (Flush)904-691 U-Clip936-155 Glass <strong>Gas</strong>ket20) 434-011 Fire box base21) 434-032 Control Shield22) 948-247 Door Handle23) 434-018F Heat Defl ector24) 918-803 Manual* Not available as a replacement part.PARTS LIST46<strong>Regency</strong> <strong>P33</strong> Sunrise TM <strong>Gas</strong> <strong>Fireplace</strong>
WARRANTY<strong>Regency</strong> ® <strong>Fireplace</strong> Products are designed with reliability and simplicity in mind. In addition, our internal Quality Assurance Team carefully inspects eachunit thoroughly before it leaves our door. <strong>Regency</strong> ® is pleased to extend this limited lifetime warranty to the original purchaser of a <strong>Regency</strong> ® Product.The Warranty: LifetimeCovered under the agreement are the following components: The combustion chamber, heat exchanger, burner tubes/pans, logs, glass crystals, ceramic spa stones,pebbles, brick panels and gold plating (against defective manufacture only) are covered under the Limited Lifetime Warranty for fi ve (5) years for parts and labour andparts only thereafter.External casting, surrounds and grills are covered against cracks and warps resulting from manufacturer defects, parts and labour for one (1) year from the date ofpurchase and parts only thereafter.Special Finishes - One year on stainless steel panels, nickel overlays, nickel faceplates, brushed nickel and antique copper full screens and doors. You can expect somechanges in color as the product "ages" with constant heating and cooling. FPI warranties the product for any manufacturing defects on the original product. However,the manufacturers warranty does not cover changing colors and marks, ie. fi nger prints, etc applied after the purchase of the product. Damage from the use of abrasivecleaners is not covered by warranty.Electrical components such as fans, switches, ignition modules, wiring, thermodiscs, remote control, thermopiles, thermocouples and gas valves are covered for oneyear for parts and labour from the date of purchase.The warranty on brass parts is for one year, no labour. The brass is not warranted against tarnishing.Repair/replacement parts purchased by the consumer from <strong>Regency</strong> ® after the original coverage has expired on the unit will carry a 90 day warranty valid with a receiptonly. Any item shown to be defective will be repaired or replaced at our discretion. No labour coverage is included with these parts.Conditions:All installations must be performed by a qualifi ed gas fi tter and installed according to all applicable local and national codes. Also, all service work must be carried outby a qualifi ed gas service person provided by the selling dealer. It is the responsibility of the installer to ensure that the appliance is fi ring as per rating plate. Any partor parts of this unit which in our judgement show evidence of such defect will be repaired or replaced at <strong>Regency</strong> ® 's option, through an accredited distributor or agentprovided that the defective part be returned to the distributor or agent Transportation Prepaid, if requested. In areas where there is not an approved service agent orthe closest approved service agent is situated more than thirty (30) kilometres from the installation, <strong>Regency</strong> is not obliged to arrange warranty repairs and travel and/or additional labour charges will apply.Porcelain/Enamel - Absolute perfection is neither guaranteed nor commercially possible. Any chips must be reported and inspected by an authorised dealer within threedays of installation. Reported damage after this time will be subject to rejection.It is the general practice of <strong>Regency</strong> ® to charge for larger, higher priced replacement parts and issue credit once the replaced component has been returned to <strong>Regency</strong>and evaluated fro manufacturer defect.At all time <strong>Regency</strong> reserves the right to inspect product in the fi eld which is claimed to be defective.All claims must be submitted to <strong>Regency</strong> ® by authorised selling dealers. It is essential that all submitted claims provide all of the necessary information including customername, purchase date, serial #, type of unit, problem, and part or parts requested, without this information the warranty will be invalid.Exclusions:This limited Lifetime Warranty does not extend to or include paint, door or glass gasketing or trim. It does not cover installation and operational related problems such asover-fi ring, downdrafts or spillage caused by environmental conditions, nearby trees, buildings, hilltops, mountains, inadequate fl ueing or ventilation, excessive offsets,negative air pressures caused by insuffi cient make up air, mechanical systems such as furnaces, fans, clothes dryers etc.Embers, rockwool, gaskets, door handles and paint are not covered under the terms of this warranty policy.<strong>Regency</strong> ® will not be liable for acts of God, or acts of terrorism, which cause malfunction of the appliance.Performance problems due to operator error will not be covered by this warranty policy.The warranty does not extend to any part or parts which show evidence of misuse or abuse, neglect, accident, lack of maintenance, or improper installation.Products made by other manufacturers and used in conjunction with the operation of this appliance without authorisation from <strong>Regency</strong> ® , may nullify your warranty onthis product.<strong>Regency</strong> shall in no event be liable for any special, indirect consequential damages of any nature whatsoever which are in excess of the original purchase price of theproduct. Any alteration to the unit which causes sooting or carboning that results in damage to the exterior facia is not the responsibility of FPI.SUBJECT TO CHANGE.DISTRIBUTORS:SERVICE AGENTS:Western AustraliaAIR GROUP AUSTRALIA28 DIVISION STWELSHPOOL WA 6106AIR GROUP AUSTRALIA28 DIVISION STWELSHPOOL WA 6106NOTE: PLEASE RETAIN YOUR INVOICE AS PROOF OF PURCHASE FOR WARRANTY VERIFICATIONINCORRECT INSTALLATION, ELECTRICAL SURGES WHICH MAY CAUSE DAMAGE TO ELECTRICAL COMPONENTS/ GAS VALVES ORGAS PRESSURE SETTINGS ARE NOT COVERED BY WARRANTYA SERVICE OR CALL OUT FEE WILL BE CHARGED IN THESE CIRCUMSTANCES.<strong>Regency</strong> <strong>P33</strong> Sunrise TM <strong>Gas</strong> <strong>Fireplace</strong> 47
FPI fireplaces are designed with reliability and simplicityin mind. In addition, our internal Quality Assurance Teamcarefully inspects each unit thoroughly before it leavesour door.FPI <strong>Fireplace</strong> Products International Ltd. is pleased to extendthis Limited Lifetime Warranty to the original purchaser ofa FPI Product.See the inside back cover for details.Installer: Please complete the following informationDealer Name & Address: _________________________________________________________________________________________________________________Installer: ___________________________________________________________Phone #: ___________________________________________________________Date Installed: ______________________________________________________Serial No.: __________________________________________________________<strong>Regency</strong> Sunrise is a trademark of FPI <strong>Fireplace</strong> Products International Ltd.© Copyright 2009, FPI <strong>Fireplace</strong> Products International Ltd. All rights reserved.48Printed in Canada<strong>Regency</strong> <strong>P33</strong> Sunrise TM <strong>Gas</strong> <strong>Fireplace</strong>