
Create successful ePaper yourself
Turn your PDF publications into a flip-book with our unique Google optimized e-Paper software.
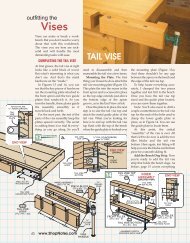
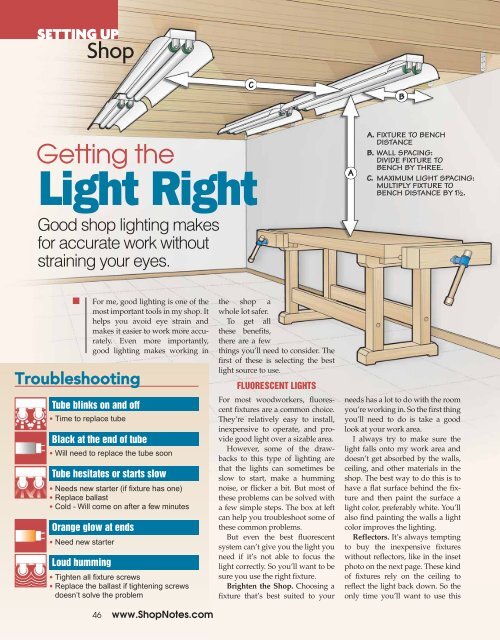
SETTING UP<strong>Shop</strong>CBGetting theLight RightGood shop lighting makesfor accurate work withoutstraining your eyes.AA. FIXTURE TO BENCHDISTANCEB. WALL SPACING:DIVIDE FIXTURE TOBENCH BY THREE.C. MAXIMUM LIGHT SPACING:MULTIPLY FIXTURE TOBENCH DISTANCE BY 1!/2.TroubleshootingFor me, good lighting is one of themost important tools in my shop. Ithelps you avoid eye strain andmakes it easier to work more accurately.Even more importantly,good lighting makes working inTube blinks on and off• Time to replace tubeBlack at the end of tube• Will need to replace the tube soonTube hesitates or starts slow• Needs new starter (if fixture has one)• Replace ballast• Cold - Will come on after a few minutesOrange glow at ends• Need new starterLoud humming• Tighten all fixture screws• Replace the ballast if tightening screwsdoesn’t solve the problem46 www.<strong>Shop</strong>Notes.comthe shop awhole lot safer.To get allthese benefits,there are a fewthings you’ll need to consider. Thefirst of these is selecting the bestlight source to use.FLUORESCENT LIGHTSFor most woodworkers, fluorescentfixtures are a common choice.They’re relatively easy to install,inexpensive to operate, and providegood light over a sizable area.However, some of the drawbacksto this type of lighting arethat the lights can sometimes beslow to start, make a hummingnoise, or flicker a bit. But most ofthese problems can be solved witha few simple steps. The box at leftcan help you troubleshoot some ofthese common problems.But even the best fluorescentsystem can’t give you the light youneed if it’s not able to focus thelight correctly. So you’ll want to besure you use the right fixture.Brighten the <strong>Shop</strong>. Choosing afixture that’s best suited to yourneeds has a lot to do with the roomyou’re working in. So the first thingyou’ll need to do is take a goodlook at your work area.I always try to make sure thelight falls onto my work area anddoesn’t get absorbed by the walls,ceiling, and other materials in theshop. The best way to do this is tohave a flat surface behind the fixtureand then paint the surface alight color, preferably white. You’llalso find painting the walls a lightcolor improves the lighting.Reflectors. It’s always temptingto buy the inexpensive fixtureswithout reflectors, like in the insetphoto on the next page. These kindof fixtures rely on the ceiling toreflect the light back down. So theonly time you’ll want to use this
type of fixture is when your ceilingis flat and light in color.In my shop, I have an openceiling with exposed joists. So Ichose to use a fixture that hasreflectors, like the one you see inthe top photo at right. These reflectorsbounce the light down towardthe work surface. You’ll also wantto use these fixtures if your ceilingsurface is dark or the fixtures aresuspended from the ceiling.LOCATING THE LIGHTIf your workbench is against thewall, it’s always a good idea to tryto position the fixture directly overworksurface. That way the light isnot behind you causing shadows.Distance From The Wall.There’s a simple rule of thumb Ilike to use for locating a fixtureover a workbench. And it requirestaking only one measurement. Ijust measure the distance from mybenchtop to the fixture (see illustrationon opposite page). Then Isimply divide that distance bythree ( 1 / 3 the distance). This tells mehow far away from the wall tomount the fixture.The ceiling in my shop is 8' highand the distance from my bench tothe fixture is 5'. So I mounted thefixture on the ceiling a distance of20" away from the wall.More Than One Fixture. In mostshops, one fixture won’t be enoughto supply adequate light. You’llneed to install a number of fixturesto evenly light the space. So thenext thing you’ll need to determineis the farthest distance you canspace the fixtures apart.How Far Apart? Again, I returnto my initial measurement of theworkbench to the fixture. Then youcan simply multiply that distanceby 1 1 / 2 to find the maximum distanceto leave between fixtures.That means if the distance fromthe workbench to the fixture is 5',the farthest apart my fixtures couldbe is 7 1 / 2' (5 x 1 1 / 2 = 7 1 / 2). If possible,I like to place them a little closertogether because this lights theroom even better. I also try to lineup the fixtures so they run thelength of the entire room.Now that you know how farapart to space them, it’s easy tofigure out how many rows of fixturesyou’ll need to cover theroom. Just determine the numberof additional fixtures you’ll needin each row. You’ll find fluorescentfixtures come in 4’ and 8’ lengths.So it’s easy to configure a set of fixturesto get the light you wantright where you need it.There’s one final thing you’llneed to think about if you’re going{ Reflectors.Winged reflectorshelp to direct thelight downwardtoward theworksurface.to be using fluorescentlighting. And that’s tomake sure the fixtureyou’re using is alsoright for the environmentthat exists in yourworkshop. This means makingsure you get the right ballast. Thebox below has the informationneeded to help you with this.As you can see, properly lightingyour shop requires the same kindof preparation and setup asinstalling a new power tool. You’llwant the right fixture positioned inthe just the right place.{ Strip Fixture. Afixture withoutreflectors dependson the surfacedirectly above it toreflect the light.Choose the RightBallastOne thing you’ll find about fluorescentlights that differs from othertypes of lighting is they require aballast to operate. The ballast islocated in the fixture (photo atright). It provides both a highvoltage jolt to start the lamp andthe low voltage stream needed fornormal operation. You’ll want to besure you have the right ballast forthe temperature in your shop.So, when you choose a fluorescentlighting system, make sureyou check the starting temperatureof the ballast. If the temperature inyour work area is likely to dropbelow 50°, you’ll want to use fixtureswith ballasts that start atthese lower temperatures. This iseasy to determine. You’ll find theminimum starting temperatureand other information printeddirectly on the ballast.This information will also tellyou whether the ballast is a magneticor electronic type. Electronicballasts are a little bit more expensivebut they tend to flicker less,run somewhat quieter, and work atlower temperatures.You’ll find the noise ratingprinted on the ballast as well. Arating system of A, B, or C is mostcommonly used, with “A” offeringthe quietest operation.www.<strong>Shop</strong>Notes.com 47