Glue set up for HOT MELT machines - Langguth America
Glue set up for HOT MELT machines - Langguth America
Glue set up for HOT MELT machines - Langguth America

Create successful ePaper yourself
Turn your PDF publications into a flip-book with our unique Google optimized e-Paper software.
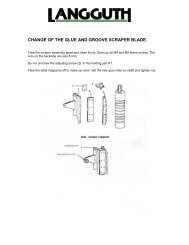
<strong>Glue</strong> <strong>set</strong> <strong>up</strong> <strong>for</strong> LANGGUTH E62 / E40 / 310 / 330Heat <strong>up</strong> the glue system to operation temperature.Wear safety gear, gloves and eye protection at all times!Hot-Melt <strong>Glue</strong> <strong>set</strong> <strong>up</strong> from scratch:Take the glue application head off the stand and turn it sideways. This will allow you tosee better what happens and you can catch the glue better. Se picture below <strong>for</strong> the <strong>set</strong><strong>up</strong>. Take all air caps of the nozzles.Set the pressure gate at the Nordson glue Melter to 0.9 bar. The red scale just belowthe 1 this is a good starting point.Have a little screw driver and a measuring tape available. Mark a position 200 mm or 8”away from the pick-<strong>up</strong> glue head on your cardboard <strong>set</strong> <strong>up</strong>.Switch the system on and make sure the pressure is at 0.9 bar at the Nordson Melter.
Take the little screw driver and press down the white button in the solenoid valve. Theglue should flow in a nice curved bent and hit the cardboard about 200 mm or 8” awayfrom the nozzle. If the stream is going less or more, you need to adjust the gluepressure to get it just right.Repeat this with every nozzle on your system and make sure they all work the sameway. Minimal differences are OK.Clean <strong>up</strong>, wipe the nozzles and the glue off the tips and install all the air caps back ontothe glue nozzles.Set The Air pressure <strong>for</strong> the swirl air to about 2bar:
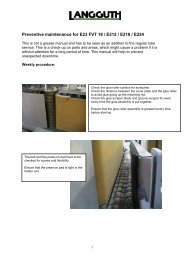
The location is beside the main pressure gauge see picture above. On inline <strong>machines</strong>this gauge is inside the bottom frame open the door and it is on the discharge side ofthe machine.Take a piece of cardboard and spray glue on to the cardboard.You should see a nice circle.The goal here is to create the circle with as little glue pressure and as little air pressureas possible. This is the bottom line to avoid glue overspray.
Nozzle <strong>set</strong> <strong>up</strong> <strong>for</strong> pick-<strong>up</strong> glue.Step 1.Set the glue application timing to 100 <strong>for</strong> the pick-<strong>up</strong> and lap glue at the control panel.Set machine to jog mode.Close all glue modules and open them <strong>up</strong> just half a turn. Push the manual glue buttonand spray one glue shot onto a cardboard piece (hold it away from the nozzle about 10-15 mm (1/4 – ½ “).Use the manual glue release button to <strong>set</strong> the glue amount <strong>for</strong> each gun. Repeat thisstep until all glue circles look the same.The drop of glue should not have any runs - about a needle head size is OK.When all glue guns spry a drop of even size, reinstall the air nozzles.
If different label sizes are used, find a number in the middle and this will work well <strong>for</strong>all labels.Example:The <strong>set</strong>-<strong>up</strong> <strong>for</strong> the longest label is 380 mm and the <strong>set</strong>-<strong>up</strong> <strong>for</strong> the shortest label is240 mm. This is the distance from the photo eye to the leading edge of the label, notthe label length.The delay time should be <strong>set</strong> at 31 to get the middle amount of the timing.After every change the machine has to be metered to store the value at the LAS 100card. The number at the card and the two-digit number under the cover on thecontrol panel should match.Common problems:These tasks have to be per<strong>for</strong>med by a licensed electrician.The wires <strong>for</strong> the lap glue timing are crossed instead of 31 you need to adjust 13 toget the glue in the right spot. If this is the case, change the wire.Pick-<strong>up</strong> glue is sprayed when the bottle is way past the pick-<strong>up</strong> glue head.The photo eye is connected the wrong way. Change the photo eye to normally open.The running LED <strong>for</strong> the encoder is on but no glue.The encoder is connected backwards and needs to be changed. Refer to manual ofthe LAS 100.