Content (english text) - Digital tog og digital modeljernbane
Content (english text) - Digital tog og digital modeljernbane
Content (english text) - Digital tog og digital modeljernbane

You also want an ePaper? Increase the reach of your titles
YUMPU automatically turns print PDFs into web optimized ePapers that Google loves.
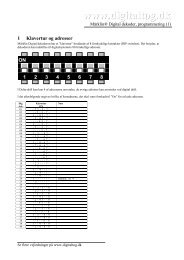
Pr<strong>og</strong>ramming modes and pr<strong>og</strong>ramming procedures of the Lokmaus®2Before you start to pr<strong>og</strong>ram a loco decoder you should read the instruction to find out what parametersand which values can be pr<strong>og</strong>rammed and which kind of pr<strong>og</strong>ramming mode is required. An overviewfor the ROCO decoders and the decoders of other manufacturers that we have tested you find in thecompatibility-list on page 33. There you find a list of the facilities of the ROCO decoders too.Using the Lokmaus ® 2 you can take advantage of all the features of a loco decoder including the pr<strong>og</strong>rammation.The Lokmaus offers two modes of pr<strong>og</strong>rammation: the standard and the professionalmode. Using the standard mode you can pr<strong>og</strong>ramm the loco address, the minimum speed, the accelerationand deceleration, the maximum speed ant the CV29. Using the professional mode you can pr<strong>og</strong>ramall important settings of the decoders by pr<strong>og</strong>ramming the CVs from 01 to 99 indicating valuesfrom 00 to 99.IMPORTANT: there must be only one decoder in the system during the pr<strong>og</strong>ramming procedure(except the <strong>digital</strong> turnout drive. 42624). If there are more than one loco or switch decoder on the trackor connected to the amplifier all decoders are pr<strong>og</strong>rammed simultaneously including switch-decoders!By that way e.g. all decoders could be pr<strong>og</strong>rammed to the same address!Therefore it is the best way to pr<strong>og</strong>ram loco and switch decoders on a separate pr<strong>og</strong>ramming-track. Sofirst unplug all feeding tracks of your layout, second plug the pr<strong>og</strong>ramming track and then start the pr<strong>og</strong>rammingprocedure. Instead of unplugging you can install a two-pole-switch that cuts the feeding ofthe driving area of your layout and only feeds the pr<strong>og</strong>ramming track (see fig. 4 on page 37).IMPORTANT: Be careful with switch decoders, they could be damaged that way!Standard Pr<strong>og</strong>ramming ProcedureIn this mode you can change the most important parameters of a loco such as the address, minimumspeed, acceleration and deceleration delay and the maximum speed. Pressing ‘P’ and one of the functionbuttons ‘star’ or ‘F1’ to ‘F4’ leads you into the standard pr<strong>og</strong>ramming mode. By the same procedureyou select the parameter that you want to pr<strong>og</strong>ram (see the list below).Meanwhile you press the two buttons the display shows ‘SP’ and all trains on the layout stop. The twopoints of the display flash alternately to indicate the standard pr<strong>og</strong>ramming mode. After you releasedthe two buttons the mouse indicates in the display the default value for the selected parameter (connectedto an amplifier or central unit that can read out the decoder it indicates the actual setting of the decoder).If you want to change this value e.g. the loco address you select an othere setting by the ‘up’ or‘down’ button. Pressing the button ‘P’ you confirm the selection and start the pr<strong>og</strong>ramming procedurethat writes the setting into the decoder. This procedure takes some time depending on the pr<strong>og</strong>rammingmodes that are executed. The display indicates this procedure showing ‘P’. After this procedure theLokmaus®2 returns automatically to the normal state and the locos restart to run. By pressing ‘STOP’you can return to the normal state without writing something into the decoder.IMPORTANT:Pay attention to the valid range for the parameters! Please read the instruction of the locodecoder. A list of the features of the ROCO decoders you find on page 34.This pr<strong>og</strong>ramming mode can be deactivated by the menu C3 – so it can’t be used unintentionally by children– see on page 28.‘P’ + ‘star’ pr<strong>og</strong>rams the address,value 01 to 99, default is 03‘P’ + ‘F1’ defines the minimum speed,value 01 to 99, default is 08‘P’ + ‘F2’ defines the acceleration delay,value 01 to 99, default is 04‘P’ + ‘F3’ defines the deceleration delay,value 01 to 99, default is 04‘P’ + ‘F4’ defines the maximum speed(only can be pr<strong>og</strong>rammed if the decoder is load regulated)value 01 to 99, default is 15‘P’ + ‘STOP’ pr<strong>og</strong>rams the CV29 that contains basic settings of the decodervalue 01 to 99, default is 0424
Pr<strong>og</strong>ramming the CV29The CV29 is used for the setup of the decoder. It defines the behaviour of the decoder according to thefacilities of the central unit and to your wishes. The CV29 sets up the following features: the sense of driving the speed step mode the automatical rec<strong>og</strong>nition of the DC operation (by this way you can use DC to stop the loco in frontof a red semaphore)The valid values for the CV29 are at most of the locos:0 sense of driving: normal speed step mode14 <strong>digital</strong> only1 sense of driving: inverted speed step mode14 <strong>digital</strong> only2 sense of driving: normal speed step mode28 <strong>digital</strong> only3 sense of driving: inverted speed step mode28 <strong>digital</strong> only4 sense of driving: normal speed step mode14 <strong>digital</strong> and DC5 sense of driving: inverted speed step mode14 <strong>digital</strong> and DC6 sense of driving: normal speed step mode28 <strong>digital</strong> and DC (default)7 sense of driving: inverted speed step mode28 <strong>digital</strong> and DCProfessional Pr<strong>og</strong>ramming ProcedurePress the button ‘P’ for at least 8 seconds (this time can be changed by the menu C5 see page 28). Youenter the professional pr<strong>og</strong>ramming mode. The display shows ‘EP’ and both points of the display flashsimultaneously. Release ‘P’ and changes to indicates ‘01’ for the CV01 the first memory of the decoder.If you want to pr<strong>og</strong>ram a different CV then you select this CV using the ‘up’ and ‘down’ buttons e.g. theCV04 to pr<strong>og</strong>ram the deceleration delay. The range of CVs you can pr<strong>og</strong>ram by the Lokmaus ® 2 is from01 to 99 with values from 00 to 99.Press ‘F1’ to confirm your selection and read the decoder or ‘F4’ to confirm and write it.If you press ‘F1’ the display shows ‘FS’ to indicated the reading procedure and after that it shows you theresult.IMPORTANT: The actual amplifier 10761 is not able to read out the decoder, therefore you get an error-messagein the display of the Lokmaus ® 2. For the future ROCO plans to develop a device that ismore powerful and supports to read the decoder. If you use the Lokmaus ® 2 <strong>t<strong>og</strong></strong>ether with a LZ100 andLV101 by Lenz then you can read out the loco decoder already today.If you select ‘F4’ to write the decoder then you must indicate the value you want to pr<strong>og</strong>ram by the buttons‘up’ and ‘down’. By principle all values from 00 to 99 are pr<strong>og</strong>rammable, but most of the decodersonly support a smaller range of values. ROCO decoder e.g. accept for the deceleration a range from 01to 31. In this example you indicate 10 for the deceleration.Pressing the button ‘P’ you start the pr<strong>og</strong>ramming procedure and the value is written into the decoder.This procedure takes some time. The display shows ‘FP’ to indicate this procedure. After that the Lokmaus®2 returns to the selection of the CV and you can select the next CV in order to pr<strong>og</strong>ram it. At anytime during the pr<strong>og</strong>ramming menu you can cancel the procedure by pressing the ‘STOP’ button andquit the menu without reading or writing the decoder.The time you have to press the button ‘P’ to enter this pr<strong>og</strong>ramming mode can be defined by the menuC5 and in the same menu it can be deactivated – so it can’t be used unintentionally by children – see onpage 28.Pr<strong>og</strong>ramming ModesThere exist some different methods to transmit the pr<strong>og</strong>ramming information to the decoder: the address-only-mode,the register-mode, the paged-mode and the direct-mode (direct CV-pr<strong>og</strong>ramming).The address-only-mode can only determin the address of a loco. It was designed for very simple decoders,that don’t support other features.The register-mode (physical register mode) is the oldest method to transmit the pr<strong>og</strong>ramming informationto the decoder. The pr<strong>og</strong>ramming information are transmitted as commands for the loco addresses120 to 127 and are accepted as pr<strong>og</strong>ramming information by every loco after a reset (therefor youshould not use the addresses 120 to 127 to control a loco). The selected address defines which kind ofinformation (which memory of the decoder) is accessed. So you have a maximum of eight memories25
Using one or more boosters 10762Devide your layout into separated feeding sections. Define the sections in a way that every sectionneeds nearly the same amount of power. To calculate the power consumption see the following list: standing locos including headlights about 100 mA driving locos depending on the type of loco and its load 300 to 600 mA illuminated car per bulb about 30 mA <strong>digital</strong> uncoupler or smoke generator about 100 mAIf the sum of power consumption is higher than 2500 mA then the section is overloaded and must be devided.Please remember that bulbs have a big tolerance in power consumption. It can reach from 25 to70 mA. If you use the <strong>digital</strong> turnout drive 46264 or connect other switch decoders directly to the tracksthen you must calculate a reserve of 500 mA to operate them.Those sections are without any influence on the running of the locos or on the way how to operate aturnout. At any time and at any place of the layout always the same information is available. Thereforeyou do not need to know in which section a loco is running to address and control it.In order to install the sections switch off the layout. Devide it into separated sections by using the ROCOplastic connectors 42611, by using sectionated track or simply cut the profiles of the tracks on both sides.Install a feeding track ROCO 42517 or use the wire 22217 to feed the section. Connect it to thetrack out plug of the booster. The booster gets its energy via the two-ople black wire from the transformer10718. The booster gets its information to amplify via the special wire that comes with the booster. Itconnects the plug ‘booster out’ of the amplifier with the plug ‘booster in’ of the booster. The plug ‘boosterout’ of the booster can be used to connect an additional booster. A maximum of four boosters can beused. The scheme fig. 3 on page 36 shows the wiring diagram.IMPORTANT: Make sure that the tracks at all sections have the same polarity, so that there don’t happenshort circuits if a train passes from one section to an other. If a short circuit occurs simply turn theplug of the feeding track by 180°!Anal<strong>og</strong>ue locos (locos without <strong>digital</strong> decoder) on <strong>digital</strong> tracksThe second generation of the ROCO <strong>digital</strong> system does not support controlling a loco without a <strong>digital</strong>decoder (also the old <strong>digital</strong> is cool system didn’t). The reason is that a loco without <strong>digital</strong> decoder on a<strong>digital</strong> layout causes an enormeously bothering high-frequency noise. There is also the danger thatsmall motors (originally N-scale motors) that are installed in some small H0 locos could be damaged.ATTENTION: in no case you may plug parallelly to a <strong>digital</strong> system a normal DC-transformer tothe same tracks! The <strong>digital</strong> amplifier will be damaged!Even locos that you already have can be equiped with a decoder. If the loco is equipped with aNEM-plug it is very easy to install the decoder. Inside those locos you find the plug to connect the decoder.There is no nesessity of mechanical works because the space for the decoder is prepared. How toinstall the decoder is shown in the instruction of those locomotives.Most of the locos that are not equipped with a NEM plug can be converted to <strong>digital</strong> too. But in that casemechanical works could be necessary and therefore it is better to ask your specialized dealer to convertyour locos.Locos of other manufacturers can be converted to <strong>digital</strong> too. If they are equipped with a NEM-plug theconversion is as easy as to convert a ROCO locomotive. If the loco is not prepared for the <strong>digital</strong> conversionyou must find a space for the decoder inside the loco or make it by mechanical works.If you want to install the decoder with load regulation then the loco must be equipped with a DC-motor orthe AC-motor must be converted from electrical field magnets to a motor with permanent magnets.Compatibility of the new system (RocoNet) to the old <strong>digital</strong> system (Maus-Bus)The new Lokmaus ® 2 10760 and amplifier 10761 offer a lot of additional features compared to the oldROCO ‘<strong>digital</strong> is cool’ system with the Lokmaus 10750 and the central unit 10751. The new Lokmaus ® 2can control 99 locos, can pr<strong>og</strong>ram all features of the decoders and can be combined with more devices.This extension only was possible by creating a new, extended structure of data-communication betweenthe Lokmaus®2 and the amplifier. We call it the RocoNet. That is why it is not possible to use theLokmaus ® 2 in combination with the former central unit 10751 (you must not try to connect it to the oldsystem – what is not possible because of the different plugs).27
The old ‘<strong>digital</strong> is cool’ system by ROCO (Lokmaus 10750 and central unit 10751) can be used – with itsold facilities – <strong>t<strong>og</strong></strong>ether with the new system. In order to connect it to the new system you need the tanslatormodul 10759 that is plugged to the RocoNet as any Lokmaus®2 (slave input of the amplifier or viaan Y-adaptor to the extended RocoNet). The wiring diagram shoes fig 3 on page 35.In that way you can control by the old system eight locos in the new system (addresses 1 to 8) and operatethe headlights and one additional function F1. You can operate the switches 1 to 8 and control the<strong>digital</strong> crane 46800.IMPORTANT: Locomotives that you control by the old Lokmaus must be pr<strong>og</strong>rammed to the 14 speedsteps mode because the Lokmaus of the first generation only ‘knows’ this mode. The new container cranecan’t be operated neither by the old nor by the new Lokmaus. You need the joystick 10780.Compatibility of control devices and decodersThe new Lokmaus ® 2 is fully compatible to the actual devices of the Lenz <strong>digital</strong> plus system (X-Bus andXpressNet see list on page 33). More detailed and actual information you get from the support departmentof ROCO in your country or via internet at ‘www.roco.co.at’.On a layout that is controlled by the ROCO Lokmaus ® 2 you can also control locos equipped with aROCO Decoder but also all decoders that are compatible to the standards of NMRA-DCC. A list thattells you all decoders that we have tested for compatible is printed on page 33.You can also equip locos of other brands with ROCO decoders. Conditions are enough space to installthe decoder. If you want to install the decoder with load regulation then the loco must be equipped with aDC-motor or the AC-motor must be converted from electrical field magnets to a motor with permanentmagnets.The menu system of the Lokmaus®2The menu system of the Lokmaus ® 2 allows you to define a lot of settings of this <strong>digital</strong> system to adapt itto the specifications of your layout and your wishes. For example you can protect the system from unintentionalpr<strong>og</strong>ramming and emergency-stop.In order to enter the menu system you must unplug the Lokmaus ® 2 while the amplifier is running. keepthe button ‘P’ pushed meanwhile you re-plug the Lokmaus ® 2. The display shows you the first menu‘C0’. Using the buttons ‘up’ and ‘down’ you can also select other menus e.g. ‘C3’. Push ‘P’ again and thedisplay shows the actual value of ‘C3’. By the buttons ‘up’ and ‘down’ you can change this value of ‘C3’and pushing ‘P’ you confirm and activate your input. Pushing ‘STOP’ you quit this menu.The following list tells you the various menus and explains the system-functions that you define by thosemenus:C0 – the device address of the individual Lokmaus ® 2. Normally the autoconfiguration feature of theLokmaus®2 selects it automatically. But if you have deactivated this feature by the menu CA then youhave to do it yourself (e.g. in case of difficulties). Addresses are valid from 01 to 30. Factory default is 01.C1 – the number of smart-search-addresses defines the length of the smart search list. It should beas long as the number of locos that are running on your layout. Making it longer slows down the datatransmission to the locos. But it is possible to run more locos than places in this list.This setting affects all input devices, but only the setting of the master-Lokmaus®2 is activated. ChangingC1 at a slave-Lokmaus ® 2 don’t affect the system but are stored in the memory of this Lokmaus ® 2and get activated if this Lokmaus ® 2 becomes master. Minimum is 1 maximum is 22 addresses, defaultis 5.C2 – the smart-search-function can be enabled and disabled by this menu. If you select the value 00the smart-search-function for this individual Lokmaus ® 2 is disabled. The search function at this devicedoesn’t stop at any address but runs continously. =1 enables the smart-search-function.C3 – the protection (1) disables the standard pr<strong>og</strong>ramming mode for this individual Lokmaus ® 2 andthe changement of the speed steps mode. So it protects the system from unintentional use of thosefunctions e.g. by children. 00 deactivates those functions, 01 enables the standard pr<strong>og</strong>ramming andthe changement of the speed step mode.C4 – the protection (2) disables the button ‘STOP’ of this individual Lokmaus ® 2. So the ‘STOP’ can’tbe used unintentionally e.g. by children. In any case after a short circuit you can release the layout withthis button. 00 disables the button and 01 enables it again.C5 – protection (3) this menu defines the time you have to push the button ‘P’ continously to enter theexperts’ pr<strong>og</strong>ramming mode. Setting it to 00 disables this pr<strong>og</strong>ramming mode on this individual Lok-28
maus ® 2 and protects it against unintentional use e.g. by children. A value from 01 to 15 enables the experts’pr<strong>og</strong>ramming mode and defines the time you have to push the button ‘P’ to enter the pr<strong>og</strong>rammingtool.C6 – the basic definition of the speed step mode. This setup defines the default speed step mode forany loco. The display indicates it by horizontal bars: one bar means 14 speed steps, two bars 28 and 3bars symbolize 128 speed steps. For every individual loco you can change this setup. An example: youhave selected 28 speed steps as default for all locos then you can set individually 128 speed steps forthe locos 04, 19 and 73 and 14 steps for the address 01 because this loco only supports this mode.C7 – the reset-function restores the factory defaults of this individual Lokmaus®2. C7 normally is 00.Setting it to 01 causes the reset. All menus of this Lokmaus are re-defined in the way it came from thefactory.C8 – the number of addressed devices defines how many devices are addressed by the master Lokmaus® 2. Only a device that is addressed can send information to the master-Lokmaus ® 2 in order tocontrol a loco or in order to operate a turnout drive. Therefore you must increment the number of addresseddevices if you use more than 5 devices such as Lokmaus ® 2 or turnout keyboards 10770. The addresses29 and 30 that are reserved for the Translator 10759 and the Lenz interface LI100 are alwaysaddressed and don’t have to be included in your calculation. It is not useful to raise this number higherthan the number of devices you use because it slows down the reaction of the system.C9 – choice of the pr<strong>og</strong>ramming methods that are executed by the Lokmaus ® 2. The Lokmaus ® 2can pr<strong>og</strong>ram a loco by four methods (see page 25). Any pr<strong>og</strong>ramming method takes time so it is not usefulto execute methods that are not necessary. By this menu you can disable those methods. The followingtable shows the values for C9 and the pr<strong>og</strong>ramming methods you select by this values:C9 AO RG CV PM C9 AO RG CV PM00 — — — — 08 on — — —01 — — — on 09 on — — on02 — — on — 10 on — on —03 — — on on 11 on — on on04 — on — — 12 on on — —05 — on — on 13 on on — on06 — on on — (default) 14 on on on —07 — on on on 15 on on on onAO = address only, RG = register mode, CV = CV direkt, PM = paged modeDefault is 14 (at the Lokmaus ® 2 that are included in the starting sets 41203 and 41212 default is 06) thatmeans that the Lomaus ® 2 executes the three methods address only, register and CV direct one afterthe other.Only the setup of the master-Lokmaus®2 takes effect. The setup of the slave Lokmaus®2 takes no effectbut is stored in this Lokmaus ® 2.CA – the autoconfiguration procedure is managed by this menu. The autoconfiguration automaticallysearches the next free RocoNet address if a device is plugged the first time to a system. By default this isset to 01 in order to unable this procedure. By 00 you disable this procedure. In this case you have to definethe device address yourself. This makes only sense if there are problems with the autoconfigurationor if autoconfiguration is not supported by the system the Lokmaus®2 is plugged to.CB – the software-version of the Lokmaus ® 2 is displayed. The display tells you the software-versionof this individual Lokmaus ® 2. The function is read-only. You can’t change it.CC – the software-version of the RocoNet is displayed. The display tells you the version of the Roco-Net. The function is read-only. You can’t change it.Combination of <strong>digital</strong> and non-<strong>digital</strong> parts of a layoutAll ROCO <strong>digital</strong> locomotives also run on conventional DC layouts (except the versions for the MärklinMotorola <strong>digital</strong> system that run on a conventional AC layout). The loco decoder automatically detectsthe system he is running in. Therefore it is easily possible to construct a layout that combines <strong>digital</strong> anconventional sections e.g. in the phase of converting your layout from conventional to <strong>digital</strong>. In this phasenot <strong>digital</strong>ized locos can run on the DC-section of your layout without problems parallely to the <strong>digital</strong>locos that can run on both sections.29
Installing the separator 10768The <strong>digital</strong> and the DC-section of your layout must be strictly separated from each other. In order to besure that it is insulated separate the sections by using the ROCO plastic connectors 42611 on both sidesof the track or cut both track profiles (see fig. 6 on page 38).In spite of the insulation the two sections are connected by the wheels of a train that passes from onesection to the other. This causes a short circuit between the <strong>digital</strong> and the conventional system thatcould damage the <strong>digital</strong> amplifier or booster. In order to avoid the short circuit the separator is installedbetween the DC transformer and the feeding track of the conventional section. The separator cuts theconnection between the DC transformer and the tracks automatically if the insulation between the twosections is bridged by a train. So the short circuit detection of the Lokmaus ® 2 is not activated and thetrain can pass from one system to the other.Passing from the <strong>digital</strong> system to the DC-section the loco decoder automatically detects the differentfeeding and assimilates the speed of the loco to the DC tension on the tracks. It also checks the polarityof the tracks. If it matches the sense of driving of the loco then it continuos its run. If it doesn’t match thetrain stops with the pr<strong>og</strong>rammed deceleration delay. To make it continue, you have to set the knob of theDC transformer to the middle (stop-position) and re-start the train.In the same way the decoder reacts passing from the DC-section to the <strong>digital</strong> system. In the <strong>digital</strong> sectionit immediately gets the <strong>digital</strong> information and regards these commands. It also checks the informationof the direction and in case that it doesn’t match the train stops with the pr<strong>og</strong>rammed decelerationdelay. Now you must change the sense of driving of the train to make it re-start.A pass-over-sectionThis simple wiring and procedure with the ROCO separator 10768 includes a small disadvantage if thereare several trains on the tracks:Meanwhile one train passes the separation between the two systems the complete DC-section is fed bythe <strong>digital</strong> system. This causes all conventional locos to stop and all <strong>digital</strong> locos get <strong>digital</strong> informationsand could react according to those commands. This effect can be avoided by installing apass-over-section as shown in fig. 7 on page 38. This section must be longer than the longest train thatpasses over it. It is insulated on both ends on both sides. A train that passes over this section only connectsthe pass-over-section to the <strong>digital</strong> or to the DC system that is controlled by the separator. In thatway no <strong>digital</strong> information can enter the DC-section and influence the locos running there.Turning loops in a <strong>digital</strong> layoutEverybody knows the problems caused by a turning loop in a conventional DC layout. Also on a <strong>digital</strong>layout after a loop the left and the right track profile meet each other and would cause a short circuit ifyou don’t install a wiring that avoids this matter.The ROCO <strong>digital</strong> turnaround loop module 10769 solves the problems of a turnaround loop in the <strong>digital</strong>system. Separate the turnaround loop at both ends on both track profiles as shown in fig. 5 on page 37.The separated section must be longer than the longest train that will pass the loop. The feeding of theturnaround loop is controlled by the turnaround loop module 10769. The modul itself is powered from atrack outside of the loop or directly connected to the amplifier or a booster.The turnaround loop module 10769 works as follows: If a train enters the turnaround loop – doesn’t matterfrom which direction – and the polarity of the tracks before and inside the loop are not identical then ashort circuit occurs inside the turnaround loop modul that is detected immediately and the modul invertsthe polarity of the loops. This happens that fast that the amplifier doesn’t detect a short circuit or that thetrain slows down. Now the loop has the right polarity to enter the loop.This procedure must be repeated when the train leaves the loop, because now the polarity of the loop iswrong for leaving it. For the <strong>digital</strong> operation of the trains the polarity of the tracks doesn’t matter the trainis not disturbed if the polarity of the tracks is inverted. It can pass the loop without stopping and with anyaction that would have to be done by you.To make sure that the turnaround modul 10769 detects the short circuit fast enough you must adjust thesensitivity of the modul by the lateral potentiometer (see instruction of the modul).30
Trouble-shootingHeadlights don’t work correctly speed step mode of the Lokmaus ® 2 and the loco-decoder don’tflashes or can’t be switched on match. The speed step mode for the address of the loco at theor offLokmaus ® 2 is wrong or the CV29 is pr<strong>og</strong>rammed faulty.How to define the speed step mode see page 23How to pr<strong>og</strong>ram the CV29 you find on page 25loco doesn’t movespeed step mode of the Lokmaus®2 and the loco-decoder don’t(128 speed step mode) match. The speed step mode for the address of the loco at theLokmaus ® 2 is wrong or the decoder desn’t support this mode.How to define the speed step mode see page 23How to pr<strong>og</strong>ram the CV29 you find on page 25sense of driving of the loco isinversedthe pr<strong>og</strong>ramming of the CV29 must be corrected to change thesense of driving.How to pr<strong>og</strong>ram the CV29 you read on page 25headlights of the pilot car (e.g. By pr<strong>og</strong>ramming the CV29 you must change the sense of drivingof the ICE don’t match direction of the pilot car. Put the pilot car without loco on the pr<strong>og</strong>ramming track!How to pr<strong>og</strong>ram the CV29 you read on page 25an other Lokmaus ® 2 in the system is pr<strong>og</strong>ramming. You can pro-gram only by one Lokmaus ® 2 simultaneously. During this time no otherLokmaus ® 2 can make an input. If the pr<strong>og</strong>ramming procedure is finished,this message disappears automatically and the locos re-startto run.the speed step mode can’t bechangedthe display shows themessage ‘PA’knob is not in middle position (00). In this position you can controlthe speed step mode, but you can’t change it.How to change the speed step mode you can read on page 23.31
Error Messageserror-code E1error-code E2error-code E3error code E6A short circuit on the pr<strong>og</strong>ramming track has occured. Pleasemake sure that the loco is not derailed and that there’s no fault inthe wiring of the pr<strong>og</strong>ramming track.A newly converted loco may have a faulty wired decoder.Trying to read the decoder didn’t have a result because the locodidn’t answer.Please make sure that the loco is not derailed and that there’s nofault in the wiring of the pr<strong>og</strong>ramming track.A newly converted loco may have a faulty wired decoder.the result of reading a decoder is higher than 99 and therefore theLokmaus ® 2 can’t display it on their 2-digits display. It can displayvalues from 00 to 99. If the result is higher then you get this error-message.The actual RocoNet address of the Lokmaus ® 2 is already in use.After this error message the Lokmaus ® 2 automatically starts tosearch for a new free device-address. If you have disabled the autoconfigurationyou must correct the device address yourself.How to change the device-address you can read on page 28.error code E7error code E8error code E9The actual RocoNet address of the Lokmaus®2 is not addressed.This error message may occur because you added more devicesto the system than defined in the menu C8.How you raise the number of devices you read on page 29.This error message can also appear in the moment that you plugthe Lokmaus®2 to the system very slowly. The data transmissionis connected later than the power supply of the Lokmaus ® 2.This error is corrected automatically after a short time.A data communication error in the RocoNet has happened. If thesystem doesn’t continue after this error message please unplugthe amplifier from the transformer and re-plug it.The Lokmaus®2 has received an unknown command or the datatransmission was disturbed. This error message also occurs if youtry to read a decoder but the Lokmaus ® 2 is plugged to an amplifier(e.g. the amplifier 10761) that doesn’t support this feature.By pressing ‘STOP’ you release this error message.32
Compatibility of loco decodersManufacturer Code AO PM RG CV CommentRoco 10740 ok — — ok10741 ok — — ok10742 ok ok ok ok10745 ok ok ok ok10771 ok CV01 CV01 okKöf ok ok ok okICE — — — — from starting-sets 41100 and215 — — — — 41101 not pr<strong>og</strong>rammableICE — CV01 — CV01 headlight-decoder ICEBR310 ok ok ok ok42624 — CV01 — CV01 <strong>digital</strong> turnout driveArnold 81200 ok — ok ok81210 ok — ok ok81220 ok — ok okDigitrax DH140 — ok ok okHAG501 — ok ok okESU LokSound ok — ok okKühn T121 ok ok ok okLenz LE100 ok — — okLE111N ok ok ok okLE131N ok ok ok okMRC AC310 — — — okSoundtraxx DSD150 ok — — okSystem One CH155 ok ok — okZimo MX61R/N ok ok ok okDevices of other brands as input devices at the RocoNetmanufacturer device autoconfiguration commentLenz LH100 — you need an adaptor-plugLH200 ok can’t be masterLI100 — you need an adaptor-plugArnold 81210 — you need an adaptor-plug81220 — you need an adaptor-plugLokmaus®2 as input device for other systemsmanufacturer central unit bus system commentLenz LZ100 XBUS / XpressNet you need an adaptor-plugLV101 XBUS / XpressNet —Arnold 81200 XBUS you need an adaptor-plug(you can’t pr<strong>og</strong>ram by the mouse)33
Eigenschaften der ROCO / LENZ LokdecoderCV Werte Bezeichnung Einschränkungen01 01 - 99 Lokadresse nicht bei ICE / 215 aus 4110002 01 - 15 Mindestanfahrspannung nicht bei 1074003 01 - 31 Anfahrverzögerung nicht bei 1074004 01 - 31 Bremsverzögerung nicht bei 1074005 01 - 15 Maximalgeschwindigkeit nur bei ROCO 10745!!07 ?? Versionsnummer nur lesen (nicht bei 10740)08 ?? Herstellerkennung nur lesen (nicht bei 10740)29 00 - 07 Fahrstufen, Fahrtrichtung, etc. nicht bei 10740siehe Seite 910741 nur 14 FahrstufenFeatures of the ROCO / LENZ loco decodersCV range feature restrictions01 01 - 99 loco address not for ICE / 215 from 4110002 01 - 15 minimum speed not 1074003 01 - 31 acceleration delay not 1074004 01 - 31 deceleration delay not 1074005 01 - 15 maximum speed only ROCO 10745 !07 ?? software-version read-only (not 10740)08 ?? Manufacturer read only (not 10740)29 00 - 07 setup (speed step mode etc.) not 10740see page 2510741 only 14 speed stepsProprietes du décodeur ROCO / LENZ LokdecoderCV valeurs paramêtre limitations01 01 - 99 adresse de la locomotive pas pour l’ ICE / 215 de 4110002 01 - 15 vitesse minimale pas pour le décodeur 1074003 01 - 31 vitesse de accelération pas pour le décodeur 1074004 01 - 31 vitesse de décélération pas pour le décodeur 1074005 01 - 15 vitesse maximale seulement ROCO 10745!!07 ?? version du l<strong>og</strong>ociel seulement lire (10740 non)08 ?? identification du fabricant seulement lire (10740 non)29 00 - 07 definitions de base pas pour le decodeur 10740voir côte 4510741 seulement 14 niveauxde vitessesQualità delle ROCO / LENZ loco decodificatoriCV intervallo parametro restrizioni01 01 - 99 indirizzo ICE e 215 della 41100/1 no02 01 - 15 velocitá minima 10740 no03 01 - 31 accelerazione 10740 no04 01 - 31 decelerazione 10740 no05 01 - 15 velocitá massima solamente ROCO 10745 !07 ?? versione della software sol. leggere (10740 no)08 ?? identificazione della fabrica sol. leggere (10740 no)29 00 - 07 determinazioni (setup). 10740 novede pagina 6110741 sol. 14 passi di veloc.34