These instructions apply to the DREAM HOME Laminate collection
These instructions apply to the DREAM HOME Laminate collection
These instructions apply to the DREAM HOME Laminate collection

Create successful ePaper yourself
Turn your PDF publications into a flip-book with our unique Google optimized e-Paper software.
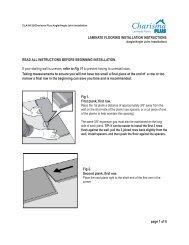
CUTTING AROUND PIPES81. Measure <strong>the</strong> distance from <strong>the</strong> wall <strong>to</strong> <strong>the</strong> center of <strong>the</strong> pipe.Mark <strong>the</strong> plank where <strong>the</strong> hole for <strong>the</strong> pipe will be drilled. Remember <strong>to</strong> allow for <strong>the</strong> spacer. Small parts should be fitted <strong>to</strong>ge<strong>the</strong>rusing PVA laminate glue2. Measure <strong>the</strong> diameter of <strong>the</strong> pipe. Drill <strong>the</strong> hole in <strong>the</strong> plank ¼” larger than <strong>the</strong> diameter of <strong>the</strong> pipe.3. If <strong>the</strong> hole for <strong>the</strong> pipe is located in <strong>the</strong> center of <strong>the</strong> plank, make a cut perpendicular <strong>to</strong> <strong>the</strong> long side of <strong>the</strong> plank. The cut shouldbe made going directly through <strong>the</strong> hole.4. If <strong>the</strong> hole for <strong>the</strong> pipe is located near <strong>the</strong> edge of <strong>the</strong> plank, make two 45º angle cuts <strong>to</strong> <strong>the</strong> hole from <strong>the</strong> side of <strong>the</strong> plank closest<strong>to</strong> <strong>the</strong> hole.5. You can now position <strong>the</strong> two pieces around <strong>the</strong> pipe. Apply a bead of PVA laminate glue <strong>to</strong> <strong>the</strong> cut edge of <strong>the</strong> fill piece and pressin<strong>to</strong> place. Immediately wipe off any excess glue from <strong>the</strong> surface with a damp cloth. Use a wedge and hold in place until glue dries.6. The expansion space around <strong>the</strong> perimeter of <strong>the</strong> pipe shall be completely filled with a silicone caulking.STEP DOWN AND STAIR TREAD APPLICATIONSUse stair nosing <strong>to</strong> finish a single stair edge or for a step down application. Use a stair tread and riser for complete stair applications.Stair parts should be nailed and glued for safety. Due <strong>to</strong> <strong>the</strong> complexity of stair installation and local building codes, it is highlyrecommended <strong>to</strong> consult with a professorial flooring installer or <strong>the</strong> manufacturer for stair installation advice.FINISHING THE INSTALLATION1. Remove spacers from perimeter of room.2. Install transition moldings. Do not fasten transitions in<strong>to</strong> <strong>the</strong> laminate flooring.3. Install quarter round or baseboard molding. Molding must be sufficient size <strong>to</strong> cover <strong>the</strong> ¼” or ½” expansion space. Do notfasten moldings through <strong>the</strong> laminate flooring. Fasten in<strong>to</strong> <strong>the</strong> wall.4. Use plywood when moving furniture or appliances in<strong>to</strong> position <strong>to</strong> protect <strong>the</strong> flooring.5. Use coasters or proper floor protec<strong>to</strong>rs under <strong>the</strong> legs of furniture.6. <strong>DREAM</strong> <strong>HOME</strong> <strong>Laminate</strong> Flooring should be maintained by using a dry swiffer mop or cleaned with laminate floor cleaners. Donot flood mop floor. Do not use abrasive cleaners.7. Chipping edges, dents and Scratches are site related, not warrantable.ROUTINE MAINTENANCE and PROTECTION1. Use a damp cloth <strong>to</strong> blot up spills as soon as <strong>the</strong>y happen. Never allow liquids <strong>to</strong> stand on your floor.2. For <strong>to</strong>ugh spots, such as oil, paint, markers, lipstick, ink, or tar, <strong>apply</strong> mineral spirits on a clean white cloth, <strong>the</strong>n wipe <strong>the</strong> areawith a damp cloth <strong>to</strong> remove any remaining residue.3. Sweep, dust, or vacuum <strong>the</strong> floor regularly with a recommended hard floor attachment (not a beater bar) <strong>to</strong> prevent accumulationof dirt and grit that can scratch or dull <strong>the</strong> floor finish.4. Do not wash or wet mop <strong>the</strong> floor with soap, water, oil-soap detergent, or any o<strong>the</strong>r liquid cleaning material, this could causeswelling, warping, delamination, joint-line separation and void <strong>the</strong> warranty.5. Do not use steel wool, abrasive cleaners, or strong ammoniated or chlorinated type cleaners.6. Do not use any type of buffing or polishing machine, <strong>the</strong>se can generate heat or hot spots.7. For spots such as candle wax or chewing gum, harden <strong>the</strong> spot with ice and <strong>the</strong>n gently scrape with a plastic scraper, such as acredit card. Be careful not <strong>to</strong> scratch <strong>the</strong> flooring surface. Wipe clean with a damp cloth.8. A more frequent dust-mopping or vacuuming schedule may be required in very sandy areas such as a beach home.9. Entry mats will help collect <strong>the</strong> dirt, sand, grit, and o<strong>the</strong>r substances such as oil, asphalt, or driveway sealer that might o<strong>the</strong>rwisebe tracked on<strong>to</strong> your floor.10. Do not use rubber or foam backed plastic mats as <strong>the</strong>y may discolor <strong>the</strong> flooring finish. To prevent slippage, use an approvedvinyl rug underlayment approved for urethane finishes.11. Use floor protec<strong>to</strong>rs and wide-load bearing leg bases/ rollers <strong>to</strong> minimize indentations and scratches from heavy objects. As arule, <strong>the</strong> heavier <strong>the</strong> object, <strong>the</strong> wider <strong>the</strong> floor protec<strong>to</strong>r.12. Avoid excessive exposure <strong>to</strong> water.13. Do not walk on your floor with stilet<strong>to</strong> heels, shoes with sports cleats or exposed metal parts.14. Do not allow sharp, pointed, or rough textured objects <strong>to</strong> be exposed <strong>to</strong> <strong>the</strong> flooring.15. Keep your pet’s nails trimmed <strong>to</strong> prevent <strong>the</strong>m from scratching your floor.16. Protect from direct UV sunlight17. Use a dolly when moving heavy furniture or appliances; but first, put down a piece of quarter inch plywood or Masonite <strong>to</strong> protect<strong>the</strong> floor. Never try <strong>to</strong> slide or roll heavy objects across <strong>the</strong> floor.18. A protective mat should be used for furniture or chairs with cas<strong>to</strong>rs.19. never use oil soaps, wax, liquid or o<strong>the</strong>r household products <strong>to</strong> clean your floor.20. Lumber Liquida<strong>to</strong>rs does not endorse <strong>the</strong> use of steam cleaning machines on wood products, use at your own risk.21. Toys and <strong>to</strong>ols can scratch <strong>the</strong> finishes, scratches and dents are jobsite related, not warrantable.Questions or comments regarding your application please call our Cus<strong>to</strong>mer Care or Technical Support for assistance(1-800-366-4204)