These instructions apply to the DREAM HOME Laminate collection
These instructions apply to the DREAM HOME Laminate collection
These instructions apply to the DREAM HOME Laminate collection

You also want an ePaper? Increase the reach of your titles
YUMPU automatically turns print PDFs into web optimized ePapers that Google loves.
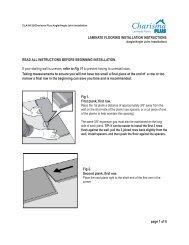
61. Ideally, <strong>the</strong> remaining pieces cut off from planks may serve as <strong>the</strong> starter or first plank in <strong>the</strong> next row.2. Stagger new end-joints from previously installed rows a minimum of 6”-12” <strong>to</strong> avoid seam line-up3. The last board of each row, under cabinets or o<strong>the</strong>r difficult areas can be tapped-in using a tapping bar.1. 2.3. 4.SECOND AND CONSECUTIVE ROWS AND INDIVIDUAL BOARDS4. Position <strong>the</strong> first plank of <strong>the</strong> second row with <strong>the</strong> short end-side against a wall spacer. Next engage <strong>the</strong> long <strong>to</strong>ngue side in<strong>to</strong> <strong>the</strong>groove planks of <strong>the</strong> first row at approximately a 45º angle until planks fit <strong>to</strong>ge<strong>the</strong>r.5. Gradually lower <strong>the</strong> plank down flat until <strong>the</strong> joint closes, locks or clicks6. Using a tapping block, gently tap <strong>to</strong> close any gaps between boards - repeat procedure until completed Note how board #6 isinstalled with a slight gap (1/8”-3/16”) in-between #6 and #5 board. The gap is <strong>the</strong>n gradually closed as board #6 is lightly tappedwith a (tapping block) against board#5. Do not over-tap, repeat process until finished.4. 5.6.