These instructions apply to the DREAM HOME Laminate collection
These instructions apply to the DREAM HOME Laminate collection
These instructions apply to the DREAM HOME Laminate collection

You also want an ePaper? Increase the reach of your titles
YUMPU automatically turns print PDFs into web optimized ePapers that Google loves.
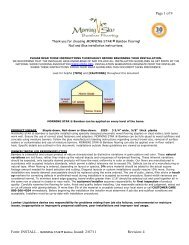
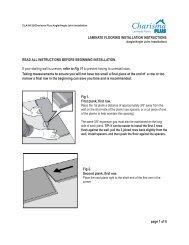
51. Example of board placement sequence during Layout. Note how board #6 is installed with a slight gap (1/8”-3/16”) in-between #6and #5 board. The gap is <strong>the</strong>n gradually closed as board #6 is lightly tapped with a (tapping block) against board#5. Do not over-tap.2. Adding additional spacers <strong>to</strong> <strong>the</strong> (beginning and ending rows) can temporarily help “hold” installed planks <strong>to</strong>ge<strong>the</strong>r duringinstallation. Remove spacers when finished.3. If <strong>the</strong> starting or ending wall is irregular, scribe or trace <strong>the</strong> con<strong>to</strong>ur of <strong>the</strong> wall <strong>to</strong> <strong>the</strong> row of boards.STARTING THE FIRST ROW6. Provide perimeter expansion. The expansion space is <strong>the</strong> same as <strong>the</strong> thickness of <strong>the</strong> new flooring. 1/4” thick flooring willrequire 1/4” expansion. Start by placing spacers against <strong>the</strong> wall at <strong>the</strong> short and long side of each plank and at a seam where twoplanks join. Double this spacing for larger room areas over 27’ in any direction.7. Complete <strong>the</strong> first row progressively building or locking <strong>to</strong>ge<strong>the</strong>r <strong>the</strong> shorter ends of <strong>the</strong> planks6. 7.8. The last plank in any row will need <strong>to</strong> be cut. Measure <strong>the</strong> distance between <strong>the</strong> wall and <strong>the</strong> surface of <strong>the</strong> last full plank, makesure <strong>to</strong> allow for <strong>the</strong> spacer. If this measurement is less than 12”, <strong>the</strong> length of first plank in <strong>the</strong> row should be adjusted. This willallow for a longer plank at <strong>the</strong> end of <strong>the</strong> row. The first and last plank in each row should be at least 12” in length. Boards used under<strong>the</strong> recommended 12” should also be edge-glued9. Fill-in planks can be cut with a jig saw, power saw, or hand saw. TIP: Clean cuts are achieved using a thin kerf, carbide tippedsaw blade. Blade cut rotation should cut in<strong>to</strong> <strong>the</strong> décor or finished side of <strong>the</strong> plank.8. 9.