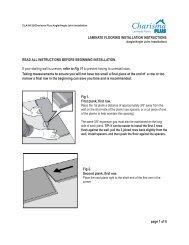
These instructions apply to the DREAM HOME Laminate collection
These instructions apply to the DREAM HOME Laminate collection
These instructions apply to the DREAM HOME Laminate collection

Create successful ePaper yourself
Turn your PDF publications into a flip-book with our unique Google optimized e-Paper software.
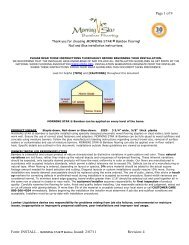
OTHER SUBFLOOR REQUIREMENTS1. Ceramic tiles, terrazzo, vinyl sheet goods, linoleum and resilient (VCT) vinyl composition tile and older vinyl and linoleum tiles orsheet goods normally do not need <strong>to</strong> be removed providing <strong>the</strong>y are smooth, sound and dry. Older vinyl sheet goods and tile maycontain asbes<strong>to</strong>s. Contact your local municipalities for special precautions should you choose <strong>to</strong> remove <strong>the</strong>se older floor coverings.2. A vapor barrier is always required when installing laminate over vinyl, linoleum sheet goods, resilient tiles or ceramic tiles andconcrete.NEW CONSTRUCTIONS1. The installation should be scheduled as late in <strong>the</strong> building cycle process as possible <strong>to</strong> prevent any unnecessary damage fromoccurring as <strong>the</strong> result of o<strong>the</strong>r trades involved with <strong>the</strong> construction process. Always protect <strong>the</strong> floor if o<strong>the</strong>r trades will be walkingon <strong>the</strong> floor after installation.2. Prior <strong>to</strong> installation, <strong>the</strong> building must be closed and <strong>the</strong> climate controls should be in normal operation for at least two weeks.3. See specific product acclimation, site moisture and subfloor requirements.4. Kitchen cabinet bases should be installed before <strong>the</strong> floor is installed. However, cabinets may be installed after <strong>the</strong> floor is inplace providing <strong>the</strong> cabinets; island cabinets, etc. are not fixed /attached <strong>to</strong> <strong>the</strong> laminate floor.5. Areas of water exposure, such as <strong>the</strong> expansion space in front of <strong>the</strong> kitchen sink, in front of or around <strong>the</strong> dishwasher, around<strong>the</strong> refrigera<strong>to</strong>r space and around any water supply line, in front of any exterior doors and sliding glass doors must be sealed/filledwith a flexible 100% mildew-resistant silicone sealant.BATHROOMS<strong>Laminate</strong> flooring is water resistant, not water proof<strong>Laminate</strong> flooring may be installed in bathrooms; however, it is important <strong>to</strong> safeguard <strong>the</strong> floor from water damage.Installation in bathrooms must be made in accordance with <strong>the</strong> following <strong>instructions</strong>:1. Do not install in rooms with a floor drain.2. Avoid steam, provide ventilation and floor mats, quickly remove standing water3. All expansion spaces provided between <strong>the</strong> new flooring and walls; <strong>the</strong> doorway transition or o<strong>the</strong>r fixed objects such as pipes forradia<strong>to</strong>rs, sinks, water supply <strong>to</strong> water closet or <strong>to</strong>ilet flanges and areas of water exposure MUST be sealed with 100% mildewresistantsilicone sealant.4. When flooring is installed in a bathroom and an adjoining hall or room, a T-Molding transition must be installed in <strong>the</strong> doorwaybetween <strong>the</strong> rooms or hallway and <strong>the</strong> expansion space under <strong>the</strong> T-Molding must be filled with <strong>the</strong> proper sealant. Place sealant in<strong>the</strong> expansion space of any flooring transition in <strong>the</strong> doorway of a bathroom.KITCHENSInstallation in kitchens must be made in accordance with <strong>the</strong> following <strong>instructions</strong>:1. Kitchen cabinet bases should be installed before <strong>the</strong> floor is installed.2. Areas of water exposure, such as <strong>the</strong> expansion space in front of <strong>the</strong> kitchen sink, in front of or around <strong>the</strong> dishwasher, around<strong>the</strong> refrigera<strong>to</strong>r space and around any water supply line, in front of any exterior doors and sliding glass doors MUST be sealed with100% mildew-resistant silicone sealant..3. Install <strong>the</strong> planks up <strong>to</strong> <strong>the</strong> cabinet kick plate, leaving <strong>the</strong> expansion space. Cover <strong>the</strong> expansion space with a quarter roundmolding.LAUNDRY ROOMS<strong>Laminate</strong> flooring may be installed in laundry rooms; however, it is important <strong>to</strong> safeguard <strong>the</strong> floor from water damage.1. All expansion spaces in a laundry room MUST be filled with sealant.2. <strong>Laminate</strong>s must not be installed in rooms with a floor drain or sump pump.3. Areas of water exposure, such as <strong>the</strong> expansion space near a sink, around any water supply line, MUST be sealed with 100%mildew-resistant silicone sealant.4. When flooring is installed in a laundry room and an adjoining hall or room, a T-Molding transition must be installed in <strong>the</strong>doorway between <strong>the</strong> rooms or hallway and <strong>the</strong> expansion space under <strong>the</strong> T-Molding must be filled with <strong>the</strong> proper sealant. Placesealant in <strong>the</strong> expansion space of any flooring transition in <strong>the</strong> doorway of a laundry room.RADIANT FLOOR HEATING<strong>DREAM</strong> <strong>HOME</strong> flooring can be used in combination with many types of in-floor heating.1. Follow <strong>the</strong> <strong>instructions</strong> from <strong>the</strong> supplier of <strong>the</strong> floor heating system.2. Concrete subfloors must be installed and cured a minimum of 60 days.3. The heating system must be in operation for at least two weeks before installation <strong>to</strong> dissipate any residual moisture. Duringinstallation, <strong>the</strong> system may be turned off or set <strong>to</strong> a suitable installation temperature 65 <strong>to</strong> 75°F.4. Adjust <strong>the</strong> heating system gradually. The heating surface temperature must not exceed 85°F.INSTALLATION WITHOUT CLIMATE CONTROLFor best results, follow <strong>the</strong> ACCLIMATION guidelines found on page 1.1. Installation installations must be met.2. The crawl spaces must be enclosed and vented and meet all requirements, and <strong>the</strong> job site conditions must be correct.3. Insulation of <strong>the</strong> floor in <strong>the</strong> crawl space is recommended.4. The floor must not be installed in an area where it will be exposed <strong>to</strong> constant dampness or extremely high or low humidity.5. Relative humidity must range between 35-75%. The temperature should be at least 60-85°F for <strong>the</strong> product acclimation and atleast two days after <strong>the</strong> installation.6. Summer homes that are closed without adequate ventilation during hot and humid seasons will exhibit closed or “green housesyndrome” where <strong>the</strong> interior humidity level rises above 90%. Ventilation of <strong>the</strong>se homes is highly recommended.SEASONAL CHANGES - What <strong>to</strong> expectTo assure that your floors provide lasting satisfaction note <strong>the</strong>se recommendations below:Seasonal gapping should be expected in all wood products and does not constitute a product failure.It is normal that wood products will be affected by environmental fluctuations in humidity and temperatures within a building. Therelative humidity should be 35-75%, with temperature of 60-85°F. Correct acclimation will minimize plank gapping or swelling.3