These instructions apply to the DREAM HOME Laminate collection
These instructions apply to the DREAM HOME Laminate collection
These instructions apply to the DREAM HOME Laminate collection

Create successful ePaper yourself
Turn your PDF publications into a flip-book with our unique Google optimized e-Paper software.
<strong>These</strong> <strong>instructions</strong> <strong>apply</strong> <strong>to</strong> <strong>the</strong> <strong>DREAM</strong> <strong>HOME</strong> <strong>Laminate</strong> <strong>collection</strong>
<strong>These</strong> <strong>instructions</strong> <strong>apply</strong> <strong>to</strong> <strong>the</strong> <strong>DREAM</strong> <strong>HOME</strong> <strong>Laminate</strong> <strong>collection</strong>. Avoid costly mistakes, please read <strong>instructions</strong>carefully before beginning <strong>Laminate</strong> installation. Delay installation until <strong>the</strong> guidelines are completed.<strong>DREAM</strong><strong>HOME</strong> <strong>Laminate</strong> Flooring can be installed in every level of <strong>the</strong> home<strong>DREAM</strong> <strong>HOME</strong> <strong>Laminate</strong> Flooring is intended for indoor use only, is designed as a glueless floating floor and should not be glued ornailed <strong>to</strong> <strong>the</strong> subfloor. Selected styles are approved for commercial applications. <strong>Laminate</strong>s without a pre-attached foamunderlayment will require a separate underlayment.BEFORE YOU START<strong>DREAM</strong> <strong>HOME</strong> <strong>Laminate</strong> Flooring consists of planks made from a durable laminate surface, a wood based core and a balancingbacking. The planks are clicked <strong>to</strong>ge<strong>the</strong>r <strong>to</strong> form a long lasting, very easy <strong>to</strong> maintain surface. Like almost all materials in <strong>the</strong> home,flooring expands and contracts due <strong>to</strong> changes in temperature and humidity. Before beginning installation, you must allow unopenedcar<strong>to</strong>ns of flooring <strong>to</strong> lay flat in <strong>the</strong> room where <strong>the</strong>y will be installed and acclimate <strong>to</strong> normal room conditions for 48 hours, dependingupon climate. Most installation failures are <strong>the</strong> result of moisture intrusion or <strong>the</strong> product was cut <strong>to</strong>o tight around fixed objects. Theexpansion space must be left around <strong>the</strong> perimeter of <strong>the</strong> floor <strong>to</strong> allow for movement. Failure <strong>to</strong> meet <strong>the</strong>se requirements can resultin <strong>the</strong> floor buckling or chipping. Determine <strong>the</strong> need of a moisture barrier. <strong>DREAM</strong> <strong>HOME</strong> <strong>Laminate</strong> Flooring includes a wide range ofcoordinating moldings and transition strips designed <strong>to</strong> cover <strong>the</strong> expansion space at <strong>the</strong> walls, doorways and transitions <strong>to</strong> o<strong>the</strong>rflooring. Inspect <strong>the</strong> quality and quantity of planks, flooring transitions and wall trim needed for your installation. Fully acquaintyourself with <strong>the</strong>se detailed installation <strong>instructions</strong> and make a job site evaluation <strong>to</strong> ensure that current home environmentalconditions are acceptable for installation.Acclimation: Condition <strong>the</strong> flooring before, during and after <strong>the</strong> installation in <strong>the</strong> room area <strong>to</strong> be installed. Do not s<strong>to</strong>re product onbare cement. Allow <strong>the</strong> planks <strong>to</strong> lie flat in unopened car<strong>to</strong>ns away from exterior walls where <strong>the</strong>y will be installed, for 48 hours beforestarting <strong>the</strong> installation. The indoor relative humidity should be 35-75%, with temperature of 60-85°F. Very dry or very humidclimates may need extended conditioning. Poor acclimation may promote plank gapping or edge swelling.OVERVIEW1. Planks can be installed on any grade level on <strong>the</strong> home, intended for indoor use only.2. Ensure <strong>the</strong> surface of <strong>the</strong> subfloor is flat, clean, dry and sound before starting.3. Do not install over any carpeting, o<strong>the</strong>r laminates, floating floors or wood subflooring if installed directly over a concrete subfloor.4. Inspect each plank during installation <strong>to</strong> ensure quality.5. Add 5% <strong>to</strong> your square footage for most standard installations, 15% for diagonal installations.6. Use a moisture vapor barrier (6, 8 mil sheet plastic) on concrete, ceramic tiles, (VCT) Vinyl composition tiles or similar substrates.7. For best appearance Install from several boxes, inspect every plank when removing from <strong>the</strong> car<strong>to</strong>n.8. <strong>Laminate</strong>s must have a minimum expansion space provided around <strong>the</strong> perimeter of <strong>the</strong> room and any fixed objects such as pipesor columns and walls. The expansion space is same as <strong>the</strong> thickness of <strong>the</strong> new flooring. EXAMPLE: 1/4” thick flooring will require1/4” expansion. Door jambs and casings must be undercut. The flooring must be placed under jambs and casings without binding.9. Areas greater than 27’ feet in any direction such as; (one room, two or more adjoining rooms, archways greater than 4 feet andlarge rooms with a connected hallway) must have T-molding breaks installed across <strong>the</strong> room, at <strong>the</strong> archway or at <strong>the</strong> beginning of<strong>the</strong> hallway or entry <strong>to</strong> provide additional expansion space.10. Room areas greater than 27’ feet in any direction or when exposed <strong>to</strong> extended high humidity will also require a <strong>to</strong>tal of 1⁄2"expansion space around <strong>the</strong> perimeter of <strong>the</strong> room and all fixed objects.
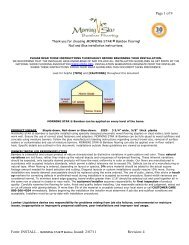
2JOB SITEExterior conditions can influence home interior.1. Check water drainage from gutters, sprinklers, drainage <strong>to</strong> adjoining properties, changes <strong>to</strong> your home site or incorrect buildingprocedures or damage can allow excessive water or moisture <strong>to</strong> penetrate basement walls, flow beneath concrete slabs and basementfloors and in<strong>to</strong> crawl spaces.2. <strong>Laminate</strong> flooring should not be installed over any floor with a sump pump or in a room with a floor drain.3. Check specific local building codes for assistance when correcting excessive moisture4. Yard grading; inspect <strong>the</strong> outside surroundings for improper drainage or obvious sources of moisture. The soil should slope awayfrom <strong>the</strong> foundation (at least 1⁄2 inch per foot for at least 10 feet). Walkways and driveways should direct water away from <strong>the</strong>foundation. Adjoining properties should drain water away from <strong>the</strong> building site.MOISTURE1. A moisture test is recommended on all concrete subfloors or wood subfloors constructed over a crawl space or basement <strong>to</strong>determine if moisture is elevated. The source of elevated moisture should be identified and corrected before installation.2. Common moisture testing <strong>to</strong>ols are; (Meters for wood subfloors), (Calcium Chloride, RH rapid depth test for cement)Maximum acceptable moisture reading for wood subfloors is 14%.3. Maximum acceptable moisture reading for concrete subfloors is 4.5% or a Calcium Chloride moisture vapor emission rate of5lbs/1000sq. ft/24 hrs. Ensure that job site conditions as well as moisture readings are acceptable, document <strong>the</strong> results.Because cement substrates can be dry <strong>to</strong>day and wet later, it is always recommended <strong>to</strong> use moisture barriers.MOISTURE BARRIERS1. Use <strong>DREAM</strong> <strong>HOME</strong> 6 or 8-mil plastic sheeting film having an impermeable vapor retard or perm rating of less than or equal <strong>to</strong> .15,<strong>the</strong>reby limiting <strong>the</strong> passage of moisture <strong>to</strong> near zero (ASTM D-1745) Overlap all seams 4-8” inches and tape <strong>the</strong> complete seam fromend <strong>to</strong> end. Run <strong>the</strong> plastic up <strong>the</strong> edge of <strong>the</strong> baseboard or wall 2” <strong>to</strong> protect <strong>the</strong> finished floor edges from possible water vapors.After installation, role and tuck <strong>the</strong> plastic down in<strong>to</strong> <strong>the</strong> side gaps or expansion space <strong>to</strong> protect <strong>the</strong> laminate edges. Apply moisturebarriers over concrete subfloors, ceramic tiles, terrazzo, kitchen vinyl or similar.2. Wood subfloors, do not place plastic sheeting film vapor barrier over a wood subfloor under any circumstances. Wood subfloorsneed <strong>to</strong> brea<strong>the</strong>.3. Crawl spaces, when installing over a crawl space, <strong>the</strong> exposed soil or a concrete slab in <strong>the</strong> crawl space area must be completelycovered by a 6 or 8-mil plastic sheeting film with seams overlapped at least 8 inches or more, and taped from end <strong>to</strong> end.FOUNDATION VENTS, vents must provide good cross ventilation without dead air space or fan assisted ventilation. Minimum ven<strong>to</strong>penings equal <strong>to</strong> 1.5% of <strong>the</strong> square footage within <strong>the</strong> crawl space should be maintained. Example, 100 square feet of crawl spacemust have at least 1.5 square feet of open vents.SUBFLOOR REQUIREMENTS -basicsWOOD1. Carpet and pad must always be removed.2. Check for rot, squeaks and repair damages before beginning.3. Subfloor surface must be flat, 3⁄16” within a 6’-foot radius, without dips.4. Any existing wood flooring on concrete subfloors must be removed prior <strong>to</strong> installation.5. High areas, peaked joints in <strong>the</strong> subfloor or o<strong>the</strong>r ridges in <strong>the</strong> wood subfloor must be sanded or planed flat and low areas repairedor filled with a Portland cement based leveling compound or covered with a rigid plywood type underlayment.CONCRETE -basics1. Always use a moisture barrier2. Carpet and pad must always be removed.3. Check for elevated moisture and correct before installation4. New concrete must cure for 60 days before any flooring is installed.5. Do not install flooring in a room with a floor drain or sump pump.6. Subfloor surface must be flat, 3⁄16” within a 6’-foot radius, without dips.7. High spots or ridges must be ground down flat. Low areas should be filled in using a Portland cement and latex-based floor leveler.
OTHER SUBFLOOR REQUIREMENTS1. Ceramic tiles, terrazzo, vinyl sheet goods, linoleum and resilient (VCT) vinyl composition tile and older vinyl and linoleum tiles orsheet goods normally do not need <strong>to</strong> be removed providing <strong>the</strong>y are smooth, sound and dry. Older vinyl sheet goods and tile maycontain asbes<strong>to</strong>s. Contact your local municipalities for special precautions should you choose <strong>to</strong> remove <strong>the</strong>se older floor coverings.2. A vapor barrier is always required when installing laminate over vinyl, linoleum sheet goods, resilient tiles or ceramic tiles andconcrete.NEW CONSTRUCTIONS1. The installation should be scheduled as late in <strong>the</strong> building cycle process as possible <strong>to</strong> prevent any unnecessary damage fromoccurring as <strong>the</strong> result of o<strong>the</strong>r trades involved with <strong>the</strong> construction process. Always protect <strong>the</strong> floor if o<strong>the</strong>r trades will be walkingon <strong>the</strong> floor after installation.2. Prior <strong>to</strong> installation, <strong>the</strong> building must be closed and <strong>the</strong> climate controls should be in normal operation for at least two weeks.3. See specific product acclimation, site moisture and subfloor requirements.4. Kitchen cabinet bases should be installed before <strong>the</strong> floor is installed. However, cabinets may be installed after <strong>the</strong> floor is inplace providing <strong>the</strong> cabinets; island cabinets, etc. are not fixed /attached <strong>to</strong> <strong>the</strong> laminate floor.5. Areas of water exposure, such as <strong>the</strong> expansion space in front of <strong>the</strong> kitchen sink, in front of or around <strong>the</strong> dishwasher, around<strong>the</strong> refrigera<strong>to</strong>r space and around any water supply line, in front of any exterior doors and sliding glass doors must be sealed/filledwith a flexible 100% mildew-resistant silicone sealant.BATHROOMS<strong>Laminate</strong> flooring is water resistant, not water proof<strong>Laminate</strong> flooring may be installed in bathrooms; however, it is important <strong>to</strong> safeguard <strong>the</strong> floor from water damage.Installation in bathrooms must be made in accordance with <strong>the</strong> following <strong>instructions</strong>:1. Do not install in rooms with a floor drain.2. Avoid steam, provide ventilation and floor mats, quickly remove standing water3. All expansion spaces provided between <strong>the</strong> new flooring and walls; <strong>the</strong> doorway transition or o<strong>the</strong>r fixed objects such as pipes forradia<strong>to</strong>rs, sinks, water supply <strong>to</strong> water closet or <strong>to</strong>ilet flanges and areas of water exposure MUST be sealed with 100% mildewresistantsilicone sealant.4. When flooring is installed in a bathroom and an adjoining hall or room, a T-Molding transition must be installed in <strong>the</strong> doorwaybetween <strong>the</strong> rooms or hallway and <strong>the</strong> expansion space under <strong>the</strong> T-Molding must be filled with <strong>the</strong> proper sealant. Place sealant in<strong>the</strong> expansion space of any flooring transition in <strong>the</strong> doorway of a bathroom.KITCHENSInstallation in kitchens must be made in accordance with <strong>the</strong> following <strong>instructions</strong>:1. Kitchen cabinet bases should be installed before <strong>the</strong> floor is installed.2. Areas of water exposure, such as <strong>the</strong> expansion space in front of <strong>the</strong> kitchen sink, in front of or around <strong>the</strong> dishwasher, around<strong>the</strong> refrigera<strong>to</strong>r space and around any water supply line, in front of any exterior doors and sliding glass doors MUST be sealed with100% mildew-resistant silicone sealant..3. Install <strong>the</strong> planks up <strong>to</strong> <strong>the</strong> cabinet kick plate, leaving <strong>the</strong> expansion space. Cover <strong>the</strong> expansion space with a quarter roundmolding.LAUNDRY ROOMS<strong>Laminate</strong> flooring may be installed in laundry rooms; however, it is important <strong>to</strong> safeguard <strong>the</strong> floor from water damage.1. All expansion spaces in a laundry room MUST be filled with sealant.2. <strong>Laminate</strong>s must not be installed in rooms with a floor drain or sump pump.3. Areas of water exposure, such as <strong>the</strong> expansion space near a sink, around any water supply line, MUST be sealed with 100%mildew-resistant silicone sealant.4. When flooring is installed in a laundry room and an adjoining hall or room, a T-Molding transition must be installed in <strong>the</strong>doorway between <strong>the</strong> rooms or hallway and <strong>the</strong> expansion space under <strong>the</strong> T-Molding must be filled with <strong>the</strong> proper sealant. Placesealant in <strong>the</strong> expansion space of any flooring transition in <strong>the</strong> doorway of a laundry room.RADIANT FLOOR HEATING<strong>DREAM</strong> <strong>HOME</strong> flooring can be used in combination with many types of in-floor heating.1. Follow <strong>the</strong> <strong>instructions</strong> from <strong>the</strong> supplier of <strong>the</strong> floor heating system.2. Concrete subfloors must be installed and cured a minimum of 60 days.3. The heating system must be in operation for at least two weeks before installation <strong>to</strong> dissipate any residual moisture. Duringinstallation, <strong>the</strong> system may be turned off or set <strong>to</strong> a suitable installation temperature 65 <strong>to</strong> 75°F.4. Adjust <strong>the</strong> heating system gradually. The heating surface temperature must not exceed 85°F.INSTALLATION WITHOUT CLIMATE CONTROLFor best results, follow <strong>the</strong> ACCLIMATION guidelines found on page 1.1. Installation installations must be met.2. The crawl spaces must be enclosed and vented and meet all requirements, and <strong>the</strong> job site conditions must be correct.3. Insulation of <strong>the</strong> floor in <strong>the</strong> crawl space is recommended.4. The floor must not be installed in an area where it will be exposed <strong>to</strong> constant dampness or extremely high or low humidity.5. Relative humidity must range between 35-75%. The temperature should be at least 60-85°F for <strong>the</strong> product acclimation and atleast two days after <strong>the</strong> installation.6. Summer homes that are closed without adequate ventilation during hot and humid seasons will exhibit closed or “green housesyndrome” where <strong>the</strong> interior humidity level rises above 90%. Ventilation of <strong>the</strong>se homes is highly recommended.SEASONAL CHANGES - What <strong>to</strong> expectTo assure that your floors provide lasting satisfaction note <strong>the</strong>se recommendations below:Seasonal gapping should be expected in all wood products and does not constitute a product failure.It is normal that wood products will be affected by environmental fluctuations in humidity and temperatures within a building. Therelative humidity should be 35-75%, with temperature of 60-85°F. Correct acclimation will minimize plank gapping or swelling.3
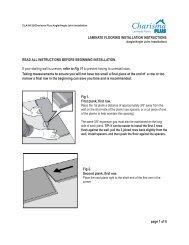
• (Dry) Heating Season - A humidifier may be needed <strong>to</strong> improve low humidity levels. Wood s<strong>to</strong>ves, radiant floor heat and electricheat all create dryer conditions.• (Humid, Wet) Non-Heating Season - Proper humidity levels can be maintained by use of an air conditioner or dehumidifier. Avoidexcessive exposure <strong>to</strong> water during periods of inclement wea<strong>the</strong>r. Do not obstruct expansion joints around <strong>the</strong> perimeter of your floor.COMMERCIAL APPLICATIONS -products designated commercial1.Areas greater than 27’ feet in any direction such as; (one room, two or more adjoining rooms, archways greater than 4’ feet andlarge rooms with a connected hallway) must have T-molding breaks installed across <strong>the</strong> room, at <strong>the</strong> archway or at <strong>the</strong> beginning of<strong>the</strong> hallway or entry <strong>to</strong> provide additional expansion space.2. Areas greater than 27’ feet in any direction will also require a <strong>to</strong>tal of 1⁄2" expansion space around <strong>the</strong> perimeter of <strong>the</strong> room andall fixed objects, walls, pillars, pipes.3. When fastening fixtures <strong>to</strong> a floating floor, <strong>the</strong> anchoring bolts or fasteners must have <strong>the</strong> same expansion space 1⁄2” around eachbolt or fastener as required for walls, pillars, pipes and o<strong>the</strong>r fixed objects.4. Transitions and moldings that accommodate <strong>the</strong> 1⁄2" expansion space is strongly recommended.4PLANNING1. <strong>DREAM</strong> <strong>HOME</strong> <strong>Laminate</strong> Flooring is intended for indoor use only, is designed as a glueless floating floor and should not be glued ornailed <strong>to</strong> <strong>the</strong> subfloor. Inspect all planks for visible defects and damage before and during installation. Do not install damaged planks.During installation, inspect <strong>the</strong> groove area for any debris that may prevent proper assembly of planks.<strong>DREAM</strong><strong>HOME</strong> <strong>Laminate</strong> Flooring will not accept responsibility for claims on flooring installed with obvious defects.2. Determine in which direction <strong>the</strong> planks will be installed. To make <strong>the</strong> room appear larger or if installing in very small rooms orhallways, it is preferable <strong>to</strong> lay <strong>the</strong> planks parallel <strong>to</strong> <strong>the</strong> longest room dimension.3. End-joint “shadow” can be minimized, avoid running board direction in<strong>to</strong> <strong>the</strong> primary light source.4. Carefully measure <strong>the</strong> room <strong>to</strong> determine squareness and <strong>the</strong> width of <strong>the</strong> first and last row of planks. If <strong>the</strong> width of <strong>the</strong> lastrow of planks is less than 2” excluding <strong>the</strong> <strong>to</strong>ngue, adjust <strong>the</strong> width of first plank row accordingly.3. 4.WHEN INSTALLING PLANKS5. The <strong>to</strong>ngue side of <strong>the</strong> plank should face <strong>the</strong> starting wall. To get <strong>the</strong> laminate row closer <strong>to</strong> <strong>the</strong> wall you may remove <strong>the</strong> <strong>to</strong>nguefrom <strong>the</strong> starting row of planks only. Begin laying planks on <strong>the</strong> left side corner of <strong>the</strong> starting wall and work <strong>to</strong> <strong>the</strong> right side. Whencutting planks, make sure <strong>the</strong> teeth of <strong>the</strong> power saw blade is cutting in<strong>to</strong> <strong>the</strong> decorative surface. Best results are achieved whenusing a thin, carbide tipped cutting blade.6. Example of incorrect board placement5. 6.
51. Example of board placement sequence during Layout. Note how board #6 is installed with a slight gap (1/8”-3/16”) in-between #6and #5 board. The gap is <strong>the</strong>n gradually closed as board #6 is lightly tapped with a (tapping block) against board#5. Do not over-tap.2. Adding additional spacers <strong>to</strong> <strong>the</strong> (beginning and ending rows) can temporarily help “hold” installed planks <strong>to</strong>ge<strong>the</strong>r duringinstallation. Remove spacers when finished.3. If <strong>the</strong> starting or ending wall is irregular, scribe or trace <strong>the</strong> con<strong>to</strong>ur of <strong>the</strong> wall <strong>to</strong> <strong>the</strong> row of boards.STARTING THE FIRST ROW6. Provide perimeter expansion. The expansion space is <strong>the</strong> same as <strong>the</strong> thickness of <strong>the</strong> new flooring. 1/4” thick flooring willrequire 1/4” expansion. Start by placing spacers against <strong>the</strong> wall at <strong>the</strong> short and long side of each plank and at a seam where twoplanks join. Double this spacing for larger room areas over 27’ in any direction.7. Complete <strong>the</strong> first row progressively building or locking <strong>to</strong>ge<strong>the</strong>r <strong>the</strong> shorter ends of <strong>the</strong> planks6. 7.8. The last plank in any row will need <strong>to</strong> be cut. Measure <strong>the</strong> distance between <strong>the</strong> wall and <strong>the</strong> surface of <strong>the</strong> last full plank, makesure <strong>to</strong> allow for <strong>the</strong> spacer. If this measurement is less than 12”, <strong>the</strong> length of first plank in <strong>the</strong> row should be adjusted. This willallow for a longer plank at <strong>the</strong> end of <strong>the</strong> row. The first and last plank in each row should be at least 12” in length. Boards used under<strong>the</strong> recommended 12” should also be edge-glued9. Fill-in planks can be cut with a jig saw, power saw, or hand saw. TIP: Clean cuts are achieved using a thin kerf, carbide tippedsaw blade. Blade cut rotation should cut in<strong>to</strong> <strong>the</strong> décor or finished side of <strong>the</strong> plank.8. 9.
61. Ideally, <strong>the</strong> remaining pieces cut off from planks may serve as <strong>the</strong> starter or first plank in <strong>the</strong> next row.2. Stagger new end-joints from previously installed rows a minimum of 6”-12” <strong>to</strong> avoid seam line-up3. The last board of each row, under cabinets or o<strong>the</strong>r difficult areas can be tapped-in using a tapping bar.1. 2.3. 4.SECOND AND CONSECUTIVE ROWS AND INDIVIDUAL BOARDS4. Position <strong>the</strong> first plank of <strong>the</strong> second row with <strong>the</strong> short end-side against a wall spacer. Next engage <strong>the</strong> long <strong>to</strong>ngue side in<strong>to</strong> <strong>the</strong>groove planks of <strong>the</strong> first row at approximately a 45º angle until planks fit <strong>to</strong>ge<strong>the</strong>r.5. Gradually lower <strong>the</strong> plank down flat until <strong>the</strong> joint closes, locks or clicks6. Using a tapping block, gently tap <strong>to</strong> close any gaps between boards - repeat procedure until completed Note how board #6 isinstalled with a slight gap (1/8”-3/16”) in-between #6 and #5 board. The gap is <strong>the</strong>n gradually closed as board #6 is lightly tappedwith a (tapping block) against board#5. Do not over-tap, repeat process until finished.4. 5.6.
7LAST ROWS1. Measure and cut <strong>to</strong> sufficient width and allow for <strong>the</strong> recommended expansion gap.2. Scribe or trace con<strong>to</strong>urs for <strong>the</strong> last row3. Planks less that 3” would also need <strong>to</strong> be glued at <strong>the</strong> edges1. . 2 3.For rooms wider or longer than 27’, <strong>the</strong> use of <strong>DREAM</strong> <strong>HOME</strong> T-Molding is required <strong>to</strong> account for <strong>the</strong> normal movement of <strong>the</strong>floor. T-Moldings should be utilized in areas such as doorways, archways, etc.Removing <strong>the</strong> Lip or locking system, as needed4. In areas where it is difficult <strong>to</strong> angle <strong>the</strong> planks up in<strong>to</strong> position, such as around/under door moldings or jams, kitchen cabinetry orolder type heat registers, it is necessary <strong>to</strong> remove <strong>the</strong> lip or locking system from <strong>the</strong> groove edge of <strong>the</strong> planks you are fitting <strong>to</strong>.This is done by lightly scraping or planning off <strong>the</strong> lip only on <strong>the</strong> groove side of <strong>the</strong> plank. This will allow you <strong>to</strong> install <strong>the</strong> planklaying it flat. After <strong>the</strong> lip has been trimmed on <strong>the</strong> planks you are fitting <strong>to</strong>, lay <strong>the</strong> plank flat on <strong>the</strong> floor.5. Apply a thin bead of PVA laminate glue on <strong>to</strong>p of <strong>the</strong> <strong>to</strong>ngue and push <strong>the</strong> planks in<strong>to</strong> position. Immediately wipe off any excessglue with a damp cloth.4. 5.
CUTTING AROUND PIPES81. Measure <strong>the</strong> distance from <strong>the</strong> wall <strong>to</strong> <strong>the</strong> center of <strong>the</strong> pipe.Mark <strong>the</strong> plank where <strong>the</strong> hole for <strong>the</strong> pipe will be drilled. Remember <strong>to</strong> allow for <strong>the</strong> spacer. Small parts should be fitted <strong>to</strong>ge<strong>the</strong>rusing PVA laminate glue2. Measure <strong>the</strong> diameter of <strong>the</strong> pipe. Drill <strong>the</strong> hole in <strong>the</strong> plank ¼” larger than <strong>the</strong> diameter of <strong>the</strong> pipe.3. If <strong>the</strong> hole for <strong>the</strong> pipe is located in <strong>the</strong> center of <strong>the</strong> plank, make a cut perpendicular <strong>to</strong> <strong>the</strong> long side of <strong>the</strong> plank. The cut shouldbe made going directly through <strong>the</strong> hole.4. If <strong>the</strong> hole for <strong>the</strong> pipe is located near <strong>the</strong> edge of <strong>the</strong> plank, make two 45º angle cuts <strong>to</strong> <strong>the</strong> hole from <strong>the</strong> side of <strong>the</strong> plank closest<strong>to</strong> <strong>the</strong> hole.5. You can now position <strong>the</strong> two pieces around <strong>the</strong> pipe. Apply a bead of PVA laminate glue <strong>to</strong> <strong>the</strong> cut edge of <strong>the</strong> fill piece and pressin<strong>to</strong> place. Immediately wipe off any excess glue from <strong>the</strong> surface with a damp cloth. Use a wedge and hold in place until glue dries.6. The expansion space around <strong>the</strong> perimeter of <strong>the</strong> pipe shall be completely filled with a silicone caulking.STEP DOWN AND STAIR TREAD APPLICATIONSUse stair nosing <strong>to</strong> finish a single stair edge or for a step down application. Use a stair tread and riser for complete stair applications.Stair parts should be nailed and glued for safety. Due <strong>to</strong> <strong>the</strong> complexity of stair installation and local building codes, it is highlyrecommended <strong>to</strong> consult with a professorial flooring installer or <strong>the</strong> manufacturer for stair installation advice.FINISHING THE INSTALLATION1. Remove spacers from perimeter of room.2. Install transition moldings. Do not fasten transitions in<strong>to</strong> <strong>the</strong> laminate flooring.3. Install quarter round or baseboard molding. Molding must be sufficient size <strong>to</strong> cover <strong>the</strong> ¼” or ½” expansion space. Do notfasten moldings through <strong>the</strong> laminate flooring. Fasten in<strong>to</strong> <strong>the</strong> wall.4. Use plywood when moving furniture or appliances in<strong>to</strong> position <strong>to</strong> protect <strong>the</strong> flooring.5. Use coasters or proper floor protec<strong>to</strong>rs under <strong>the</strong> legs of furniture.6. <strong>DREAM</strong> <strong>HOME</strong> <strong>Laminate</strong> Flooring should be maintained by using a dry swiffer mop or cleaned with laminate floor cleaners. Donot flood mop floor. Do not use abrasive cleaners.7. Chipping edges, dents and Scratches are site related, not warrantable.ROUTINE MAINTENANCE and PROTECTION1. Use a damp cloth <strong>to</strong> blot up spills as soon as <strong>the</strong>y happen. Never allow liquids <strong>to</strong> stand on your floor.2. For <strong>to</strong>ugh spots, such as oil, paint, markers, lipstick, ink, or tar, <strong>apply</strong> mineral spirits on a clean white cloth, <strong>the</strong>n wipe <strong>the</strong> areawith a damp cloth <strong>to</strong> remove any remaining residue.3. Sweep, dust, or vacuum <strong>the</strong> floor regularly with a recommended hard floor attachment (not a beater bar) <strong>to</strong> prevent accumulationof dirt and grit that can scratch or dull <strong>the</strong> floor finish.4. Do not wash or wet mop <strong>the</strong> floor with soap, water, oil-soap detergent, or any o<strong>the</strong>r liquid cleaning material, this could causeswelling, warping, delamination, joint-line separation and void <strong>the</strong> warranty.5. Do not use steel wool, abrasive cleaners, or strong ammoniated or chlorinated type cleaners.6. Do not use any type of buffing or polishing machine, <strong>the</strong>se can generate heat or hot spots.7. For spots such as candle wax or chewing gum, harden <strong>the</strong> spot with ice and <strong>the</strong>n gently scrape with a plastic scraper, such as acredit card. Be careful not <strong>to</strong> scratch <strong>the</strong> flooring surface. Wipe clean with a damp cloth.8. A more frequent dust-mopping or vacuuming schedule may be required in very sandy areas such as a beach home.9. Entry mats will help collect <strong>the</strong> dirt, sand, grit, and o<strong>the</strong>r substances such as oil, asphalt, or driveway sealer that might o<strong>the</strong>rwisebe tracked on<strong>to</strong> your floor.10. Do not use rubber or foam backed plastic mats as <strong>the</strong>y may discolor <strong>the</strong> flooring finish. To prevent slippage, use an approvedvinyl rug underlayment approved for urethane finishes.11. Use floor protec<strong>to</strong>rs and wide-load bearing leg bases/ rollers <strong>to</strong> minimize indentations and scratches from heavy objects. As arule, <strong>the</strong> heavier <strong>the</strong> object, <strong>the</strong> wider <strong>the</strong> floor protec<strong>to</strong>r.12. Avoid excessive exposure <strong>to</strong> water.13. Do not walk on your floor with stilet<strong>to</strong> heels, shoes with sports cleats or exposed metal parts.14. Do not allow sharp, pointed, or rough textured objects <strong>to</strong> be exposed <strong>to</strong> <strong>the</strong> flooring.15. Keep your pet’s nails trimmed <strong>to</strong> prevent <strong>the</strong>m from scratching your floor.16. Protect from direct UV sunlight17. Use a dolly when moving heavy furniture or appliances; but first, put down a piece of quarter inch plywood or Masonite <strong>to</strong> protect<strong>the</strong> floor. Never try <strong>to</strong> slide or roll heavy objects across <strong>the</strong> floor.18. A protective mat should be used for furniture or chairs with cas<strong>to</strong>rs.19. never use oil soaps, wax, liquid or o<strong>the</strong>r household products <strong>to</strong> clean your floor.20. Lumber Liquida<strong>to</strong>rs does not endorse <strong>the</strong> use of steam cleaning machines on wood products, use at your own risk.21. Toys and <strong>to</strong>ols can scratch <strong>the</strong> finishes, scratches and dents are jobsite related, not warrantable.Questions or comments regarding your application please call our Cus<strong>to</strong>mer Care or Technical Support for assistance(1-800-366-4204)