WG text - StoneAge Inc
WG text - StoneAge Inc
WG text - StoneAge Inc

You also want an ePaper? Increase the reach of your titles
YUMPU automatically turns print PDFs into web optimized ePapers that Google loves.
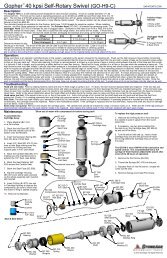
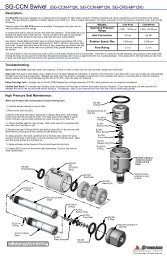
6.1 <strong>WG</strong> DISASSEMBLY INSTRUCTIONSTo disassemble the Warthog:1. Unscrew the Head (<strong>WG</strong> 040) from the Shaft.2. Unscrew the Inlet Nut (<strong>WG</strong> 002) fromthe Body (<strong>WG</strong> 003). Pull off the Centralizer(<strong>WG</strong> 080).<strong>WG</strong> 002Inlet Nut<strong>WG</strong> 080Centralizer<strong>WG</strong> 008O-RingBJ 010-DShaft Seal<strong>WG</strong> 002Inlet Nut3. Remove the O-Ring(<strong>WG</strong> 008) and Weep Seal(MJ 021-S) from the Inlet Nut.4. Remove the Shaft Seal(BJ 010-D) from the Inlet Nutif it appears damaged.5. Remove the Seat (MJ 011)and Seal (HC 012-TO) from theShaft bore.<strong>WG</strong> 007Bearing<strong>WG</strong> 001Shaftdo not dingor raise anyburrs on thisportion of ShaftMJ 021-SWeep Seal6. Remove the Wave Spring(<strong>WG</strong> 014).<strong>WG</strong> 003BodyMJ 011SeatHC 012-TOH.P. Seal<strong>WG</strong> 014Wave Spring7. Push the Shaft (<strong>WG</strong> 001)out of the Body.8. Remove the Shaft Seal(BJ 010-D) from the Bodyif it is damaged.9. Carefully pry the Bearings(<strong>WG</strong> 007) off of the Shaft.Make sure not to raise any burrson the large diameter portion ofthe Shaft with the groove.<strong>WG</strong> 007BearingBJ 010-DShaft Sealalways holdBody by flats<strong>WG</strong> 040Head06/02